

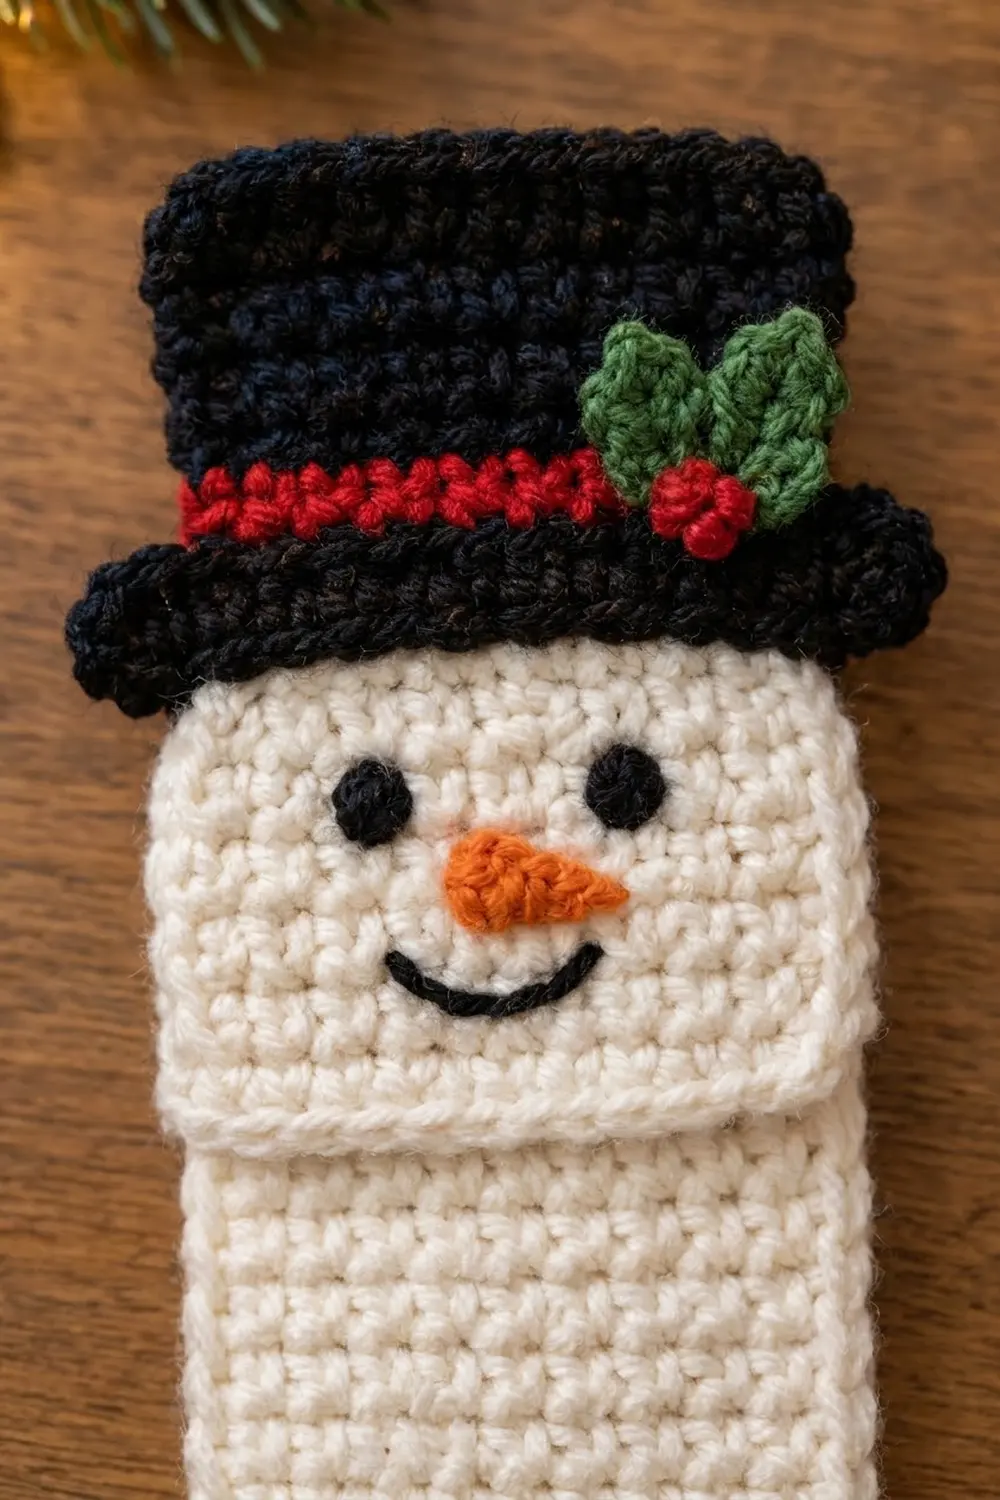
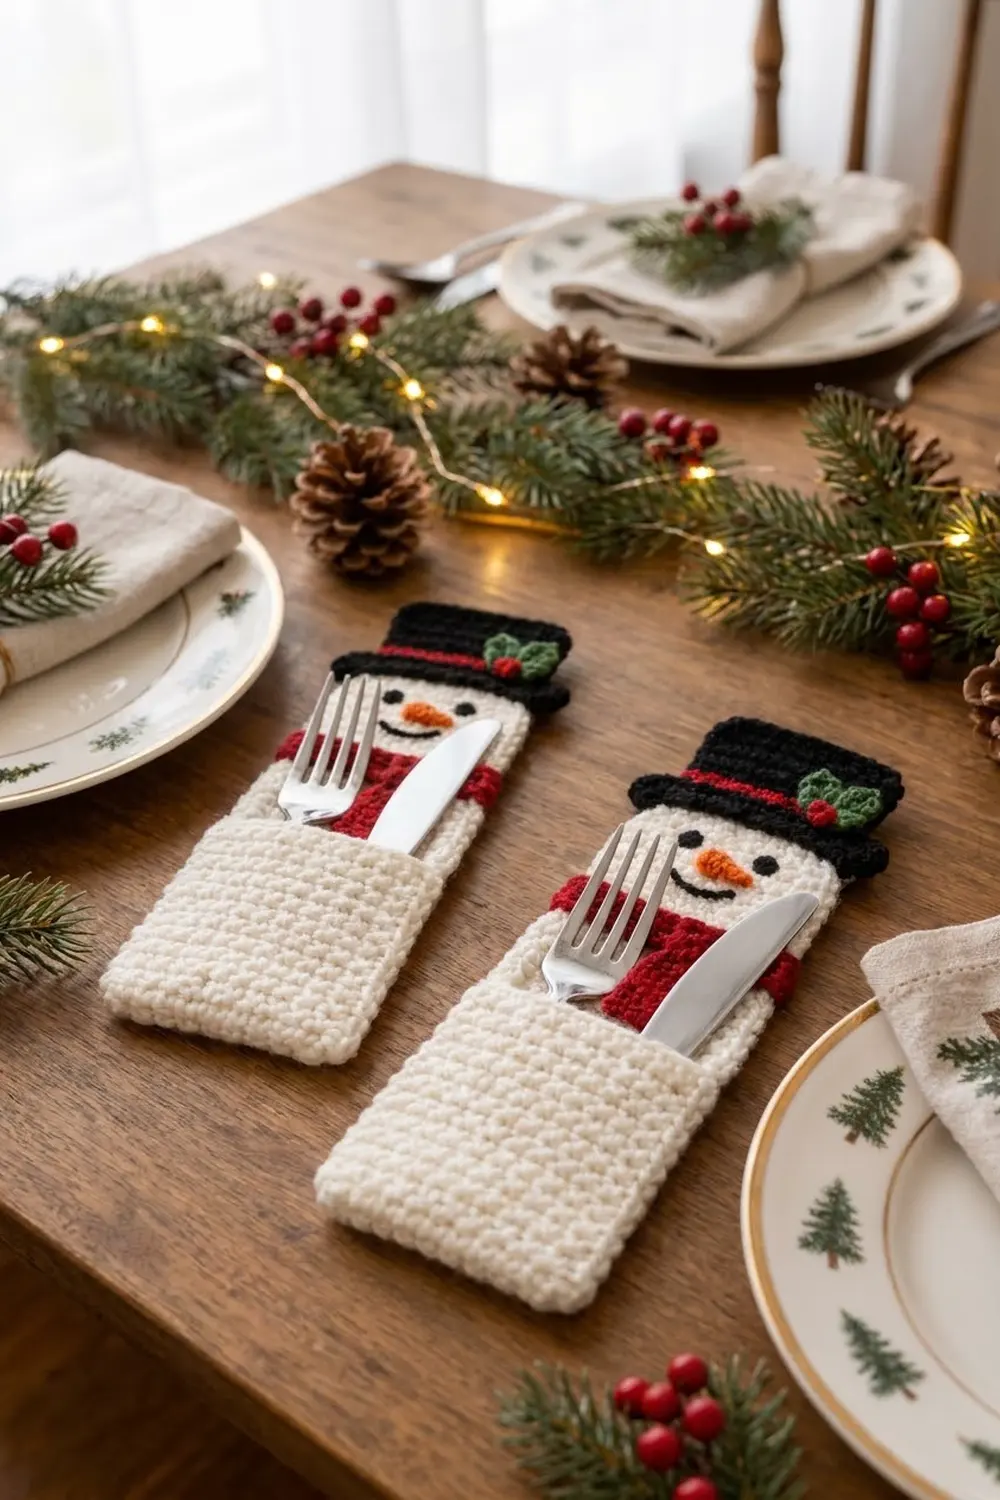
This snowman cutlery holder is a small, flat pocket that holds a fork and knife at each place setting. The body is cream single crochet. A black top hat with a red band and a sprig of holly sits on top, a red scarf crosses the neck, and a cream pocket across the lower half holds the cutlery.
The colors are classic Christmas: cream for the snowman, black for the hat, eyes, and smile, red for the hat band, scarf, and berries, green for the holly, and orange for the carrot nose. The style is clean and graphic, with tight stitches, embroidered features, and small appliqué pieces.
All terms are US crochet terms. The finished holder body measures 3.5 in (8.9 cm) wide by 8.5 in (21.6 cm) tall. With the hat on, it is about 10.4 in (26.4 cm) tall.
To make it, you crochet a back panel and a pocket in rows and embroider the face. Then you work one round of single crochet border that joins the pocket to the panel. The hat, scarf, and holly are crocheted separately and sewn on last. This pattern makes one holder, so repeat it for each place setting.
Finished Size and Construction
- Finished size (body): 3.5 in (8.9 cm) wide x 8.5 in (21.6 cm) tall
- Height with hat: about 10.4 in (26.4 cm)
- Skill level: Easy
- Terminology: US crochet terms
- Yarn weight: Worsted (#4)
- Hook: 4.0 mm (US G-6)
- Number of pieces: 1 holder, made from a back panel and a front pocket, plus small appliqués (crown, brim, scarf band, 2 scarf tails, 2 leaves, 3 berries)
- Layout: pocket layered over the lower half of the back panel, open at the top
- Back panel: 12 sts x 36 rows, 3 in (7.6 cm) x 8 in (20.3 cm)
- Pocket: 12 sts x 18 rows, 3 in (7.6 cm) x 4 in (10.2 cm)
- Size before border: 3 in (7.6 cm) x 8 in (20.3 cm)
- Border depth: 1 round of sc, about 0.25 in (0.6 cm) on each edge
Materials
Choose a smooth worsted weight yarn. Cotton or a cotton blend gives crisp stitches and washes well, which is useful for table use. Acrylic also works. Avoid fuzzy yarns, because they blur the embroidered face.
Yarn for one holder:
- Cream (main color): 15 g, about 30 m
- Black: 6 g, about 12 m
- Red: 5 g, about 10 m
- Green: 2 g, about 4 m
- Orange: 1 g, about 2 m
These quantities include a margin for swatching and sewing tails. For a pair, double everything.
Tools:
- 4.0 mm (US G-6) crochet hook
- Tapestry needle
- Stitch markers
- Sewing pins
- Scissors
- Ruler or tape measure
- Blocking mat and spray bottle
Abbreviations (US Terms)
- ch – chain
- sl st – slip stitch
- sc – single crochet
- hdc – half double crochet
- st(s) – stitch(es)
- rnd – round
- RS – right side
Special technique – French knot: Bring the needle up through the fabric and wrap the yarn twice around the needle. Insert the needle back down right next to where it came up. Hold the wraps snug while you pull the needle through.
Gauge and Checkpoints
Gauge: 16 sc and 18 rows = 4 in (10.2 cm) in sc worked in rows.
That works out to 4 sts and 4.5 rows per inch. Keep your stitches tight and even, because the pocket must hold cutlery without stretching open.
Make the back panel first and treat it as your gauge test. Check these points:
- After Row 1: 12 sc measure 3 in (7.6 cm) across.
- After Row 18: the panel is 4 in (10.2 cm) tall.
- After Row 36: the panel is 8 in (20.3 cm) tall.
- Pocket: it matches the panel exactly at 3 in (7.6 cm) x 4 in (10.2 cm).
- After the border: the holder is 3.5 in (8.9 cm) x 8.5 in (21.6 cm).
If your piece is too big, change to a 3.75 mm (US F-5) hook. If it is too small, change to a 4.5 mm (US 7) hook. Width matters most, so fix it at Row 1 before you go on.
Back Panel
With cream, ch 13.
Row 1 (RS): Sc in 2nd ch from hook and in each ch across, turn. (12 sc)
Rows 2–36: Ch 1 (does not count as a st), sc in each st across, turn. (12 sc)
Check your measurements at Row 18 and Row 36. Fasten off and weave in the ends.
Count rows from the bottom (Row 1 is the bottom row). With the RS facing, count stitches from right to left as sts 1–12.
Face Embroidery
Embroider the face while the panel is still flat. The hat brim will later cover Row 36 and the top border, so the face sits slightly below them.
Eyes: With black, make one French knot on Row 33 in st 4 and another on Row 33 in st 9. The two eyes mirror each other.
Nose: With orange, ch 4. Sl st in 2nd ch from hook, sc in next ch, hdc in last ch. (3 sts) Fasten off, leaving a 6 in (15.2 cm) tail. This makes a small tapered carrot. Sew the wide (hdc) end over sts 6–7 of Row 31, with the point facing the right edge.
Smile: With black, backstitch a shallow curve:
- Start at Row 30, st 4.
- Work down to Row 29 across sts 5, 6, 7, and 8.
- Finish back up at Row 30, st 9.
Keep the backstitches small so the curve looks smooth. Weave the ends in on the back of the panel.
With cream, ch 13.
Row 1 (RS): Sc in 2nd ch from hook and in each ch across, turn. (12 sc)
Rows 2–18: Ch 1, sc in each st across, turn. (12 sc)
Fasten off and weave in the ends. The pocket measures 3 in (7.6 cm) x 4 in (10.2 cm), the same as Rows 1–18 of the panel.
Lay the pocket on the RS of the panel. Line up the foundation edges and side edges so that each pocket row sits on the matching panel row. Pin the sides and the bottom, and leave the top edge (Row 18) open.
Hat Crown
With black, ch 11.
Row 1: Sc in 2nd ch from hook and in each ch across, turn. (10 sc)
Rows 2–6: Ch 1, sc in each st across, turn. (10 sc) Change to red at the end of Row 6.
Rows 7–8: With red, ch 1, sc in each st across, turn. (10 sc)
Fasten off. The crown measures 2.5 in (6.4 cm) wide and about 1.8 in (4.6 cm) tall. Its lower edge is a 2-row red band.
Hat Brim
With black, ch 17.
Row 1: Sc in 2nd ch from hook and in each ch across, turn. (16 sc)
Row 2: Ch 1, sc in each st across, turn. (16 sc)
Row 3 (rounding row): Ch 1, sl st in first st, sc in next 14 sts, sl st in last st. (14 sc + 2 sl st = 16 sts)
Fasten off. The brim measures 4 in (10.2 cm) wide and about 0.7 in (1.8 cm) tall. The slip stitches at each end of Row 3 round off the corners.
Scarf
Band: With red, ch 15.
Row 1: Sc in 2nd ch from hook and in each ch across, turn. (14 sc)
Rows 2–3: Ch 1, sc in each st across, turn. (14 sc)
Fasten off. The band measures 3.5 in (8.9 cm) x about 0.7 in (1.8 cm), the same as the holder’s bordered width.
Tails (make 2): With red, ch 7.
Row 1: Sc in 2nd ch from hook and in each ch across, turn. (6 sc)
Row 2: Ch 1, sc in each st across. (6 sc)
Fasten off, leaving a 10 in (25.4 cm) tail for sewing. Each scarf tail measures 1.5 in (3.8 cm) long and just under 0.5 in (1.3 cm) wide.
Holly Leaves and Berries
Leaf (make 2): With green, ch 5.
Side 1: Sl st in 2nd ch from hook, hdc in next ch, sc in next ch, sl st in last ch. (4 sts)
Side 2: Turn the piece to work along the other side of the foundation chain. Sl st in first ch, sc in next ch, hdc in next ch, sl st in last ch. (4 sts)
Sl st into the tip. (8 sts total) Fasten off, leaving a tail. Each leaf is about 1 in (2.5 cm) long, pointed at both ends and widest in the middle.
Berry (make 3): With red, make a magic ring. Work 6 sc into the ring, pull it tight, and sl st to the first sc. (6 sc) Fasten off, leaving a tail. Each berry is a small round bead about 0.4 in (1.0 cm) across.
Border (Joins the Pocket)
Border gauge: On the top and bottom edges, the border follows stitch gauge (4 sts per inch). On the sides, it follows row gauge, with 1 sc per row end (4.5 per inch).
With the RS facing and the pocket pinned in place, join cream in the first st of Row 36 (the top right corner).
Rnd 1: Ch 1. Work as follows:
- Top edge: 3 sc in first st, sc in next 10 sts, 3 sc in last st. (16 sc: 3 + 10 + 3)
- Left side: Work down the side. Sc in the row ends of Rows 35–19 through the panel only (17 sc). Then sc in the row ends of Rows 18–2 through both the pocket and the panel (17 sc). (34 sc)
- Bottom edge: Work through both foundation chains together. 3 sc in first st, sc in next 10 sts, 3 sc in last st. (16 sc: 3 + 10 + 3)
- Right side: Work up the side. Sc in Rows 2–18 through both layers (17 sc), then in Rows 19–35 through the panel only (17 sc). (34 sc)
Sl st to the first sc. (100 sc total) Fasten off and weave in the ends.
Why the math works: On the top and bottom edges, each of the 12 sts gets 1 sc, except the first and last sts, which get 3 sc each. The middle sc of each 3-sc group becomes the new corner. On the sides, the corner groups already cover Rows 1 and 36, so only Rows 2–35 get a stitch. That is 34 row ends with 1 sc each. The total is 16 + 34 + 16 + 34 = 100.
The border adds about 0.25 in (0.6 cm) on every edge, taking the holder from 3 in (7.6 cm) x 8 in (20.3 cm) to 3.5 in (8.9 cm) x 8.5 in (21.6 cm). The pocket is now closed on the sides and bottom and open at the top.
Final Blocking
- Pin the holder flat at 3.5 in (8.9 cm) x 8.5 in (21.6 cm), keeping the pocket smooth over the panel.
- Mist it until damp but not soaked. Block the crown, brim, scarf band, and tails to their stated sizes in the same way.
- Let everything dry completely before you unpin it.
- Brim: Center the brim across the top of the holder. Its lower edge sits 0.5 in (1.3 cm) below the bordered top edge, and each end extends 0.25 in (0.6 cm) past the side. Whipstitch the lower and side edges.
- Crown: Center the red edge of the crown along the top of the brim, so 3 brim sts show on each side. Overlap the brim by about half a row and sew the crown in place across its full width. The crown stands above the holder.
- Holly: Sew the two leaves in a V on the right side of the crown, with their bases on the red band. Sew the 3 berries in a cluster where the leaves meet.
- Scarf: Sew the band across Rows 25–27 from edge to edge. Tuck the tops of both tails under the band just left of center, angle them slightly apart, and sew them down. To form the knot, wrap red yarn 5 times around the band where the tails meet and secure it on the back. The tails end at the top edge of the pocket.
Final Quality-Control Checklist
- The body measures 3.5 in (8.9 cm) x 8.5 in (21.6 cm), and the holder is about 10.4 in (26.4 cm) tall with the hat.
- The border has 100 sc: 16 on the top, 16 on the bottom, and 34 on each side.
- The pocket is closed on 3 sides and its top edge is straight.
- Both eyes are on Row 33 and the smile is centered.
- The nose points right and is firmly attached.
- The brim is level and extends the same amount past each side.
- The crown is centered and the red band shows above the brim.
- The scarf tails don’t block the pocket opening.
- No yarn ends show on the front.
Troubleshooting
The pocket doesn’t line up. Recount the rows. The pocket should have 18 rows, the same as Rows 1–18 of the panel.
The sides ruffle. Your row ends are shorter than the gauge expects. Rework the border with a hook one size smaller.
The sides pull in. Check that you worked into every row end from Row 2 to Row 35.
The face is off-center. Recount from the right edge. The eyes go in sts 4 and 9.
The crown flops forward. Sew it to the brim along its full width.
The cutlery slips out. Your gauge is too loose. Remake the pocket with a smaller hook.
Care
Hand wash in cool water with mild soap and lay flat to dry. Don’t wring it, or the hat and scarf may lose their shape.
Final Notes
Here is the full measurement chain:
- 12 sc at 4 sts per inch gives 3 in (7.6 cm) of width.
- 36 rows at 4.5 rows per inch gives 8 in (20.3 cm) of height, and the 18-row pocket covers exactly half.
- One 100-sc border round adds 0.25 in (0.6 cm) on every edge, for a body of 3.5 in (8.9 cm) x 8.5 in (21.6 cm).
- The 4 in (10.2 cm) brim and the 1.8 in (4.6 cm) crown bring the total height to about 10.4 in (26.4 cm).
If your gauge is right at Row 1, the rest of these measurements will follow. Make one for every plate on the table.
Happy crocheting!