

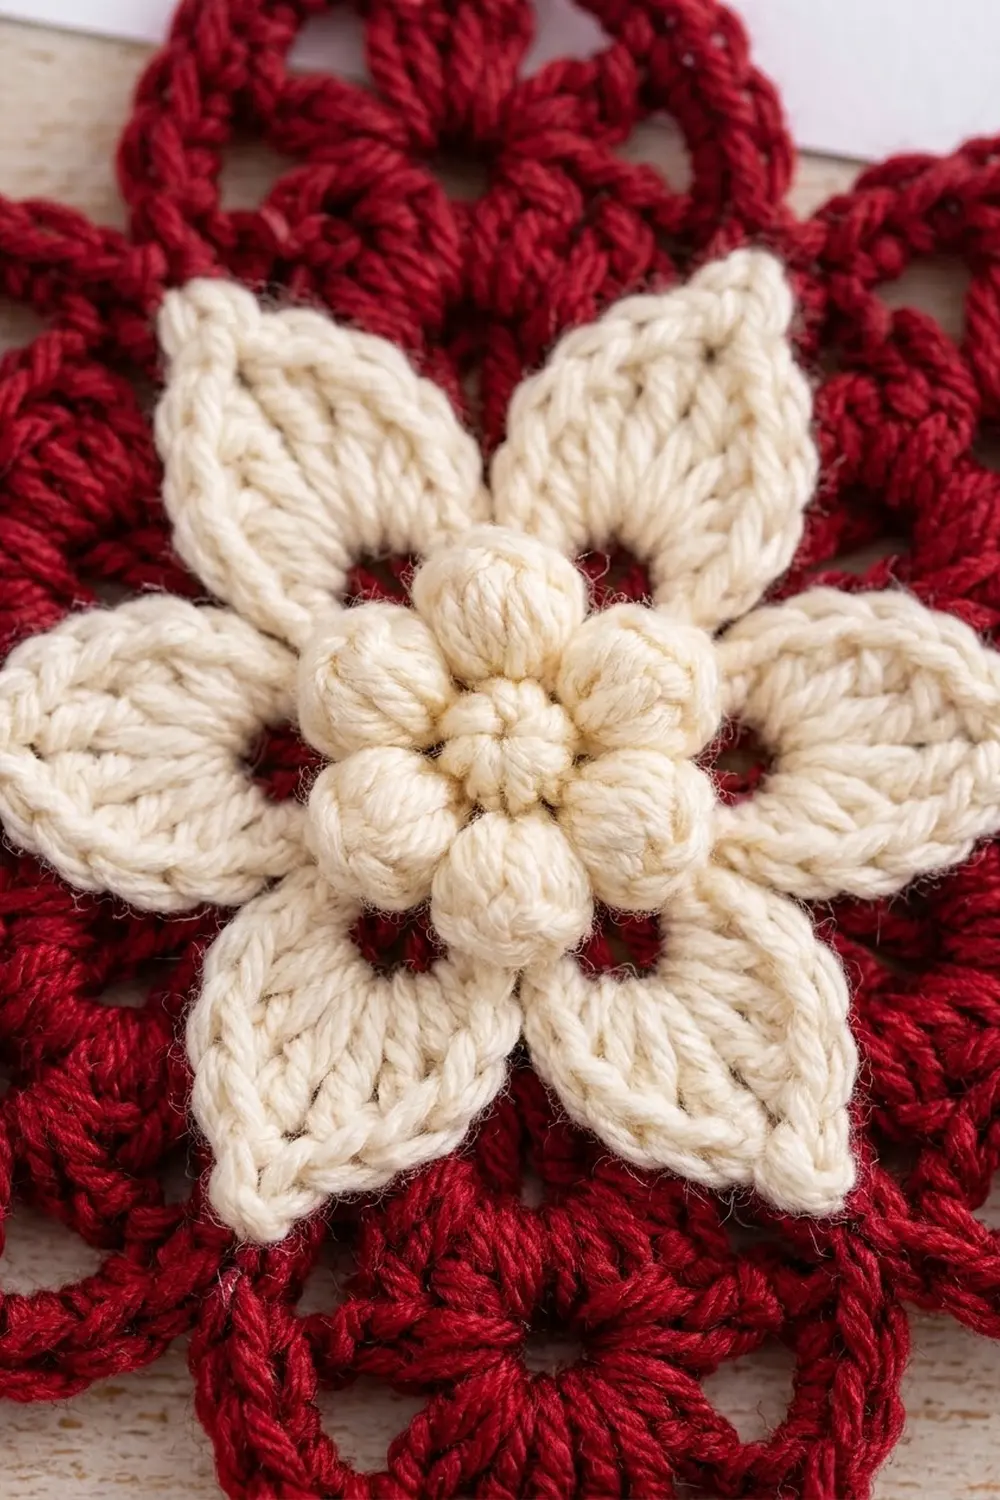
The Winter Poinsettia Star is a layered crochet motif. A deep cranberry-red lace star with eight points sits at the back, and a creamy six-petal flower sits on top. Seven cream bobbles form a raised center like a cluster of berries, and small flashes of red show between the petal bases.
Each red point has an open window with a single cluster in the middle. A smooth outline frames the window and rises to a sharp tip. The cream petals are pointed and slightly raised, so the motif reads as two clear layers even from across a room.
This pattern uses US crochet terms. The finished motif measures 5.5 in (14.0 cm) from point to point, and the cream flower measures 3 in (7.6 cm) across.
You will make three small components: the red star base, the cream flower with its built-in bobble ring, and one single bobble for the very center. The flower is stitched onto the star and the center bobble is sewn into the flower’s middle. Together they make one finished motif.
Finished Size and Construction
- Finished size: 5.5 in (14.0 cm) point to point
- Skill level: Easy-intermediate
- Terminology: US crochet terms
- Yarn weight: DK (light worsted, #3)
- Hooks: 4.0 mm for the red star, 3.5 mm for the cream flower
- Number of pieces: 1 finished motif, built from 3 components
- Layout: cream flower centered and layered on the red star
- Flower size: 3 in (7.6 cm) across
- Star size before the outline round (border): 4 in (10.2 cm) across
- Border depth: 0.75 in (1.9 cm) added on every side, taking 4 in (10.2 cm) to 5.5 in (14.0 cm)
Materials
Choose a smooth DK yarn with good stitch definition. Cotton or a cotton blend gives crisp points and firm bobbles. Soft acrylic also works, but it may need firmer blocking.
- Red (cranberry): 12 g / 30 m
- Cream (ivory): 6 g / 15 m
These quantities include a margin of about 20 percent for testing, tails, and sewing.
Tools:
- 4.0 mm crochet hook
- 3.5 mm crochet hook
- Tapestry needle
- Scissors
- Rustproof pins and a blocking mat or folded towel
- Spray bottle with water
- Ruler or tape measure
Abbreviations (US Terms)
- ch: chain
- sl st: slip stitch
- sc: single crochet
- hdc: half double crochet
- dc: double crochet
- tr: treble crochet
- sp: space
- st(s): stitch(es)
- RS: right side
Special stitches:
- 3-dc cluster (3-dc cl): *Yarn over, insert hook in the stitch, pull up a loop, yarn over and pull through 2 loops; repeat from * 2 more times in the same stitch (4 loops on hook), then yarn over and pull through all 4 loops.
- Beginning cluster: Ch 2, then work a 2-dc cluster in the same stitch the same way, ending with 3 loops on the hook pulled through together. This counts as one 3-dc cl.
- 5-dc bobble: *Yarn over, insert hook in the stitch, pull up a loop, yarn over and pull through 2 loops; repeat from * 4 more times in the same stitch (6 loops on hook), then yarn over and pull through all 6 loops.
- Beginning bobble: Ch 2, then work a 4-dc bobble in the same stitch. This counts as one 5-dc bobble.
Gauge and Checkpoints
Gauge is measured round by round instead of with a flat swatch. Make one complete red star first and check it against the measurements below before you go on.
Red star (4.0 mm hook):
- After Round 1: 1.25 in (3.2 cm) across
- After Round 2: 2.25 in (5.7 cm) across
- After Round 3: 3 in (7.6 cm) across
- After Round 4: 4 in (10.2 cm) across, loop tip to loop tip
- After Round 5: 5.5 in (14.0 cm) point to point
Cream flower (3.5 mm hook):
- After Round 1: 0.5 in (1.3 cm) across
- After Round 2: 1.25 in (3.2 cm) across
- After Round 4: 3 in (7.6 cm) petal tip to petal tip
A difference of up to 0.25 in (0.6 cm) is fine. If Round 2 of the star measures more than 2.25 in (5.7 cm), go down half a millimeter in hook size. If it measures less, go up half a millimeter. When the flower is laid on the star, it should cover star Rounds 1–2 and reach about halfway across the cluster windows.
Red Star Base
Use red yarn and the 4.0 mm hook. Keep the RS facing you and do not turn.
Round 1: Make a magic ring. Ch 3 (counts as first dc), then work 15 dc in the ring. Pull the ring closed and join with sl st to the top of the beginning ch-3. (16 dc)
Round 2 (growth round): Ch 3 (counts as dc), dc in the same st, then 2 dc in each st around. Join with sl st to the top of the ch-3. (32 dc)
Round 3 (cluster round): Work a beginning cluster in the same st as the join, ch 3, skip the next 3 sts. 3-dc cl in the next st, ch 3, skip the next 3 sts; repeat from * 6 more times. Join with sl st to the top of the beginning cluster. (8 clusters, 8 ch-3 sps)*
Check: each repeat uses 1 st for the cluster and skips 3, so 8 × 4 = 32 sts. That matches Round 2 exactly.
Round 4 (frame round): Sl st into the first ch-3 sp. Ch 1, sc in the same sp, ch 9. Sc in the next ch-3 sp, ch 9; repeat from * 6 more times. Join with sl st to the first sc. (8 sc, 8 ch-9 loops)*
Each ch-9 loop arches over one Round 3 cluster. This creates the open window around the cluster, and each loop becomes one star point in the next round. Gently pull each loop outward so its cluster sits centered inside it.
Measure: 4 in (10.2 cm) from loop tip to the opposite loop tip. Do not fasten off. Go straight on to the border round.
Border (Outline Round)
The outline round shapes the eight sharp points and gives the star its smooth, solid edge.
Border gauge: each point uses 15 sts plus a ch-3 tip and adds 0.75 in (1.9 cm) of depth beyond the Round 4 loops.
Round 5: Ch 1, sc in the same sc as the join (first valley st). *In the next ch-9 loop work (2 sc, 2 hdc, 2 dc, tr, ch 3, tr, 2 dc, 2 hdc, 2 sc), then sc in the next sc; repeat from * 6 more times. Work the last ch-9 loop the same way. Join with sl st to the first sc. Fasten off and weave in the ends.
Count: (8 valley sc, worked 1 per existing sc) + (14 sts in each of the 8 loops = 112 sts) = 120 sts, plus 8 ch-3 tips
Per point: 7 sts up one side (2 sc, 2 hdc, 2 dc, 1 tr), the ch-3 tip, 7 sts down the other side (1 tr, 2 dc, 2 hdc, 2 sc), and 1 valley sc, for 15 sts per point.
Why the math works: Round 4 has exactly 8 loops and 8 sc. Every loop gets the same 14 stitches and every sc gets 1, so 8 × 15 = 120, with nothing left over or missing. Stitch heights climb from sc to tr and back down, so each loop rises to a peak. The ch-3 at the top makes a crisp tip that pins out cleanly. The single sc in each valley holds the points apart and makes the deep notches.
Measure: 5.5 in (14.0 cm) from a point to the opposite point.
Cream Flower
Use cream yarn and the 3.5 mm hook. Keep the RS facing you throughout.
Round 1: Make a magic ring. Ch 1, then work 6 sc in the ring. Pull the ring closed, leaving a small hole in the center. Join with sl st to the first sc. (6 sc)
Round 2 (bobble round): Work a beginning bobble in the same st, ch 1. 5-dc bobble in the next st, ch 1; repeat from * 4 more times. Join with sl st to the top of the beginning bobble. (6 bobbles, 6 ch-1 sps)*
Push each bobble toward the RS with your finger so they all puff forward evenly.
Round 3 (petal base round): Sl st into the first ch-1 sp. Ch 1, sc in the same sp, ch 5. Sc in the next ch-1 sp, ch 5; repeat from * 4 more times. Join with sl st to the first sc. (6 sc, 6 ch-5 sps)*
Keep the ch-5 loops lying just behind the outer edge of each bobble, not over the top of it. Each ch-5 sp becomes one petal.
Round 4 (petal round): *In the next ch-5 sp work (sc, hdc, 2 dc, tr, ch 2, tr, 2 dc, hdc, sc), then sl st in the next sc; repeat from * 5 more times. The last sl st goes into the joining sc. Fasten off, leaving an 18 in (45.7 cm) tail for sewing.
Count: 6 petals × 10 sts = 60 sts, plus 6 ch-2 tips and 6 sl sts between the petals
Each petal steps up from sc to tr and back down, which gives it a long, pointed leaf shape. The sl st between petals pinches each base narrow. That is what lets small gaps of red show through once the flower is layered on the star.
Measure: 3 in (7.6 cm) from a petal tip to the opposite petal tip.
Center Bobble
Use cream yarn and the 3.5 mm hook. Make a magic ring and work a beginning bobble into it (ch 2, then a 4-dc bobble). Pull the ring tightly closed. Fasten off, leaving a 10 in (25.4 cm) tail.
Use the tail to sew the bobble into the flower’s center hole, surrounded by the six Round 2 bobbles. That makes seven bobbles in the center cluster.
Assembly
- Lay the red star flat, RS up.
- Center the cream flower on top, with one petal pointing at the top star point. Six petals cannot line up evenly with eight points, and that offset is part of the design.
- Pin through the flower’s Round 3 sc sts into star Round 2.
- Use the cream tail to whipstitch through each Round 3 sc and the star stitch directly below it. Keep the stitches small and snug.
- Tack each petal once, about 0.25 in (0.6 cm) above its base. Leave the petal tips free so they lift slightly.
- Weave in all ends on the wrong side.
If the red star bunches under the flower, your sewing stitches are too tight.
Final Blocking
- Lay the motif RS up on a blocking mat or folded towel.
- Pin each of the 8 ch-3 star tips, spacing them evenly around a 5.5 in (14.0 cm) circle.
- Pin each valley sc lightly so the notches stay deep and even.
- Open any cluster window that looks pinched by placing a pin inside its frame.
- Pin the 6 petal tips out to a 3 in (7.6 cm) circle.
- Mist the motif until it is damp but not soaked. Don’t press the bobbles flat.
- Gently pinch each bobble back into a round shape.
- Let the motif dry completely, then remove the pins.
Final Quality-Control Checklist
- The star measures 5.5 in (14.0 cm) point to point, within 0.25 in (0.6 cm).
- The flower measures 3 in (7.6 cm) tip to tip.
- Round 5 has 120 sts and 8 ch-3 tips (15 sts per point).
- All 8 cluster windows are open and centered.
- All 6 petals have 10 sts and a clear ch-2 tip.
- Seven bobbles form a tight, raised center.
- Small red gaps show between the petal bases.
- No ends are visible on the RS.
Troubleshooting
The star cups or ruffles: Round 2 is probably the cause. Compare it to 2.25 in (5.7 cm) and change hook size if it doesn’t match.
The points look round instead of sharp: Check that you worked a tr on each side of the ch-3 tip, and pin the tips firmly when blocking.
The clusters sag inside the windows: Your ch-9 loops may be too loose. Chain more firmly, or work ch 8 if your chains run long.
The bobbles push to the back: Push each bobble forward as soon as you finish it, before you work the next ch 1.
The flower is larger than 3 in (7.6 cm): Switch to a 3.25 mm hook, or chain more tightly in Round 3.
Care
Hand wash in cool water with mild soap. Press the water out in a towel and dry flat, re-pinning the points if needed. Don’t tumble dry, because heat can flatten the bobbles.
Final Notes
Here is the full measurement chain. The red star grows from 1.25 in (3.2 cm) to 2.25 in (5.7 cm), then 3 in (7.6 cm), then 4 in (10.2 cm). The outline round adds 0.75 in (1.9 cm) on each side to reach 5.5 in (14.0 cm). The cream flower grows from 0.5 in (1.3 cm) to 1.25 in (3.2 cm) and finishes at 3 in (7.6 cm). If you hit each checkpoint, every motif you make will match the last.
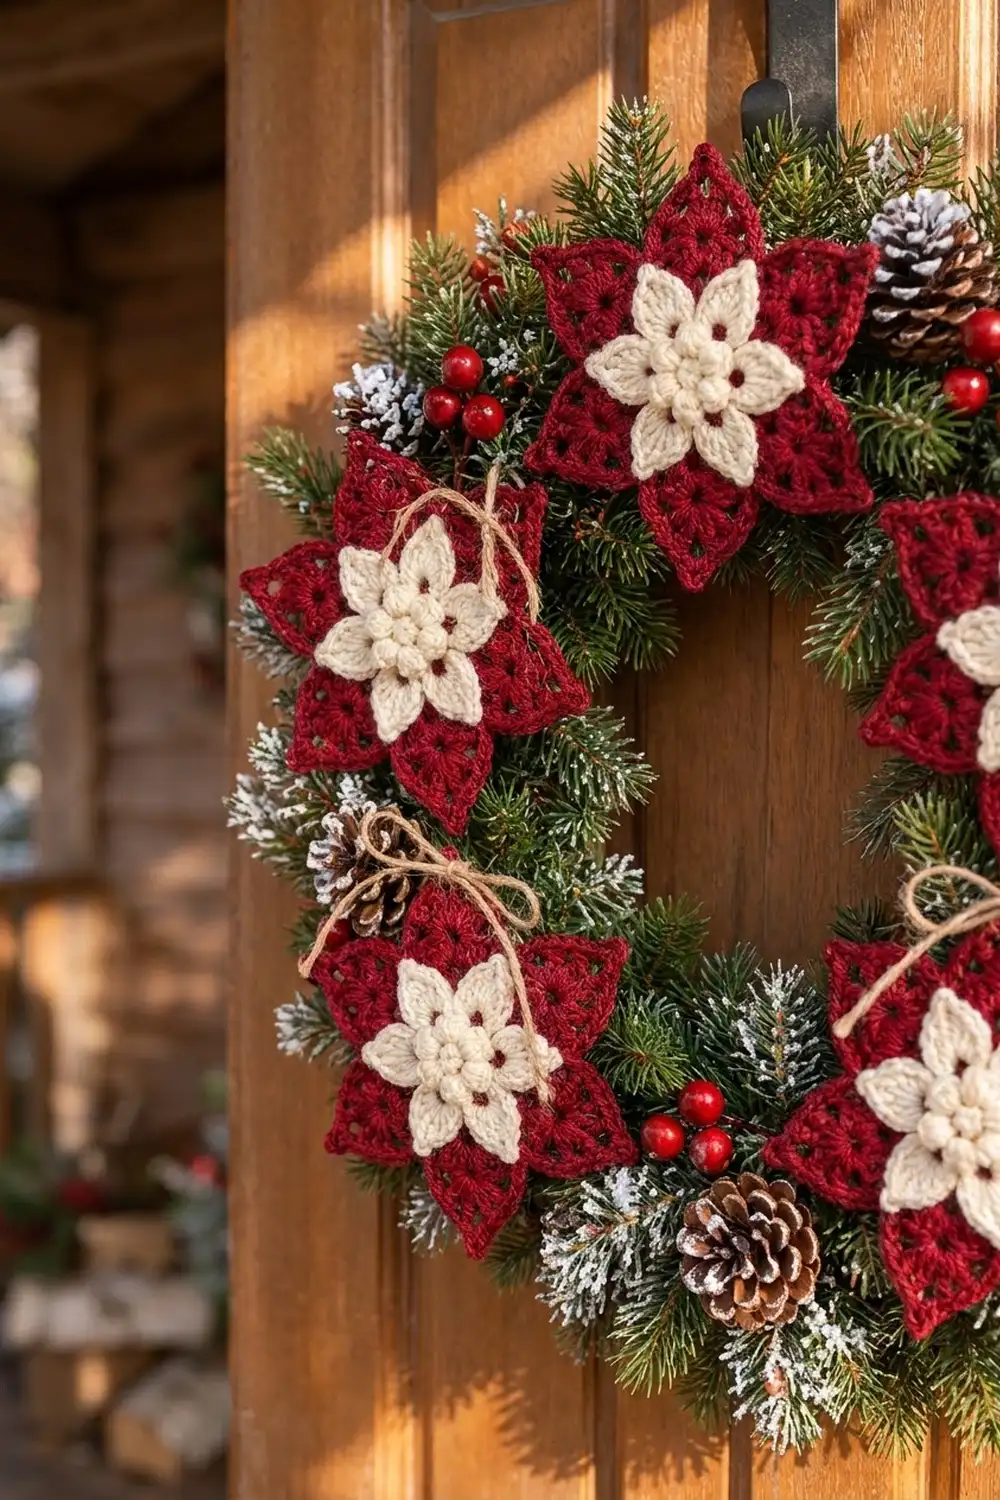
One motif makes a lovely ornament, gift topper, or coaster. You can also tie several finished stars onto an evergreen wreath for a matching holiday display.
Happy crocheting!