

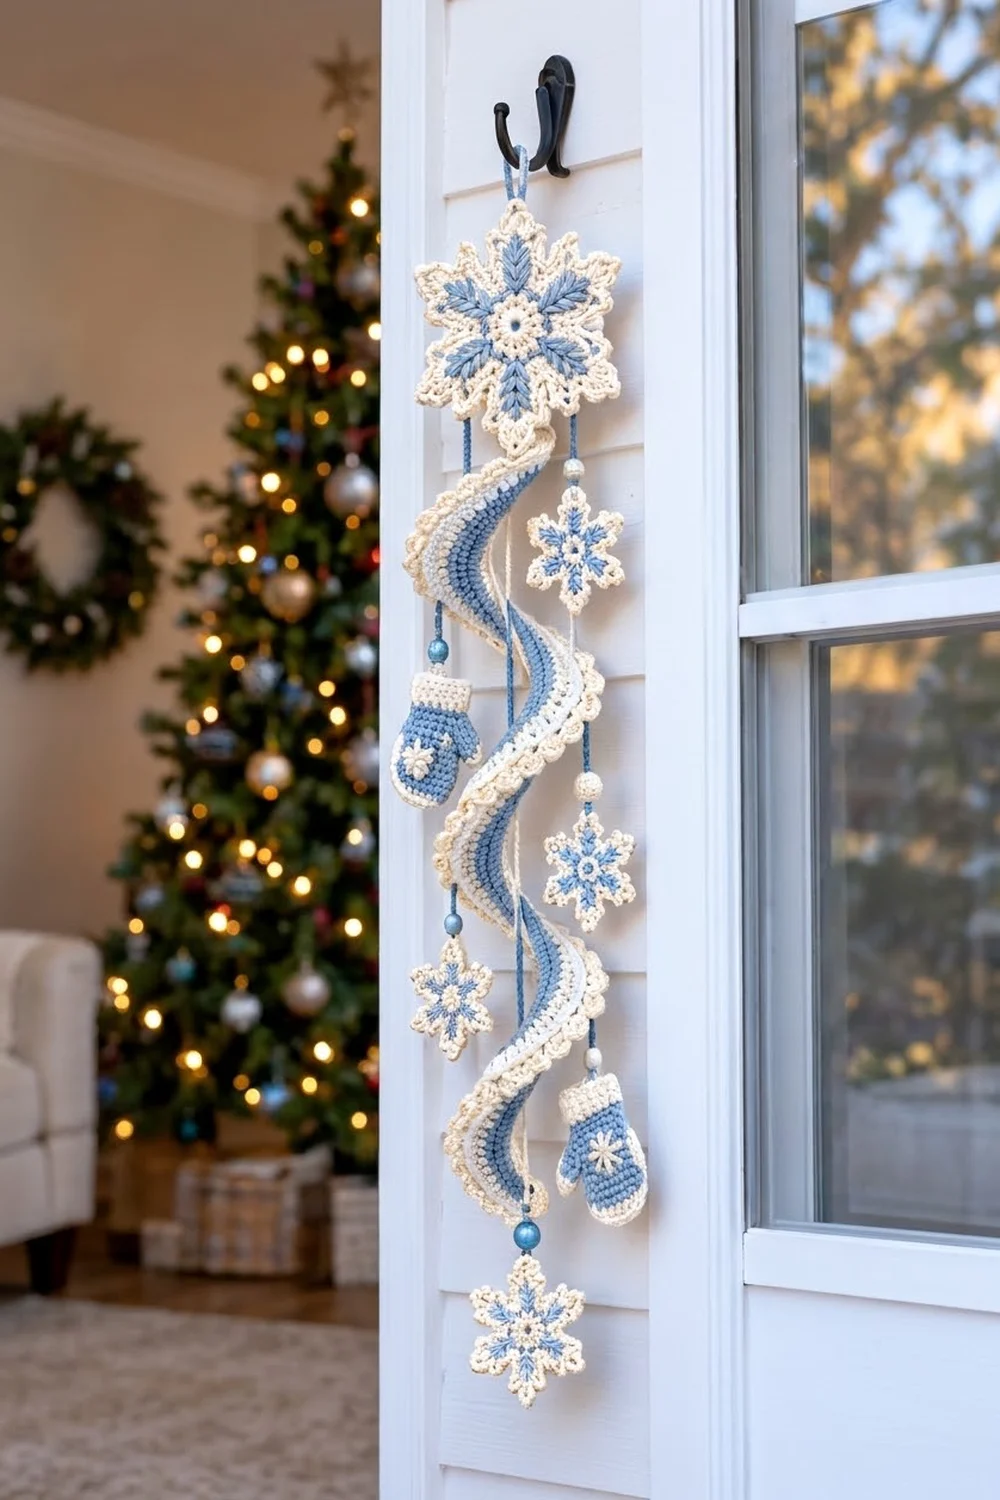
This hanging decoration starts with a large snowflake, and a ribbon-like spiral twists down beneath it. Small snowflakes and two little mittens hang off the spiral on blue cords, so the piece looks like snow drifting down.
The colors are dusty blue, cream, and a little bright white. The spiral has a blue center band, cream and white stripes on each side, and a scalloped cream shell edge on both edges. The snowflakes are cream with embroidered blue leaves. The mittens have blue hands, ribbed cream cuffs, and a tiny cream star.
The pattern uses US terms. Hung up, the decoration measures about 28.5 in (72.4 cm) long and about 7 in (17.8 cm) across at the dangles.
The spiral is a flat strip with a long outer edge and a short inner edge, so it coils by itself. Starch then sets it into a helix with about three turns. You tie all the other pieces on with blue slip-stitch cords.
Finished Size and Construction
- Finished length: 28.5 in (72.4 cm)
- Widest point: 7 in (17.8 cm)
- Skill level: Intermediate
- Terminology: US
- Yarn weight: DK / light worsted (#3) cotton
- Hook: 3.5 mm (E-4)
- Number of pieces: 8 main pieces (1 large snowflake, 1 spiral, 4 small snowflakes, 2 mittens) plus 7 crochet beads
- Layout: one vertical column
- Piece sizes: large snowflake 5.25 in (13.3 cm); small snowflake 2.75 in (7.0 cm); mitten 2 x 2.75 in (5.1 x 7.0 cm)
- Spiral before border: 1.5 in (3.8 cm) wide, 30 in (76.2 cm) long along the center line
- Border depth: 3/8 in (1.0 cm) per edge, so the finished spiral is 2.25 in (5.7 cm) wide
Materials
Use a smooth mercerized cotton. It shows the stitches clearly, starches well, and holds the spiral’s shape. Acrylic will sag more.
- Dusty blue: 40 g, about 80 m (87 yd)
- Cream: 45 g, about 90 m (98 yd)
- Bright white: 10 g, about 20 m (22 yd)
Tools:
- 3.5 mm (E-4) hook
- Tapestry needle
- Stitch markers
- Seven 10 mm blue beads with holes at least 3 mm wide
- Fiberfill or yarn scraps
- Fabric stiffener or heavy spray starch
- Rustproof pins and a blocking mat
- A cardboard tube about 3 in (7.6 cm) across
The yarn amounts include a margin of about 15% for swatching and cords.
Abbreviations (US Terms)
- ch: chain
- sl st: slip stitch
- sc: single crochet
- hdc: half double crochet
- dc: double crochet
- sc2tog: single crochet 2 together
- blo: back loop only
- MR: magic ring
- sp: space
- st(s): stitch(es)
Special stitches:
- Picot: ch 2, sl st in first ch.
- Shell: 5 dc in the same st.
- Slip-stitch cord: chain the stated length, then sl st in the back bump of each ch back to the start. This gives a firm cord that doesn’t stretch.
Gauge and Checkpoints
Gauge: 20 sc and 22 rows = 4 in (10.2 cm), which is 5 sts per inch.
Make one small snowflake first to test your gauge. Check these measurements as you go:
- Small snowflake: Round 1 is 0.6 in (1.5 cm) across. The finished snowflake is 2.75 in (7.0 cm) from tip to tip.
- Large snowflake: 2.1 in (5.3 cm) after Round 3, and 5.25 in (13.3 cm) when finished.
- Spiral: Row 1 is 30 in (76.2 cm) long. The strip is 1.5 in (3.8 cm) wide before the border.
If your pieces are too big, go down half a hook size. If they’re too small, go up half a size. On the spiral, gauge matters most along the length: 10 extra stitches add 2 in (5.1 cm).
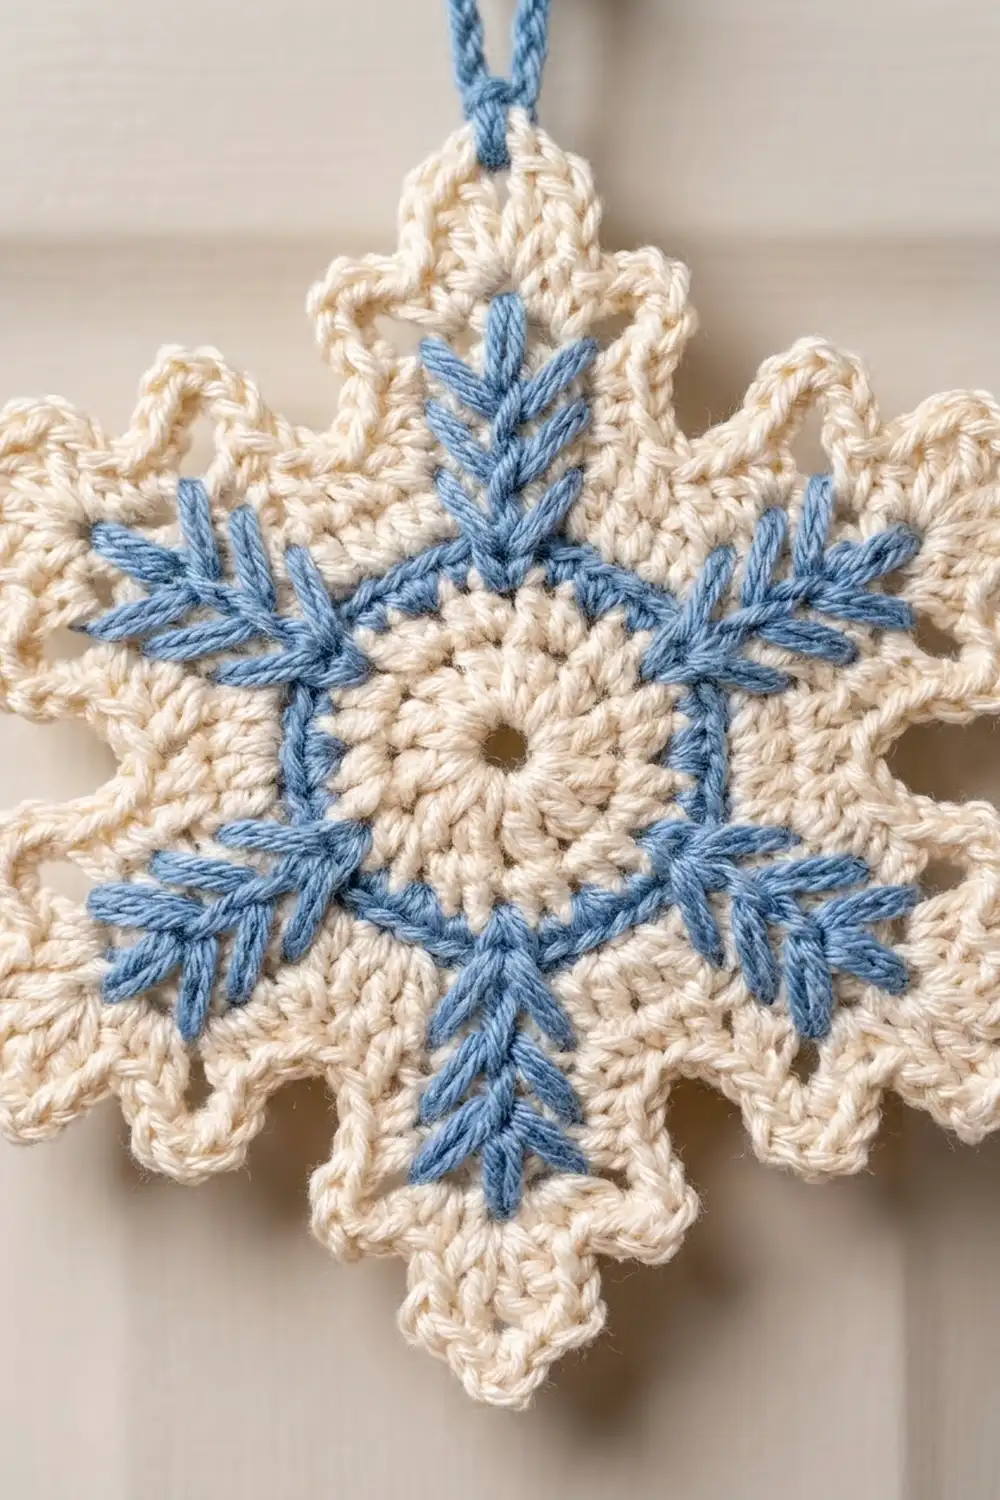
Large Snowflake (make 1)
Round 1 (cream): MR, ch 3 (counts as dc), 11 dc in ring, join. (12 dc)
Round 2 (blue): Join blue, ch 1, 2 sc in each st around, join. Fasten off. (24 sc)
Round 3 (cream): Join cream in any st. Ch 3 (counts as dc), dc in next 3 sts, ch 3, dc in next 4 sts, ch 3; repeat from * 4 more times, join. (24 dc, 6 ch-3 sps)
Round 4 (arms): Sl st into the first ch-3 sp. Then for each arm:
- Sc in the ch-3 sp, ch 9.
- Working back down the chain: sc in 2nd ch from hook, hdc, dc in next 4 ch, hdc, sc. (8 arm sts)
- Sc in the same ch-3 sp.
- Skip 1 dc, sl st in next 2 dc, skip 1 dc.
Repeat 5 more times and join. (6 arms)
Round 5 (outline): Sl st in the first base sc. Then for each arm:
- Working up the free loops of the arm chain: sc in next 3, picot, sc in next 3, picot, sc in next 2.
- Work (sc, ch 3, sc) in the tip.
- Working down the arm sts: sc in next 2, picot, sc in next 3, picot, sc in next 3.
- Sl st in the base sc, then sl st in the 2 sl sts between arms.
Each arm now has 18 sc, 4 side picots, and a ch-3 tip. Join and fasten off.
Embroidery: With blue, embroider a fishbone leaf down the center of each arm: 3 slanted stitch pairs, with the leaf pointing outward.
Hanging loop: Join blue in one arm’s ch-3 tip, ch 20, sl st in the same tip. The loop stands about 1.5 in (3.8 cm) tall. The arm directly opposite the loop is the bottom arm.
Small Snowflake (make 4)
Round 1 (blue): MR, ch 1, 12 sc in ring, join. Fasten off. (12 sc)
Round 2 (cream arms): Join cream in any st. Then for each arm:
- In the next st: sc, ch 6.
- Working back down the chain: sc in 2nd ch from hook, hdc, dc in next 2 ch, sc. (5 arm sts)
- Sc in the same st as before, then sl st in the next st.
Repeat 5 more times and join. (6 arms; all 12 sts used)
Round 3 (outline): For each arm: sc in the 5 free loops going up, (sc, ch 2, sc) in the tip, sc in the 5 sts going down, then sl st in the sl st between arms. (12 sc per arm) Join and fasten off.
Embroider a blue fishbone leaf with 2 stitch pairs on each arm. The finished snowflake is 2.75 in (7.0 cm).
Mitten (make 2)
Hand (blue): Ch 7.
- Row 1: Sc in 2nd ch from hook and in each ch across. (6)
- Row 2: Ch 1, turn, sc across. (6)
- Row 3: Ch 1, turn, 2 sc in first st, sc in next 5. (7)
- Row 4: Ch 1, turn, sc in next 6, 2 sc in last st. (8) Both increases sit on the thumb edge.
- Row 5: Ch 1, turn, sc across. (8)
- Row 6: Ch 1, turn, sc in next 6, and leave the 2 sts on the thumb edge unworked. (6)
- Rows 7–9: Ch 1, turn, sc across. (6)
- Row 10: Ch 1, turn, sc2tog, sc in next 2, sc2tog. (4)
- Row 11: Ch 1, turn, sc2tog twice. (2) Fasten off.
Thumb (blue): Join blue in the 2 unworked sts of Row 5 and sc in each. (2) Ch 1, turn, sc2tog. (1) Fasten off.
Cuff (cream): Join cream in the free loops of the foundation chain.
- Row 1: Sc in each of the 6 free loops. (6)
- Rows 2–3: Ch 1, turn, sc blo across. (6)
Outline (cream): Don’t fasten off after the cuff. Ch 1 and rotate. Sc around the hand and thumb, working 1 sc in each row-end and st and 3 sc at the tip of the hand and the tip of the thumb. Sl st to the opposite corner of the cuff and fasten off.
Embroider a 6-spoke cream star on the back of the hand. The finished mitten is 2 x 2.75 in (5.1 x 7.0 cm).
Crochet Beads (make 7)
Use cream throughout.
- Round 1: MR, 6 sc. (6)
- Round 2: 2 sc in each st. (12)
- Round 3: Sc around. (12)
- Round 4: Sc2tog around. (6)
Stuff the bead and close the hole. Each bead is about 0.5 in (1.3 cm) across.
Spiral Strip (make 1)
Center band (blue): Ch 151.
- Row 1: Sc in 2nd ch from hook and in each ch across. (150)
- Rows 2–4: Ch 1, turn, sc across. (150) Fasten off. The band is about 0.75 in (1.9 cm) wide.
Outer edge:
- Row 5 (cream, conversion row): Join cream at the start of Row 4. Ch 1, sc in next 2, 2 sc in next; repeat from * 49 more times. (150 worked + 50 added = 200) Fasten off.
- Row 6 (white): Join white, ch 1, sc in each st across. (200) Fasten off.
Inner edge: Work this side in the free loops of the foundation chain.
- Row 7 (cream, conversion row): Ch 1, sc in next, sc2tog; repeat from * 49 more times. (150 worked − 50 = 100) Fasten off.
- Row 8 (white): Ch 1, sc in each st across. (100) Fasten off.
The outer edge is now 40 in (101.6 cm) long and the inner edge is 20 in (50.8 cm). That difference in length is what makes the strip coil. The strip should be 1.5 in (3.8 cm) wide at this point.
Make All Pieces
Here’s where each color goes:
- Blue: Round 1 of 4 small snowflakes, Round 2 of the large snowflake, 2 mitten hands and thumbs, the spiral center band, all cords, and the embroidery on the snowflakes
- Cream: all snowflake arms and outlines, 2 cuffs and mitten outlines, 7 beads, spiral Rows 5 and 7, the border, and the mitten star embroidery
- White: spiral Rows 6 and 8
Layout, from top to bottom:
        [blue loop]
   [ LARGE SNOWFLAKE ]
          |  cream bead
   (( SPIRAL, top ))
   shell 8  -> small snowflake (3 in cord)
   shell 16 -> mitten          (4 in cord)
   shell 24 -> small snowflake (3 in cord)
   shell 32 -> small snowflake (4 in cord)
   shell 40 -> mitten          (3 in cord)
   (( SPIRAL, bottom ))
          |  cream bead + blue bead
   [ small snowflake ]
Joining
Top connector:
- Make a 2 in (5.1 cm) blue slip-stitch cord and thread on one cream bead.
- Sew one end to the tip of the large snowflake’s bottom arm.
- Sew the other end to the center of the spiral’s top short end. The finished gap between them is 1 in (2.5 cm).
Dangles: Count shells along the outer edge, starting from the top. For each dangle:
- Tie the cord through the center dc of the listed shell.
- Thread on a cream bead, then a blue bead.
- Sew the cord to the snowflake’s top arm tip or to the center of the mitten’s cuff.
Use 3 in (7.6 cm) cords at shells 8, 24, and 40, and 4 in (10.2 cm) cords at shells 16 and 32. One full turn of the spiral is about 17 shells, so spacing the dangles 8 shells apart makes them alternate left and right.
Bottom: Attach a 2 in (5.1 cm) cord to the center of the bottom short end. Add a cream bead and a blue bead, then sew on the last small snowflake.
Last bead: Thread the seventh blue bead onto the hanging loop.
Tension: Tie the knots snug, but not so tight that they pucker the shells. Weave the tails up inside the cords.
Size checkpoint: 1.5 in loop + 5.25 in snowflake + 1 in connector + 16 in spiral + 2 in cord + 2.75 in snowflake = 28.5 in (72.4 cm).
Border (Spiral Shell Edge)
Border gauge: One repeat (sc, skip 1, shell, skip 1) uses 4 sts, which is 0.8 in (2.0 cm). The border adds 3/8 in (1.0 cm) to each edge.
Round 1 (cream): Join cream in the first st of Row 6.
- Outer edge: Sc in next st, skip 1, shell in next st, skip 1; repeat from * 49 more times. (200 sts used = 50 shells)
- First short end: Sc in each row-end: Rows 6, 5, 4, 3, 2, 1, 7, and 8. (8 sc)
- Inner edge: Repeat from * 25 times across Row 8. (100 sts used = 25 shells)
- Second short end: Sc in each of the 8 row-ends. (8 sc)
Join and fasten off. The round has 75 shells and 91 sc: 75 sc between the shells and 16 on the short ends.
Why the math works: 200 and 100 both divide evenly by 4, so each edge starts and ends on a complete repeat. Working 1 sc per row-end keeps the short ends flat.
Final Blocking
- Wet all the pieces, then roll them in a towel to remove the extra water.
- Pin the snowflakes out to their sizes, opening every picot.
- Pin the mittens flat with the cuff ribs straight.
- Soak the spiral in stiffener and squeeze out the excess.
- Wind the spiral around the 3 in (7.6 cm) tube, inner edge against the tube, leaving about 2 in (5.1 cm) between turns. Pin the shells open.
- Spray the snowflakes with starch.
- Let everything dry completely, about 24 hours, then slide the spiral off the tube.
- Assemble the pieces as described in Joining.
Final Quality-Control Checklist
- Large snowflake is 5.25 in (13.3 cm) and the small ones are 2.75 in (7.0 cm).
- Every snowflake arm is even and has its leaf.
- Spiral counts are 150 / 200 / 100 sts, with 50 + 25 shells.
- The spiral hangs at about 16 in (40.6 cm) with about three turns.
- The dangles alternate sides and hang straight.
- All tails are hidden.
Troubleshooting
- The spiral coils into a tight tube: Row 7 is too tight. Rework it with looser tension.
- The spiral won’t coil: Check that Row 5 has 200 sts and Row 7 has 100, then re-starch it on a smaller tube.
- A snowflake cups: The arm chains are too tight. Chain more loosely or block harder.
- The shells ruffle: Work 4 dc per shell instead of 5.
- The piece hangs crooked: Move one dangle up or down by one shell.
Care
Dust it gently or spot-clean only. Washing removes the stiffener, so if the spiral gets wet, re-starch it and shape it on the tube again.
Final Notes
The sizes all build on each other, starting from the gauge:
- A gauge of 5 sts per inch gives a 30 in (76.2 cm) center band.
- That band becomes a 40 in (101.6 cm) outer edge and a 20 in (50.8 cm) inner edge.
- Those edges coil into a 16 in (40.6 cm) helix.
- With the snowflakes, cords, and loop added, the finished hanger is 28.5 in (72.4 cm) long.
Check each checkpoint as you go and the hanger will turn out true to size.
Happy crocheting!