

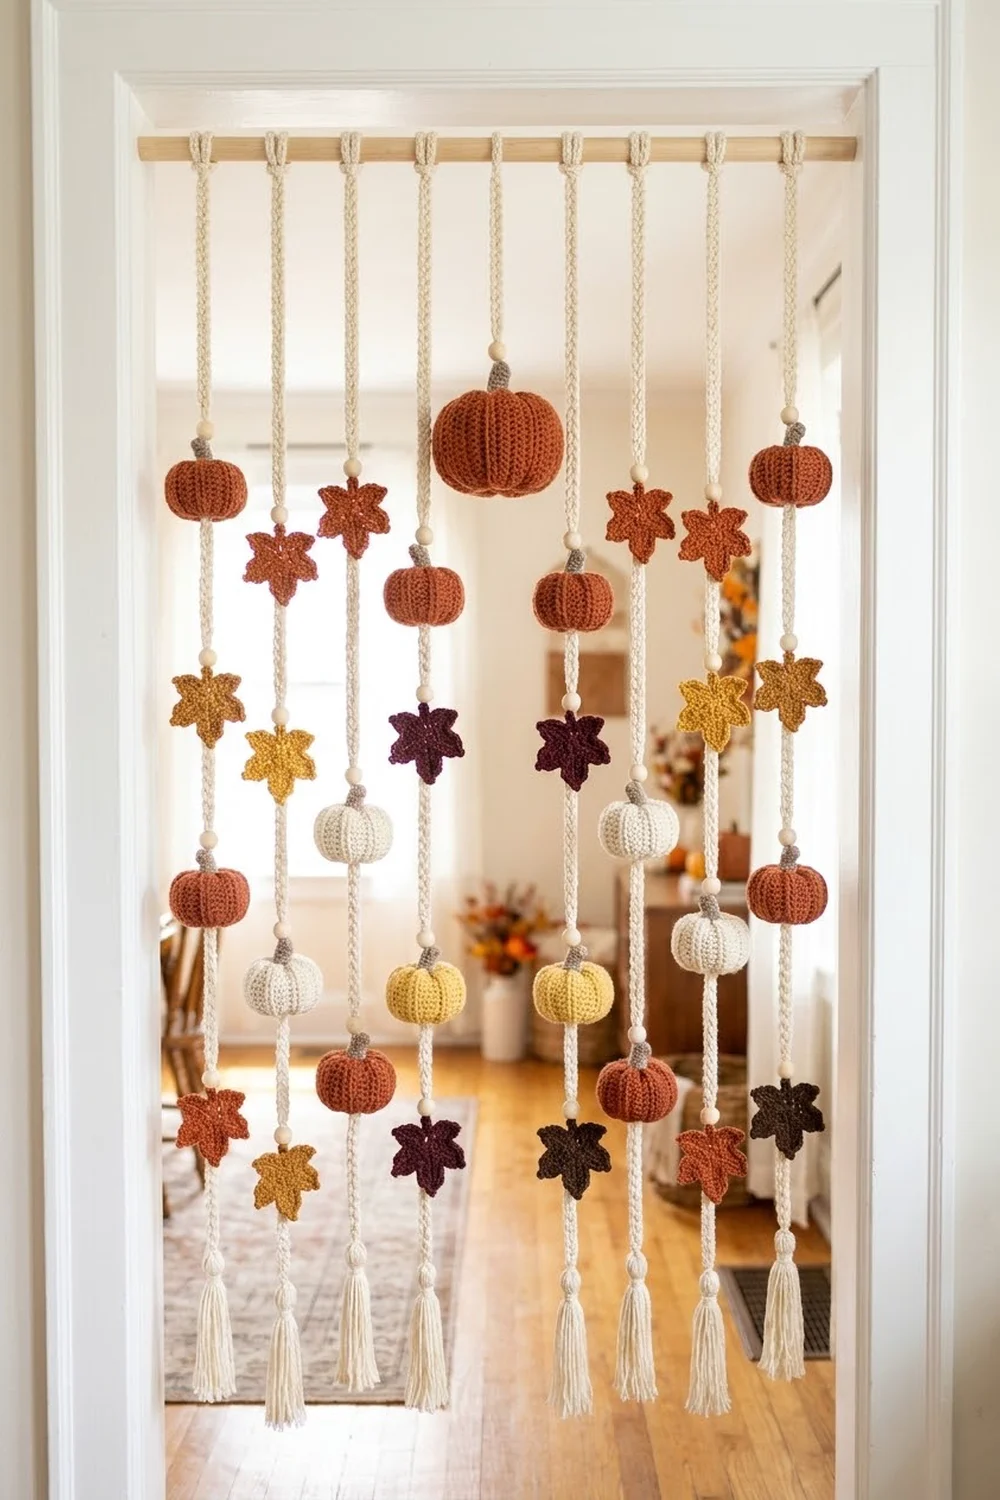
The Harvest Hearth Doorway Curtain brings a warm fall look to any doorway. It has nine cream braided cords hanging from a natural wooden dowel. Ribbed pumpkins and five-point maple leaves alternate down each cord, and a wooden bead sits on top of each one. A larger pumpkin near the top of the center cord acts as the focal point.
The colors are rust, cream, butter yellow, mustard gold, deep burgundy and chocolate brown. Together they give a cozy, farmhouse look that works from September through Thanksgiving.
The pattern uses US crochet terms. The finished curtain is 36 in (91.4 cm) wide at the dowel and hangs 72 in (182.9 cm) from the dowel to the tips of the tassels.
You will make three kinds of pieces: pumpkins from a ribbed rectangle that is seamed, gathered and stuffed; flat maple leaf motifs; and long Romanian cords. Then you thread the beads and pumpkins onto the cords, stitch the leaves in place, tie each cord over the dowel and finish the bottom ends with tassels.
Finished Size and Construction
- Finished size: 36 in (91.4 cm) wide × 72 in (182.9 cm) drop
- Skill level: Easy–Intermediate
- Terminology: US
- Yarn weight: Worsted (#4)
- Hooks: 4.5 mm (US 7) for the motifs; 5 mm (US H-8) for the cords
- Number of pieces: 9 cords, 35 small pumpkins, 1 large pumpkin, 36 stems, 36 leaves
- Layout: 9 strands, each with 8 motifs, spaced 3.5 in (8.9 cm) apart
- Piece sizes: small pumpkin 2 in (5.1 cm) wide × 1.75 in (4.4 cm) tall; large pumpkin 3.5 in (8.9 cm) × 3 in (7.6 cm); leaf 2.75 in (7.0 cm) point to point
- Size before finishing: each cord is 74 in (188.0 cm) long
- Edge finish: a 4 in (10.2 cm) loop over the dowel at the top and a 2 in (5.1 cm) tassel at the bottom
Materials
Use a smooth acrylic or wool-blend worsted yarn that holds its shape. The amounts below assume about 183 m per 100 g (200 yd per 100 g).
- Rust/terracotta: 150 g (about 274 m) for 17 small pumpkins, 1 large pumpkin and 12 leaves
- Cream: 150 g (about 274 m) for 9 cords, 9 tassels and 9 small pumpkins
- Butter yellow: 50 g (about 91 m) for 9 small pumpkins
- Mustard gold: 50 g (about 91 m) for 10 leaves
- Deep burgundy: 50 g (about 91 m) for 10 leaves
- Chocolate/taupe brown: 50 g (about 91 m) for 36 stems and 4 leaves
All amounts include a safety margin of at least 25%.
Tools:
– 4.5 mm and 5 mm hooks
– 80 natural wooden beads, 20 mm (0.8 in) with 8 mm holes (72 are used; the rest are spares)
– Wooden dowel, 36 in (91.4 cm) long and 0.75 in (1.9 cm) thick, plus two cup hooks or brackets
– Fiberfill
– Tapestry needle and a 5 in (12.7 cm) doll needle
– Strong sewing thread to use as a threading leader
– Stitch markers, tape measure and scissors
Abbreviations (US Terms)
- ch – chain
- sl st – slip stitch
- sc – single crochet
- hdc – half double crochet
- dc – double crochet
- tr – treble crochet
- BLO – back loop only
- st(s) – stitch(es)
- rnd – round
Picot: ch 3, then sl st in the 3rd ch from the hook.
Romanian cord step: with 1 loop on the hook, insert the hook under the 2 loops on the left side edge, yarn over and pull up a loop, then yarn over and draw through both loops.
Gauge and Checkpoints
Motif gauge: with the 4.5 mm hook, 16 sts and 18 rows in BLO sc = 4 in (10.2 cm) square.
Cord gauge: with the 5 mm hook, 5 Romanian cord steps = 1 in (2.5 cm).
Make one small pumpkin, one leaf and 10 in (25.4 cm) of cord before you make the rest.
- Small pumpkin panel: after Row 18 it should measure 2.5 in × 4 in (6.4 × 10.2 cm).
- Stuffed small pumpkin: 2 in (5.1 cm) wide.
- Leaf: 2.75 in (7.0 cm) from point to point after Rnd 2.
- Cord: 50 steps should measure 10 in (25.4 cm).
If your pieces come out too big, go down 0.5 mm in hook size. If they come out too small, go up 0.5 mm.
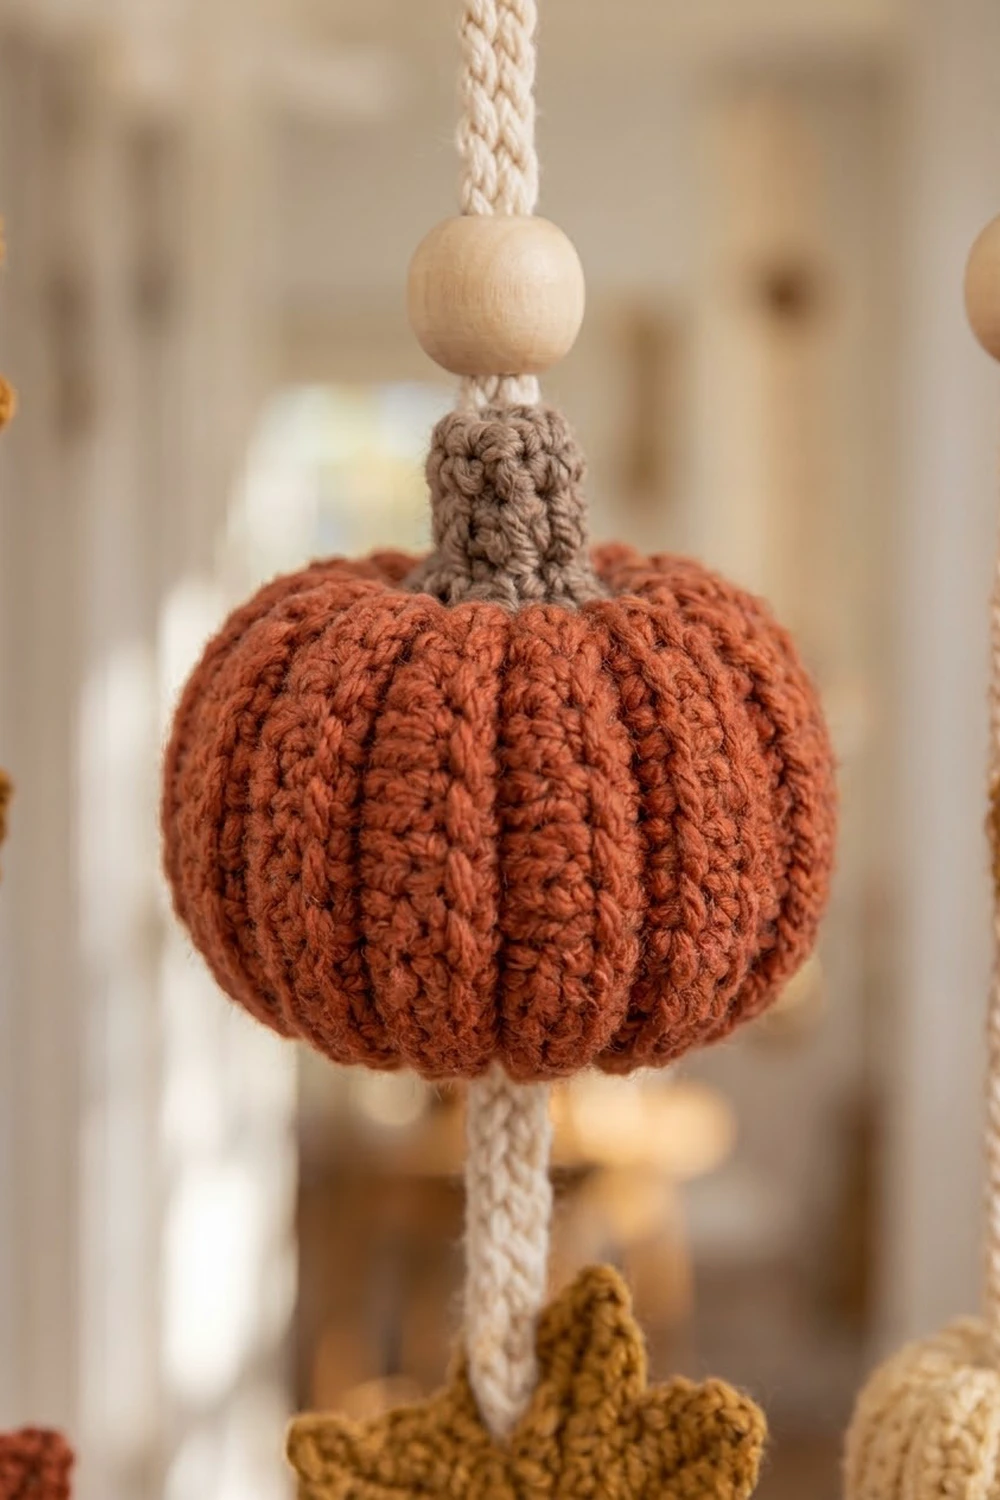
Small Pumpkin (Make 35)
Make 17 in rust, 9 in cream and 9 in butter yellow. Use the 4.5 mm hook.
Ch 11.
Row 1: Sc in the 2nd ch from the hook and in each ch across, turn. (10 sc)
Row 2: Ch 1 (does not count as a st), sc BLO in each st across, turn. (10 sc)
Rows 3–18: Repeat Row 2. (10 sc in each row, 18 rows total)
Checkpoint: the panel measures 2.5 in × 4 in (6.4 × 10.2 cm), with 9 ridges on each side.
Seam: Fold the panel so Row 18 lies against the foundation chain. Sl st through the front loops of Row 18 and the free loops of the chain together. (10 sl st) Fasten off, leaving a 12 in (30.5 cm) tail.
The rows now run from top to bottom, so the BLO ridges become the pumpkin’s vertical ribs.
Shape:
1. Thread the tail onto the tapestry needle. Weave it in and out through the 18 row ends along one open edge.
2. Pull the edge tight, leaving a 0.25 in (0.6 cm) hole for the cord, and knot.
3. Stuff firmly.
4. Gather the second edge the same way with a new 12 in (30.5 cm) strand. Leave the same size hole and do not cut the tail.
5. Press down on the top with your thumb so the pumpkin flattens to 1.75 in (4.4 cm) tall.
Small Stem (Make 35)
With brown, ch 6 and sl st in the first ch to form a ring.
Rnd 1: Ch 1, sc in each ch, join. (6 sc)
Rnds 2–3: Ch 1, sc in each st, join. (6 sc)
Fasten off, leaving an 8 in (20.3 cm) tail. Sew the stem around the top hole so the two openings line up. The stem is 0.5 in (1.3 cm) tall, so the pumpkin with its stem is 2.25 in (5.7 cm) tall.
Large Pumpkin (Make 1)
Use rust and the 4.5 mm hook. Ch 17.
Row 1: Sc in the 2nd ch from the hook and in each ch across, turn. (16 sc)
Rows 2–36: Ch 1, sc BLO in each st across, turn. (16 sc in each row, 36 rows total)
Checkpoint: the panel measures 4 in × 8 in (10.2 × 20.3 cm), with 18 ridges on each side.
Seam as for the small pumpkin (16 sl st), using 16 in (40.6 cm) tails. Gather all 36 row ends on each edge and stuff. The finished pumpkin is 3.5 in (8.9 cm) wide and 3 in (7.6 cm) tall.
Large stem: Ch 8 and join into a ring. Work 4 rnds of 8 sc. Sew it on as for the small stems. It is 0.75 in (1.9 cm) tall.
Maple Leaf (Make 36)
Make 12 in rust, 10 in mustard, 10 in burgundy and 4 in brown. Use the 4.5 mm hook.
Rnd 1: Make a magic ring. Ch 2 (does not count), work 18 hdc in the ring, pull the ring closed and sl st in the first hdc. (18 hdc)
Rnd 2 (lobes and stem):
1. Work (sc, hdc, dc) in the next st. In the next st work (dc, tr, picot, tr, dc). Work (dc, hdc, sc) in the next st. Repeat from * to * 4 more times. (5 lobes, 10 sts and 1 picot each, using 15 base sts)
2. Sl st in the next st.
3. In the next st, sl st, then ch 7. Sl st in the 2nd ch from the hook and in each of the next 5 ch, then sl st again in the same base st. (stem made)
4. Sl st in the last st and join to the first sc.
Fasten off, leaving a 10 in (25.4 cm) tail.
Count check: 50 lobe sts + 5 picots + 3 base sl sts + 6 stem sl sts. The 15 lobe sts plus 3 stem sts use all 18 base sts.
Checkpoint: 2.75 in (7.0 cm) from point to point, and 3 in (7.6 cm) tall including the stem.
Cord (Make 9)
Use cream and the 5 mm hook. Leave a 6 in (15.2 cm) starting tail.
- Ch 2, then sc in the 2nd ch from the hook.
- Turn the piece clockwise like a page in a book. Insert the hook under the front loop of the first ch, yarn over and pull up a loop, then yarn over and draw through both loops.
- Turn the piece clockwise again and work 1 Romanian cord step. Repeat from * until you have 370 steps.
Fasten off.
Checkpoint: let the cord hang for 10 minutes, then measure it. It should be 74 in (188.0 cm) (370 ÷ 5 = 74). Work more steps or pull some out until it matches.
Make All Pieces
Totals by color:
– Rust: 17 small pumpkins, 1 large pumpkin, 12 leaves
– Cream: 9 small pumpkins, 9 cords
– Butter yellow: 9 small pumpkins
– Mustard: 10 leaves
– Burgundy: 10 leaves
– Brown: 36 stems, 4 leaves
Layout: strands S1–S9 are numbered left to right. Positions 1–8 run from top to bottom.
Key:
– Pumpkins: R = rust, C = cream, Y = butter yellow, LG = large pumpkin
– Leaves: r = rust, m = mustard, b = burgundy, k = brown
Pos  S1  S2  S3  S4  S5  S6  S7  S8  S9
1    r   Y   b   C   LG  R   r   R   k
2    R   m   R   r   m   b   Y   m   C
3    m   R   r   R   C   C   b   Y   b
4    C   b   Y   m   r   m   R   r   R
5    b   C   m   Y   R   R   m   R   r
6    R   r   R   b   k   r   C   b   Y
7    r   R   b   R   Y   Y   k   C   r
8    Y   k   C   m   b   r   R   m   R
Each strand has 4 pumpkins and 4 leaves. The column totals match the color list above.
Drop positions: measure from the underside of the dowel to the top of each motif.
– Odd strands (S1, S3, S5, S7, S9): 6, 14, 22, 30, 38, 46, 54 and 62 in (15.2, 35.6, 55.9, 76.2, 96.5, 116.8, 137.2 and 157.5 cm).
– Even strands (S2, S4, S6, S8): 10, 18, 26, 34, 42, 50, 58 and 66 in (25.4, 45.7, 66.0, 86.4, 106.7, 127.0, 147.3 and 167.6 cm).
The 4 in (10.2 cm) offset between odd and even strands creates the staggered look.
Joining
The pieces are joined by threading and tacking, not by seaming them to each other.
1. Thread, top to bottom. Tie a 12 in (30.5 cm) loop of sewing thread to the fastened-off end of a cord to act as a leader. Work down the strand’s column in the layout grid. Slide on 1 bead for every position, and for pumpkin positions add the pumpkin right after its bead. Pass the doll needle and leader from the stem down through the pumpkin’s center so the pumpkin hangs stem-up. Slide everything up loosely; the leaves are added in step 3.
2. Position the pumpkins. Lay the cord flat with the starting tail at the top. Mark a point 4 in (10.2 cm) from the top to stand for the underside of the dowel. Measure each drop position from that mark. Using the stem tail, stitch through the stem and the cord 3 times. Then stitch through the bottom gather and the cord 3 times with its tail. Each bead rests on its pumpkin’s stem.
3. Tack the leaves. Place each leaf face-up with the cord running behind it, stem pointing down, and its top point at the drop position. Slide that position’s bead down so it rests on the leaf’s top point. Using the leaf tail, stitch through the center ring and the cord 3 times at the top of Rnd 1 and 3 times at the bottom.
Tension: Pull the tacking stitches snug enough that the piece cannot twist, but not so tight that they dent the cord.
Checkpoint: Lay all 9 cords side by side. The motifs on matching strands should line up within 0.25 in (0.6 cm).
Border: Header and Tassel Ends
This curtain has no stitched border. Its two edges are the header loops at the top and the tassels at the bottom.
Header gauge: the strands are 3.5 in (8.9 cm) apart, center to center.
Header:
1. Mark the dowel 4 in (10.2 cm) in from each end, then make 7 more marks 3.5 in (8.9 cm) apart, for 9 marks in all.
2. At each mark, fold the top 4 in (10.2 cm) of a cord over the dowel to the back.
3. Tie the short end around the hanging cord with an overhand knot just below the dowel.
4. Tack the tail to the back of the cord.
Header math: 8 gaps × 3.5 in = 28 in (71.1 cm). Adding 4 in (10.2 cm) at each end gives 28 + 8 = 36 in (91.4 cm), the length of the dowel.
Tassels (1 per strand, 9 total):
1. Cut 6 cream strands, each 4.5 in (11.4 cm) long.
2. Pull them through the last cord step and fold them in half, which gives 12 ends.
3. Wrap the cord’s end tail tightly around them 0.25 in (0.6 cm) below the cord and knot.
4. Brush out the ends and trim to 2 in (5.1 cm).
Length math: 74 in cord − 4 in header = 70 in (177.8 cm) of hanging cord. Add the 2 in tassel for a 72 in (182.9 cm) drop. The lowest motifs sit at 62 in and 66 in, which leaves 8 in (20.3 cm) or 4 in (10.2 cm) of bare cord below them.
Final Blocking
- Pin each leaf flat to 2.75 in (7.0 cm), with the points opened out.
- Steam the leaves lightly without touching the yarn with the iron, and let them dry.
- Reshape each pumpkin by hand, pressing the top in toward the stem.
- Hang the curtain and steam each cord from top to bottom to relax any twist.
- Let it hang for 24 hours, then check that all the tassels end 72 in (182.9 cm) below the dowel.
Final Quality-Control Checklist
- 9 strands with 72 motifs, and a bead on top of each motif
- Every pumpkin has a stem and is stitched to the cord at the top and bottom
- Every leaf has its stem pointing down and is tacked at 2 points
- Strands are 3.5 in (8.9 cm) apart with 4 in (10.2 cm) to each end of the dowel
- Tassels are even at 2 in (5.1 cm)
- All ends are woven in
Troubleshooting
- Ribs run sideways: you seamed the long edges. Seam Row 18 to the foundation chain instead.
- Gather hole is too big: pull the running stitch tighter and add a second pass.
- Leaf curls: your tension in Rnd 2 is tight. Use a hook 0.5 mm larger for Rnd 2 only.
- Cord stretches unevenly: hang all 9 cords before you measure, then adjust the header knots.
- Pumpkins spin on the cord: add 2 more tacking stitches at the stem.
Care
Spot clean with a damp cloth. Dust gently with a lint roller or a hair dryer on the cool setting. Store the curtain flat with the dowel removed.
Final Notes
Every measurement depends on the one before it. A gauge of 16 sts and 18 rows per 4 in gives a 2.5 × 4 in panel, which makes a 2 in pumpkin. 5 steps per inch makes a 74 in cord. Motifs are spaced 8 in apart on each strand, and strands are 3.5 in apart across a 36 in dowel. The 4 in header and 2 in tassel complete the 72 in drop. Check each stage before moving to the next and the curtain will hang straight.
Happy crocheting!