

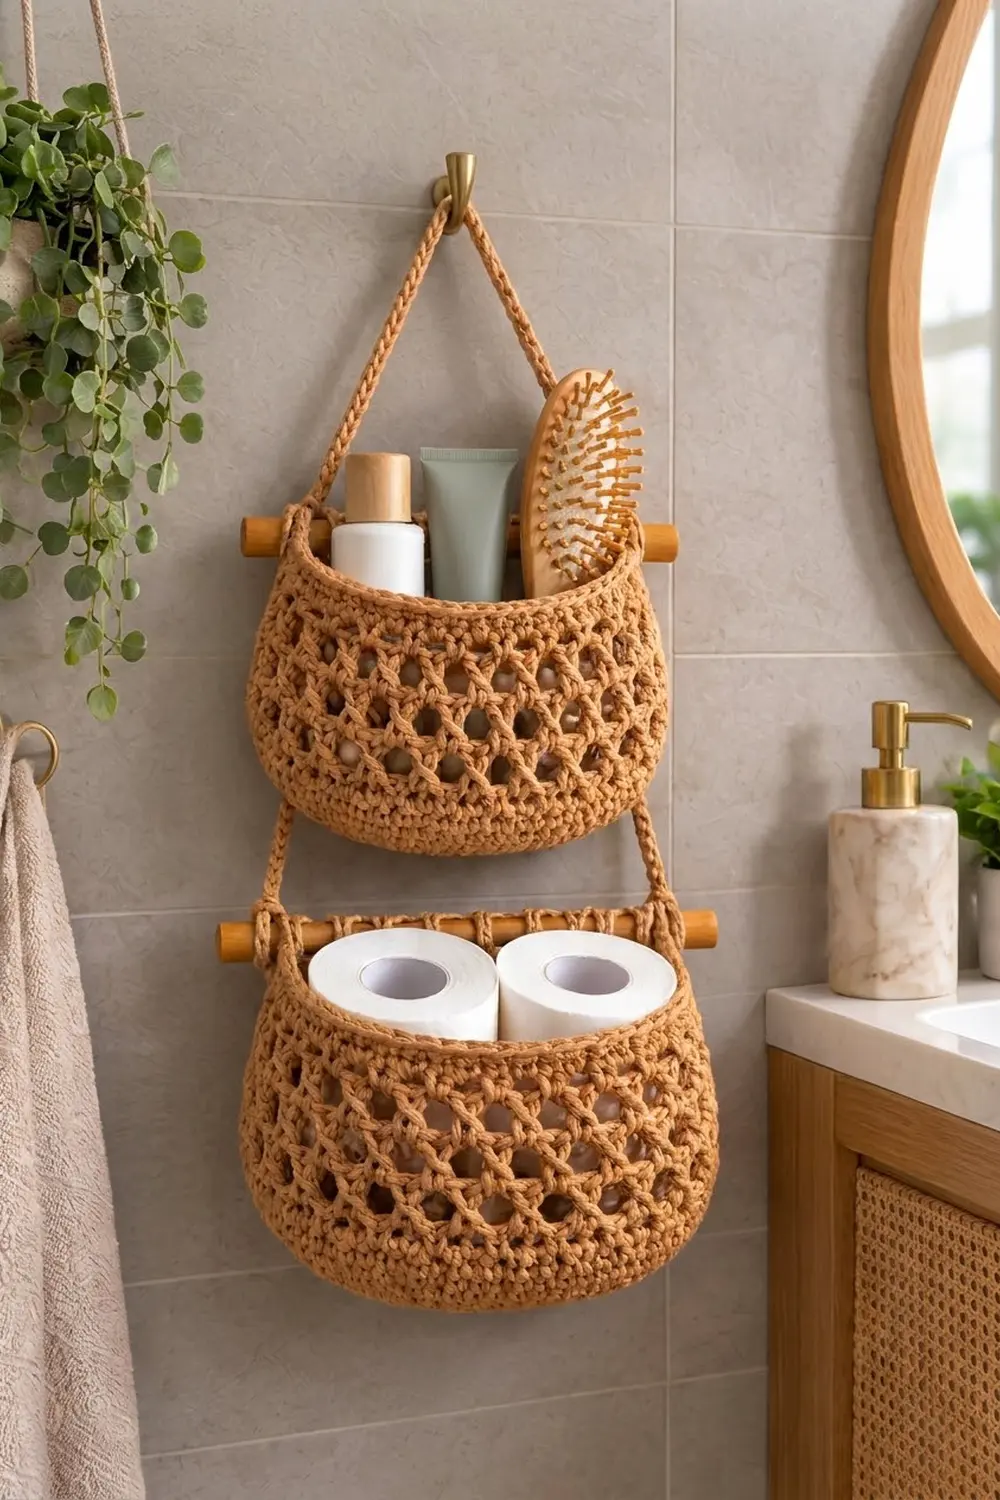
This two-tier hanging basket brings warm, natural texture to a bathroom, entryway or craft corner. The smaller upper basket holds bottles, tubes and a brush. The larger lower basket fits two standard toilet paper rolls side by side.
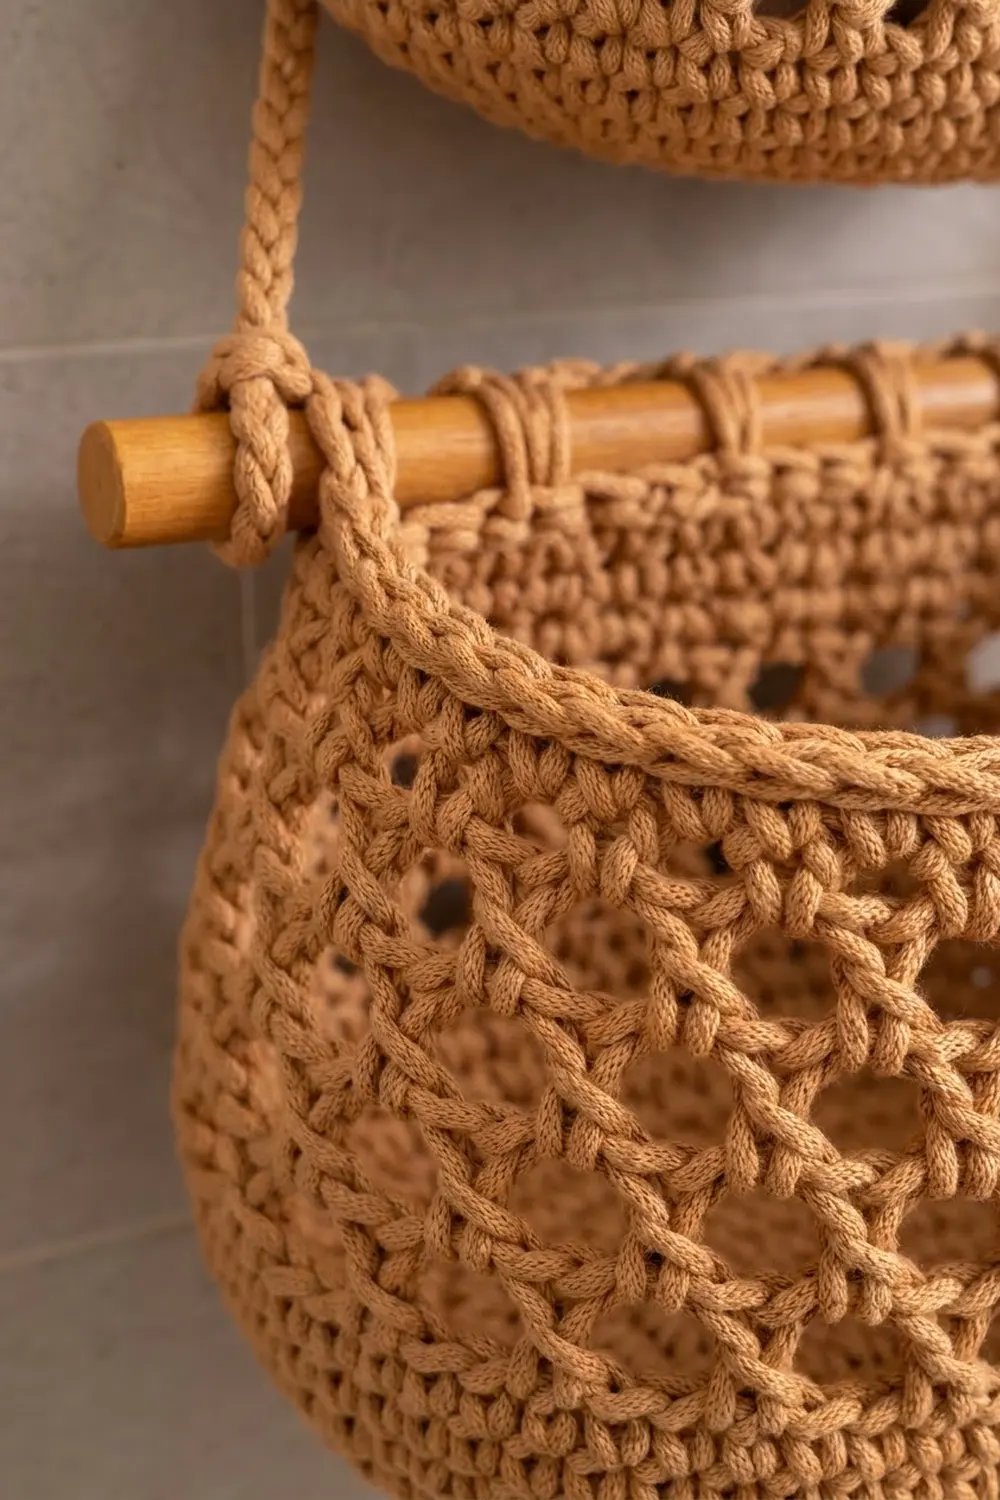
The whole organizer uses one caramel tan cotton. Solid single crochet bands at the bottom and top of each basket frame a wide band of open diamond lattice, which gives the sides a soft, rounded belly. A wooden dowel is crocheted into the front rim of each basket. Firm slip-stitch cords link the two tiers and hang the set from one wall hook.
The pattern uses US crochet terms. The upper basket measures about 9.4 x 4.7 in (23.9 x 11.9 cm) at the base and 5.75 in (14.6 cm) tall. The lower basket measures about 11.5 x 5.3 in (29.2 x 13.5 cm) at the base and 6.75 in (17.1 cm) tall. Hung up, the full set is about 25.75 in (65.4 cm) from hook to bottom.
For each basket, you work an oval base in the round and turn up the wall with a back-loop round. Then you work solid rounds, lattice rounds and solid rounds again, and finish with a two-round rim that encases the dowel. The three cords are made separately and sewn into loops around the dowel ends.
Finished Size and Construction
- Finished size (hung): about 25.75 in (65.4 cm) tall, 14 in (35.6 cm) wide at the lower dowel
- Skill level: Easy-intermediate
- Terminology: US crochet terms
- Yarn weight: Bulky (#5) cotton or cotton blend
- Hook: 6 mm (US J-10)
- Number of pieces: 5 crocheted pieces (2 baskets, 1 top cord, 2 connector cords) plus 2 dowels
- Layout: Vertical, two tiers, hung from one point
- Piece size: Upper base 9.4 x 4.7 in (23.9 x 11.9 cm); lower base 11.5 x 5.3 in (29.2 x 13.5 cm)
- Size before border: Upper wall 5 in (12.7 cm); lower wall 6 in (15.2 cm)
- Border depth: 0.75 in (1.9 cm), 2 rounds per basket
Materials
Choose a firm bulky cotton, cotton cord or cotton blend that holds its shape, at about 110 m per 100 g. Soft, splitty yarn makes a floppy basket.
- Caramel tan: 150 g, about 165 m total
- Upper basket: about 45 g / 50 m
- Lower basket: about 64 g / 70 m
- Three cords: about 7 g / 8 m
These quantities include a margin of about 20% for your swatch and differences in tension.
Tools:
- 6 mm (US J-10) hook
- 4 locking stitch markers
- Tapestry needle, scissors, measuring tape
- 2 wooden dowels, 3/8 in (1.0 cm) diameter: one 12 in (30.5 cm), one 14 in (35.6 cm)
- Fine sandpaper and wood wax (optional)
- 1 sturdy wall hook
Abbreviations (US Terms)
- ch – chain
- sc – single crochet
- sl st – slip stitch
- st(s) – stitch(es)
- sp – space
- sk – skip
- inc – 2 sc in the same st
- BLO – back loop only
- rev sc – reverse single crochet (crab stitch)
- rnd(s) – round(s)
Special stitches:
- Sc over dowel: Hold the dowel along the top edge against the wrong side. Insert the hook into the next st, yarn over behind the dowel and pull up a loop. Then yarn over above the dowel and pull through both loops. The stitch wraps the dowel.
- Slip-stitch cord: Chain, then sl st in the back bump of each ch. This makes a firm cord that doesn’t stretch.
Gauge and Checkpoints
- Sc gauge: 11 sc x 12 rnds = 4 in (10.2 cm)
- Mesh gauge: 4 mesh rnds = 2 in (5.1 cm) tall
- Cord gauge: 5 sl sts = 2 in (5.1 cm)
Test one piece first. Work the upper base (Rnds 1–7). It should measure 9.4 x 4.7 in (23.9 x 11.9 cm) and lie flat.
Checkpoints:
- Upper base, Rnd 7: 9.4 x 4.7 in (23.9 x 11.9 cm)
- Lower base, Rnd 8: 11.5 x 5.3 in (29.2 x 13.5 cm)
- First 3 wall rnds: 1 in (2.5 cm)
- Mesh band: 3 in (7.6 cm) upper, 4 in (10.2 cm) lower
- Before border: 5 in (12.7 cm) upper, 6 in (15.2 cm) lower
Too big? Go down to a 5.5 mm hook. Too small? Go up to a 6.5 mm hook. A cupping base means your tension is too tight, and a ruffling base means it’s too loose. Fix the base before you start the walls, because every later measurement depends on it.
Upper Basket
Begin every rnd with ch 1 (it doesn’t count as a st), and join with a sl st to the first sc.
Base
Ch 16.
Rnd 1: 3 sc in 2nd ch from hook, sc in next 13 ch, 3 sc in last ch. Working along the opposite side of the chain, sc in next 13 ch. (32 sts: 3 per end, 13 per side)
Each rnd keeps 13 sts on each side and adds 3 sts to each end.
Rnd 2: [Inc] 3 times, sc 13, [inc] 3 times, sc 13. (38 sts: 6 per end)
Rnd 3: [Sc 1, inc] 3 times, sc 13, [sc 1, inc] 3 times, sc 13. (44 sts: 9 per end)
Rnd 4: [Sc 2, inc] 3 times, sc 13, [sc 2, inc] 3 times, sc 13. (50 sts: 12 per end)
Rnd 5: [Sc 3, inc] 3 times, sc 13, [sc 3, inc] 3 times, sc 13. (56 sts: 15 per end)
Rnd 6: [Sc 4, inc] 3 times, sc 13, [sc 4, inc] 3 times, sc 13. (62 sts: 18 per end)
Rnd 7: [Sc 5, inc] 3 times, sc 13, [sc 5, inc] 3 times, sc 13. (68 sts: 21 per end)
Walls
Rnd 8: Sc in BLO of each st. (68 sts) This turns the wall up and leaves a neat ridge.
Rnds 9–10: Sc in each st. (68 sts)
Rnd 11 (mesh set-up): Sc in first st, *ch 3, sk next st, sc in next st; repeat from * around, ending ch 3, sk last st. (34 sc and 34 ch-3 sps; 34 x 2 = 68 sts used)
Rnds 12–16 (mesh): Sl st into first ch-3 sp, ch 1, sc in same sp, *ch 3, sc in next ch-3 sp; repeat from * around, ending ch 3. (34 ch-3 sps)
Each sc sits in the center of a loop from the round below, so the holes stack into a diamond lattice. The loops are slightly wider than the 2 sts they replace, so the mesh flares into the rounded belly.
Rnd 17 (conversion): Sl st into first ch-3 sp, ch 1, then work 2 sc in this sp and in each ch-3 sp around. (34 sc worked 1 per sp + 34 extra sc = 68 sts)
Rnds 18–19: Sc in each st. (68 sts) These solid rounds pull the top back in.
The wall should now measure 5 in (12.7 cm). Don’t fasten off.
Lower Basket
Base
Ch 20.
Rnd 1: 3 sc in 2nd ch from hook, sc in next 17 ch, 3 sc in last ch. Working along the opposite side, sc in next 17 ch. (40 sts: 3 per end, 17 per side)
Rnd 2: [Inc] 3 times, sc 17, [inc] 3 times, sc 17. (46 sts: 6 per end)
Rnd 3: [Sc 1, inc] 3 times, sc 17, [sc 1, inc] 3 times, sc 17. (52 sts: 9 per end)
Rnd 4: [Sc 2, inc] 3 times, sc 17, [sc 2, inc] 3 times, sc 17. (58 sts: 12 per end)
Rnd 5: [Sc 3, inc] 3 times, sc 17, [sc 3, inc] 3 times, sc 17. (64 sts: 15 per end)
Rnd 6: [Sc 4, inc] 3 times, sc 17, [sc 4, inc] 3 times, sc 17. (70 sts: 18 per end)
Rnd 7: [Sc 5, inc] 3 times, sc 17, [sc 5, inc] 3 times, sc 17. (76 sts: 21 per end)
Rnd 8: [Sc 6, inc] 3 times, sc 17, [sc 6, inc] 3 times, sc 17. (82 sts: 24 per end)
Walls
Rnd 9: Sc in BLO of each st. (82 sts)
Rnds 10–11: Sc in each st. (82 sts)
Rnd 12 (mesh set-up): Work as upper Rnd 11. (41 sc and 41 ch-3 sps; 41 x 2 = 82 sts used)
Rnds 13–19 (mesh): Work as upper Rnds 12–16. (41 ch-3 sps)
Rnd 20 (conversion): Work as upper Rnd 17. (41 sc worked 1 per sp + 41 extra sc = 82 sts)
Rnds 21–22: Sc in each st. (82 sts)
The wall should now measure 6 in (15.2 cm). Don’t fasten off.
Cords
Top cord: Ch 76. Sl st in back bump of 2nd ch from hook and each ch across. (75 sl sts, 30 in / 76.2 cm)
Connector cords (make 2): Ch 26. Sl st in back bump of 2nd ch from hook and each ch across. (25 sl sts, 10 in / 25.4 cm)
Leave a 10 in (25.4 cm) tail at both ends of every cord for sewing.
Make All Pieces
Every piece is caramel tan:
- 1 upper basket (68 rim sts) with the 12 in (30.5 cm) dowel
- 1 lower basket (82 rim sts) with the 14 in (35.6 cm) dowel
- 1 top cord (75 sl sts)
- 2 connector cords (25 sl sts each)
Layout (front view):
                 [ wall hook ]
                  /         \
            top cord      top cord
              /                \
   o====[ UPPER BASKET, 12 in dowel ]====o
   |                                     |
connector                           connector
   |                                     |
 o=====[ LOWER BASKET, 14 in dowel ]=====o
Border (Dowel Rim)
Border gauge: 11 sc = 4 in (10.2 cm). The dowel round is slightly taller than a plain sc round, so the 2 border rounds measure 0.75 in (1.9 cm) together.
Mark the front: Press the basket flat with the base centered. Find the center stitch of the front long side. Mark 21 sts (10 on each side of the center) on the upper basket, or 25 sts (12 on each side) on the lower basket.
Upper Basket
Border Rnd 1: Sc in each st to the first marker. Center the 12 in (30.5 cm) dowel so equal lengths stick out at each end. Sc over dowel in the 21 marked sts, then sc in each remaining st. (21 front dowel sts + 47 back and end sts = 68 sts)
Border Rnd 2: Rev sc in each st, including the dowel sts. Fasten off. (21 front + 47 back and end = 68 sts)
Lower Basket
Border Rnd 1: Work as upper, using the 14 in (35.6 cm) dowel. (25 front dowel sts + 57 back and end sts = 82 sts)
Border Rnd 2: Rev sc in each st. Fasten off. (25 + 57 = 82 sts)
Why the math works: Both border rounds are worked 1 stitch into each stitch with no increases, so the rim count matches the wall: 68 upper and 82 lower. The dowel section covers one straight side plus 4 stitches curving into each end: 13 + 4 + 4 = 21 and 17 + 4 + 4 = 25. The rest of the round is the back side plus the remaining end stitches: 13 + 17 + 17 = 47 and 17 + 20 + 20 = 57. At 2.75 sts per inch, the dowel sections are 7.6 in (19.3 cm) and 9.1 in (23.1 cm) long, which leaves the dowel ends bare for the cords.
Joining
Method: Fold each cord end into a loop around a dowel end and sew it to itself.
Stitch-to-stitch logic: Fold the cord so sl st 1 lies against sl st 8, with sts 3–6 forming the loop. Whipstitch st 1 to st 8 and st 2 to st 7. Each end uses 4 sts, about 1.6 in (4.1 cm) of cord.
- Loop one end of each connector onto an upper dowel end, 0.5 in (1.3 cm) from the tip.
- Loop the other end of each connector onto the lower dowel, 0.5 in (1.3 cm) from the tip.
- Loop the top cord ends onto the upper dowel, just outside the connector loops.
- Weave the tails through the center of the cords.
Tension advice: Sew the loops snug enough that they don’t slide, but not so tight that the cord twists. Make all four connector loops the same size so the lower basket hangs level.
Size checkpoint: The loops sit about 11 in (27.9 cm) apart on the upper dowel and about 13 in (33.0 cm) apart on the lower dowel. The lower dowel hangs about 6.75 in (17.1 cm) below the upper dowel, which leaves about a 1 in (2.5 cm) gap under the upper basket. The top cord’s peak rises about 12.2 in (31.0 cm) above the upper dowel.
Final Blocking
- Lightly mist each basket with water, keeping the dowels as dry as possible.
- Stuff each basket firmly with a folded towel to shape the belly.
- Press the base flat and line up the BLO ridge evenly.
- Open the lattice holes with your fingers so the diamonds are even.
- Smooth the rev sc rim straight along the dowel.
- Dry for about 24 hours before hanging.
Final Quality-Control Checklist
- The bases measure 9.4 x 4.7 in (23.9 x 11.9 cm) and 11.5 x 5.3 in (29.2 x 13.5 cm), and both lie flat
- Rim counts are 68 sts (upper) and 82 sts (lower)
- Mesh rounds have 34 sps (upper) and 41 sps (lower), with no skipped loops
- Both dowels are centered
- Every cord loop uses exactly 4 sts
- The lower basket hangs level, about 1 in (2.5 cm) below the upper basket
- All tails are woven in securely
Troubleshooting
- Base cups: Your tension is too tight. Go up a hook size.
- Base ruffles: Your tension is too loose. Go down a hook size, and check you have 3 increases per end.
- Mesh flares too much: Use ch 2 loops, or a smaller hook for the mesh only.
- Holes look crooked: Work each sc into the ch-3 sp, not into the sc below.
- Wrong count after conversion: Each sp gets exactly 2 sc. Count the sps first (34 or 41).
- Dowel slides: Tack the rim to the dowel with a few stitches at each end of the dowel section.
- Lower basket tilts: Re-sew the connector loops so each uses exactly 4 sts.
Care
Spot clean with a damp cloth. For a full wash, slide out the dowels if you can, hand wash in cool water, then reshape around a towel and dry flat.
Final Notes
The whole basket builds from one gauge: 11 sc = 4 in (10.2 cm). At that gauge the bases measure 9.4 x 4.7 in (23.9 x 11.9 cm) and 11.5 x 5.3 in (29.2 x 13.5 cm). The walls reach 5 in (12.7 cm) and 6 in (15.2 cm) before the border. The 0.75 in (1.9 cm) dowel rim brings the baskets to 5.75 in (14.6 cm) and 6.75 in (17.1 cm). The 10 in (25.4 cm) connectors and 30 in (76.2 cm) top cord give a total hanging height of about 25.75 in (65.4 cm). Check each measurement before moving on, and both tiers will hang level and hold their shape.
Happy crocheting!