

These lace curtain panels hang from a brass rod like a pair of holiday windows. Each panel is a grid of square lace motifs. Every motif has a deep burgundy poinsettia with eight pointed petals and a small cream center, set inside an open cream frame of chain arches with a solid single crochet edge.
The palette is two colors: warm cream and rich burgundy. It reads as classic Christmas but still looks soft and traditional. With light behind the panels, the open chain spaces glow and the flowers stand out like stained glass.
This pattern uses US crochet terms. Each finished panel measures 25.5 in wide x 85.5 in long (64.8 cm x 217.2 cm). The pattern makes a matching pair.
You crochet 56 identical 6 in (15.2 cm) motifs per panel. Then you join them stitch to stitch in a grid of 4 across and 14 down and add a three-round picot border.
Finished Size and Construction
- Finished panel size: 25.5 in x 85.5 in (64.8 cm x 217.2 cm)
- Number of panels: 2 (a matching pair)
- Skill level: Intermediate
- Terminology: US crochet terms
- Yarn weight: DK (#3) cotton
- Hook: 4.0 mm (US G-6)
- Number of pieces: 56 motifs per panel, 112 in total
- Layout: 4 motifs across x 14 motifs down per panel
- Motif size: 6 in x 6 in (15.2 cm x 15.2 cm), 25 sts per side
- Size before border: 24 in x 84 in (61.0 cm x 213.4 cm)
- Border depth: 0.75 in (1.9 cm) on every side
Materials
Choose a smooth cotton or cotton blend in DK weight, about 225 m per 100 g. Cotton holds the petal points crisply, blocks flat, and hangs without stretching too much. Avoid fuzzy yarns, because they hide the lace openings.
- Color A, Cream: 950 g (about 2,140 m)
- Color B, Burgundy: 450 g (about 1,015 m)
These quantities cover both panels and include a margin of about 15 percent. Each motif uses about 6.5 g of cream and 3.5 g of burgundy. Each border uses about 40 g of cream.
Tools
- 4.0 mm (US G-6) crochet hook
- Tapestry needle
- Scissors
- Stitch markers
- Measuring tape
- Blocking mats, rustproof pins, and a spray bottle
- 8 to 10 curtain clip rings per panel
Abbreviations (US Terms)
- ch = chain
- sl st = slip stitch
- sc = single crochet
- hdc = half double crochet
- dc = double crochet
- tr = treble crochet
- sp(s) = space(s)
- st(s) = stitch(es)
- BLO = back loop only
- beg = beginning
- rnd = round
Petal: In one ch-4 space, work (sc, hdc, dc, tr, ch 2, tr, dc, hdc, sc). This makes one pointed petal with a ch-2 tip.
Picot group: Work (sc, ch 3, sc) in the same space.
Gauge and Checkpoints
Gauge: one finished motif (Rnds 1-6) is 6 in x 6 in (15.2 cm x 15.2 cm), with 25 sts along each side.
Make one motif first, block it, and measure it before you make the rest. Check it at each stage:
- After Rnd 1: about 1 in (2.5 cm) across.
- After Rnd 3: the flower is about 3.5 in (8.9 cm) from one petal tip to the opposite tip.
- After Rnd 4: about 5 in (12.7 cm) along one side.
- After Rnd 5: about 5.5 in (14.0 cm) square.
- After Rnd 6: 6 in (15.2 cm) square.
If your motif is too big, go down to a 3.75 mm hook. If it is too small, go up to a 4.5 mm hook. Small errors add up: being off by 0.25 in (0.6 cm) per motif changes the panel by 1 in (2.5 cm) across and 3.5 in (8.9 cm) in length.
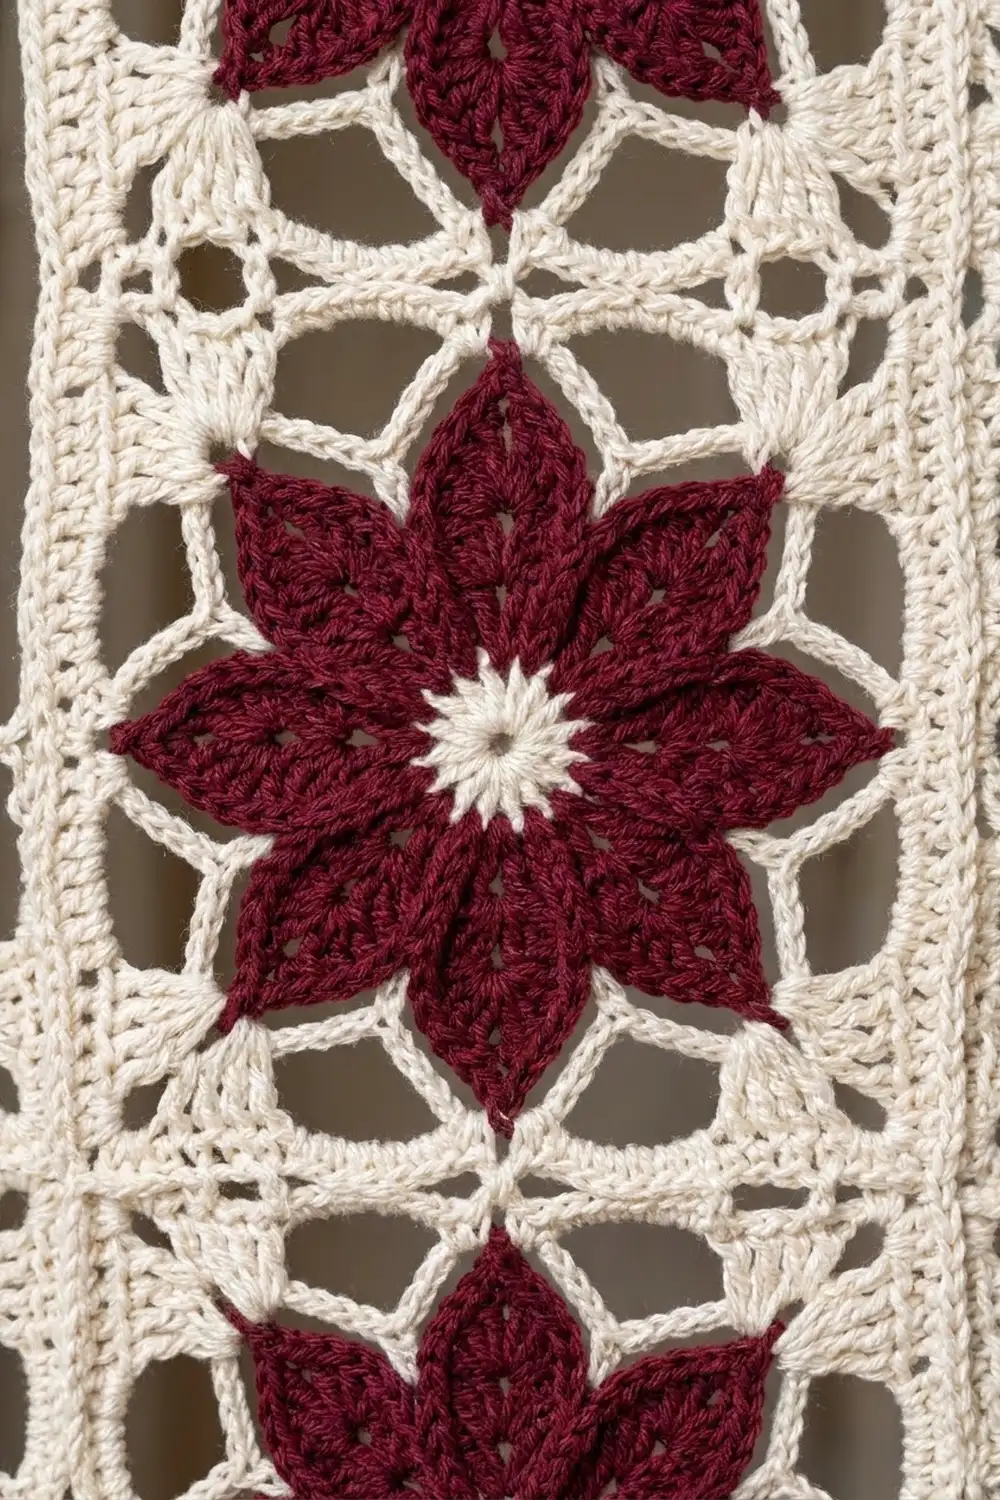
Motif (make 112)
Rnd 1 (Color A, Cream)
Make a magic ring. Ch 1 and work 16 sc into the ring. Pull the ring closed and sl st to the first sc. (16 sc)
Fasten off.
Rnd 2 (Color B, Burgundy)
Join Color B with a sl st in any sc. Ch 1, then sc in the same st, ch 4, and skip the next sc. Sc in the next sc, ch 4, skip the next sc; repeat from * 6 more times. Sl st to the first sc. (8 sc, 8 ch-4 sps)
Rnd 3 (Color B, Burgundy): Petals
Sl st into the first ch-4 sp. Work 1 Petal in the ch-4 sp, then sl st in the next sc of Rnd 2; repeat from * 7 more times. The last sl st lands in the joining sc. (8 petals = 64 sts, plus 8 sl sts and 8 ch-2 tips)
Each petal climbs from sc to hdc to dc to tr, so it tapers to a sharp tip. The sl st between petals pulls each petal’s base in, which gives the poinsettia its outline. Fasten off.
Rnd 4 (Color A, Cream): Squaring Round
Four petal tips, every other one, become corners. The other four become side tips.
Join Color A with a sl st in any petal tip ch-2 sp. Ch 4 (counts as tr), then work (tr, ch 3, 2 tr) in the same sp. Ch 5, sc in the next tip, ch 5, (2 tr, ch 3, 2 tr) in the next tip; repeat from * 2 more times. Ch 5, sc in the next tip, ch 5, and sl st to the top of the beg ch-4. (16 tr, 4 sc, 8 ch-5 sps, 4 corner ch-3 sps)
The ch-5 arches make the open lace windows between the petals.
Rnd 5 (Color A, Cream): Lattice
Sl st in the next tr and into the corner ch-3 sp. Ch 1 and work (sc, ch 3, sc) in the same sp. Ch 4, sc in the next ch-5 sp, ch 4, sc in the next sc, ch 4, sc in the next ch-5 sp, ch 4, (sc, ch 3, sc) in the next corner sp; repeat from * 2 more times. Finish with ch 4, sc in the next ch-5 sp, ch 4, sc in the next sc, ch 4, sc in the next ch-5 sp, ch 4, and sl st to the first sc. (20 sc, 16 ch-4 sps, 4 corner ch-3 sps)
Rnd 6 (Color A, Cream): Solid Edge
Sl st into the corner ch-3 sp. Ch 1 and work 3 sc in the same sp. Sc in the next sc, [4 sc in the next ch-4 sp, sc in the next sc] 3 times, 4 sc in the next ch-4 sp, sc in the next sc, 3 sc in the next corner sp; repeat from * 2 more times. Finish the last side the same way without the corner, then sl st to the first sc. (96 sc)
This is a conversion round. Between the corner groups, each side has 1 + (4 + 1) x 3 + 4 + 1 = 21 sc. Adding 3 sc at each of the 4 corners gives (21 x 4) + (3 x 4) = 96 sc.
Stitches per side: the middle sc of each 3-sc corner is the corner stitch. Each side has 25 sts: corner st, 1 sc, 21 sc, 1 sc, corner st. This count already includes both corner stitches. Check: (25 x 4) – 4 shared corners = 96.
Fasten off. Block each motif lightly to 6 in (15.2 cm) square.
Make All Pieces
- Per panel: 56 motifs. For the pair: 112 motifs.
- Color A (Cream): Rnd 1 and Rnds 4-6 of every motif
- Color B (Burgundy): Rnds 2-3 of every motif
All the motifs are identical. Layout per panel, with 4 columns x 14 rows:
[M][M][M][M]   Row 1 (top)
[M][M][M][M]
[M][M][M][M]
[M][M][M][M]
[M][M][M][M]
[M][M][M][M]
[M][M][M][M]
[M][M][M][M]
[M][M][M][M]
[M][M][M][M]
[M][M][M][M]
[M][M][M][M]
[M][M][M][M]
[M][M][M][M]   Row 14 (bottom)
Joining
Method: slip stitch through the back loops only in Color A, worked with wrong sides together. This leaves a neat cream ridge that blends into the lattice.
Order: first join the motifs into 14 strips of 4. Then join the strips along their long edges.
Stitch-to-stitch logic:
- Line up two motifs edge to edge.
- Start in the corner stitch of both motifs.
- Sl st through the BLO of 1 st from each motif at the same time. Work all 25 sts and end in the opposite corner stitch.
- Always match 25 sts to 25 sts. Never skip a stitch or double one up.
- When you join strips, work the two motif corner stitches at each seam as two separate stitches. Do not add chains between motifs.
Tension: keep the slip stitches as loose as the sc of Rnd 6. Tight seams make the panel pucker. If you need to, use a 4.5 mm hook just for joining.
Checkpoint: a joined strip of 4 should measure 24 in (61.0 cm) wide. The finished grid should measure 24 in x 84 in (61.0 cm x 213.4 cm).
Border
Border gauge: work the border at the same tension as the motifs, about 25 sc = 6 in (15.2 cm). Each round adds about 0.25 in (0.6 cm) to every side.
Starting counts:
- Short sides: 4 motifs x 25 sts = 100 sts
- Long sides: 14 motifs x 25 sts = 350 sts
Both counts include the panel corner stitch at each end. The perimeter is (2 x 100) + (2 x 350) – 4 shared corners = 896 sts.
Border Rnd 1: Single Crochet
With the right side facing, join Color A in any panel corner stitch. Ch 1 and work (sc, ch 2, sc) in that st. Sc in each st to the next corner stitch, working 1 sc in each of the two corner stitches at every seam. Work (sc, ch 2, sc) in each panel corner. Sl st to the first sc.
This is a conversion round. (896 sts worked 1 per existing st) + (4 extra corner sc) = 900 sc, plus 4 corner ch-2 sps.
- Per short side: 100 sc
- Per long side: 350 sc
Border Rnd 2: Mesh
Sl st into the corner ch-2 sp. Ch 1 and work (sc, ch 3, sc) in the same sp. [Sc in the next sc, ch 2, skip 1 sc] across the side, then (sc, ch 3, sc) in the corner sp; repeat around. Sl st to the first sc.
- Per short side: 50 sc and 50 ch-2 sps
- Per long side: 175 sc and 175 ch-2 sps
- Round total: 450 side sc + 8 corner sc = 458 sc, plus 450 ch-2 sps and 4 corner ch-3 sps
Border Rnd 3: Picot Edge
Sl st into the corner ch-3 sp. Ch 1 and work (sc, ch 3, sc, ch 3, sc) in the same sp. Work 1 Picot group in each ch-2 sp across the side, then (sc, ch 3, sc, ch 3, sc) in the corner sp; repeat around. Sl st to the first sc and fasten off.
- Per short side: 50 picots
- Per long side: 175 picots
- Round total: 450 side picots + 8 corner picots = 458 picots
Why the math works: each motif side is 25 sts over 6 in (15.2 cm). The border starts with exactly 100 and 350 sts, so it matches the edge stitch for stitch and won’t ruffle or pull in. Both counts are even, so the 2-stitch mesh repeat fits each side with nothing left over. Three rounds of 0.25 in (0.6 cm) give a 0.75 in (1.9 cm) border. That makes the panel 24 + 1.5 = 25.5 in (64.8 cm) wide and 84 + 1.5 = 85.5 in (217.2 cm) long.
Repeat the joining and border steps for the second panel.
Final Blocking
- Weave in every end, running each tail through stitches of its own color.
- Set up a blocking surface at least 25.5 in x 85.5 in (64.8 cm x 217.2 cm).
- Spray the panel until it is evenly damp, or soak it and roll it in a towel to remove the excess water.
- Lay it right side up and pin the four corners to 25.5 in x 85.5 in (64.8 cm x 217.2 cm).
- Pin along the edges at every seam, checking that each motif is 6 in (15.2 cm).
- Pin out the petal tips so they’re sharp, and open up the ch-5 arches.
- Pin each border picot into a crisp point.
- Let the panel dry completely, usually about 24 hours, before you unpin it.
Final Quality-Control Checklist
- Every motif is 6 in (15.2 cm) square, with 8 pointed petals and a cream center.
- Every motif side has 25 sts, and every seam matches 25 to 25.
- The seams lie flat with no puckering.
- Each panel is 24 in x 84 in (61.0 cm x 213.4 cm) before the border.
- Border Rnd 1 has 100 and 350 sc per side, and Rnds 2 and 3 have 50 and 175 repeats.
- Both panels are 25.5 in x 85.5 in (64.8 cm x 217.2 cm) and hang at the same length.
- All the ends are secure.
Troubleshooting
Petals look round. Check that the tr and ch-2 sit at the center of each petal, and pin the tips firmly when blocking.
Flower cups or ruffles. Keep the Rnd 2 ch-4 snug. If your tension is loose, use ch 3 instead.
Corners pull in. Make sure each corner tip in Rnd 4 has (2 tr, ch 3, 2 tr), and each corner in Rnd 6 has 3 sc.
Rnd 6 count is off. You should have 21 sc between corner groups. The most common mistake is missing the sc worked into a sc of Rnd 5.
Border ruffles. Recount Border Rnd 1 to 100 and 350 sc per side.
Panel stretches when hung. Block it to exact size and space the clip rings evenly to share the weight.
Care
Hand wash in cool water with a mild detergent. Lay flat to dry and reshape to size; don’t tumble dry or hang the panels while they’re wet.
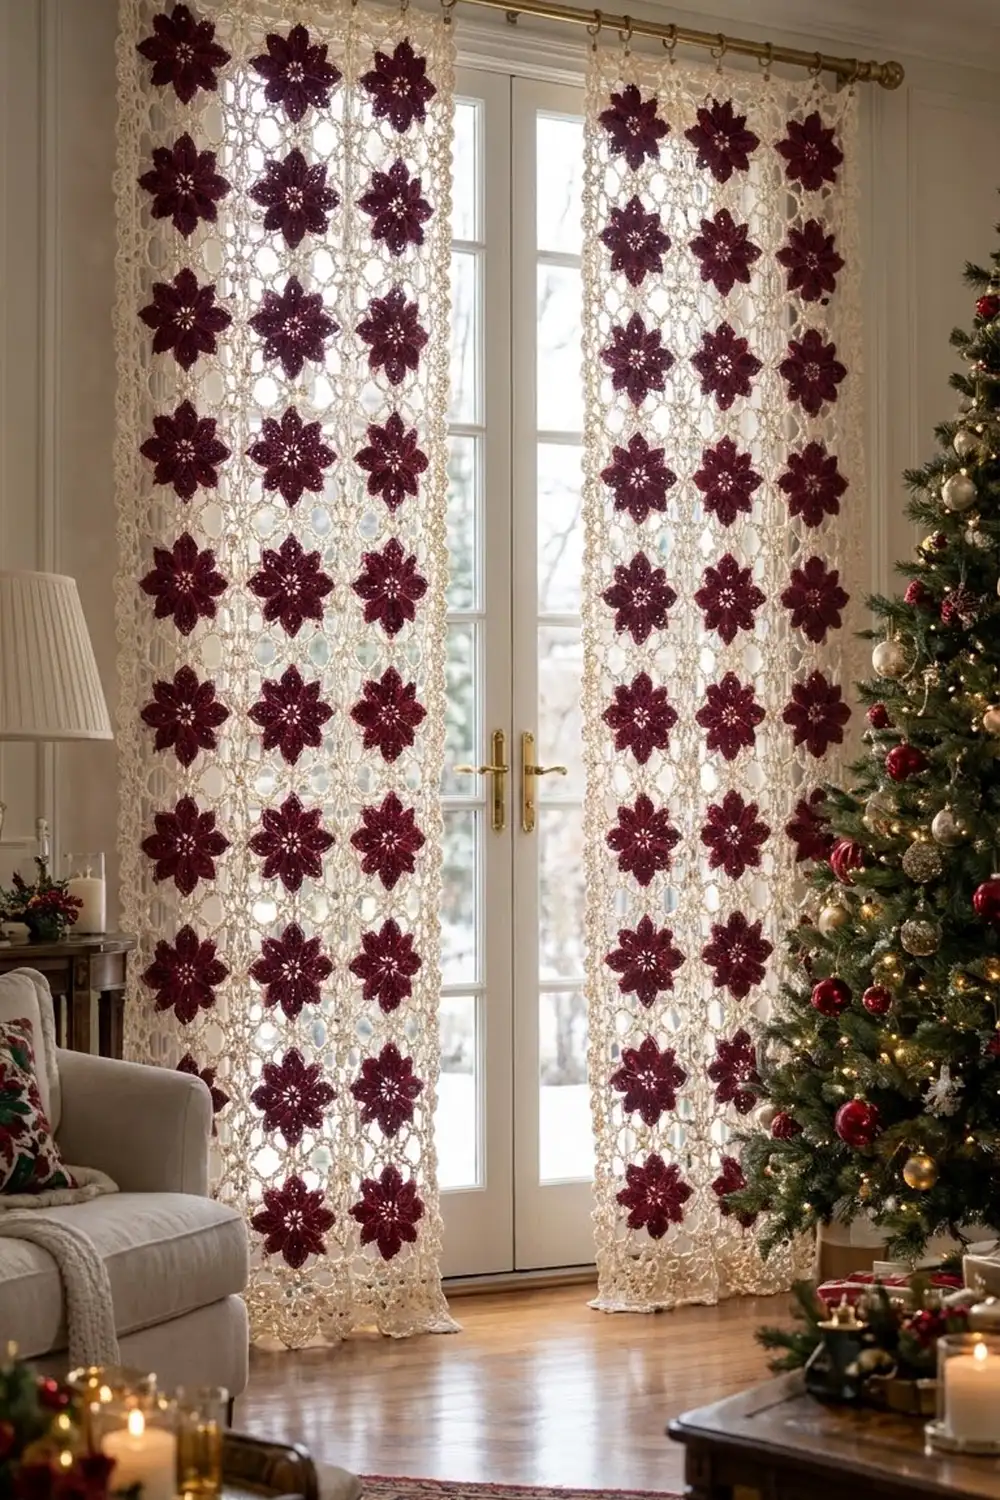
Final Notes
The whole project follows one measurement chain. Each motif is 25 sts and 6 in (15.2 cm) per side. Four motifs across give 100 sts and 24 in (61.0 cm), and fourteen motifs down give 350 sts and 84 in (213.4 cm). The 0.75 in (1.9 cm) picot border brings each panel to 25.5 in x 85.5 in (64.8 cm x 217.2 cm). If your first motif hits its checkpoints, the rest will fall into place.
Clip on the rings, slide the panels onto the rod, and let the light shine through your poinsettias.
Happy crocheting!