

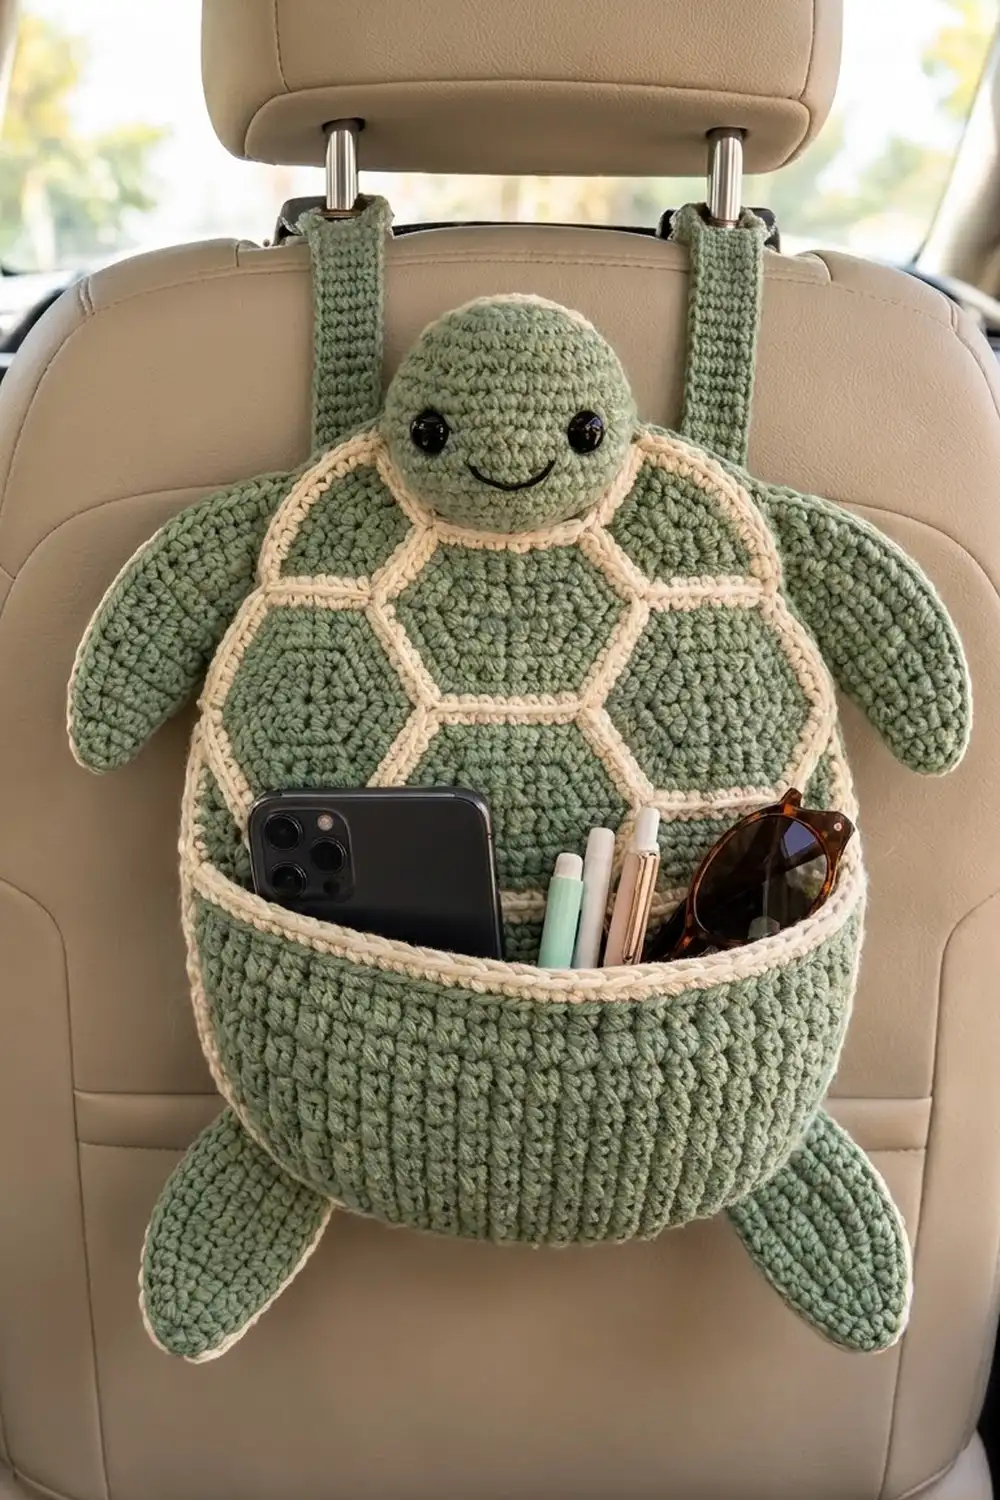
This turtle hangs on the back of a car seat and holds a phone, pens, sunglasses and small snacks. The shell is seven sage-green hexagons outlined in cream, and a deep pocket covers the lower half. A round amigurumi head and four flat flippers finish the turtle.
The palette is sage green and cream, with black for the face. Sc fabric keeps the organizer firm enough to hold its shape when loaded.
The pattern uses US crochet terms. The finished shell is about 11.5 in (29.2 cm) across. The whole turtle, including flippers and head, is about 17 in (43.2 cm) wide and 16 in (40.6 cm) tall, not counting the straps.
Construction overview: crochet 7 hexagons and whipstitch them together. Work a green fill band and a cream border around the joined hexagons. Then crochet the pocket, head, 4 flippers and 2 straps separately, block the shell, and sew everything together.
Finished Size and Construction
- Finished shell: about 11.5 in (29.2 cm) across
- Overall: about 17 in (43.2 cm) wide × 16 in (40.6 cm) tall
- Skill level: Intermediate
- Terminology: US
- Yarn weight: worsted (#4)
- Hook: 4.5 mm (US 7)
- Number of pieces: 15 (7 hexagons, 1 pocket, 1 head, 4 flippers, 2 straps)
- Layout: 7-hexagon flower (1 center + 6 around)
- Hexagon size: 3 in (7.6 cm) flat to flat, 3.5 in (8.9 cm) point to point
- Shell size before border: about 10.5 in (26.7 cm) across
- Border depth: 0.5 in (1.3 cm)
Materials
Choose a smooth worsted acrylic or cotton-acrylic blend. It needs to hold its shape and survive sun and handling in the car. Avoid fuzzy yarns, because they hide the cream outlines.
- Sage green (Color A): 200 g, about 400 m
- Cream (Color B): 60 g, about 120 m
- Black: 2 g, about 4 m (embroidery thread or worsted scrap)
These amounts include a margin of about 25%.
Tools:
– 4.5 mm (US 7) crochet hook
– Two 12 mm black safety eyes
– About 20 g fiberfill
– Two 1 in (2.5 cm) buttons
– Tapestry needle
– Stitch markers
– Rustproof pins and a blocking mat
Abbreviations (US Terms)
- ch – chain
- sl st – slip stitch
- sc – single crochet
- hdc – half double crochet
- dc – double crochet
- tr – treble crochet
- sc2tog – single crochet 2 together
- BLO – back loop only
- sp – space
- st(s) – stitch(es)
- Rnd – round
Special stitch: tr2tog (treble 2 together). Yo twice, insert the hook in the first space, pull up a loop, (yo, pull through 2) twice. Repeat from * to * in the second space. Yo and pull through all 3 loops on the hook.
Gauge and Checkpoints
Gauge: 16 sc and 18 rows = 4 in (10.2 cm) in sc.
Crochet one hexagon before anything else and use it as your gauge test.
- After Rnd 6: about 2.75 in (7.0 cm) flat to flat.
- After Rnd 7: 3 in (7.6 cm) flat to flat and 3.5 in (8.9 cm) point to point. Each side is 1.75 in (4.4 cm).
- Joined flower: about 9 in (22.9 cm) across.
- After the fill band: about 10.5 in (26.7 cm).
- After the border: about 11.5 in (29.2 cm).
If your hexagon is too big, go down 0.5 mm in hook size. If it is too small, go up 0.5 mm. Don’t add or skip rounds to fix the size, because the border counts depend on exactly 7 sc per hexagon side.
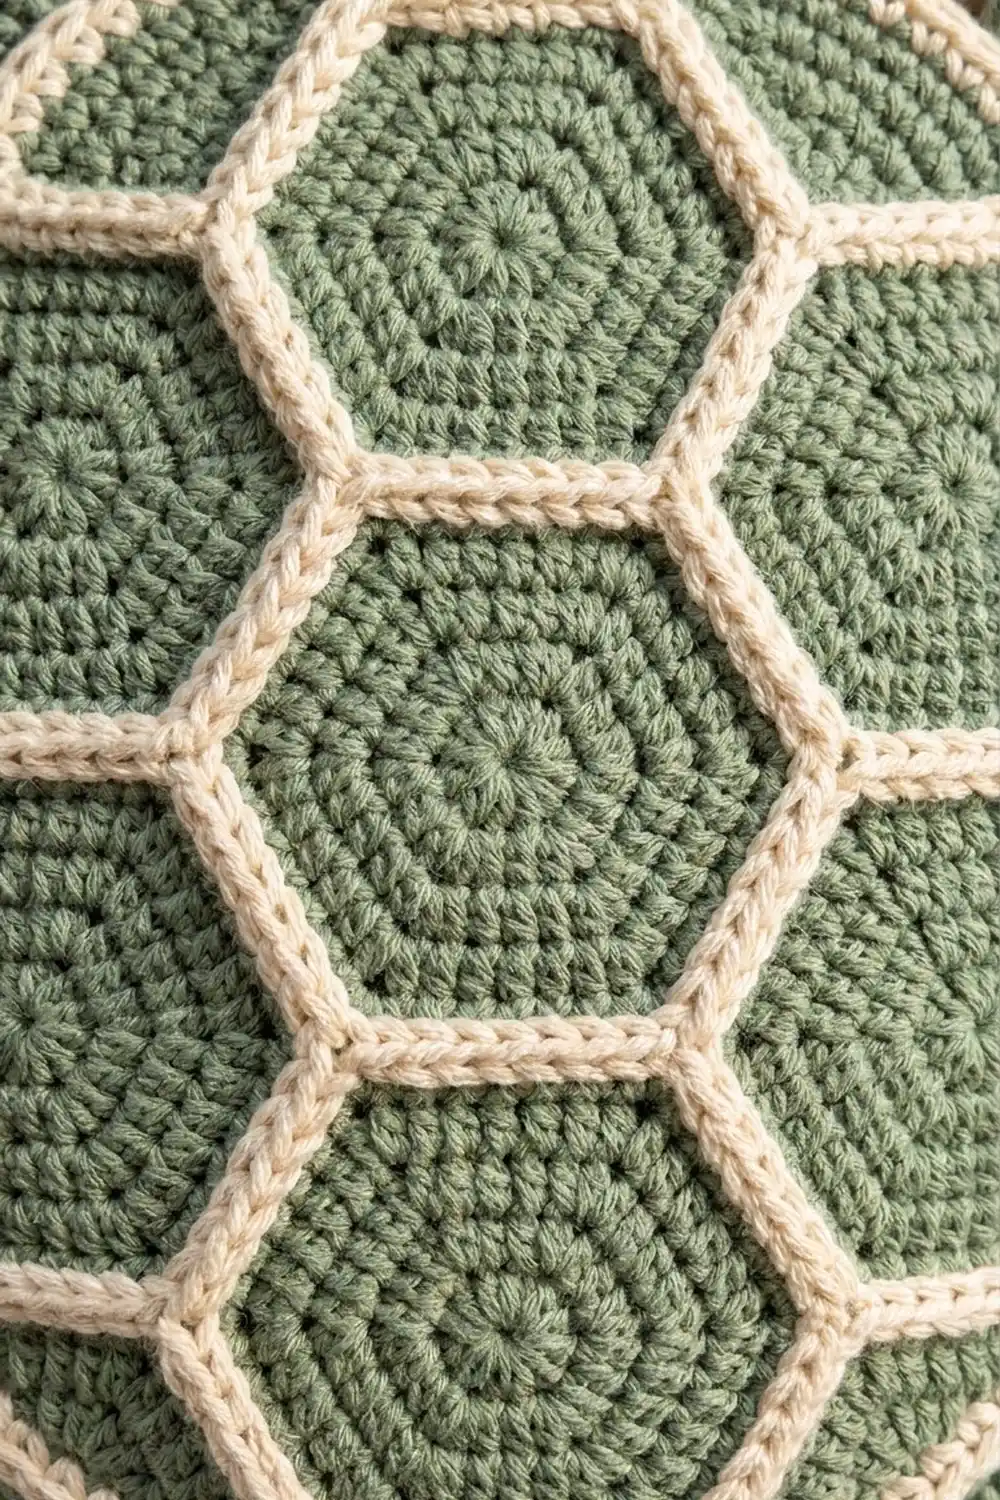
Hexagon (Make 7)
Work in joined rounds, with the right side facing you throughout. The increases stack on top of each other, and that is what forms the six corners.
With Color A:
Rnd 1: Make a magic ring, ch 1, 6 sc in the ring, sl st to the first sc. (6)
Rnd 2: Ch 1, 2 sc in each st, sl st to join. (12)
Rnd 3: Ch 1, sc in next st, 2 sc in next st 6 times, join. (18)
Rnd 4: Ch 1, sc in next 2 sts, 2 sc in next st 6 times, join. (24)
Rnd 5: Ch 1, sc in next 3 sts, 2 sc in next st 6 times, join. (30)
Rnd 6: Ch 1, sc in next 4 sts, 2 sc in next st 6 times, join. (36) Fasten off Color A.
Rnd 7 (conversion round, Color B): Join Color B in the first st after any increase. Ch 1, sc in next 5 sts, (sc, ch 2, sc) in next st 6 times, join.
Count: 36 sc worked one per st + 6 extra sc = 42 sc, plus 6 ch-2 corner spaces.
Each side now has 7 sc between two ch-2 corner spaces. The corner spaces are not counted as sts. Fasten off and weave in the ends.
Pocket (Make 1)
The base is an oval worked around both sides of a foundation chain. The sides are then worked straight up.
With Color A: ch 27.
Rnd 1: Sc in the 2nd ch from the hook, sc in the next 24 ch, 3 sc in the last ch. Rotate the work and sc in the next 24 ch along the other side, then 2 sc in the same ch as the first sc. Join. (1 + 24 + 3 + 24 + 2 = 54)
Rnd 2: Ch 1, 2 sc in next st, sc in next 24, 2 sc in each of next 3, sc in next 24, 2 sc in each of next 2. Join. (2 + 24 + 6 + 24 + 4 = 60)
Rnd 3: Ch 1, sc in next st, 2 sc in next st, sc in next 24, (sc, 2 sc in next) 3 times, sc in next 24, (sc, 2 sc in next) 2 times. Join. (3 + 24 + 9 + 24 + 6 = 66)
Rnd 4: Ch 1, sc in next 2, 2 sc in next, sc in next 24, (sc in next 2, 2 sc in next) 3 times, sc in next 24, (sc in next 2, 2 sc in next) 2 times. Join. (4 + 24 + 12 + 24 + 8 = 72)
Checkpoint: the base measures about 8.25 in (21.0 cm) × 1.75 in (4.4 cm).
Rnd 5: Ch 1, sc in the BLO of each st, join. (72) This leaves a ridge along the base edge.
Rnds 6–26: Ch 1, sc in each st, join. (72) Fasten off Color A.
Checkpoint: the sides are about 5 in (12.7 cm) tall.
Rnds 27–28 (Color B): Ch 1, sc in each st, join. (72)
Finished pocket: the opening goes all the way around at 18 in (45.7 cm). Flattened, it is 9 in (22.9 cm) wide, and the sides are about 5.5 in (14.0 cm) tall.
Head (Make 1)
Work in a continuous spiral with Color A and mark the first st of each round.
- Rnd 1: 6 sc in a magic ring. (6)
- Rnd 2: 2 sc in each st. (12)
- Rnd 3: Sc, 2 sc in next 6 times. (18)
- Rnd 4: Sc 2, 2 sc in next 6 times. (24)
- Rnd 5: Sc 3, 2 sc in next 6 times. (30)
- Rnd 6: Sc 4, 2 sc in next 6 times. (36)
- Rnd 7: Sc 5, 2 sc in next 6 times. (42)
- Rnds 8–15: Sc in each st. (42)
Insert the safety eyes between Rnds 11 and 12, with 6 sts between them. Embroider a smile with black about 1 in (2.5 cm) wide across Rnds 13–14.
- Rnd 16: Sc 5, sc2tog 6 times. (36)
- Rnd 17: Sc 4, sc2tog 6 times. (30)
- Rnd 18: Sc 3, sc2tog 6 times. (24) Stuff firmly.
- Rnd 19: Sc 2, sc2tog 6 times. (18)
- Rnd 20: Sc, sc2tog 6 times. (12) Finish stuffing.
- Rnd 21: Sc2tog 6 times. (6)
Fasten off, close the hole and leave a long tail for sewing.
Finished head: about 3.25 in (8.3 cm) wide and 3 in (7.6 cm) tall.
Flippers
Front Flipper (Make 2)
With Color A: ch 13.
- Rnd 1: Sc in the 2nd ch from the hook, sc in the next 10 ch, 3 sc in the last ch. Sc in the next 10 ch along the other side, 2 sc in the first ch. Join. (26)
- Rnd 2: Ch 1, 2 sc in next, sc 10, 2 sc in each of next 3, sc 10, 2 sc in each of next 2. Join. (32)
- Rnd 3: Ch 1, sc, 2 sc in next, sc 10, (sc, 2 sc in next) 3 times, sc 10, (sc, 2 sc in next) 2 times. Join. (38) Fasten off Color A.
- Rnd 4 (Color B): Ch 1, sc 2, 2 sc in next, sc 10, (sc 2, 2 sc in next) 3 times, sc 10, (sc 2, 2 sc in next) 2 times. Join. (32 sc worked one per st + 6 extra = 44 sc in total)
Finished front flipper: about 4.5 in (11.4 cm) × 2 in (5.1 cm).
Back Flipper (Make 2)
With Color A: ch 7.
- Rnd 1: Sc in the 2nd ch from the hook, sc in the next 4 ch, 3 sc in the last ch. Sc in the next 4 ch along the other side, 2 sc in the first ch. Join. (14)
- Rnd 2: Ch 1, 2 sc in next, sc 4, 2 sc in each of next 3, sc 4, 2 sc in each of next 2. Join. (20) Fasten off Color A.
- Rnd 3 (Color B): Ch 1, sc, 2 sc in next, sc 4, (sc, 2 sc in next) 3 times, sc 4, (sc, 2 sc in next) 2 times. Join. (20 sc worked one per st + 6 extra = 26 sc in total)
Finished back flipper: about 2.75 in (7.0 cm) × 1.5 in (3.8 cm).
Straps (Make 2)
With Color A: ch 7.
- Row 1: Sc in the 2nd ch from the hook and in each ch across. (6)
- Rows 2–36: Ch 1, turn, sc in each st. (6)
- Row 37 (buttonhole): Ch 1, turn, sc 2, ch 2, skip 2, sc 2. (4 sc + 1 ch-2 sp)
- Row 38: Ch 1, turn, sc 2, 2 sc in the ch-2 sp, sc 2. (6)
- Rows 39–40: Ch 1, turn, sc in each st. (6)
Finished strap: about 9 in (22.9 cm) × 1.5 in (3.8 cm).
Make All Pieces
- Color A with Color B outline: 7 hexagons
- Color A with Color B rim or edge: 1 pocket, 2 front flippers, 2 back flippers
- Color A only: 1 head, 2 straps
Hexagon layout: points face up, and the head sits above the notch between B and C.
      [B] [C]
    [G] [A] [D]
      [F] [E]
Joining
Method: whipstitch with Color B through the back loops of Rnd 7, with the right sides facing up.
Stitch-to-stitch logic: match each 7-sc side to a 7-sc side and each ch-2 corner to a ch-2 corner. That gives 9 whipstitches per seam: 1 corner space, 7 sts, 1 corner space.
- Join center hexagon A to each of B–G. (6 seams)
- Join each outer hexagon to its neighbor: B–C, C–D, D–E, E–F, F–G, G–B. (6 seams)
That makes 12 seams in total.
Tension: pull each stitch snug but don’t let it pucker. The seam should lie as flat as the hexagons around it. The two joined cream rounds create the doubled outline.
Checkpoint: the flower measures about 9 in (22.9 cm) across.
Border
The outline of the flower has 18 exposed hexagon sides (3 per outer hexagon). It also has 12 outward corners and 6 inward notches where two outer hexagons meet.
Fill band starting count: 18 sides × 7 sc = 126 sts, plus 1 st at each of the 12 outward corners, plus 1 cluster at each of the 6 notches = 144.
Fill Rnd 1 (Color A, conversion round): Join at the first st of a side that begins at a notch. Repeat the following segment once for each outer hexagon (6 times):
- Side 1: dc 3, hdc 2, sc 2.
- Outward corner: sc in the corner space.
- Side 2: sc 7.
- Outward corner: sc in the corner space.
- Side 3: sc 2, hdc 2, dc 3.
- Notch: tr2tog, with the first leg in this hexagon’s notch corner space and the second leg in the next hexagon’s notch corner space.
Join. The taller stitches fill in the notches.
Count: 126 sts worked one per st + 12 corner sc + 6 tr2tog = 144.
Fill Rnd 2 (Color A): Ch 1, sc 10, sc2tog 12 times, join. (120 sc + 12 sc2tog = 132) Fasten off.
The first fill round follows the jagged outline. This round pulls that extra length into a smooth curve.
Checkpoint: the shell measures about 10.5 in (26.7 cm) across. That matches the gauge: 132 sts ÷ 4 sts per in = 33 in (83.8 cm) around, and 33 ÷ 3.14 ≈ 10.5 in.
Surface lines (Color B): From each of the 12 outward corners, surface slip stitch straight out across both fill rounds. This divides the fill band into 12 small edge cells.
Border gauge: 4 sts and 4.5 rounds per inch (2.5 cm).
Border Rnd 1 (Color B): Join in any st, ch 1, sc 21, 2 sc in next 6 times, join. (132 + 6 = 138)
Border Rnd 2 (Color B): Ch 1, sc 22, 2 sc in next 6 times, join. (138 + 6 = 144) Fasten off.
Place the increases of Rnd 2 halfway between those of Rnd 1, so the increases don’t stack and pull the edge into points.
Why the math works: each sc round makes the shell about 0.22 in (0.6 cm) wider on every side. That adds about 1.4 in (3.6 cm) to the distance around, or about 6 sts per round. The final 144 sts ÷ 4 = 36 in (91.4 cm) around, which matches a circle of about 11.5 in (29.2 cm). So the shell lies flat without ruffling or cupping.
Final Blocking
- Wet-block the shell only. Soak it, press out the water and roll it in a towel.
- Pin it out in a circle 11.5 in (29.2 cm) across. Line up the hexagon seams so they run straight, and let it dry completely.
- Steam the flippers flat. Do not block the head or the pocket.
- Pocket: flatten it so the base chain runs side to side. Pin the back 36 sts of the rim across the middle of the shell, level with the lower half of hexagon A. Sew the back half of the Rnd 4 base edge near the bottom border, then sew the sides vertically. The front wall will bulge outward.
- Front flippers: sew them behind the shell edge at the 10 and 2 o’clock positions, overlapping 0.75 in (1.9 cm).
- Back flippers: sew them at the 5 and 7 o’clock positions, overlapping 0.75 in (1.9 cm).
- Head: sew it at 12 o’clock, overlapping the shell 0.75 in (1.9 cm). Stitch around the back of Rnd 16 so the head stays secure.
- Straps: sew the Row 1 end of each strap to the back of the shell at 11 and 1 o’clock, overlapping 1 in (2.5 cm). Place them about 6 in (15.2 cm) apart. Sew a button on the front of each strap 3 in (7.6 cm) above the shell. Loop each strap over a headrest post and button it.
Final Quality-Control Checklist
- Every hexagon is 3 in (7.6 cm) flat to flat.
- Every seam has 9 whipstitches, and the corners line up.
- Fill Rnd 2 has 132 sts, and the border ends at 144 sts.
- The shell is 11.5 in (29.2 cm) across and lies flat.
- The pocket has 72 sts per round, and its rim is level.
- The eyes are secure, and the smile is centered.
- The flippers are placed symmetrically.
- The straps button easily, and each one holds 1 lb (0.45 kg) without stretching.
Troubleshooting
- The hexagons turn out round: keep the increases stacked exactly where the pattern puts them, and join every round.
- The edge ruffles: check that you worked the sc2tog decreases in Fill Rnd 2. If so, go down a hook size for the border.
- The edge cups: add 6 more increases spread evenly in Border Rnd 2.
- The pocket sags: tighten your tension on the sides, or sew a strip of plastic canvas inside the back wall.
- The head flops forward: stuff it more firmly and add a second ring of stitches attaching it to the shell.
- The seams pucker: whipstitch more loosely and block the shell again.
Care
Hand wash in cool water and dry flat. Do not put the turtle in the dryer, because heat can soften the pocket and loosen the safety eyes.
Final Notes
Here is the measurement chain in order. Each hexagon has 7 sc per side and measures 3 in (7.6 cm) flat to flat. Seven hexagons make a 9 in (22.9 cm) flower. The fill band brings it to 132 sts and 10.5 in (26.7 cm). The two-round border brings it to 144 sts and 11.5 in (29.2 cm). Check your size at each stage, because each one depends on the one before.
Happy crocheting!