

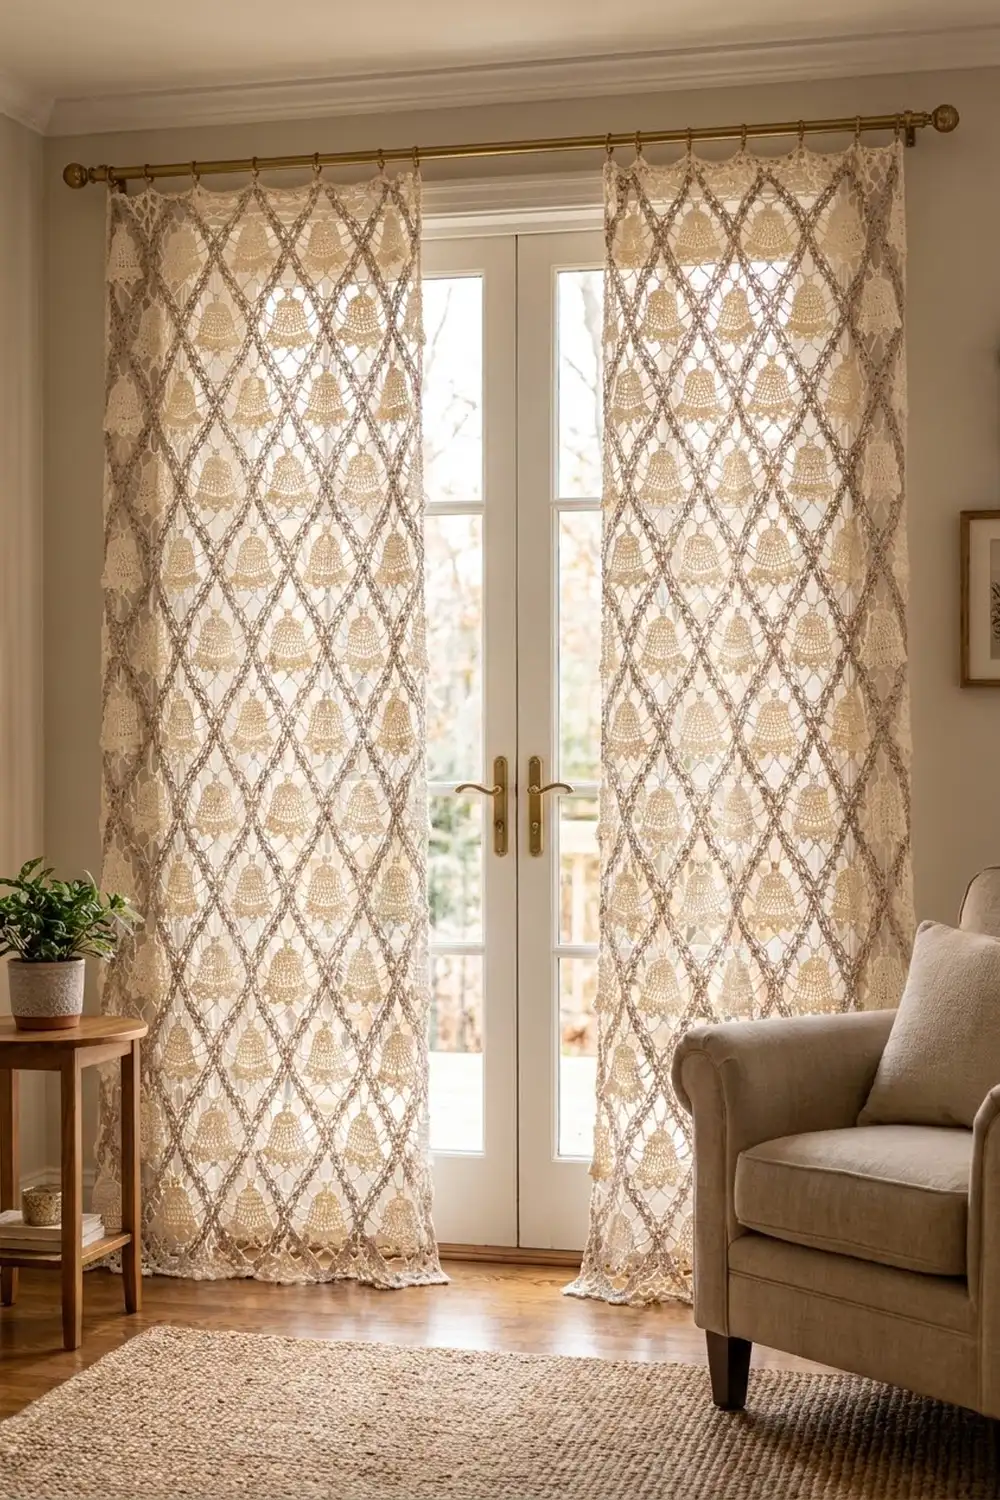
These curtains are a quiet holiday statement: a pair of tall lace panels with ivory bells, each set in its own diamond of oatmeal mesh. The diamonds line up into a strong diagonal lattice, so the bells sit in staggered rows from top to bottom. With light behind them, the open mesh glows and the solid bells stand out clearly.
The palette is just two soft neutrals, ivory and oatmeal. That keeps the look classic enough to leave up all winter. This pattern uses US crochet terms throughout.
Each finished panel measures 32.6 in × 80.3 in (82.8 cm × 204.0 cm), not counting the hanging loops. The loops add about 1.5 in (3.8 cm) above the top edge.
The construction is modular. You crochet mesh squares in rounds, sew a bell onto each one, and join the squares on point so they turn into diamonds. Half-square triangles fill in the top and sides so those edges are straight. The bottom row is left as points, and a two-round border with hanging loops finishes each panel.
Finished Size and Construction
- Finished size (each panel): 32.6 in × 80.3 in (82.8 cm × 204.0 cm), plus 1.5 in (3.8 cm) loops
- Skill level: Intermediate
- Terminology: US
- Yarn weight: DK / light worsted (#3), cotton or cotton blend
- Hook: 3.5 mm (E-4)
- Pieces per panel: 108 mesh squares, 108 bells, 29 half-square triangles
- Layout: squares set on point, in 12 rows of 5 alternating with 12 rows of 4; 5 triangles across the top and 12 down each side
- Square size: 4.5 in (11.4 cm) per side; 6.36 in (16.2 cm) corner to corner
- Size before border: 31.8 in × 79.5 in (80.8 cm × 201.9 cm), measured from the top edge to the hem points
- Border depth: 0.4 in (1.0 cm)
Materials
Choose a smooth, mercerized DK cotton so the stitches look crisp and the bells hold their shape. The amounts below assume about 115 m per 50 g (2.3 m per gram).
- Oatmeal / light taupe (mesh, triangles, joining, border): 1,250 g, about 2,875 m
- Ivory / cream (bells): 600 g, about 1,380 m
Both amounts are for the full pair of panels and include roughly a 10% margin for swatching and tails.
Tools:
– 3.5 mm (E-4) hook
– Tapestry needle
– Locking stitch markers
– Rustproof pins and blocking mats
– Spray bottle
– Measuring tape
– Curtain rod up to 1 in (2.5 cm) in diameter
Abbreviations (US Terms)
- ch – chain
- sl st – slip stitch
- sc – single crochet
- dc – double crochet
- sc2tog – single crochet 2 together
- sc3tog – single crochet 3 together
- st(s) – stitch(es)
- sp – space
- RS / WS – right side / wrong side
- rep – repeat
Shell: 5 dc worked in the same stitch.
Mesh rule (square Rounds 2–5, triangle Rows 2–5): after the 2 corner dc, ch 1 and skip the first dc of the side. Then *dc in next dc, ch 1; rep from * until you reach the last dc of the side, skip that last dc, and make the next corner. Skip all ch-1 sps; you only work into dc.
Gauge and Checkpoints
Make one square and one bell, block them, and measure before you start production.
- Base gauge: 14 sc = 3 in (7.6 cm)
- Square checkpoints: about 2.5 in (6.4 cm) per side after Rnd 3, about 4.1 in (10.4 cm) after Rnd 5, and exactly 4.5 in (11.4 cm) after Rnd 6
- Bell checkpoint: 2.75 in (7.0 cm) tall × 3.75 in (9.5 cm) wide at the hem
If your square is larger than 4.5 in (11.4 cm), go down half a hook size. If it is smaller, go up half a size. A difference of only 0.25 in (0.6 cm) per square adds up to about 3.2 in (8.1 cm) over the length of a panel, so get this right before you continue.
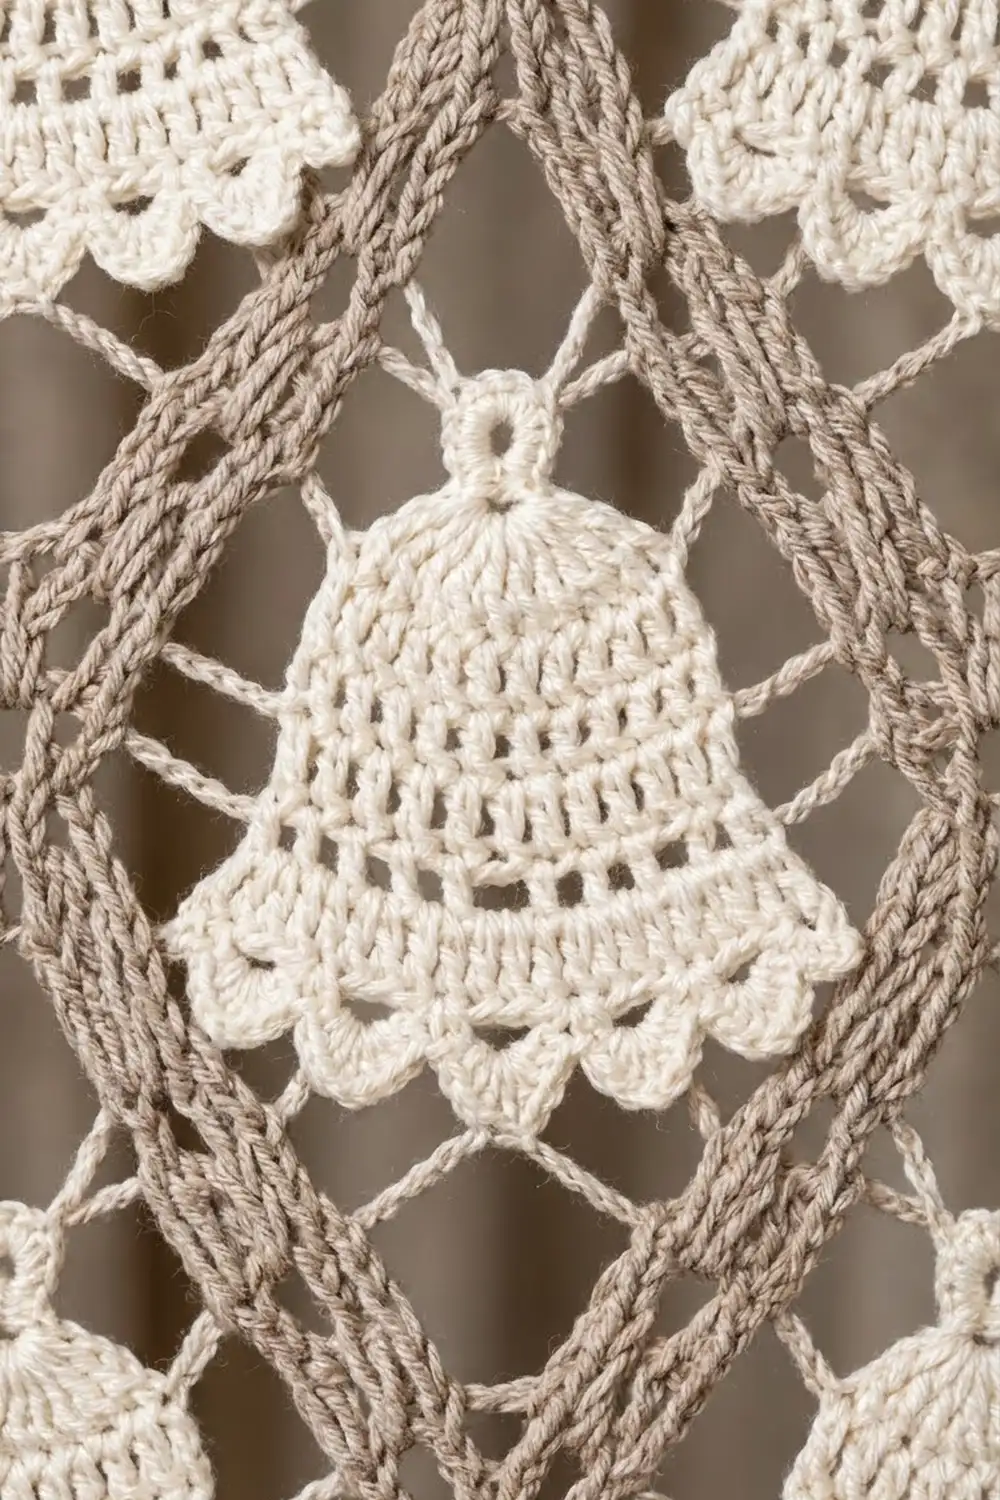
Mesh Square (make 108 per panel)
Use oatmeal.
Rnd 1: Magic ring. Ch 3 (counts as dc), 2 dc in ring, ch 2, [3 dc, ch 2] 3 times, sl st in top of ch-3.
(12 dc, 4 ch-2 corner sps; 3 sts per side)
Rnd 2: Sl st in next 2 dc and into the corner sp. Ch 3 (counts as dc), then (dc, ch 2, 2 dc) in the same sp. Work the mesh rule across the side, then (2 dc, ch 2, 2 dc) in the next corner sp. Rep from * to * twice more, then work the mesh rule across the last side. Sl st in top of ch-3.
(Each side: 2 dc, ch 1, dc, ch 1, 2 dc = 7 sts; 20 dc total)
Rnd 3: Repeat Rnd 2.
(Each side: 2 dc, 4 ch-1, 3 dc, 2 dc = 11 sts; 28 dc total)
Rnd 4: Repeat Rnd 2.
(Each side: 15 sts with 9 dc; 36 dc total)
Rnd 5: Repeat Rnd 2.
(Each side: 19 sts with 11 dc and 8 ch-1; 44 dc total)
Every mesh round adds 4 sts to each side, so a side always has 4 × (round number) − 1 sts.
Rnd 6 (trim): Sl st into the corner sp, then ch 1. Work (sc, ch 2, sc) in each corner sp, and sc in each dc and each ch-1 sp along the sides. Sl st in the first sc and fasten off.
(Each side: 19 sc worked 1 per existing st + 2 corner sc = 21 sc between corner ch-2 sps; 84 sc total)
The 2 dc stacked at each corner form solid bars from the center out to the corners. Most of these bars end up hidden behind the bell.
Bell (make 108 per panel)
Use ivory. The bell is worked flat from the crown down.
Row 1 (RS): Ch 6. Dc in 4th ch from hook and in the next 2 ch. Turn.
(4 sts; the skipped ch count as 1 dc)
Row 2: Ch 3 (counts as dc throughout), dc in same st, then 2 dc in each st across. Turn. (8 sts)
Row 3: Ch 3, dc in each st across. Turn. (8 sts)
Row 4: Ch 3, dc in same st, dc in next 2 sts, 2 dc in each of next 2 sts, dc in next 2 sts, 2 dc in last st. Turn. (12 sts)
Row 5: Ch 3, dc in each st across. Turn. (12 sts)
Row 6: Ch 3, dc in same st, [dc in next 2 sts, 2 dc in next st] 3 times, dc in next st, 2 dc in last st. Turn. (17 sts)
Row 7 (scalloped hem): Ch 1, sc in first st, [skip 1 st, shell in next st, skip 1 st, sc in next st] 4 times. Do not turn.
(4 shells, 5 sc)
Outline (round): Ch 1. Along the side, work 1 sc in the end of Row 7 and 2 sc in the end of each dc row (13 sc). Across the foundation chain, work 3 sc in the first ch, 1 sc in each of the next 2 ch, and 3 sc in the last ch (8 sc). Down the other side, work 2 sc in each dc row end and 1 sc in the end of Row 7 (13 sc). Sl st to the first sc of Row 7.
(34 sc in the outline)
Top loop: Sl st along the outline to the center of the crown. Ch 4, then sl st in the same st. Fasten off and leave a 24 in (61.0 cm) tail for sewing.
Rows 1–3 make the narrow, rounded crown. Rows 4–5 are the short waist, Row 6 flares the skirt, and Row 7 forms the scallops.
Half-Square Triangle (make 29 per panel)
Use oatmeal. Each triangle is half of a mesh square, worked in rows out from the middle of its long edge (the hypotenuse).
Row 1: Magic ring. Ch 3 (counts as dc), 2 dc in ring, ch 2, 3 dc in ring. Turn.
(6 dc; 3 per short side)
Row 2: Ch 3, dc in same st, ch 1, skip next dc. Dc in next dc, ch 1; rep from * up to the corner sp. Work (2 dc, ch 2, 2 dc) in the corner sp. Then ch 1, dc in next dc; rep from * until 2 dc remain, ch 1, skip next dc, 2 dc in the last st. Turn.
(7 sts per short side)
Rows 3–5: Repeat Row 2.
(11, then 15, then 19 sts per short side)
Row 6 (trim): Ch 1, 2 sc in first st. Sc in each dc and ch-1 sp up to the corner, (sc, ch 2, sc) in the corner sp, sc in each st and ch-1 sp across, and 2 sc in the last st. Do not turn.
(Each short side: 19 sc + 2 corner sc = 21 sc, which matches the side of a square)
Row 7 (hypotenuse): Ch 1, then rotate to work along the long edge. Work 1 sc in the end of Row 6, 3 sc in the end of each of Rows 5, 4, 3 and 2, and 2 sc in the end of Row 1 (15 sc). Mirror that on the second half of the edge (15 sc). Ch 1 and sl st in the first sc of Row 6. Fasten off.
(30 sc along the hypotenuse, plus a ch-1 at each end)
The hypotenuse is 6.36 in (16.2 cm) long. At base gauge, 30 sc measure 6.4 in (16.3 cm), so the edge lies flat.
Make All Pieces
For the pair (two panels):
– 216 mesh squares (oatmeal)
– 216 bells (ivory)
– 58 half-square triangles (oatmeal)
Before joining, block every bell and every square to size, then sew a bell onto each square. Choose one corner of the square as the top and run the bell’s center line from that corner to the opposite one. Place the top of the crown about 0.75 in (1.9 cm) below the top corner. Whipstitch through the back loops of the outline and along the hem sc between the shells. Leave the shells themselves unstitched so they lift slightly.
Layout for one panel (T = top triangle, S = side triangle, D = square with bell, set on point):
Top:   T     T     T     T     T
B1:  S    D     D     D     D    S
A1:     D     D     D     D     D
B2:  S    D     D     D     D    S
A2:     D     D     D     D     D
...    (continue alternating)
B12: S    D     D     D     D    S
A12:    D     D     D     D     D
        V     V     V     V     V   <- hem points
The 5 top triangles have their long edge on the top of the panel and their point facing down. The side triangles have their long edge vertical along the side of the panel.
Joining
Join with oatmeal using a raised slip-stitch seam. Hold two pieces WS together with the RS facing you, and sl st through both loops of both edges, 1 sl st per matching pair of sc. Each side has 21 sc on both pieces, so the seam is a straight 21-to-21 match with no extra stitches. Where corners meet, work 1 sl st through the corner sps held together. On the RS, the ridge left by the seam becomes the lattice line.
Join every seam that runs down to the right first, as long continuous diagonal seams through all the pieces in that line. Then join every seam that runs down to the left. At each point where four pieces meet, sl st through the corner sps held together, ch 1 over the seam you already made, and carry on.
Keep your tension relaxed and even. If the seam is too tight it will pull the diamonds narrow; if it is too loose, the lattice will sag.
Size checkpoint: once the triangles, B1 and A1 are joined, the strip should be 31.8 in (80.8 cm) wide and 9.5 in (24.1 cm) from the top edge down to the A1 points. The finished joined panel should measure 31.8 in × 79.5 in (80.8 cm × 201.9 cm). Each straight side edge should measure 76.4 in (194.1 cm).
Border
The border uses the base gauge of 14 sc = 3 in (7.6 cm). Both rounds use oatmeal with the RS facing you.
Rnd 1: Join at the top-left corner and ch 1. Work into the pieces’ own edge stitches only, and do not add any sc into the junctions between pieces.
- Top corners: (sc, ch 2, sc) in each corner junction. (4 sc)
- Top edge: sc in each sc along the 5 triangle hypotenuses. (5 × 30 = 150 sc)
- Each side: sc in each sc along the 12 triangle hypotenuses. (12 × 30 = 360 sc)
- Lower side points (one each side): 2 sc in the corner sp of the A12 square. (2 sc each, 4 total)
- Bottom: sc in each of the 21 sc on each lower side of the 5 hem squares. Work (sc, ch 2, sc) in the corner sp at each hem point. At each of the 4 valleys, sc2tog over the last sc of one square and the first sc of the next. (10 × 21 − 4 + 10 = 216 sts)
Sl st to the first sc. (Round total: 4 + 150 + 720 + 4 + 216 = 1,094 sts)
Rnd 2: Ch 1.
- Top corners: (sc, ch 2, sc) in each corner sp. (4 sc)
- Top edge, with loops: the top now counts 152 sts (the 150 top sc plus the Rnd 1 corner sc at each end). Sc in first 4 sts and make a Loop. *Sc in next 29 sts, make a Loop; rep from * 4 more times. Sc in the last 3 sts.
- Loop: ch 16, sl st in the sc just made, work 22 sc into the ch-16 loop, then sl st in the same base sc.
- (152 sc and 6 loops; 4 + 5 × 29 + 3 = 152)
- Each side: sc in each st. (1 + 360 + 2 = 363 sc)
- Bottom: sc in each st. Work (sc, ch 5, sc) in each hem-point ch-2 sp, and sc3tog centered over each Rnd 1 sc2tog. (216 − 8 + 10 = 218 sts, plus 5 ch-5 tips)
Sl st to the first sc and fasten off. (Round total: 4 + 152 + 726 + 218 = 1,100 sts)
Why the math works: each square side has 21 sc for 4.5 in (11.4 cm), and each hypotenuse has 30 sc for its 6.36 in (16.2 cm) diagonal. Both match the base gauge. The panel edges are built entirely from these units, with no extra stitches at the seams, so the border can’t ruffle or pull in. The loops are 29 sts apart, which is about 6.2 in (15.7 cm), a good spacing for supporting the weight of the curtain.
Final Blocking
- Soak each panel in cool water for 15 minutes, then press the water out gently. Don’t wring.
- Roll the panel in towels to take out the excess water.
- Lay it flat on blocking mats and pin it to 32.6 in × 80.3 in (82.8 cm × 204.0 cm).
- Pin the straight edges every 3 in (7.6 cm), and pin each hem point down crisply.
- Run your fingers along the seam ridges so the lattice lines are straight and the diamonds are even.
- Flatten each bell and fan out its shells.
- Let it dry completely, ideally for 24–48 hours, before you unpin.
Final Quality-Control Checklist
- Every square measures 4.5 in (11.4 cm), and every bell is upright and centered
- Each seam is a 21-to-21 match with even ridges
- Border Rnd 1 counts 1,094 sts and Rnd 2 counts 1,100 sts
- 6 evenly spaced loops sit along the top
- The 5 hem points are sharp and the same length
- Both panels measure the same within 0.5 in (1.3 cm)
- All tails are woven in through solid stitches, never across open mesh
Troubleshooting
- The lattice is wavy: your seams are uneven. Rework them with a looser sl st, or move up a hook size for joining.
- A bell pokes past its diamond: your bells are oversized. Check the 2.75 in (7.0 cm) height and go down a hook size for the ivory.
- The side edges ruffle: you probably added sc at the junctions. Remove them so each side counts 360 sc.
- The valleys pucker: make sure the sc2tog and sc3tog decreases sit exactly at the center of each valley.
- One panel is longer than the other: re-block both panels together to the same pinned measurements.
Care
Hand wash in cool water with a mild detergent and dry flat. Don’t hang the panels while they’re wet, because the weight of the water will stretch the lace.
Final Notes
Everything in this pattern comes from one measurement. Each 4.5 in (11.4 cm) square gives a 6.36 in (16.2 cm) diamond. Five diamonds across make 31.8 in (80.8 cm), and twelve and a half diamonds down make 79.5 in (201.9 cm). A 0.4 in (1.0 cm) border on every edge brings each panel to 32.6 in × 80.3 in (82.8 cm × 204.0 cm). If the first square is right, the rest of the pattern will be too.
Happy crocheting!