

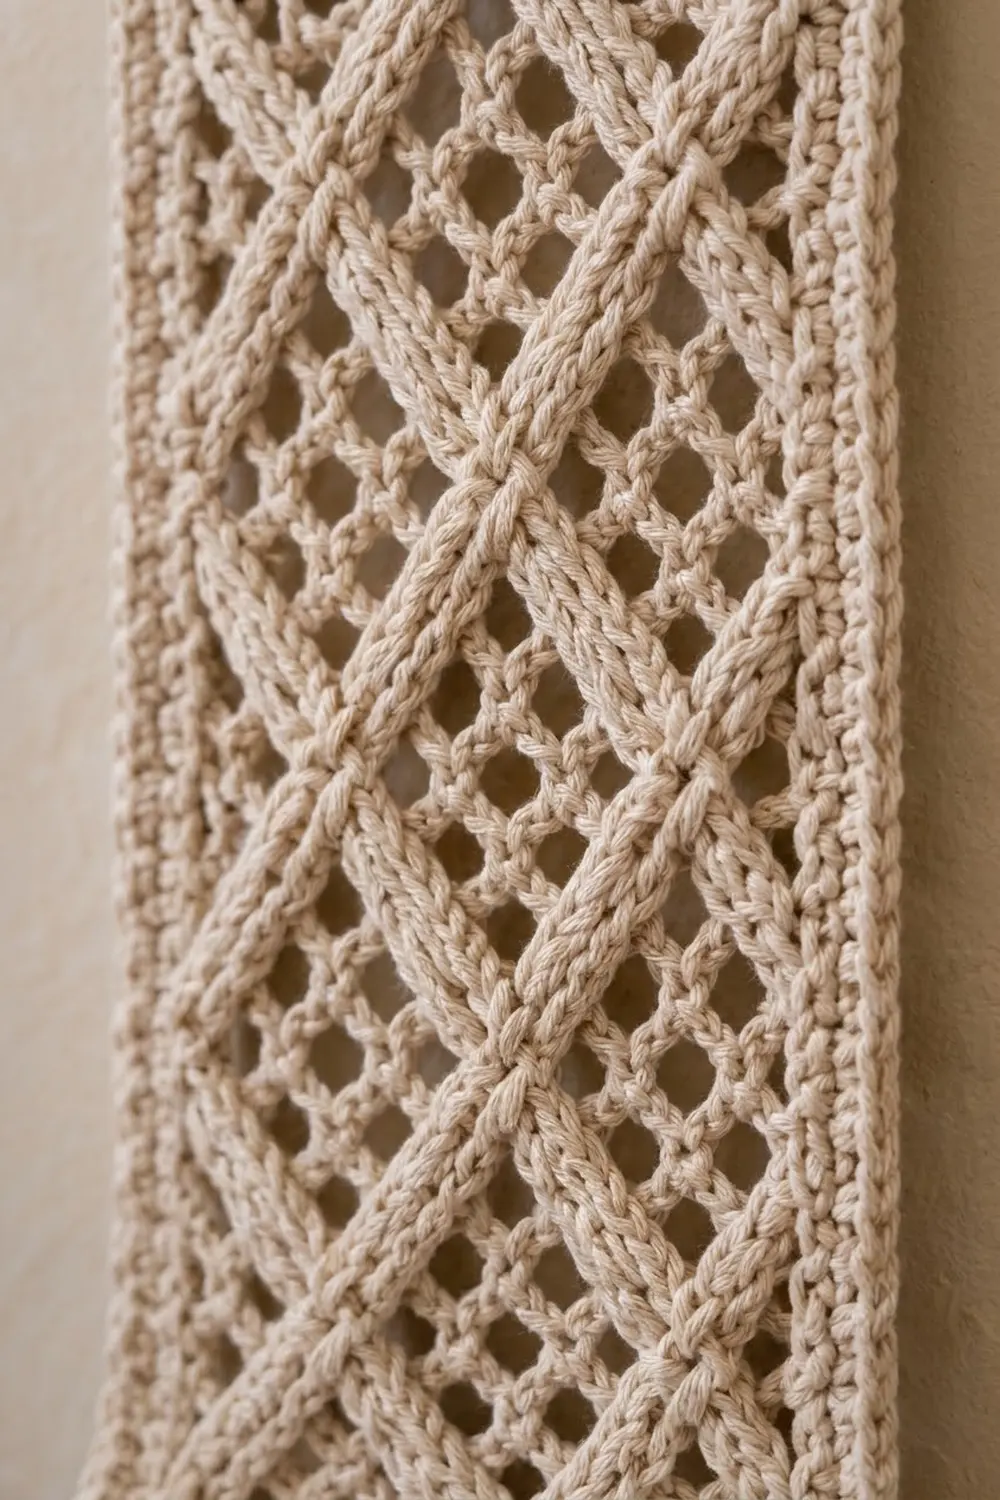
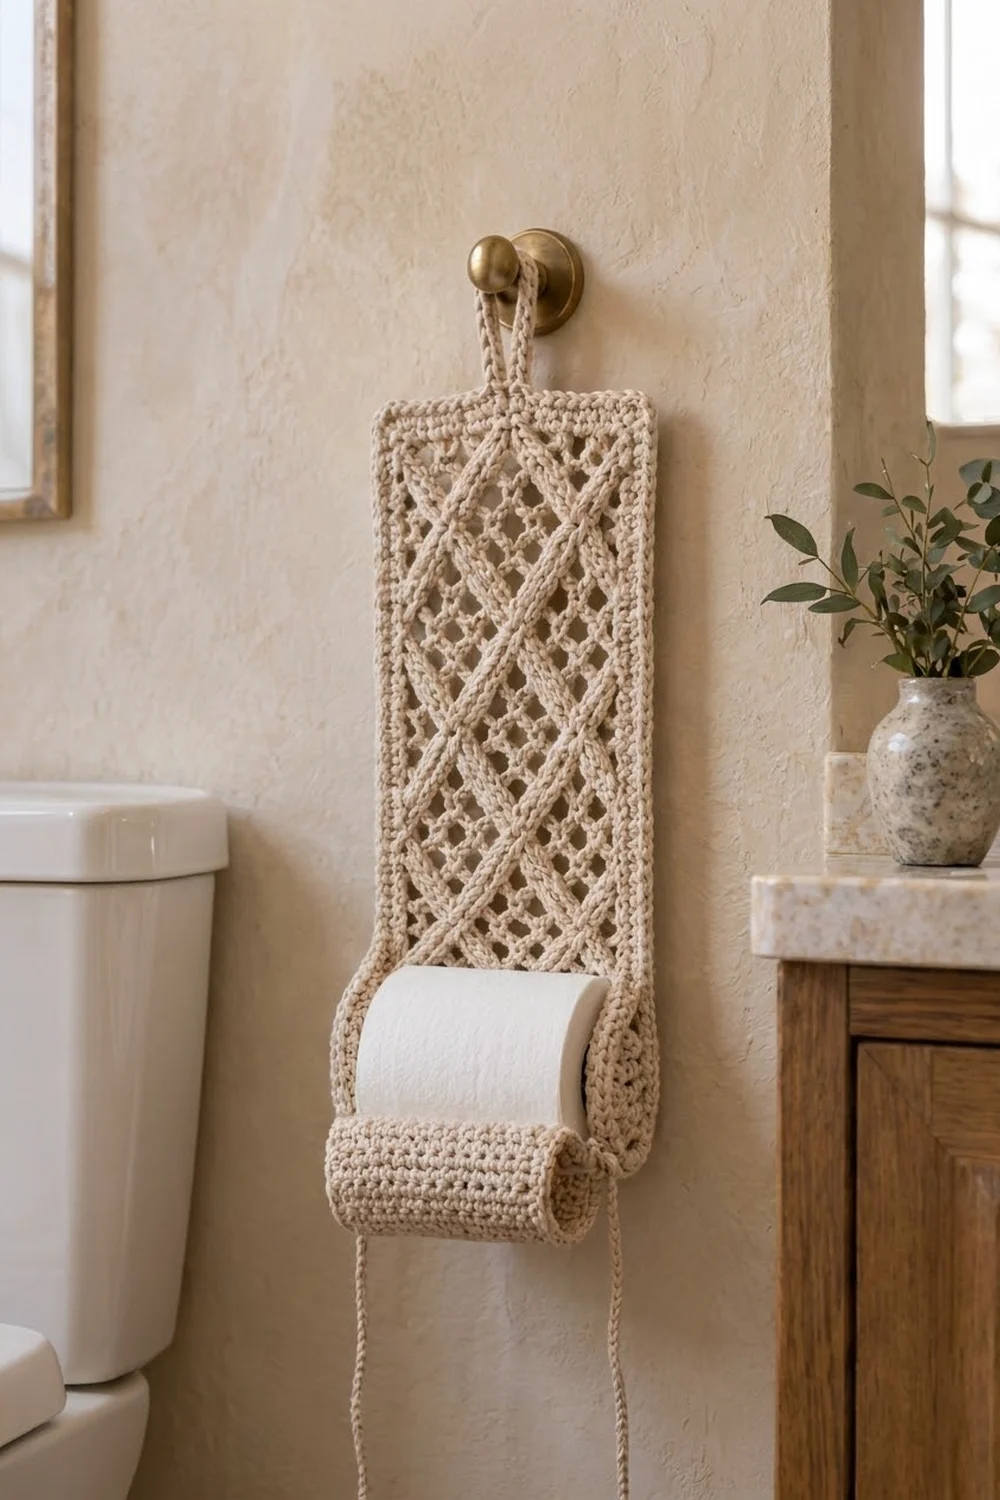
This hanging toilet paper holder is one long, narrow panel. It hangs from a single loop and holds a spare roll in a soft curled cradle at the bottom. The center is an open filet mesh crossed by raised, rope-like diagonal lines that make a diamond lattice, and a solid single crochet frame runs all the way around the edge.
The holder is worked in one color, a warm cream or natural ecru cotton. Using one shade lets the texture do the work. The mesh lets the wall color show through, and the doubled lattice lines stand up like macramé cord. It looks calm and handmade and suits a neutral bathroom.
This pattern uses US crochet terms. The finished panel measures 5.75 in (14.6 cm) wide by 27.0 in (68.6 cm) long when laid flat, not counting the hanging loop. When it hangs with the cradle tied up, the holder is shorter.
Construction is simple. You crochet one piece in rows from the bottom up: a solid single crochet flap, the mesh body, then a short solid band at the top. Next you add a two-round border, a narrow tab with a hanging loop, and two tie cords. Last, you slip stitch the diagonal lattice onto the mesh with a doubled strand.
Finished Size and Construction
- Finished size: 5.75 in x 27.0 in (14.6 cm x 68.6 cm) flat, excluding loop
- Skill level: Intermediate (easy stitches, careful counting)
- Terminology: US crochet terms
- Yarn weight: Worsted (#4) cotton
- Hook: 5.0 mm (H-8)
- Number of pieces: 1 (single panel, nothing joined)
- Layout: solid flap, mesh body, solid top band, all in one strip
- Body width before border: 19 sts = 4.75 in (12.1 cm)
- Body length before border: 26.0 in (66.0 cm)
- Border depth: 2 rounds = 0.5 in (1.3 cm) on every side
- Hanging loop: about 2.5 in (6.4 cm) tall, on a 1.2 in (3.0 cm) tab
Materials
Use a smooth, firmly twisted worsted-weight cotton or cotton blend. Cotton holds the lattice lines crisply, keeps the cradle from stretching, and copes with bathroom humidity. Do not use a fuzzy or very loosely plied yarn, because it blurs the mesh.
- Cream / natural ecru: 150 g (about 235 m / 257 yd)
This total covers the body, border, tab, loop, ties, and about 18.4 m (20 yd) of lattice yarn worked double. The amount includes a margin of roughly 25% for a gauge swatch and small differences in tension.
Tools:
- 5.0 mm (H-8) crochet hook
- Tapestry needle
- 4 locking stitch markers
- Scissors
- Tape measure
- Rustproof pins and a foam blocking mat
- Spray bottle with clean water
Abbreviations (US Terms)
- ch – chain
- sc – single crochet
- dc – double crochet
- sl st – slip stitch
- sk – skip
- sp – space
- st(s) – stitch(es)
- RS / WS – right side / wrong side
- M1–M36 – mesh rows 1 to 36 (Rows 37–72 of the piece)
Special stitch – surface slip stitch (surface sl st): Hold a doubled strand behind the work (WS). From the RS, put the hook through a mesh space, catch the yarn, and pull up a loop. Put the hook through the next space on your path, catch the yarn, and pull it up and through the loop on your hook. Repeat from *. Each space you work into counts as 1 surface sl st.
Gauge and Checkpoints
Gauge in sc: 16 sts and 20 rows = 4 in (10.2 cm).
Gauge in mesh: 16 sts (8 mesh squares) and 8 rows = 4 in (10.2 cm).
Border gauge: 4 sc = 1 in (2.5 cm) along the edges.
Since the holder is one piece, the first part of the flap works as your gauge test. After Row 10, measure before you carry on.
Checkpoints:
- After Row 1: 4.75 in (12.1 cm) wide
- After Row 36 (flap done): 7.2 in (18.3 cm) long
- After M12: the mesh section alone is 6 in (15.2 cm)
- After M36: the mesh section is 18 in (45.7 cm)
- After Row 76: the whole body is 26.0 in (66.0 cm)
- After Border Round 2: 5.75 in x 27.0 in (14.6 cm x 68.6 cm)
If the piece is too big, change to a 4.5 mm hook. If it is too small, change to a 5.5 mm hook. Width matters most. The panel has to be at least as wide as a standard roll, about 4.5 in (11.4 cm), to cradle it neatly.
Pattern
Part 1: Solid Flap (Rows 1–36)
The flap becomes the cradle at the bottom. Ch 1 at the start of each row does not count as a stitch.
Foundation: Ch 20.
Row 1: Sc in 2nd ch from hook and in each ch across, turn. (19 sc)
Rows 2–36: Ch 1, sc in each st across, turn. (19 sc)
Checkpoint: 4.75 in x 7.2 in (12.1 cm x 18.3 cm).
Part 2: Mesh Body (Rows 37–72 = M1–M36)
The ch-4 at the start of each mesh row counts as 1 dc + ch 1.
Row 37 (M1, conversion row): Ch 4, sk next sc, dc in next sc, ch 1, sk next sc, dc in next sc 8 times, turn.
Count: (10 dc + 9 ch-1 sps, worked 1 per existing sc) + 0 added = 19 sts, 9 mesh squares.
Rows 38–72 (M2–M36): Ch 4, sk first dc and ch-1 sp, dc in next dc, ch 1, dc in next dc 7 times, ch 1, dc in 3rd ch of turning ch-4, turn. (10 dc + 9 ch-1 sps = 19 sts)
Checkpoint after M36: the mesh measures 18 in (45.7 cm) and the body so far is 25.2 in (64.0 cm).
Part 3: Top Band (Rows 73–76)
Row 73 (conversion row): Ch 1, sc in first dc, sc in next ch-1 sp, sc in next dc 9 times, putting the last sc in the 3rd ch of the turning ch-4, turn.
Count: (10 sc in dc + 9 sc in ch-1 sps, 1 per existing st) + 0 added = 19 sc.
Rows 74–76: Ch 1, sc in each st across, turn. (19 sc)
The top band is 0.8 in (2.0 cm). Total body: 7.2 + 18 + 0.8 = 26.0 in (66.0 cm). Fasten off.
Part 4: Border
Each corner gets 3 sc, and the middle one of the three is the corner center. In the counts below, a side includes both of its corner centers. Each corner center belongs to two sides, so the round total equals the sum of the four sides minus 4.
Round 1 (RS): With RS facing, join yarn in the first st of Row 76.
– Top: Ch 1, 3 sc in same st, sc in next 17 sts, 3 sc in last st.
– First long side: Work 102 sc evenly down the row ends: 3 sc over the 4 top-band rows, 2 sc in each mesh row end (72 sc), and 27 sc over the 36 flap rows (3 sc for every 4 rows).
– Bottom: 3 sc in first foundation ch, sc in next 17 foundation chs, 3 sc in last foundation ch.
– Second long side: 102 sc up the row ends as before (27 + 72 + 3).
– Join with sl st to first sc.
Counts per side, including corner centers: top 21, bottom 21, each long side 106.
Total: 21 + 21 + 106 + 106 − 4 = 250 sc.
Check: 17 + 17 + 102 + 102 + (4 corners x 3) = 250.
Round 2: Ch 1, sc in first st, 3 sc in next st (corner center), [sc in each st to next corner center, 3 sc in corner center] 3 times, sc in each remaining st, join with sl st to first sc.
Count: (250 worked 1 per existing st) + (8 added, 2 extra at each of 4 corners) = 258 sc.
Per side, including corner centers: top 23, bottom 23, each long side 108. Check: 23 + 23 + 108 + 108 − 4 = 258.
Why the math works: At the border gauge of 4 sc per inch, 19 sts gives 4.75 in. The top and bottom grow to 21 sts (5.25 in / 13.3 cm) and then 23 sts (5.75 in / 14.6 cm), which is 0.25 in (0.6 cm) per round on each side. On the long sides, 2 sc per mesh row matches the 0.5 in (1.3 cm) height of a dc row. Three sc per 4 sc rows matches 0.8 in (2.0 cm) of fabric. So 106 sts = 26.5 in (67.3 cm) = 26.0 in + 0.5 in, and 108 sts = 27.0 in (68.6 cm). The edges lie flat with no ruffling or pulling.
Fasten off.
Part 5: Tab and Hanging Loop
The top edge of Round 2 has 23 sts, counting both corner centers. Count from the right corner center as st 1. The tab sits over sts 10–14, which centers it on st 12.
Row T1: With RS facing, join yarn in st 10. Ch 1, sc in same st and next 4 sts, turn. (5 sc)
Rows T2–T6: Ch 1, sc in each st across, turn. (5 sc)
The tab measures 1.25 in (3.2 cm) wide and 1.2 in (3.0 cm) tall.
Loop: At the end of T6, ch 20 and sl st in the first sc of T6 so the chain forms a loop. Ch 1, then work 26 sc over the chain loop, packing them tightly, and sl st in the last sc of T6. The loop stands about 2.5 in (6.4 cm) tall. Fasten off and weave the end through the tab.
Part 6: Tie Cords
You need 2 tie cords. With RS facing, join yarn in one bottom corner center of Round 2. Ch 40, which is about 10 in (25.4 cm), then sl st in the 2nd ch from hook and in each ch back to the corner (39 sl st). Fasten off. Repeat at the other bottom corner.
Part 7: Diamond Lattice (Surface Slip Stitch)
With the RS facing you and the top band away from you, number the mesh squares in each mesh row 1 to 9 from left to right. Each line moves up exactly one mesh row with each stitch. It also moves one square sideways until it reaches square 1 or square 9, and then it heads back the other way.
For each line, cut 2 strands of 2.5 yd (2.3 m) and hold them together. Every line works into one space in every mesh row, so it has 36 surface sl sts.
- Line A: M1 square 1 → M9 square 9 → M17 square 1 → M25 square 9 → M33 square 1 → M36 square 4.
- Line B: M1 square 9 → M9 square 1 → M17 square 9 → M25 square 1 → M33 square 9 → M36 square 6.
- Line C: M1 square 5 → M5 square 9 → M13 square 1 → M21 square 9 → M29 square 1 → M36 square 8.
- Line D: M1 square 5 → M5 square 1 → M13 square 9 → M21 square 1 → M29 square 9 → M36 square 2.
Lines C and D both start in the same space. When a line crosses one that is already worked, keep the new line on the surface and work into the same space. The four lines make full diamonds 4 squares, or 2 in (5.1 cm), wide across the center, with half-diamonds along the edges. At the end of each line, pull both strands to the WS and weave the ends behind the solid border.
Keep the surface stitches relaxed. Each one should lie as long as the mesh square underneath it.
Part 8: Forming the Cradle
Hang the holder by its loop. On each long side border, find the point 3 in (7.6 cm) above the line where the flap meets the mesh, which is level with the top of M6. Mark it. Curl the flap forward and up into a U shape, bring each tie cord up beside the end of the roll, thread it through the border at the marker, and tie a bow. Put the roll in the curve. Make the ties shorter for a smaller roll or longer for a large one.
Final Blocking
- Weave in all remaining ends before you block, but do not trim them yet.
- Pin the panel flat, RS up, to 5.75 in x 27.0 in (14.6 cm x 68.6 cm).
- Pin along each long side about every 2 in (5.1 cm) so the edges stay straight.
- Line up the mesh squares in straight columns with your fingers.
- Spray until the panel is damp but not soaked.
- Press the lattice lines gently so they lie centered over the mesh.
- Leave the flap and tie cords flat. Do not curl the cradle while it is wet.
- Let it dry completely, usually 12 to 24 hours.
- Unpin, trim the woven ends, and form the cradle.
Final Quality-Control Checklist
- Every body row has 19 sts and every mesh row has 9 squares.
- Border Round 1 has 250 sts and Round 2 has 258 sts.
- The finished panel measures 5.75 in x 27.0 in (14.6 cm x 68.6 cm).
- The long edges are straight, with no waves and no pull-in at the mesh.
- All four lattice lines have 36 stitches and meet at the planned squares.
- The tab is centered on st 12 and the loop is firm.
- Both tie cords are the same length, 10 in (25.4 cm).
- No ends show on the RS.
Troubleshooting
Mesh is wider than the flap: Your dc is loose. Change to a 4.5 mm hook for the mesh rows only.
Long border edges ripple: You are working too many sc per row end. Stick to exactly 2 per mesh row and 3 per 4 flap rows.
Long edges pull in: Too few stitches or tight tension. Recount to 102 between corners.
Lattice puckers the mesh: The surface stitches are too tight. Unpick the line and redo it with longer, relaxed loops.
Lines miss their turning squares: Count up from M1 at every turn, and mark M9, M17, M25, and M33 before you start.
Cradle sags: Shorten the tie cords, or move the tie points up one mesh row.
Loop stretches: Add a second layer of sc over the loop, or use 30 sc instead of 26.
Care
Hand wash in cool water with mild soap, press out the water in a towel, and dry flat to the blocked size. Do not tumble dry, because heat can shrink cotton and distort the lattice.
Final Notes
The measurements build on each other. The 19-stitch rows set the 4.75 in (12.1 cm) width, which matches the 9-square mesh. The 7.2 in (18.3 cm) flap, 18 in (45.7 cm) mesh, and 0.8 in (2.0 cm) top band give a 26.0 in (66.0 cm) body. Two border rounds add 0.5 in (1.3 cm) on each side, for 5.75 in x 27.0 in (14.6 cm x 68.6 cm). If you check each stage against these numbers, the lattice will land in the right squares and the cradle will hold your roll neatly.
Happy crocheting!