

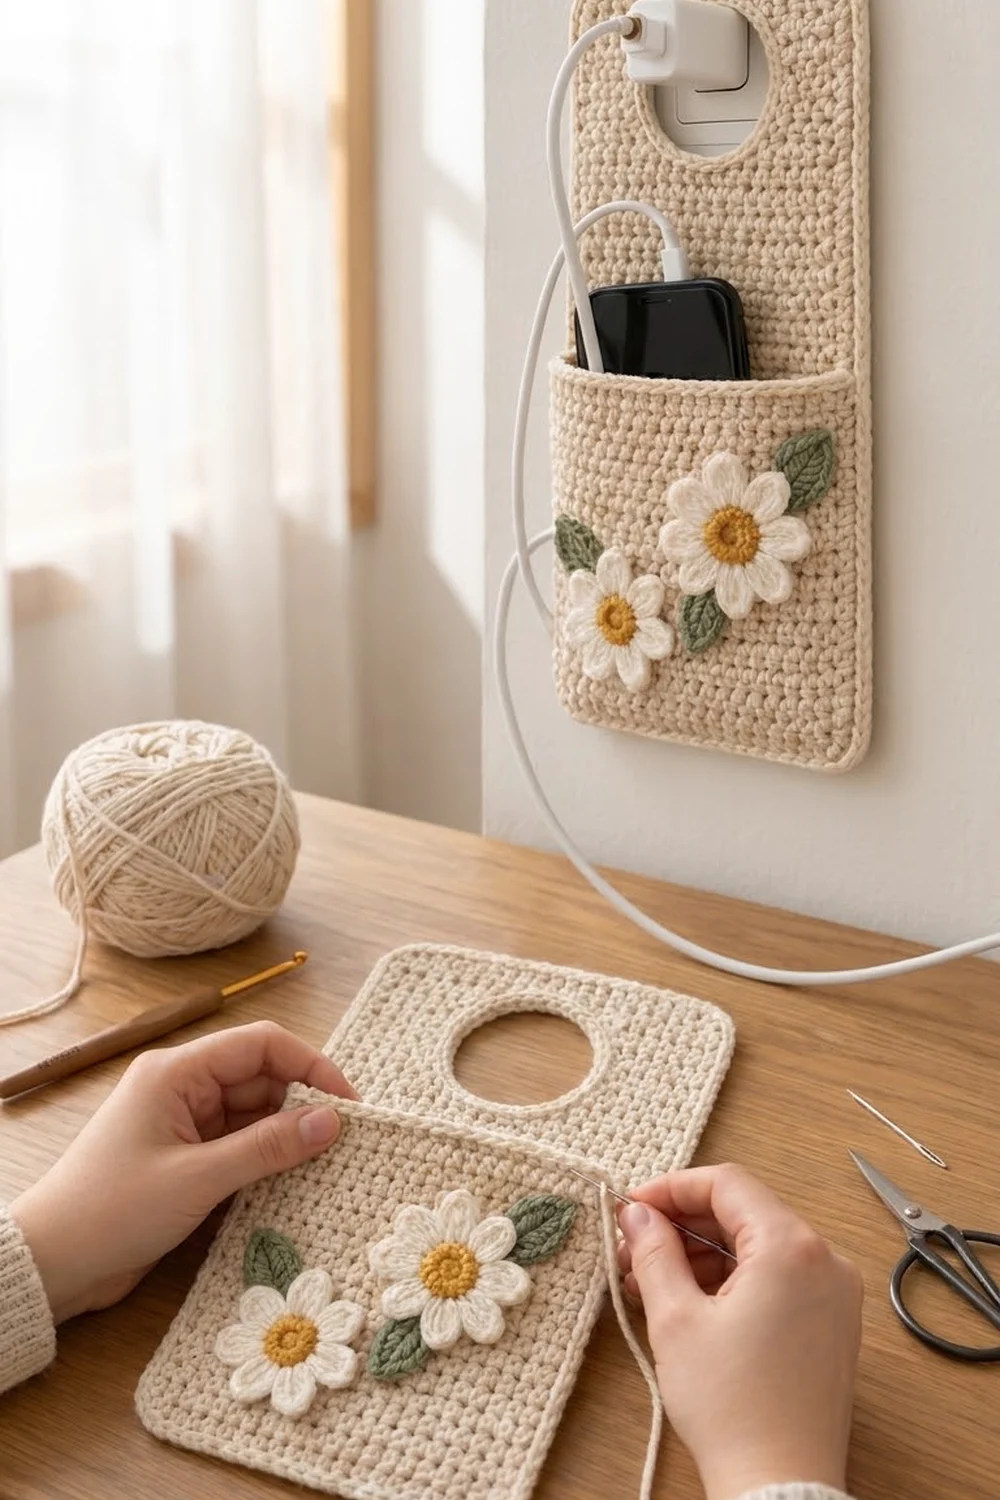
This little wall pocket solves the phone-on-the-floor problem. The back panel slips over a plug-in charger at the outlet. Your phone then sits in the front pocket while it charges, and the cable loops neatly out of the way.
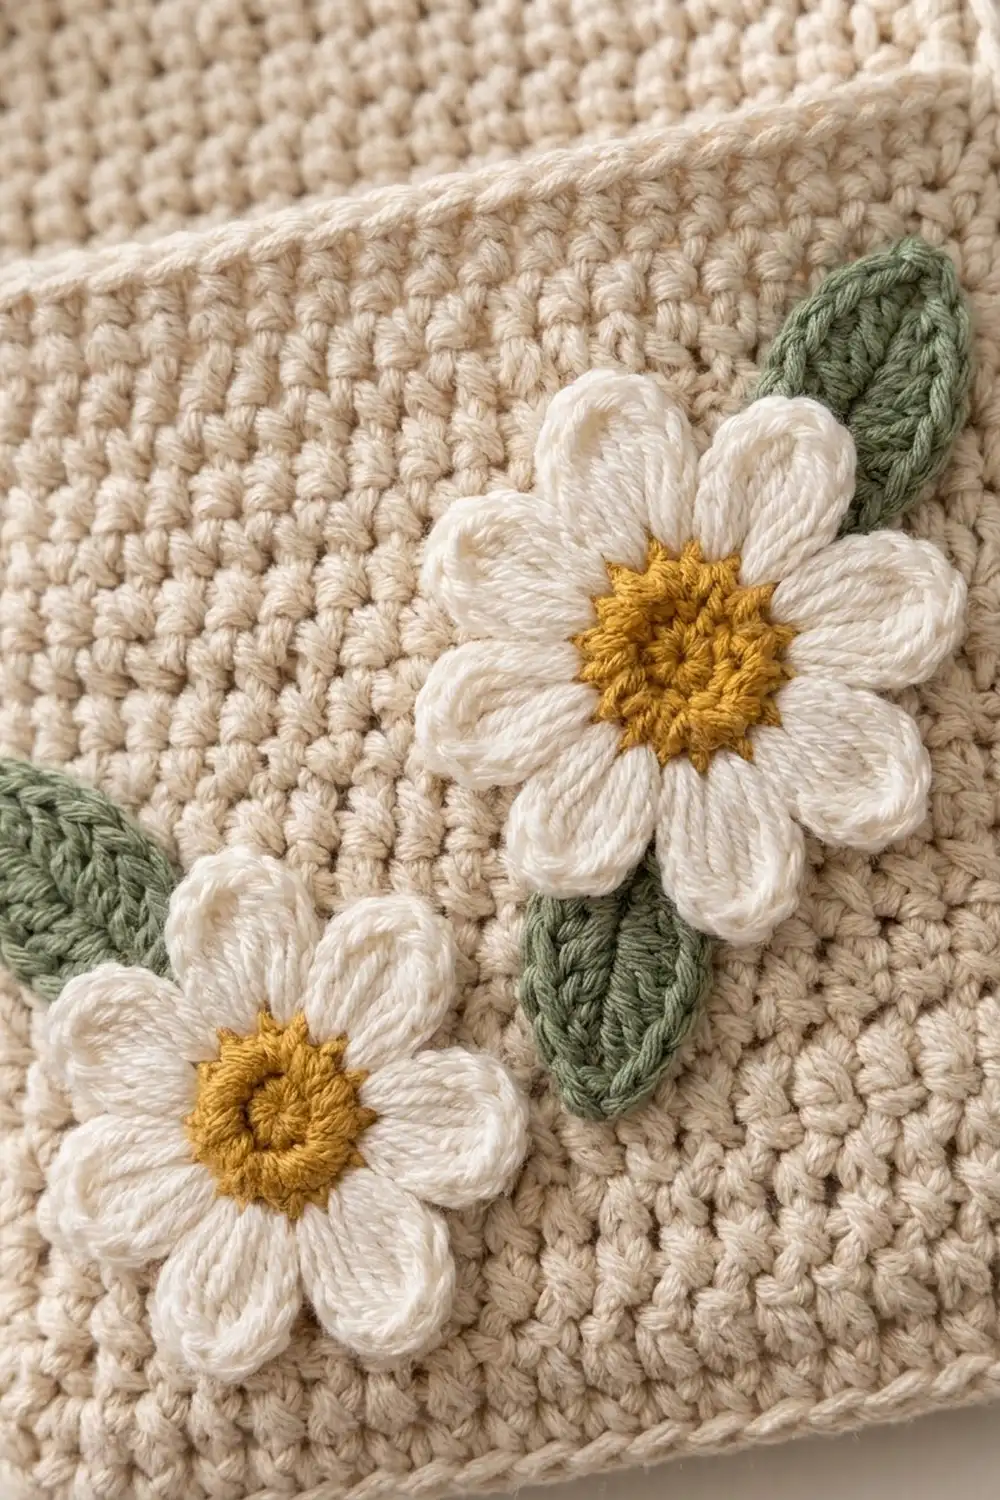
The look is soft and calm. The main fabric is a dense oatmeal-cream single crochet and every edge gets a corded reverse single crochet finish. The pocket carries a cheerful appliqué group: two white daisies with mustard-gold centers and three sage-green leaves.
The pattern uses US crochet terms. The finished holder measures 5.5 in (14.0 cm) wide by 10.5 in (26.7 cm) tall. The pocket stands about 5.25 in (13.3 cm) tall from the bottom edge.
Construction is simple. You work the back panel flat in rows, with the corners shaped round and a split-row circular hole for the charger. Then you make a matching pocket, crochet the flowers and leaves, and sew them to the pocket. A two-round border attaches the pocket to the back and finishes the whole edge in one go.
Finished Size and Construction
- Finished size: 5.5 in x 10.5 in (14.0 cm x 26.7 cm)
- Skill level: Intermediate (split rows, shaping, reverse sc)
- Terminology: US
- Yarn weight: Worsted (#4) cotton
- Hook: 4.5 mm (US 7)
- Number of pieces: 7 (1 back panel, 1 pocket, 2 daisies, 3 leaves)
- Layout: Pocket over the lower half of the back panel, with the bottom and side edges aligned
- Back panel before border: 5 in x 10 in (12.7 cm x 25.4 cm), 20 sts x 45 rows
- Pocket before border: 5 in x 4.9 in (12.7 cm x 12.4 cm), 20 sts x 22 rows
- Charger hole: 2 in (5.1 cm) before edging, about 1.75 in (4.4 cm) after
- Border depth: 0.25 in (0.6 cm) per side
Materials
Use a smooth, firm worsted-weight cotton or cotton blend, about 180 m per 100 g. Cotton holds its shape under the weight of a phone and doesn’t pill near a warm charger. Avoid fuzzy or very stretchy acrylic.
- Oatmeal cream (main color): 60 g, about 110 m
- White (petals): 5 g, about 10 m
- Mustard gold (daisy centers): 3 g, about 6 m
- Sage green (leaves): 3 g, about 6 m
Tools:
– 4.5 mm (US 7) crochet hook
– Tapestry needle
– 4 locking stitch markers
– Scissors
– Measuring tape
– Pins and a blocking mat
All quantities include a margin of roughly 20% for swatching and weaving in ends.
Abbreviations (US Terms)
- ch – chain
- sl st – slip stitch
- sc – single crochet
- hdc – half double crochet
- dc – double crochet
- tr – treble crochet
- sc2tog – single crochet 2 together
- rev sc – reverse single crochet
- st(s) – stitch(es)
- RS / WS – right side / wrong side
Special stitches:
- Reverse sc (crab stitch): Work from left to right (right-handers). Insert the hook into the next stitch to the right, yarn over, pull up a loop, then yarn over and pull through both loops. This makes the corded edge.
- sc2tog: Insert the hook in the next st and pull up a loop. Insert the hook in the following st and pull up a loop. Yarn over and pull through all 3 loops.
- Magic ring: An adjustable starting loop that you pull closed after the first round.
Gauge and Checkpoints
Gauge: 16 sc and 18 rows = 4 in (10.2 cm) in sc worked in rows.
Make the pocket first and use it as your test piece. It is small, and its numbers tell you whether the back panel will fit.
- After pocket Row 3: width 5 in (12.7 cm)
- After pocket Row 22: height 4.9 in (12.4 cm)
- After back Row 33: height about 7.3 in (18.5 cm)
- After back Row 45: 5 in x 10 in (12.7 cm x 25.4 cm)
- After the border: 5.5 in x 10.5 in (14.0 cm x 26.7 cm)
If your pocket is more than 0.25 in (0.6 cm) too wide, go down to a 4 mm hook. If it is too narrow, go up to a 5 mm hook. Keep the fabric dense. A phone should never show through the stitches.
Back Panel
With oatmeal cream, the panel is worked from the bottom up. Each row begins with ch 1, which does not count as a stitch. Turn at the end of every row.
Row 1: Ch 17, sc in 2nd ch from hook and in each ch across. (16 sts)
Row 2: Ch 1, 2 sc in first st, sc in next 14 sts, 2 sc in last st. (18 sts)
Row 3: Ch 1, 2 sc in first st, sc in next 16 sts, 2 sc in last st. (20 sts)
Rows 4–33: Ch 1, sc in each st across. (20 sts)
Check: the panel should be 5 in (12.7 cm) wide and about 7.3 in (18.5 cm) tall.
Charger Hole – First Side
The hole is shaped by working each side separately. Decreases on the inner edge open the circle, and increases close it again.
Row 34: Ch 1, sc in next 8 sts. Leave the remaining 12 sts unworked. (8 sts)
Row 35: Ch 1, sc2tog, sc in next 6 sts. (7 sts)
Row 36: Ch 1, sc in next 5 sts, sc2tog. (6 sts)
Rows 37–39: Ch 1, sc in each st. (6 sts)
Row 40: Ch 1, sc in next 5 sts, 2 sc in last st. (7 sts)
Row 41: Ch 1, 2 sc in first st, sc in next 6 sts. (8 sts)
You should now be at the outer edge. Don’t fasten off. Put a marker in the live loop.
Charger Hole – Second Side
On Row 33, skip the 4 sts next to the first side. These 4 skipped sts form the bottom of the hole. Join oatmeal cream in the 13th st.
Row 34: Ch 1, sc in same st and in next 7 sts. (8 sts)
Row 35: Ch 1, sc in next 6 sts, sc2tog. (7 sts)
Row 36: Ch 1, sc2tog, sc in next 5 sts. (6 sts)
Rows 37–39: Ch 1, sc in each st. (6 sts)
Row 40: Ch 1, 2 sc in first st, sc in next 5 sts. (7 sts)
Row 41: Ch 1, sc in next 6 sts, 2 sc in last st. (8 sts)
Fasten off. You should be at the inner edge.
Across Rows 34–41 the hole is 4, 6, 8, 8, 8, 8, 6 and 4 sts wide, which gives a round opening.
Top of Panel
Row 42: Pick up the live loop on the first side and turn. Ch 1, sc in next 8 sts, ch 4, then sc in the 8 sts of the second side, starting at its inner edge. (8 sc + 4 ch + 8 sc = 20 sts)
Row 43: Ch 1, sc in each sc and each ch across. (20 sts)
Row 44: Ch 1, sc2tog, sc in next 16 sts, sc2tog. (18 sts)
Row 45: Ch 1, sc2tog, sc in next 14 sts, sc2tog. (16 sts)
Fasten off. Rows 1–3 and Rows 44–45 mirror each other and form the rounded corners.
Check: the panel should be 5 in x 10 in (12.7 cm x 25.4 cm).
Hole Edging
Join oatmeal cream in the first of the 4 skipped sts at the bottom of the hole.
Round 1: Ch 1. Work 4 sc across the bottom of the hole. Work 8 sc up the first side (1 sc per row end, Rows 34–41). Work 4 sc into the underside of the ch-4. Work 8 sc down the second side. Sl st to the first sc. (24 sts)
Fasten off. The hole now measures about 1.75 in (4.4 cm) across. Check that your charger fits through before you go on.
Front Pocket
With oatmeal cream:
Rows 1–3: Work exactly as back panel Rows 1–3. (16, 18, then 20 sts)
Rows 4–22: Ch 1, sc in each st across. (20 sts)
Row 23 (top trim): Ch 1, do not turn. Rev sc in each st across. (20 sts)
Fasten off.
Check: the pocket should be 5 in (12.7 cm) wide and 4.9 in (12.4 cm) tall to the top of Row 22. Its bottom corners should exactly match the back panel’s.
Daisies
Large Daisy (make 1)
Round 1: With mustard gold, make a magic ring. Ch 1, work 8 sc in the ring, then sl st to the first sc. (8 sts)
Round 2: Ch 1, 2 sc in each st, then sl st to the first sc. (16 sts)
Fasten off mustard gold.
Round 3: Join white in any st. (Hdc, dc, tr, dc, hdc) in the next st, sl st in the next st. Repeat from * to * 7 more times. (8 petals)
Fasten off, leaving a 12 in (30.5 cm) tail for sewing. The large daisy measures about 2.25 in (5.7 cm) across.
Small Daisy (make 1)
Rounds 1–2: Work as for the large daisy. (16 sts)
Round 3: Join white in any st. (Sc, hdc, dc, hdc, sc) in the next st, sl st in the next st. Repeat from * to * 7 more times. (8 petals)
Fasten off and leave a long tail. The small daisy measures about 1.75 in (4.4 cm) across.
Each petal uses 2 center stitches, and 16 ÷ 2 = 8 petals.
Leaves (make 3)
With sage green:
- Ch 7. Starting in the 2nd ch from hook, work sc, hdc, 2 dc, hdc, sc. (6 sts)
- Ch 1 to make the point. Rotate and work along the other side of the chain: sc, hdc, 2 dc, hdc, sc.
- Sl st into the tip ch.
Fasten off and leave a tail. Each leaf is about 1.5 in (3.8 cm) long, with a pointed tip and a wider middle.
Make All Pieces
| Piece | Qty | Color |
|---|---|---|
| Back panel with hole | 1 | Oatmeal cream |
| 1 | Oatmeal cream | |
| Large daisy | 1 | Mustard gold + white |
| Small daisy | 1 | Mustard gold + white |
| Leaf | 3 | Sage green |
Pocket appliqué layout (20 sts wide x 22 rows tall, RS facing):
Row 22  | . . . . . . . . . . . . . . . . . L1. |
Row 14  | . . . . . . . . . [ LARGE DAISY ] . . |
Row 12  | L2. . . . . . . . . . . . . . . . . . |
Row 7   | . . [SMALL DAISY] . . . . . . . . . . |
Row 5   | . . . . . . . . . . . . L3. . . . . . |
Row 1   | . . . . . . . . . . . . . . . . . . . |
- Large daisy: center at sts 13–14, Row 14
- Small daisy: center at st 6, Row 7
- Leaf 1: tucked under the large daisy at upper right, tip toward st 19, Row 20
- Leaf 2: to the left of the small daisy, tip pointing up and left near st 2, Row 12
- Leaf 3: between the flowers, below the large daisy, tip pointing down and right near st 13, Row 5
Joining
Appliqués first. Pin the leaves in place, then pin the daisies on top so they cover the base of the leaves. Use the tails to whipstitch around each piece. Catch only the front loops of the pocket fabric so nothing shows on the back. Keep the stitches snug but not tight, so the pocket stays flat.
Pocket to back. Lay the back panel RS down. Place the pocket on top with its RS facing up. Line up the bottom edges, the side edges and the rounded corners. Pocket Row 1 sits on back Row 1, and pocket Row 22 sits on back Row 22. Place a marker at each end of back Row 22 and clip the layers together.
The border does the joining. It works through both layers wherever they overlap, with one pocket row end matched to one back row end. Keep your tension even and don’t pull the round tight, because a snug join will cup the pocket.
Checkpoint: before the border, the stacked piece should lie flat at 5 in x 10 in (12.7 cm x 25.4 cm).
Border
Border gauge: the 2 border rounds add 0.25 in (0.6 cm) to each edge.
Join oatmeal cream in the first st of back Row 45, with the pocket side facing you.
Round 1: Ch 1, then work each side as follows.
- Top edge: 2 sc in the first st, sc in next 14 sts, 2 sc in the last st. (18 sts)
- First long side: 1 sc in each row end. Work Rows 45–23 through the back only (23 sts), then Rows 22–1 through both layers (22 sts). (45 sts)
- Bottom edge: working into the foundation chains of both layers together, 2 sc in the first st, sc in next 14 sts, 2 sc in the last st. (18 sts)
- Second long side: 1 sc in each row end. Work Rows 1–22 through both layers (22 sts), then Rows 23–45 through the back only (23 sts). (45 sts)
- Sl st to the first sc.
Round 1 total: (122 sts worked one per existing stitch or row end) + (4 extra corner sc) = 126 sts. Skip the end of the pocket’s rev sc trim row; it sits just above the join.
Round 2: Ch 1, rev sc in each st around, then sl st to the first st. (126 sts)
Fasten off.
Why the math works: each long side has exactly 45 row ends, and the pocket’s 22 rows line up one-for-one with the back’s lowest 22. That keeps the join seamless, with no extra stitches. The top and bottom edges each have 16 stitches. The 2 extra sc at each end ease the border around the shaped corners so the curve stays smooth and flat. Because the pocket and back share one bottom edge, it is counted once.
Checkpoint: 5.5 in x 10.5 in (14.0 cm x 26.7 cm).
Final Blocking
- Weave in all ends inside the sc fabric, away from the hole.
- Mist the holder lightly with water until it is damp, not soaked.
- Pin it flat, RS up, at 5.5 in x 10.5 in (14.0 cm x 26.7 cm).
- Pin the hole into a circle about 1.75 in (4.4 cm) across.
- Press each daisy’s petals outward with your fingers.
- Let the holder dry completely, then unpin.
Final Quality-Control Checklist
- [ ] The back panel has 45 rows, and its widest row has 20 sts.
- [ ] The hole is round, centered, and fits your charger.
- [ ] The pocket sides line up with back Rows 1–22.
- [ ] Border Round 1 has 18 + 45 + 18 + 45 = 126 sts.
- [ ] All four corners are smoothly rounded.
- [ ] The appliqués are secure, with nothing showing on the back.
- [ ] The finished size is 5.5 in x 10.5 in (14.0 cm x 26.7 cm).
- [ ] A phone slides in easily and sits below the hole.
Troubleshooting
The hole is too small for the charger. Leave out the hole edging, or skip 6 sts instead of 4 at Row 33 and work 7 sts on each side.
The hole is oval, not round. Your row gauge is off. Block it round, and check that you are getting 18 rows per 4 in (10.2 cm).
The pocket ripples at the side seams. You skipped or doubled a row end. Count 22 joined row ends on each side.
The border cups. Your tension is too tight. Redo Round 2 loosely, or use a 5 mm hook for the rev sc.
The corners look pointed. Check the increases in Rows 2–3 and the decreases in Rows 44–45. Also make sure you worked the 2-sc corners in Border Round 1.
The phone is too snug. Wet-block the pocket over a phone wrapped in a plastic bag.
Care
Hand wash in cool water with mild soap, press out the water in a towel, and dry flat. Unplug the charger and take the holder off before cleaning.
Final Notes
The measurement chain is short and reliable. Gauge of 16 sc and 18 rows = 4 in (10.2 cm) gives a 20-stitch, 45-row back panel at 5 in x 10 in (12.7 cm x 25.4 cm). The 22-row pocket matches its lower edge one row at a time. A 126-stitch border then adds 0.25 in (0.6 cm) all around, for a finished 5.5 in x 10.5 in (14.0 cm x 26.7 cm) holder. Check each stage and the final piece will hang straight and hold your phone securely.
Happy crocheting!