

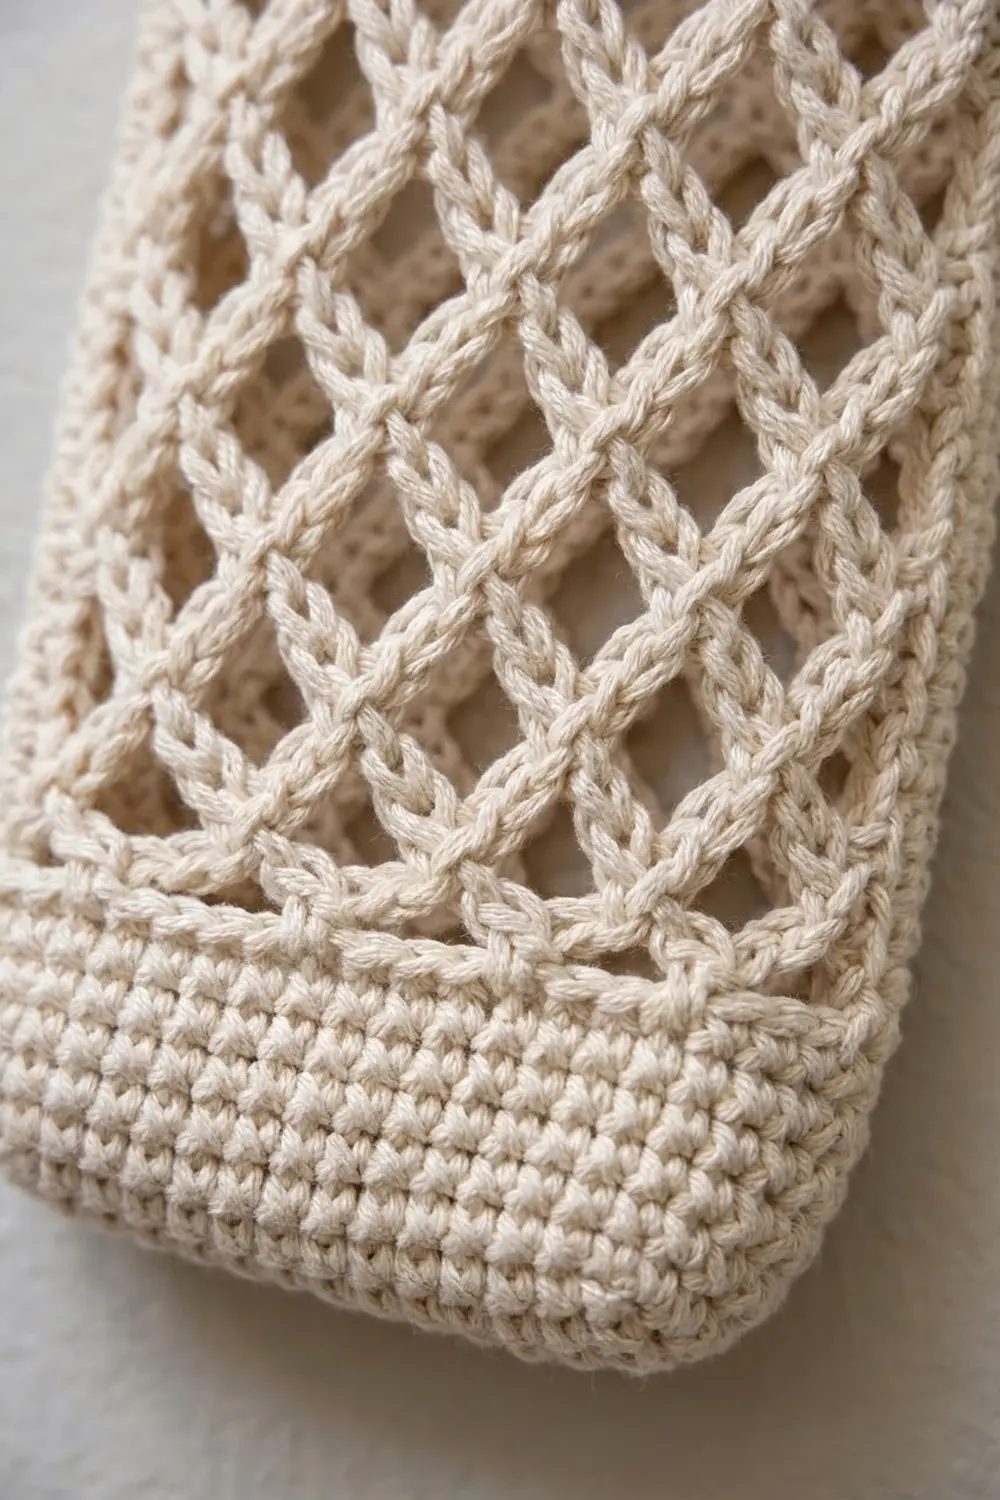
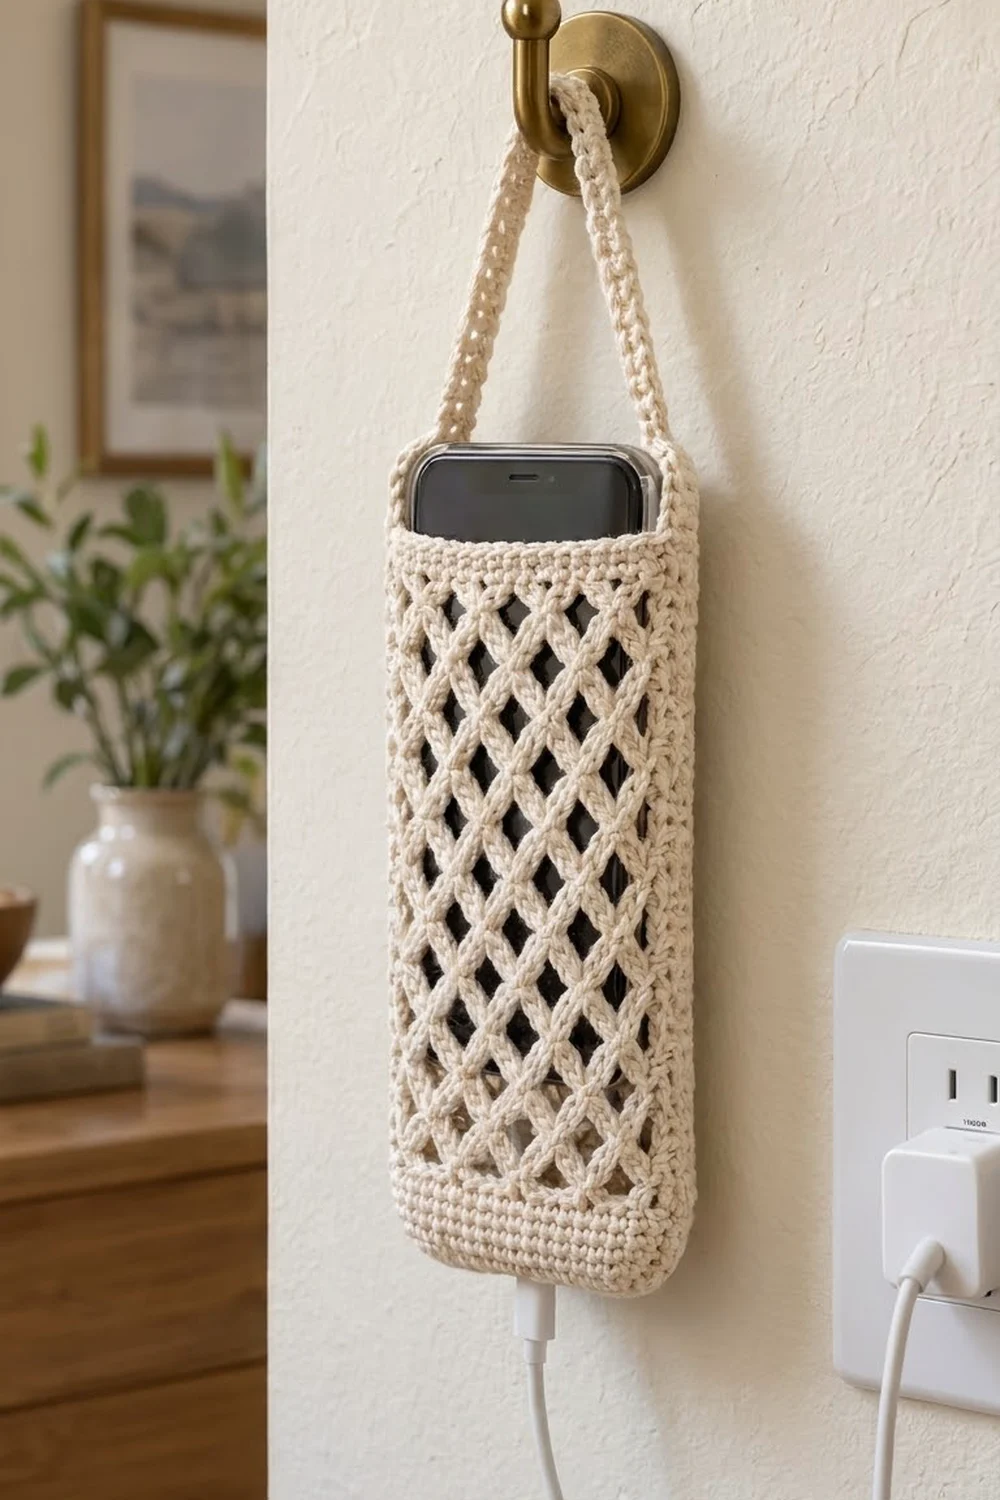
This cream lattice phone holder hangs from a wall hook next to an outlet, so your phone can charge upright and off the counter. The open diamond mesh lets you see the phone and keeps the pouch light. The solid bands at the top and bottom give it structure and a clean edge.
The design uses one color, a soft cream or natural cotton. It looks simple and natural, like a farmhouse or Scandinavian piece, and works well with wood, brass, and plants. It also makes a quick gift.
All instructions use US crochet terms. The finished pouch is 4 in (10.2 cm) wide when flat and 7.3 in (18.5 cm) tall. The strap adds 7 in (17.8 cm) of length and forms an arch about 3 in (7.6 cm) above the top edge.
Construction is seamless. You crochet a small oval base, turn the work upward for a solid band, and work the diamond lattice in joined rounds. A conversion round turns the mesh back into solid stitches for the top band. Last, you work the strap in rows from one side and sew it to the other. A small slot in the base lets the charging cable out through the bottom.
Finished Size and Construction
- Finished size: 4 in (10.2 cm) wide flat × 7.3 in (18.5 cm) tall, not including the strap
- Strap: 7 in (17.8 cm) long × about 0.7 in (1.8 cm) wide
- Skill level: Easy / Advanced Beginner
- Terminology: US crochet terms
- Yarn weight: #4 worsted, 100% cotton
- Hook: 4.0 mm (US G-6)
- Number of pieces: 1 (the strap is worked on and sewn at one end)
- Layout: a tube with an oval base, solid bottom band, lattice body, and solid top band
- Piece size: 4 in × 7.3 in (10.2 cm × 18.5 cm) flat
- Size before border: 4 in × 6.5 in (10.2 cm × 16.5 cm) after the last lattice round
- Border depth: 0.8 in (2.0 cm), worked as a solid top band of 4 rounds
Materials
Use a smooth, firmly plied 100% cotton or cotton blend. Cotton holds its shape under the weight of a phone and shows the lattice clearly. Avoid acrylic and very fuzzy yarns: they stretch and blur the diamonds.
- Cream / natural cotton, worsted (#4): 40 g, about 65 m (71 yd)
Tools:
- 4.0 mm (US G-6) crochet hook
- Tapestry needle
- Scissors
- 2 locking stitch markers
- Measuring tape
- Spray bottle and a rolled towel or a 4 in × 1 in (10.2 cm × 2.5 cm) cardboard form for blocking
The yarn amount includes a safety margin of about 25% for your gauge swatch, joins, and the strap’s sewing tail.
Abbreviations (US Terms)
- ch – chain
- sc – single crochet
- sl st – slip stitch
- st(s) – stitch(es)
- sk – skip
- sp – space
- lp – loop
- BLO – back loop only
- rnd(s) – round(s)
- ( ) × n – repeat the steps in parentheses n times
Special stitch: Lattice Loop (LL). Ch 5 and sc into the target stitch or loop. In lattice rounds, every sc goes into the center chain (the 3rd of the 5 chains) of a ch-5 loop from the round below. Because each round sits at the centers of the loops below it, the loops shift half a repeat every round. That offset creates the diagonal diamond grid.
Gauge and Checkpoints
Solid gauge: 18 sc × 20 rows = 4 in (10.2 cm), or 4.5 sc per inch.
Lattice gauge: 1 lattice round = 0.5 in (1.3 cm) tall, and one ch-5 loop spans about 0.9 in (2.3 cm) at the base of the next round.
Work a small swatch first: 18 sc for 20 rows, then 4 rounds of lattice on top. Measure it lightly steamed, not stretched.
Checkpoints:
- After base Rnd 2: the oval measures about 3.3 in × 0.9 in (8.4 cm × 2.3 cm).
- After the bottom band: the band is 1 in (2.5 cm) tall from the base edge, and the tube is 4 in (10.2 cm) wide flat.
- After the lattice: the piece is 6.5 in (16.5 cm) tall.
- After the top band: the piece is 7.3 in (18.5 cm) tall, and the top is still 4 in (10.2 cm) wide.
If your piece is too big: go down to a 3.75 mm (US F-5) hook. If it is too small: go up to a 4.5 mm (US 7) hook. Width matters most, because the pouch must fit your phone. Test with your phone after the bottom band. A phone up to about 3.2 in (8.1 cm) wide, including its case, fits comfortably.
Base
Foundation: Ch 15.
Rnd 1: Sc in the 2nd ch from the hook and in each of the next 12 ch (13 sc). Work 3 sc in the last ch. Rotate the work and, along the other side of the foundation chain, sc in each of the next 12 ch. Work 2 sc in the same ch as the first sc. Sl st to the first sc. (30 sts)
Here is how the 30 sts divide: 3 sts at each end of the oval and 12 sts along each long side (3 + 12 + 3 + 12 = 30).
Rnd 2 (increase and cord slot): Ch 1 (does not count as a st). 2 sc in the first st, sc in each of the next 12 sts, 2 sc in each of the next 3 sts. On the second long side: sc in each of the next 4 sts, ch 3, sk 3 sts, sc in each of the next 5 sts. Finish with 2 sc in each of the last 2 sts. Sl st to the first sc. (36 sts, counting each of the 3 ch as 1 st)
Count check: 2 + 12 + 6 + 4 + 3 + 5 + 4 = 36. The ch-3 opening is the cord slot. It sits on the long side that will face the wall.
Bottom Band
Rnd 3 (turning round): Ch 1. Working in the BLO, sc in each st around. Work 1 sc into each of the 3 ch of the cord slot. Sl st to the first sc. (36 sc)
Working in the BLO makes a crisp fold line so the walls stand up from the base.
Rnds 4–7: Ch 1, sc in each st around, sl st to the first sc. (36 sc in each round)
The band is now 5 rounds tall, or 1 in (2.5 cm). Flatten the tube so the cord slot sits at the center back. Mark the two side folds: the first st of the round should be near one fold and st 19 near the other. Move a marker by one st if your fold falls slightly differently. These markers show where the strap will go.
Checkpoint 2: 4 in (10.2 cm) wide flat, with 18 sts across the front and 18 across the back.
Lattice Body
Rnd 8 (set-up): Ch 1, sc in the first st. Then (ch 5, sk 3 sts, sc in the next st) × 8. Ch 5, sk the last 3 sts, and sl st to the first sc. (9 ch-5 lps and 9 sc)
Count check: 9 sc + (9 × 3 skipped sts) = 36, which matches the band exactly.
Rnd 9: Sl st in each of the first 3 ch of the next lp to reach the center ch. Ch 1, sc in the same center ch. Then (ch 5, sc in the center ch of the next lp) × 8. Ch 5 and sl st to the first sc. (9 ch-5 lps and 9 sc)
Rnds 10–18: Repeat Rnd 9. (9 ch-5 lps and 9 sc in each round)
You have 11 lattice rounds, about 5.5 in (14.0 cm) of mesh. Diamonds should form all the way around, with about 4½ across the front.
Checkpoint 3: total height 6.5 in (16.5 cm). The mesh should hang straight without flaring. Slide your phone in. The top of the phone should rise just above the last lattice round.
Border: Solid Top Band
Border gauge: the same as the bottom band, 18 sc = 4 in (10.2 cm) and 5 rounds = 1 in (2.5 cm).
Rnd 19 (conversion round): Ch 1, sc in the first sc. Work 3 sc in the next ch-5 lp. Then (sc in the next sc, 3 sc in the next ch-5 lp) × 8. Sl st to the first sc. (36 sc = 9 sc worked 1 per existing sc + 27 sc worked into the 9 lps)
Rnds 20–22: Ch 1, sc in each st around, sl st to the first sc. (36 sc in each round)
Do not fasten off yet if you want to start the strap from here. Otherwise fasten off and weave in the end.
Flattened, each side has 18 sts across the front and 18 across the back. Each count already includes the stitches at the side folds.
Why the math works: the top band has the same 36 sts as the bottom band, and 36 ÷ 4.5 sts per inch = 8 in (20.3 cm) around, which is 4 in (10.2 cm) flat. The lattice sits between the two bands, so the pouch stays straight instead of narrowing or flaring at the top. Three sc per loop is the right amount: each loop spans about 0.9 in (2.3 cm), and 3 sc plus 1 sc on top of the sc below covers 4 sts, or 0.9 in (2.3 cm).
Checkpoint 4: 7.3 in (18.5 cm) tall, 4 in (10.2 cm) wide flat.
Strap
Find the side folds on Rnd 22, in line with your markers. One fold is centered on st 1, so the strap covers sts 36, 1, and 2. The other is centered on st 19, so the strap covers sts 18, 19, and 20. That leaves 15 sts between the straps on the front (sts 3–17) and 15 on the back (sts 21–35): 3 + 15 + 3 + 15 = 36.
Row 1: Join the yarn in st 36 with a sl st. Ch 1, sc in st 36, st 1, and st 2. Turn. (3 sc)
Rows 2–35: Ch 1, sc in each of the 3 sts, turn. (3 sc in each row)
The strap is now 35 rows, or 7 in (17.8 cm), and about 0.7 in (1.8 cm) wide. Fasten off, leaving a 12 in (30.5 cm) tail.
Make sure the strap is not twisted. Use the tail to whipstitch the last row to sts 18, 19, and 20 on the inside of the top band. Sew through both loops, then go around a second time to make the join stronger. Weave in all ends.
Final Blocking
- Lightly mist the whole pouch with water until it is damp but not dripping.
- Slide in a rolled towel or a 4 in × 1 in (10.2 cm × 2.5 cm) cardboard form so the tube stands 4 in (10.2 cm) wide.
- Gently tug the lattice lengthwise until the diamonds are even and the mesh section is 5.5 in (14.0 cm) tall.
- Smooth the solid bands flat and shape the bottom corners into soft curves.
- Lay the strap straight and pin it to 7 in (17.8 cm) without stretching it.
- Let it dry completely, at least 6 hours, before hanging it.
Final Quality-Control Checklist
- The base is flat, with 36 sts after Rnd 2 and an open cord slot at the center back.
- The bottom band is 5 rounds, or 1 in (2.5 cm), with a clean BLO fold line.
- Each of the 11 lattice rounds has exactly 9 loops.
- The conversion round has 36 sc (9 + 27).
- The top band is 4 rounds, or 0.8 in (2.0 cm).
- The finished pouch is 4 in × 7.3 in (10.2 cm × 18.5 cm) flat.
- The strap is 35 rows, untwisted, and sewn firmly at both sides.
- The charging plug passes easily through the cord slot.
- All ends are woven in securely.
Troubleshooting
The lattice flares wider than the bands: your chains are loose. Ch 4 instead of 5 in the lattice rounds and keep 3 sc per loop in the conversion round.
The top band ruffles: work 2 sc instead of 3 into every third loop in Rnd 19, then increase back to 36 sts in Rnd 20.
The diamonds slant in a spiral: you are probably not landing in the center ch. Count the sl sts at the start of every lattice round.
The cord plug will not fit: before working Rnd 3, redo the slot as ch 4, sk 4, with only 4 sc after it so the round still totals 36.
The strap stretches over time: add a round of sl sts along both long edges of the strap.
The pouch is too short for a large phone: add 1 or 2 lattice rounds, each 0.5 in (1.3 cm).
Care
Hand wash in cool water with mild soap, press out the water in a towel, and lay flat to dry, reshaping the pouch over its blocking form. Do not tumble dry.
Final Notes
Each measurement builds on the one before it:
- The 36-st base sets the 4 in (10.2 cm) width.
- The 1 in (2.5 cm) bottom band holds the phone securely.
- Eleven 0.5 in (1.3 cm) lattice rounds add 5.5 in (14.0 cm) of open mesh.
- The 36-st top band brings the pouch back to exactly 4 in (10.2 cm) wide and adds 0.8 in (2.0 cm), for a total height of 7.3 in (18.5 cm).
- The 7 in (17.8 cm) strap hangs it all from a hook.
Check your gauge, count your loops, and test the fit with your own phone as you go.
Happy crocheting!