

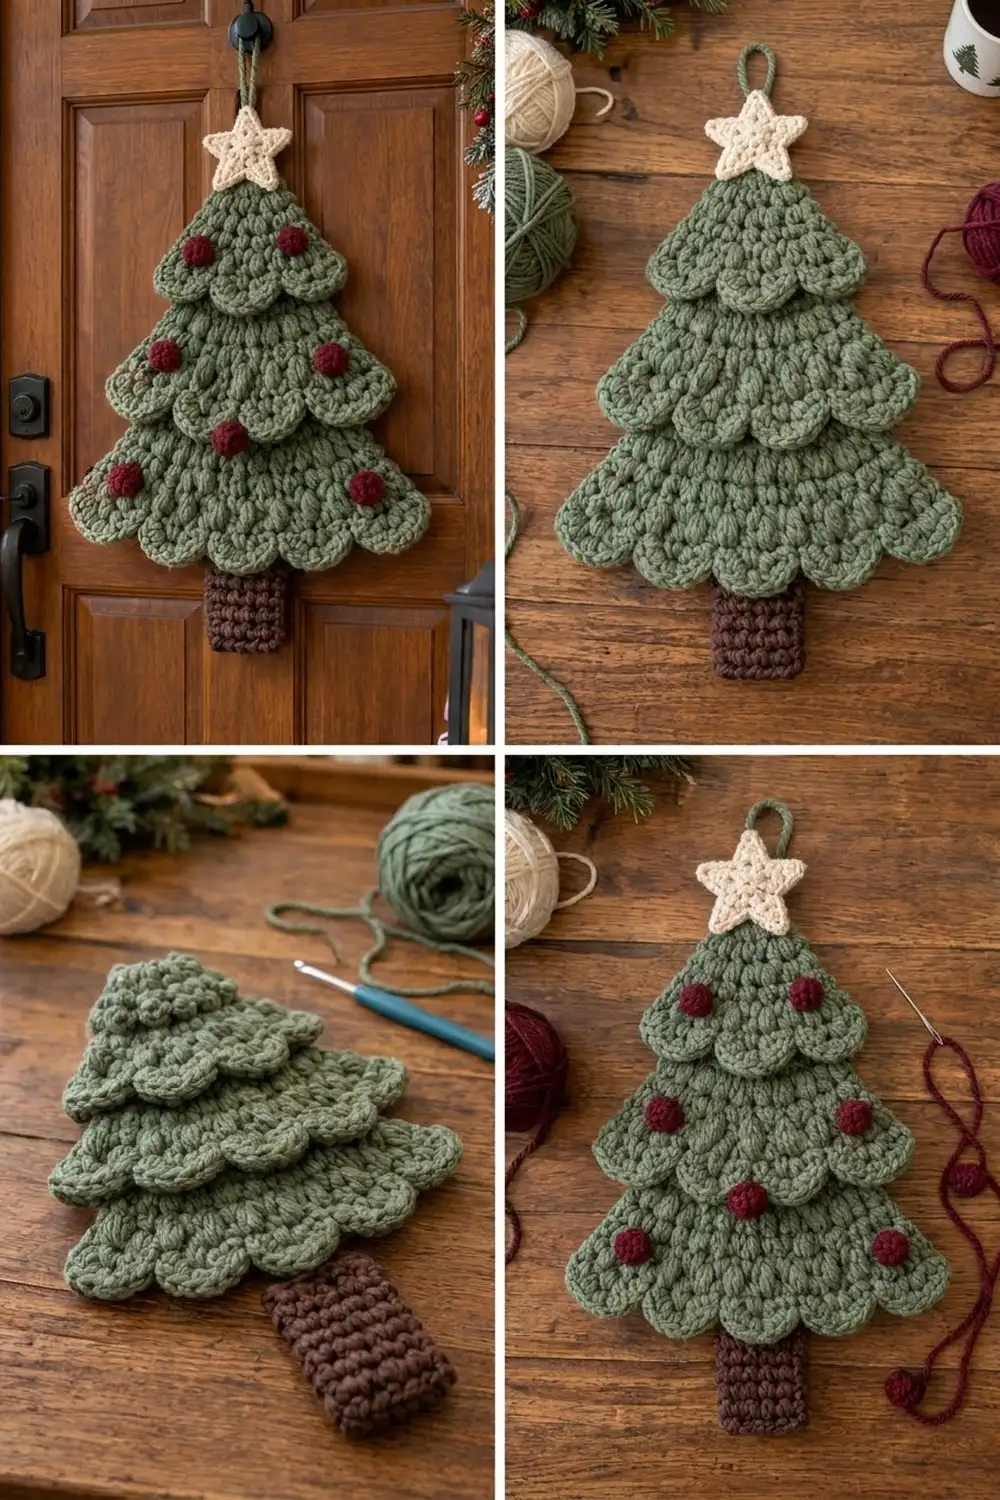
The Evergreen Puff Christmas Tree Door Hanger is a chunky, textured tree. It’s built from three stacked tiers of sage-green puff stitches, and each tier ends in a row of rounded scallops that hang over the tier below, like snowy fir branches.
The palette is kept simple: sage green for the tree, dark brown for the ribbed trunk, cream for the puffy star, and deep burgundy for seven round bobble ornaments. The look is cozy farmhouse. It hangs flat on a front door, a wall or a cabinet knob.
This pattern uses US crochet terms. The finished hanger is 10.4 in (26.4 cm) wide at its widest point and 14.2 in (36.1 cm) tall from the trunk to the top of the star, not counting the hanging loop.
You make each part flat and separately. You work the three tiers bottom-up in rows, decreasing at both ends. Then you add a scalloped edging, stack and sew the tiers, attach the trunk, star and ornaments, and finish with a chain hanging loop.
Finished Size and Construction
- Finished size: 10.4 in (26.4 cm) wide × 14.2 in (36.1 cm) tall
- Skill level: Easy-intermediate
- Terminology: US crochet terms
- Yarn weight: Bulky (#5)
- Hook: 6.0 mm (US J-10)
- Number of pieces: 1 finished hanger made of 12 parts: 3 tiers, 1 trunk, 1 star and 7 ornaments, plus a chain loop
- Layout: 3 tiers stacked vertically, each overlapping the one below by 1.0 in (2.5 cm)
- Tier sizes before edging (width × height):
- Bottom: 10.0 × 2.8 in (25.4 × 7.1 cm)
- Middle: 8.4 × 2.8 in (21.3 × 7.1 cm)
- Top: 6.8 × 3.6 in (17.3 × 9.1 cm)
- Border depth: The scallops add 0.8 in (2.0 cm) below each tier. The side edging adds about 0.2 in (0.5 cm) to the total width.
Materials
Use a smooth bulky acrylic or acrylic blend, about 140 m (153 yd) per 100 g. Smooth yarn shows the puffs clearly and holds up outdoors on a sheltered door.
- Sage green: 110 g (154 m), for the tiers and hanging loop
- Dark brown: 20 g (28 m), for the trunk
- Cream: 10 g (14 m), for the star
- Burgundy: 15 g (21 m), for the ornaments
All quantities include about a 15% margin for swatching and sewing tails.
Tools
- 6.0 mm (US J-10) crochet hook
- Tapestry needle
- Stitch markers
- Small amount of fiberfill or yarn scraps to stuff the ornaments
- Rustproof pins and a blocking mat
- Measuring tape
- Scissors
Abbreviations (US Terms)
- ch – chain
- sl st – slip stitch
- sc – single crochet
- hdc – half double crochet
- dc – double crochet
- sc2tog – single crochet 2 together
- sc3tog – single crochet 3 together
- blo – back loop only
- MR – magic ring
- sk – skip
- st(s) – stitch(es)
- rep – repeat
- RS / WS – right side / wrong side
Puff stitch (puff): (Yarn over, insert hook in the stitch, yarn over, pull up a loop to the height of a hdc) 3 times, so you have 7 loops on the hook. Yarn over and pull through all 7 loops. Do not chain to close. One puff counts as 1 stitch.
Gauge and Checkpoints
Gauge: 10 sts and 10 rows = 4 in (10.2 cm) in the tier pattern of alternating sc rows and puff rows. One stitch is 0.4 in (1.0 cm) wide and one row is 0.4 in (1.0 cm) tall. The trunk uses the same gauge in sc.
Test one piece first. Make the middle tier before anything else. It works as your gauge swatch and you will use it in the tree.
Checkpoints for the middle tier:
- After Row 1 (21 sts): 8.4 in (21.3 cm) wide
- After Row 7: 2.8 in (7.1 cm) tall, with the top edge (9 sts) 3.6 in (9.1 cm) wide
- After the edging: 3.6 in (9.1 cm) tall, scallop tips included
If your tier is too big, go down to a 5.5 mm hook. If it is too small, go up to a 6.5 mm hook. Keep every puff loop pulled to hdc height; puff height has the biggest effect on row gauge.
Tier Pattern Logic
Every tier follows the same steps:
- Row 1: sc into the foundation chain.
- Even rows (RS): puff rows.
- Odd rows from Row 3 (WS): sc rows.
- Every row from Row 2: decrease 1 st at each end, so each row is 2 sts shorter than the one before.
Puff row (worked over a row of n sts): Ch 1, sc2tog. Then puff in next st, sc in next st, and rep from * until 3 sts remain. Puff in next st, then sc2tog over the last 2 sts. The row ends with n − 2 sts, including (n − 3) ÷ 2 puffs.
Sc row: Ch 1, sc2tog, sc in each st until 2 sts remain, sc2tog. The row ends with n − 2 sts.
Bottom Tier (Tier 1) – Sage Green
Foundation: Ch 26.
- Row 1 (WS): Sc in 2nd ch from hook and in each ch across. Turn. (25 sts)
- Row 2 (RS): Puff row. Turn. (23 sts, 11 puffs)
- Row 3: Sc row. Turn. (21 sts)
- Row 4: Puff row. Turn. (19 sts, 9 puffs)
- Row 5: Sc row. Turn. (17 sts)
- Row 6: Puff row. Turn. (15 sts, 7 puffs)
- Row 7: Sc row. (13 sts)
Checkpoint: 10.0 in (25.4 cm) across Row 1, 5.2 in (13.2 cm) across Row 7, and 2.8 in (7.1 cm) tall. Don’t fasten off; go straight to the edging.
Middle Tier (Tier 2) – Sage Green
Foundation: Ch 22.
- Row 1 (WS): Sc in 2nd ch from hook and in each ch across. Turn. (21 sts)
- Row 2: Puff row. Turn. (19 sts, 9 puffs)
- Row 3: Sc row. Turn. (17 sts)
- Row 4: Puff row. Turn. (15 sts, 7 puffs)
- Row 5: Sc row. Turn. (13 sts)
- Row 6: Puff row. Turn. (11 sts, 5 puffs)
- Row 7: Sc row. (9 sts)
Checkpoint: 8.4 in (21.3 cm) across Row 1, 3.6 in (9.1 cm) across Row 7, and 2.8 in (7.1 cm) tall.
Top Tier (Tier 3) – Sage Green
Foundation: Ch 18.
- Row 1 (WS): Sc in 2nd ch from hook and in each ch across. Turn. (17 sts)
- Row 2: Puff row. Turn. (15 sts, 7 puffs)
- Row 3: Sc row. Turn. (13 sts)
- Row 4: Puff row. Turn. (11 sts, 5 puffs)
- Row 5: Sc row. Turn. (9 sts)
- Row 6: Puff row. Turn. (7 sts, 3 puffs)
- Row 7: Sc row. Turn. (5 sts)
- Row 8: Ch 1, sc2tog, puff in next st, sc2tog. Turn. (3 sts, 1 puff)
- Row 9: Ch 1, sc3tog. (1 st)
Checkpoint: 6.8 in (17.3 cm) across Row 1 and 3.6 in (9.1 cm) from Row 1 to the point.
Trunk – Dark Brown
Foundation: Ch 8.
- Row 1: Sc in 2nd ch from hook and in each ch across. Turn. (7 sts)
- Rows 2–9: Ch 1, sc blo in each st across. Turn. (7 sts)
Fasten off and leave a 12 in (30.5 cm) tail for sewing. The back-loop rows make horizontal ridges that look like bark.
Checkpoint: 2.8 in (7.1 cm) wide × 3.6 in (9.1 cm) long.
Star – Cream
- Round 1: MR, ch 1, 10 sc in ring, then sl st to the first sc. (10 sts)
- Round 2: Ch 1, sc in next st, 2 sc in next st, rep from * 4 more times, then sl st to the first sc. (15 sts)
- Round 3: Ch 4, sc in 2nd ch from hook, hdc in next ch, dc in next ch, sk next 2 sts, sl st in next st, rep from * 4 more times. The fifth sl st lands in the first st of Round 2. (5 points)
Each point uses 3 sts of Round 2, and 5 × 3 = 15, so the star closes evenly. Fasten off and leave a 12 in (30.5 cm) tail.
Checkpoint: About 3.0 in (7.6 cm) from point to point.
Ornaments – Burgundy (Make 7)
- Round 1: MR, ch 1, 6 sc in ring. Don’t join; work in a spiral. (6 sts)
- Round 2: Sc in next st, 2 sc in next st 3 times. (9 sts)
- Round 3: Sc in each st around. (9 sts)
- Round 4: Sc in next st, sc2tog 3 times. (6 sts)
Stuff the ball firmly with a pinch of fiberfill or scraps. Fasten off and leave an 8 in (20.3 cm) tail. Weave the tail through the front loops of the last 6 sts and pull it closed.
Checkpoint: About 1.1 in (2.8 cm) across.
Make All Pieces
Quantities per color:
- Sage green: 3 tiers (bottom, middle and top) and 1 hanging loop
- Dark brown: 1 trunk
- Cream: 1 star
- Burgundy: 7 ornaments
Stacking layout (front view):
              [ STAR ]            cream, overlaps tip 1.0 in
             /  TIER 3 \          17 sts, 4 scallops   (2 ornaments)
           /    TIER 2   \        21 sts, 5 scallops   (3 ornaments)
         /      TIER 1     \      25 sts, 6 scallops   (2 ornaments)
               |TRUNK|            7 sts, 1.0 in hidden behind Tier 1
Border (Scalloped Tier Edging)
Every tier gets one edging round, worked with the RS facing.
Border gauge:
- Each scallop covers 4 foundation sts, or 1.6 in (4.1 cm) of width.
- Each scallop hangs 0.8 in (2.0 cm) below Row 1.
- The side sc go 1 per row end, so the sides lie flat.
Scallop repeat: Sk 1 st, 5 dc in next st, sk 1 st, sl st in next st.
Bottom Tier Edging
You finish Row 7 at a top corner. Ch 1 and turn so the RS faces you.
- Top edge: Sc in each of the 13 sts. (13 sc)
- First slanted side: Sc in the end of each row down the side, Rows 7 to 1. (7 sc)
- Bottom edge: Working into the free loops of the foundation chain, sl st in the first loop. Then work the scallop repeat 6 times. The last sl st lands in the 25th loop. (6 scallops, 7 sl st)
- Second slanted side: Sc in the end of each row up the side, Rows 1 to 7. (7 sc)
- Sl st to the first sc. Fasten off and leave a 20 in (50.8 cm) tail for sewing.
Totals: 27 sc, 6 scallops and 7 sl st.
Middle Tier Edging
Work it the same way as the bottom tier:
- Top edge: 9 sc
- Each slanted side: 7 sc
- Bottom edge: 5 scallops and 6 sl st
Totals: 23 sc, 5 scallops and 6 sl st.
Top Tier Edging
- Point: 3 sc in the single st of Row 9.
- Each slanted side: 9 sc, one per row end.
- Bottom edge: 4 scallops and 5 sl st.
Totals: 21 sc, 4 scallops and 5 sl st.
Why the Math Works
The scallop repeat uses 4 sts. One extra sl st is needed to anchor the first scallop, so the bottom edge has to have a multiple of 4 plus 1 sts:
- Bottom tier: 25 = (6 × 4) + 1
- Middle tier: 21 = (5 × 4) + 1
- Top tier: 17 = (4 × 4) + 1
Every foundation loop is used exactly once, so the tiers don’t cup or ruffle. The side counts match the row counts because each side gets 1 sc per row end. The top-edge counts match the final rows (13 and 9) because the top edge gets 1 sc per st. No corner stitches are added, and none are counted twice.
Assembly
Block each tier lightly to its checkpoint size first; see Final Blocking below.
- Tier 2 onto Tier 1: Lay Tier 1 flat with the RS up. Place Tier 2 on top so its scallop tips sit 1.0 in (2.5 cm) below Tier 1’s top edge. Line up Tier 2’s center foundation st (st 11 of 21) with Tier 1’s center top st (st 7 of 13).
- Sew Tier 2: With green, whipstitch along Tier 2’s foundation line, just above where the scallops start, through the Tier 1 fabric underneath. Leave the scallops loose so they hang free. Keep the stitches snug but not puckered.
- Tier 3 onto Tier 2: Do the same with Tier 3. Its scallop tips sit 1.0 in (2.5 cm) below Tier 2’s top edge, and its st 9 of 17 lines up with Tier 2’s st 5 of 9.
- Trunk: Center the trunk behind Tier 1 with 1.0 in (2.5 cm) tucked under. Line up the trunk’s st 4 of 7 with Tier 1’s st 13 of 25. Whipstitch the trunk’s top edge and sides to the back of Tier 1. Only sew through the back layer of the puffs.
- Star: Place the star so its two lower points overlap the tree tip by 1.0 in (2.5 cm). It will rise 2.0 in (5.1 cm) above the tip. Sew around the star’s center round.
- Ornaments: Sew the ornaments on top of puff stitches:
- Top tier: 2, on Row 4
- Middle tier: 3, two near the side edges on Row 4 and one in the center on Row 2
- Bottom tier: 2, near the side edges on Row 4
- Hanging loop: With green, ch 27, which is about 9.0 in (22.9 cm). Fold the chain in half to make a 4.5 in (11.4 cm) loop. Sew both ends securely to the back of the tree tip, behind the star.
Size checkpoint:
- Tree from the bottom-tier scallop tips to the top point: 3.6 + 3.6 + 4.4 − 1.0 − 1.0 = 9.6 in (24.4 cm)
- Visible trunk: 2.6 in (6.6 cm)
- Star above the tip: 2.0 in (5.1 cm)
- Total height: 14.2 in (36.1 cm)
Final Blocking
- Lightly mist the assembled hanger with water, or hover a steam iron 1 in (2.5 cm) above it. Never press acrylic.
- Lay it RS up on a blocking mat.
- Pin the bottom tier to 10.4 in (26.4 cm) wide at its widest point.
- Pin each scallop into a smooth, even curve.
- Check that the trunk, tiers and star line up on one center line.
- Smooth the puffs with your fingertips; don’t flatten them.
- Let it dry completely before you hang it.
Final Quality-Control Checklist
- Tier widths at Row 1 are 10.0, 8.4 and 6.8 in (25.4, 21.3 and 17.3 cm).
- The scallop counts are 6, 5 and 4, and every scallop is the same size.
- Each tier overlaps the one below by 1.0 in (2.5 cm).
- The scallops hang free and aren’t caught in the seams.
- The trunk shows 2.6 in (6.6 cm) below the bottom tier and is centered.
- The star is centered and its points are crisp.
- All 7 ornaments are firm and secure.
- Total height is 14.2 in (36.1 cm).
- The hanging loop is secure and the hanger hangs straight.
- All tails are woven in on the back.
Troubleshooting
- The tier curls at the bottom edge: Your foundation chain is too tight. Redo it with a hook one size larger, then go back to your main hook for Row 1.
- The scallops ruffle: You put more than 5 dc in a scallop or skipped too few sts. Recount against the 4-st repeat.
- The scallops pull the tier in: You skipped too many sts. Recheck the 4k + 1 count.
- The sides are wavy: You worked more than 1 sc per row end. Work exactly 1 sc per row.
- The puffs look flat: Pull every loop up to hdc height before you close the puff.
- The tree leans: Re-pin it along the center line and block again.
- The ornaments sag: Stuff them more firmly and sew them through two puffs.
Care
Spot clean with a damp cloth and mild soap, then lay flat to dry. If you hang it outdoors, keep it under cover so the puffs stay full.
Final Notes
Each step builds on the one before. A gauge of 10 sts = 4 in (10.2 cm) gives tier widths of 10.0, 8.4 and 6.8 in (25.4, 21.3 and 17.3 cm). The 4k + 1 foundation counts give 6, 5 and 4 even scallops. The 1.0 in (2.5 cm) overlaps stack the tiers to 9.6 in (24.4 cm). The trunk and star bring the finished hanger to 10.4 × 14.2 in (26.4 × 36.1 cm). Check each measurement as you go, and the tree will come out evenly.
Happy crocheting!