

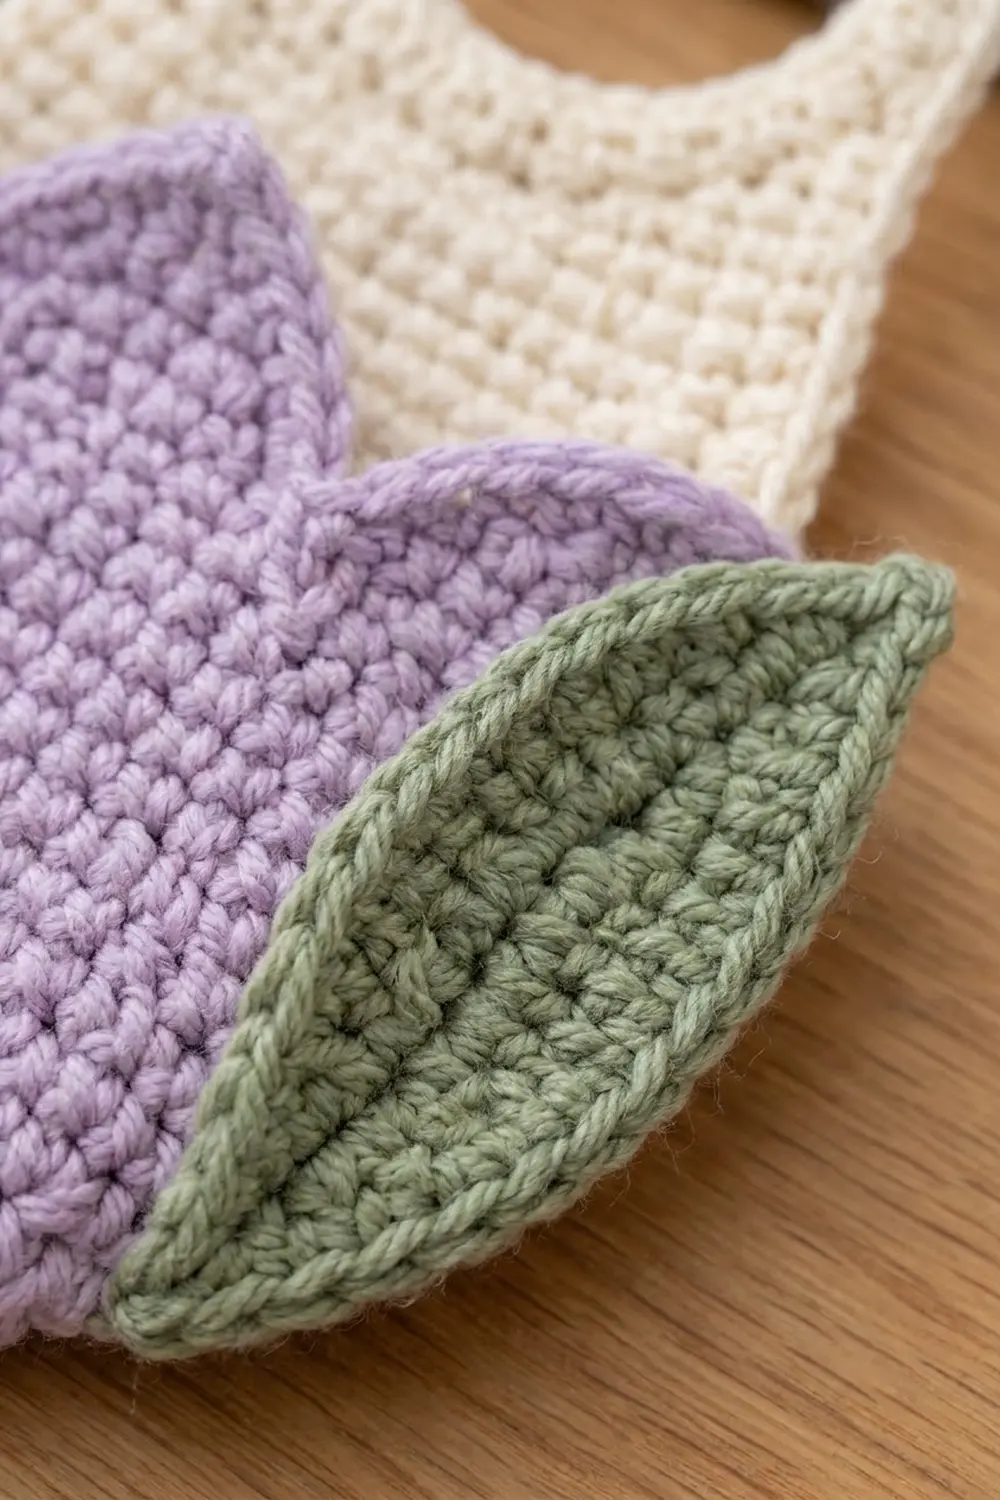
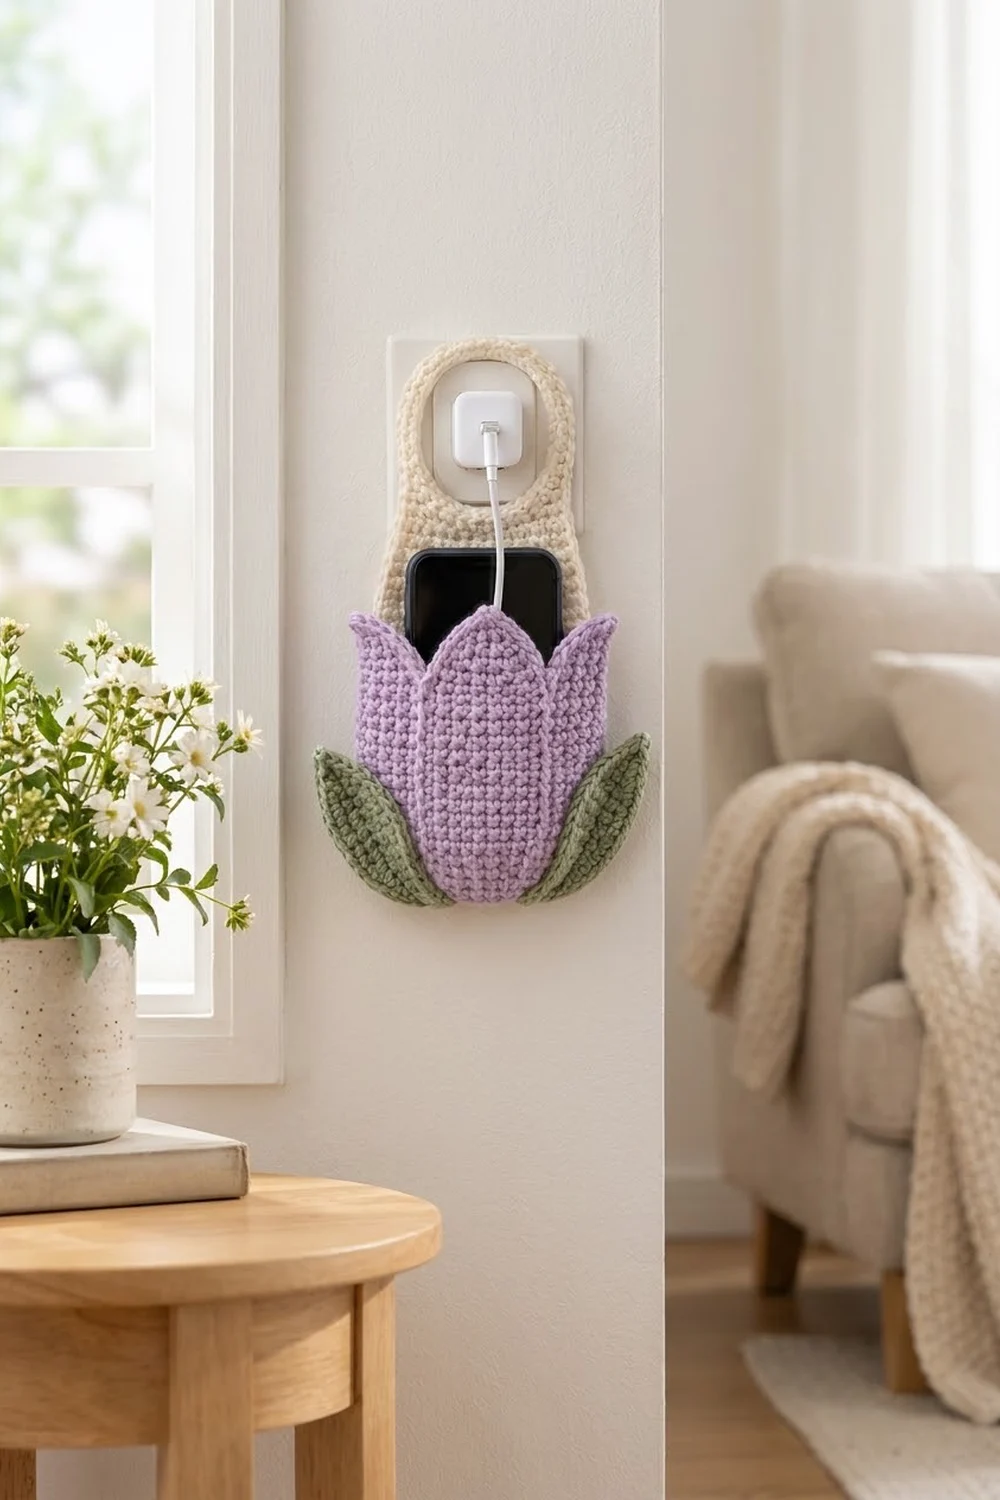
This tulip phone holder hangs right on your wall charger. A cream back panel slips over the plug through a round opening. A lavender tulip pocket holds your phone while it charges, and two sage-green leaves frame the flower at the base.
The colors are soft cream, light lavender and muted sage. Dense single crochet in worsted-weight cotton gives a sturdy fabric that holds its shape and supports a phone. The pattern uses US crochet terms throughout.
The finished holder measures about 6 in (15.2 cm) wide and 11.2 in (28.4 cm) tall. With the leaves, it is about 8 in (20.3 cm) wide.
You work the back panel and the pocket flat in rows. The pocket starts with the same rounded bottom as the panel and ends in three petals. One cream border round joins the pocket to the panel along the sides and bottom. Last, you sew the two leaves on behind the lower sides of the pocket.
Finished Size and Construction
- Finished size: 6 in (15.2 cm) wide x 11.2 in (28.4 cm) tall; 8 in (20.3 cm) wide with leaves
- Skill level: Easy-intermediate
- Terminology: US terms
- Yarn weight: Worsted (#4) cotton
- Hook: 4.0 mm (G-6)
- Number of pieces: 4 (1 back panel, 1 tulip pocket, 2 leaves), assembled into one holder
- Layout: Pocket lies over the lower back panel; leaves sit at the pocket’s lower sides
- Back panel before border: 5.5 in (14.0 cm) x 10.7 in (27.2 cm)
- Pocket before border: 5.5 in (14.0 cm) wide x 6.7 in (17.0 cm) tall at the center petal tip
- Plug opening: 3 in (7.6 cm) wide x 2.9 in (7.4 cm) tall
- Border depth: about 0.25 in (0.6 cm) per side
Materials
Use a smooth worsted-weight cotton or cotton blend at about 1.5 m per gram. Cotton barely stretches, so the holder keeps its shape under the weight of a phone. Avoid fuzzy or very stretchy acrylic.
- Cream (back panel, border): 35 g, about 54 m
- Lavender (pocket): 25 g, about 39 m
- Sage green (leaves): 8 g, about 12 m
These amounts include a margin of about 15%.
Tools:
– 4.0 mm (G-6) crochet hook
– Tapestry needle
– 4 locking stitch markers
– Scissors
– Rustproof pins
– Blocking mat and spray bottle
– Measuring tape
Abbreviations (US Terms)
- ch – chain
- sc – single crochet
- hdc – half double crochet
- dc – double crochet
- sl st – slip stitch
- st(s) – stitch(es)
- RS – right side
- rnd – round
sc2tog (single crochet 2 together): Insert the hook in the next st and pull up a loop. Insert the hook in the following st and pull up a loop. Yarn over and pull through all 3 loops on the hook. This decreases by 1 st.
Surface slip stitch: Hold the working yarn behind the fabric. Insert the hook from front to back between stitches, pull up a loop, and draw it through the loop on the hook. Repeat along the line you want, one stitch or row apart.
Gauge and Checkpoints
Gauge: 16 sc x 18 rows = 4 in (10.2 cm).
Start with the back panel. It is the largest piece, so it doubles as your gauge test. Check these measurements as you go:
- After Row 3: 22 sts measure 5.5 in (14.0 cm) across.
- After Row 10: the panel is 2.2 in (5.6 cm) tall.
- After Row 30: the panel is 6.7 in (17.0 cm) tall.
- After Row 48: the panel is 10.7 in (27.2 cm) tall.
If your piece is too big, go down a hook size to 3.75 mm (F-5). If it is too small, go up to 4.5 mm (US 7). Width matters more than height here, because the pocket must match the back panel stitch for stitch. Make the pocket with the same hook and the same tension.
Back Panel (Cream)
Work flat in rows. Ch 1 at the start of each row does not count as a stitch. Turn at the end of every row.
Foundation: Ch 15.
Row 1: Sc in 2nd ch from hook and in each ch across. (14 sts)
Row 2: Ch 1, 2 sc in each of the first 2 sts, sc in next 10 sts, 2 sc in each of the last 2 sts. (18 sts)
Row 3: Ch 1, 2 sc in each of the first 2 sts, sc in next 14 sts, 2 sc in each of the last 2 sts. (22 sts)
Checkpoint: 5.5 in (14.0 cm) wide, with gently rounded lower corners.
Rows 4–30: Ch 1, sc in each st across. (22 sts)
Checkpoint: 6.7 in (17.0 cm) tall.
Plug Opening
You now split the panel into two straps of 5 sts each, with 12 sts skipped between them.
Strap A, Rows 31–43: Ch 1, sc in the first 5 sts, turn. Leave the remaining sts unworked. Work 12 more rows of 5 sc. (13 rows, 5 sts each) Fasten off.
Strap B: Skip the 12 center sts of Row 30. Join cream in the next st, which is on the inner edge of the remaining 5 sts.
Strap B, Rows 31–43: Ch 1, sc in the same st and the next 4 sts. (5 sts) Work 12 more rows of 5 sc. You finish at the outer edge. Do not fasten off.
Checkpoint: each strap is 1.25 in (3.2 cm) wide and 2.9 in (7.4 cm) tall.
Row 44 (joining row): Ch 1, sc in each of the 5 sts of Strap B, ch 12, then sc in each of the 5 sts of Strap A. (10 sc + 12 ch)
Check that the chain is not twisted before you continue. This row closes the top of the opening.
Rounded Top
Row 45 (conversion row): Ch 1, sc2tog, sc in the next 3 sc, sc in each of the 12 ch, sc in the next 3 sc, sc2tog. You work over 22 existing stitches (10 sc + 12 ch). The two sc2tog remove 2, leaving 20 sts.
Row 46: Ch 1, sc2tog, sc in next 14 sts, sc2tog. (18 sts)
Row 47: Ch 1, sc2tog, sc in next 12 sts, sc2tog. (16 sts)
Row 48: Ch 1, sc2tog, sc in next 10 sts, sc2tog. (14 sts)
Fasten off and weave in ends.
Checkpoint: 10.7 in (27.2 cm) tall, 5.5 in (14.0 cm) wide at the body, and 3.5 in (8.9 cm) wide across Row 48.
Tulip Pocket (Lavender)
The pocket body copies the back panel’s lower section, so the two line up row for row.
Foundation: Ch 15.
Row 1: Sc in 2nd ch from hook and in each ch across. (14 sts)
Row 2: Ch 1, 2 sc in each of the first 2 sts, sc in next 10 sts, 2 sc in each of the last 2 sts. (18 sts)
Row 3: Ch 1, 2 sc in each of the first 2 sts, sc in next 14 sts, 2 sc in each of the last 2 sts. (22 sts)
Rows 4–22: Ch 1, sc in each st across. (22 sts) Do not fasten off.
Checkpoint: 5.5 in (14.0 cm) wide and 4.9 in (12.4 cm) tall. Lay the pocket on the back panel; the edges should match exactly through Row 22.
Petals
Split the 22 sts into three groups: 7 sts for the first side petal, 8 for the center petal and 7 for the second side petal. Place markers between the groups.
First Side Petal (7 sts):
– Row 1: Ch 1, sc in the first 7 sts, turn. (7 sts)
– Rows 2–7: Ch 1. Work sc across, but sc2tog the 2 sts at the inner edge, the edge facing the center. You lose 1 st per row: 6, 5, 4, 3, 2, 1. Fasten off.
The outer edge stays straight and continues the pocket side up to the tip. The inner edge slopes. This creates a petal tip at the outer corner.
Center Petal (8 sts): Join lavender in the next unworked st of Row 22.
– Row 1: Ch 1, sc in the same st and the next 7 sts. (8 sts)
– Row 2: Ch 1, sc across. (8 sts)
– Row 3: Ch 1, sc2tog, sc 4, sc2tog. (6 sts)
– Row 4: Ch 1, sc across. (6 sts)
– Row 5: Ch 1, sc2tog, sc 2, sc2tog. (4 sts)
– Row 6: Ch 1, sc across. (4 sts)
– Row 7: Ch 1, sc2tog twice. (2 sts)
– Row 8: Ch 1, sc2tog. (1 st) Fasten off.
Second Side Petal (7 sts): Join lavender in the next unworked st. Work as for the first side petal, decreasing at the inner edge. (7, 6, 5, 4, 3, 2, 1 sts)
Checkpoint: the side petals are 1.6 in (4.1 cm) tall and the center petal is 1.8 in (4.6 cm). The pocket is 6.7 in (17.0 cm) tall at the center tip, which matches the back panel at Row 30.
Petal Edging
With RS facing, join lavender at the top of the first side petal’s inner edge. Sl st evenly along the top edge:
– 6 sl st down the first petal’s inner edge
– 1 sl st in the valley
– 7 sl st up the center petal
– (sl st, ch 1, sl st) in the center tip
– 7 sl st down
– 1 sl st in the valley
– 6 sl st up the second petal’s inner edge
That makes 30 sl st and 1 ch. Fasten off. Leave the outer petal tips alone; the border covers them.
Petal Outlines
The surface lines make the three petals read as overlapping. Use lavender and work surface slip stitch from the bottom of Row 6 straight up to the valley between the first side petal and the center petal, one sl st per row (17 sl st). Repeat for the second valley. Fasten off and weave in ends on the WS.
Leaves (Sage Green, Make 2)
You work each leaf around both sides of a foundation chain.
Foundation: Ch 13.
Rnd 1: Starting in the 2nd ch from hook, work:
– sc 1, hdc 2, dc 5, hdc 2, sc 1 (11 sts)
– 3 sc in the last ch, for the tip
– Rotate and work along the other side of the chain: sc 1, hdc 2, dc 5, hdc 2, sc 1 (11 sts)
– Sl st to the first sc to join.
(25 sts)
Rnd 2 (conversion round): Ch 1. Sc in each st around, but work 3 sc in the center sc of the tip group. That is 24 sts with 1 sc each and 1 st with 3 sc, for 24 + 3 = 27 sc (25 existing + 2 added). Sl st to the first sc, ch 2 for a pointed base, then sl st in the same st. Leave a 12 in (30.5 cm) tail for sewing.
Vein: Work surface slip stitch along the foundation chain from the base up two-thirds of the leaf. Weave in this end only.
Checkpoint: each leaf is about 3.5 in (8.9 cm) long and 1.75 in (4.4 cm) wide.
Make All Pieces
Before assembly, check that you have:
– Cream: 1 back panel (Rows 1–48, with plug opening)
– Lavender: 1 tulip pocket (Rows 1–22 plus three petals, edging and outlines)
– Sage green: 2 leaves
Layout, seen from the front:
        [ cream rounded top ]
        [ strap ][ hole ][ strap ]
        [ cream back, Rows 23–30 ]   <- phone shows here
  leaf  [ lavender tulip pocket  ]  leaf
   \    [  petal | petal | petal ]    /
        [  rounded pocket bottom ]
Joining
The pocket joins to the back panel during border Round 1. You crochet through both layers.
- Block both pieces lightly before joining (see Final Blocking).
- Place the pocket on the back panel with both RS facing out. Match the foundation edges and the side row ends: pocket Row 1 to panel Row 1, and so on up to pocket Row 29 (the side petal tips) and panel Row 29.
- Pin every 5 rows on each side and along the bottom.
- Insert the hook through the pocket’s edge stitch first and then the back panel’s. Each border stitch takes one row end from each layer, so the pairs stay aligned.
Tension: Keep the joining stitches the same height as your fabric stitches. If they are tight, the sides will pucker and the pocket will not open for the phone. If they are loose, the seam will gap.
Size checkpoint after joining: the pocket sits flat and the sides do not ripple. The opening between the petals and the back panel is the full inner width, about 5.25 in (13.3 cm). That fits phones up to about 3.5 in (8.9 cm) wide.
Border
Border gauge: One sc per row end along the sides, one sc per st along the top and bottom. The border adds about 0.25 in (0.6 cm) on every side.
Plug Opening Edging (Cream)
Work this first, on the back panel only. Join cream at any corner of the opening and sc evenly around it:
– 12 sc along Row 30
– 13 sc up the strap’s inner row ends
– 12 sc in the bottom loops of the chain
– 13 sc down the other strap
That makes 50 sc. Sl st to the first sc and fasten off. The extra stitches at the corners soften the opening into the rounded shape in the photo.
Border Round 1 (Cream, Joining Round)
Join cream at the first st of Row 48.
– Top (Row 48): 3 sc in the first st, sc in the next 12 sts, 3 sc in the last st. (18 sts)
– First side: 1 sc in each row end from Row 47 down to Row 30, through the back panel only. (18 sts) Then work through both layers: 1 sc in each row end from Row 29 down to Row 2, and 2 sc in the Row 1 row end. (30 sts) Side total: 48 sts.
– Bottom: Through both layers, 1 sc in each of the 14 foundation loops. (14 sts)
– Second side: Mirror the first side. 2 sc in the Row 1 row end, then 1 sc in each row end up to Row 29 through both layers (30 sts), then 1 sc in each row end from Row 30 to Row 47, back panel only. (18 sts) Side total: 48 sts.
Sl st to the first sc. Total: 18 + 48 + 14 + 48 = 128 sc.
Border Round 2 (Cream)
Ch 1, then sl st loosely in each of the 128 sts. (128 sl st) Join and fasten off.
Why the math works: Each side has 47 row ends (Rows 1–47). Adding 1 extra sc at the curved Row 1 gives 48 per side. Of those, 30 join the pocket (Rows 1–29 plus the extra at Row 1), and 30 + 18 = 48. The top counts 14 sts plus 2 extra at each corner, for 18. The bottom has 14 sts, matching the 14 foundation chains on both pieces. Round 2 adds no stitches, because slip stitches add almost no width and don’t need corner increases.
Attaching the Leaves
Turn the holder over. Place each leaf behind the pocket’s lower side, with the base at about Row 4 and the tip angled up and out about 1 in (2.5 cm) past the border. Whipstitch the leaf to the back of the border with the green tail across 1.5 in (3.8 cm) of overlap. Make sure no stitches show on the front.
Final Blocking
- Lightly mist the whole holder with water until it is damp, not soaked.
- Lay it flat on the blocking mat, RS up.
- Pin it to 6 in (15.2 cm) wide and 11.2 in (28.4 cm) tall.
- Pin each petal tip and leaf tip into a sharp point.
- Shape the plug opening into a smooth round by pinning around its inside edge.
- Let it dry completely, at least 12 hours.
- Unpin it and check the measurements again.
Final Quality-Control Checklist
- Back panel body is 22 sts and 5.5 in (14.0 cm) wide before the border
- Plug opening is 3 in x 2.9 in (7.6 cm x 7.4 cm) and slips easily over your charger
- Pocket matches the back panel row for row up to Row 29
- Center petal tip reaches Row 30 of the back panel
- Border Round 1 has 128 sc: 18 top, 48 per side, 14 bottom
- Petal outlines run straight and end exactly in the valleys
- Leaves are symmetrical and their sewing stitches don’t show on the front
- Finished size is 6 in x 11.2 in (15.2 cm x 28.4 cm)
Troubleshooting
Pocket is wider than the back panel. Your tension relaxed on the second piece. Remake the pocket with a smaller hook, or tighten up and check that you have 22 sts.
Sides ripple after joining. Too many stitches went into the row ends. Remove the extra sc at Row 1, or switch to a smaller hook for the border.
Plug opening is too tight. Skip the opening edging, or lengthen the opening by adding 2 rows to each strap and 2 more decrease rows at the top.
Petals curl forward. Block with pins at every tip and let them dry fully. Firm cotton holds the shape well once blocked.
Phone slides out sideways. Make sure the join runs all the way to Row 29 on both sides.
Leaves flop. Add a second line of whipstitches near the leaf base.
Care
Hand wash in cool water with mild soap, press out the water in a towel, and dry flat. Reshape the petals and leaf points while the holder is damp.
Final Notes
The measurements build on each other: a 16-sc-per-4-in (10.2 cm) gauge gives a 22-st panel 5.5 in (14.0 cm) wide. Forty-eight rows bring it to 10.7 in (27.2 cm) tall. The pocket repeats the panel’s first 22 rows and then rises into petals that reach Row 30. A 128-st border joins the two pieces and brings the holder to 6 in x 11.2 in (15.2 cm x 28.4 cm). The leaves take it to 8 in (20.3 cm) wide. Check gauge early, match the pocket to the panel and keep the border tension even.
Happy crocheting!