

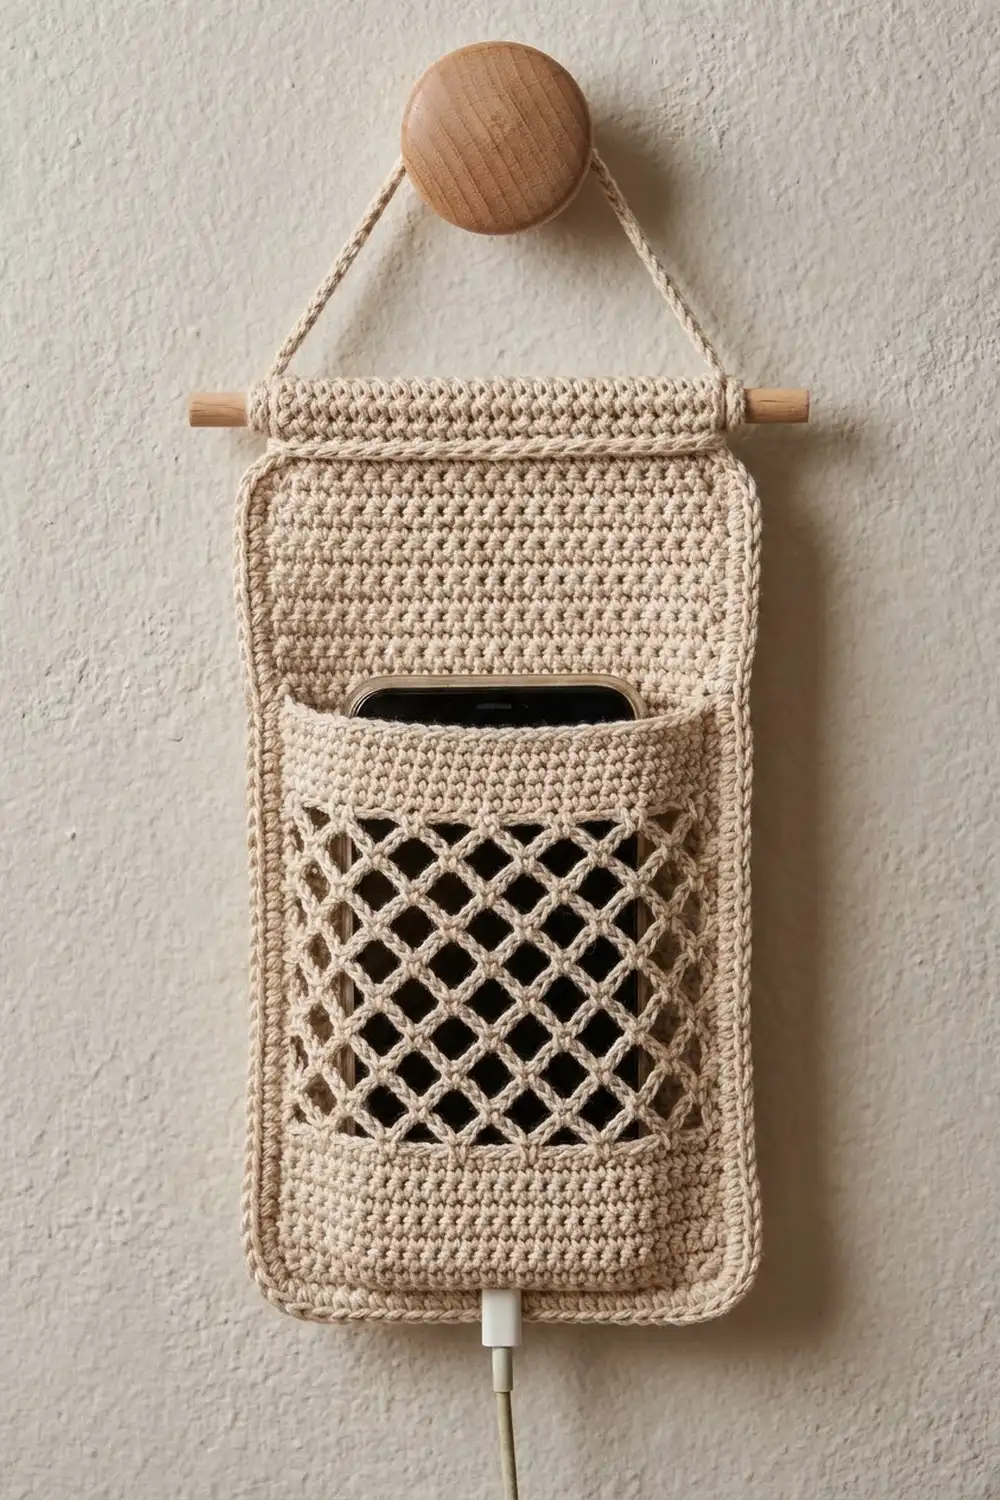
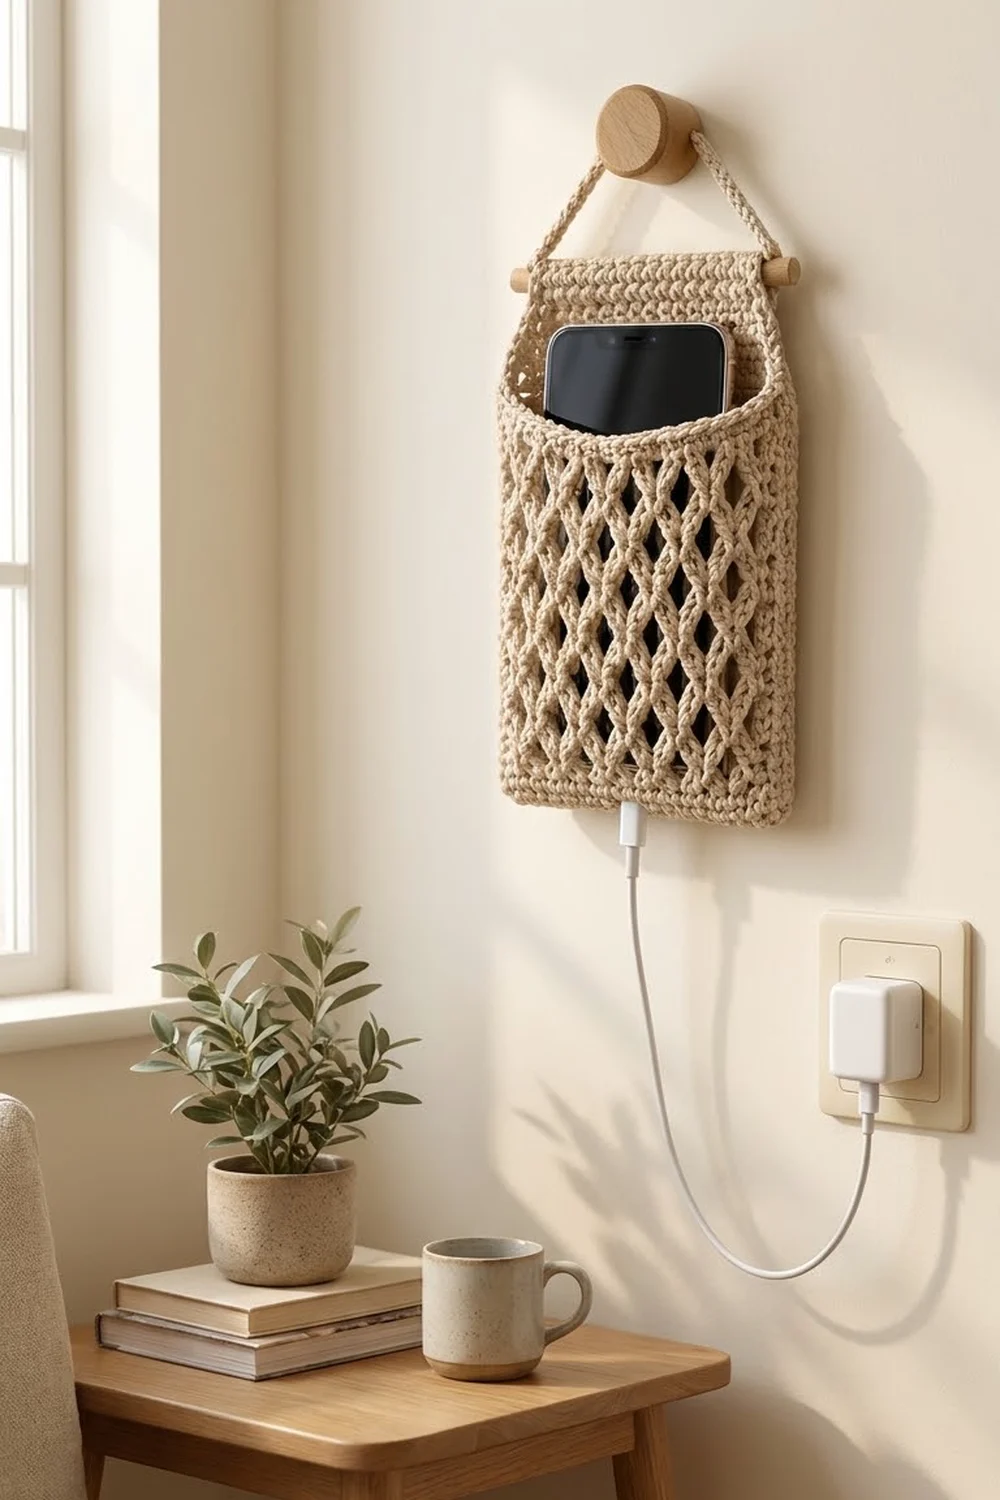
The Lattice Nook is a small wall-hanging phone holder with a solid back panel, an open diamond-lattice pocket, and a wooden dowel at the top. Hang it beside an outlet and your phone sits upright while it charges, with the cable running through the bottom of the lattice.
The design uses one natural beige cotton for a calm, modern look. The solid areas look tidy, and the chain lattice lets the light through. It looks best in a matte cotton or a soft cotton cord.
This pattern is written in US crochet terms. The finished holder measures about 5.75 in (14.6 cm) wide and 8.25 in (21.0 cm) tall, not counting the dowel ends and hanging cord.
Construction is simple. You work the back panel flat in single crochet with extra rows at the top for a dowel casing. Next you work the pocket flat: a solid band, chain-loop mesh, and a solid top band. You then fold and stitch the casing, place the pocket on the back, and join the two layers with a single crochet border. To finish, make a slip stitch cord and tie it to the dowel.
Finished Size and Construction
- Finished size: 5.75 in (14.6 cm) wide x 8.25 in (21.0 cm) tall
- Skill level: Easy
- Terminology: US
- Yarn weight: #4 worsted cotton or 3 mm cotton cord
- Hook: 5.0 mm (H-8)
- Number of pieces: 3 (back panel, front pocket, hanging cord), plus a dowel
- Layout: pocket placed flat on the lower part of the back panel, bottom and side edges lined up
- Back panel size: 5.25 in (13.3 cm) x 8 in (20.3 cm) visible after folding the casing
- Pocket size: 5.25 in (13.3 cm) x 6 in (15.2 cm)
- Size before border: 5.25 in (13.3 cm) x 8 in (20.3 cm)
- Border depth: about 0.25 in (0.6 cm) on each side and along the bottom
Materials
Yarn: Use a smooth, firm worsted cotton or cotton cord of about 170 m per 100 g. Cotton holds its shape and does not stretch out under the weight of a phone. Acrylic is not recommended because the lattice will sag.
- Natural beige: 80 g, about 136 m
This amount includes about a 15% margin for your gauge swatch and tails.
Tools:
- 5.0 mm (H-8) crochet hook
- Wooden dowel, 3/8 in (1.0 cm) diameter, cut to 7 in (17.8 cm) long
- Tapestry needle
- 6 locking stitch markers or pins
- Scissors
- Measuring tape
- Fine sandpaper for the dowel ends (optional)
Abbreviations (US Terms)
- ch – chain
- sc – single crochet
- dc – double crochet
- sl st – slip stitch
- sk – skip
- st(s) – stitch(es)
- RS / WS – right side / wrong side
- [ ] – repeat the steps inside the brackets as directed
Special stitch – chain-loop mesh: A ch-5 loop is anchored to the fabric with a sc. On the next row, each sc goes into the center of a ch-5 loop from the row below. This offsets the loops by half a repeat and makes the diamond lattice.
Gauge and Checkpoints
Single crochet gauge: 16 sc and 18 rows = 4 in (10.2 cm).
Mesh gauge: Each ch-5 loop spans about 1.05 in (2.7 cm) across. Nine mesh rows measure about 4.25 in (10.8 cm) tall when lightly stretched.
Make the pocket first and use it as your test piece. It is small, it uses both stitch patterns, and it tells you right away whether your gauge works.
Checkpoints:
- Pocket after Row 3: 5.25 in (13.3 cm) wide, about 0.67 in (1.7 cm) tall.
- Pocket after Row 12: about 4.9 in (12.4 cm) tall.
- Finished pocket: 5.25 in (13.3 cm) x 6 in (15.2 cm).
- Back panel after Row 33: 5.25 in (13.3 cm) x about 7.33 in (18.6 cm).
- Back panel after Row 39: about 8.67 in (22.0 cm) tall, unfolded.
If your piece is too big, go down one hook size (to 4.5 mm). If it is too small, go up one size (to 5.5 mm). Width matters most, because the pocket and back must both measure 5.25 in (13.3 cm) across so the edges line up for the border.
Front Pocket
Ch 22.
Row 1 (RS): Sc in 2nd ch from hook and in each ch across. (21 sc)
Rows 2–3: Ch 1, turn, sc in each st across. (21 sc)
This is the solid bottom band.
Row 4 (Mesh A): Ch 1, turn, sc in first sc, [ch 5, sk 3 sts, sc in next st] 5 times. (6 sc, 5 ch-5 loops)
Check: 1 sc + (5 repeats x 4 sts used) = 21 sts, so the row ends exactly in the last sc.
Row 5 (Mesh B): Ch 5 (counts as dc + ch 2), turn, sc in first ch-5 loop, [ch 5, sc in next ch-5 loop] 4 times, ch 2, dc in last sc. (5 sc, 4 ch-5 loops, 2 half loops at the edges)
Row 6 (Mesh A): Ch 1, turn, sc in first dc, [ch 5, sc in next ch-5 loop] 4 times, ch 5, sc in 3rd ch of turning ch-5. (6 sc, 5 ch-5 loops)
Rows 7–12: Repeat Rows 5 and 6 three more times. (Row 12: 6 sc, 5 ch-5 loops)
That makes nine mesh rows (Rows 4–12). Ending on a Mesh A row puts a sc at each edge and a full loop in each of the 5 spaces.
Row 13 (conversion row): Ch 1, turn, sc in first sc, [3 sc in next ch-5 loop, sc in next sc] 5 times. (6 sc worked 1 per existing sc + 15 sc worked into the loops = 21 sc)
Rows 14–17: Ch 1, turn, sc in each st across. (21 sc)
Rows 13–17 make the solid top band, about 1.1 in (2.8 cm) tall. Fasten off and leave an 8 in (20.3 cm) tail.
Pocket check: 21 sts and 5.25 in (13.3 cm) across at both the bottom and top bands. The height is 3 rows (0.67 in / 1.7 cm) + 9 mesh rows (4.25 in / 10.8 cm) + 5 rows (1.1 in / 2.8 cm), about 6 in (15.2 cm) in total.
Back Panel
Ch 22.
Row 1 (RS): Sc in 2nd ch from hook and in each ch across. (21 sc)
Rows 2–33: Ch 1, turn, sc in each st across. (21 sc)
Place a marker at each end of Row 33. These markers show where the border will stop.
Rows 34–39 (casing): Ch 1, turn, sc in each st across. (21 sc)
Fasten off and leave a 20 in (50.8 cm) tail for sewing the casing.
Back panel check: 21 sts and 5.25 in (13.3 cm) wide, 39 rows and about 8.67 in (22.0 cm) tall before folding.
Hanging Cord
Leave a 6 in (15.2 cm) tail and ch 56.
Row 1: Sl st in back bump of 2nd ch from hook and in each back bump across. (55 sl st)
Fasten off and leave a 6 in (15.2 cm) tail. The cord should measure about 14 in (35.6 cm). Slip stitching into the back bumps gives a firm, round cord that does not stretch.
Make All Pieces
This holder has three crocheted pieces, one of each, all in natural beige:
- Front pocket: 1
- Back panel: 1
- Hanging cord: 1
Layout (front view):
   [dowel ===================== dowel]
   |      casing (3 rows)            |
   |      back panel only, 1.33 in   |
   |---------------------------------|
   |  pocket top band (5 rows)       |
   |  lattice mesh (9 rows)          |
   |  pocket bottom band (3 rows)    |
   |_________________________________|
Joining
Step 1 – Fold the casing. With the WS of the back panel facing you, fold Rows 37–39 down so that the fold sits along the top of Row 36. The top loops of Row 39 now lie against the top of Row 33. Use the long tail to whipstitch each of the 21 sts of Row 39 to the matching st of Row 33, one to one. Leave both short ends of the tube open.
The casing is 6 rows deep, so its circumference is about 1.33 in (3.4 cm). That gives a 3/8 in (1.0 cm) dowel, with a circumference of about 3.0 cm, a snug but easy fit. The visible back is now 33 + 3 = 36 rows, which is 8 in (20.3 cm).
Step 2 – Insert the dowel. Sand the ends lightly if needed, then slide the dowel through the casing so that 0.875 in (2.2 cm) sticks out on each side.
Step 3 – Position the pocket. Lay the back panel RS up. Place the pocket on top, RS up, with its Row 1 lined up with the back’s Row 1. The 21 foundation sts of each piece match one to one. The pocket’s top band ends about 2 in (5.1 cm) below the dowel. Pin both bottom corners and each side at the pocket top.
Stitch logic: Both pieces are 21 sts wide, so the bottom edges line up stitch for stitch and you never add or skip a stitch to make them fit. The sides are joined in the first border row, working through both layers.
Tension: Use the same relaxed tension as your fabric. If the seam is too tight, the pocket bottom will cup. If it is too loose, the edge will wave.
Size checkpoint: The pinned pieces should lie flat at 5.25 in (13.3 cm) x 8 in (20.3 cm).
Border
Border gauge: Work 4 sc per 1 in (2.5 cm) along the row ends. This matches your stitch gauge, so the side edges stay the same length as the panel.
The border runs in a U-shape: up the left side, across the bottom, and up the right side. It stops at the markers below the casing, so the casing ends stay open for the dowel.
Border Row 1 (joining): With the RS facing you, join yarn at the left marker (top of Row 33 on the back only).
- Left side: Work 5 sc evenly through the back panel only, down to the pocket top. Then work 24 sc evenly down to the bottom corner, going through both layers. (29 sc)
- Bottom: Working through both layers in the 21 foundation sts, work 3 sc in first st, sc in each of next 19 sts, 3 sc in last st. (21 sts worked 1 per st + 4 extra corner sts = 25 sc)
- Right side: Work 24 sc evenly through both layers up to the pocket top, then 5 sc through the back only, up to the right marker. (29 sc)
Row 1 total: 29 + 25 + 29 = 83 sc.
Border Row 2: Ch 1, turn, sl st in each sc around the U. (83 sl st)
Fasten off.
Why the math works: The bordered side is 33 rows tall, which is 7.33 in (18.6 cm). At 4 sc per inch, that calls for 29 sc. The pocket part is 6 in (15.2 cm), which needs 24 sc. The single-layer part above it is 1.33 in (3.4 cm), which needs about 5 sc. Along the bottom, one piece of 21 sts gets one sc per st, and the 4 extra sts at the corners make them turn neatly. The border adds about 0.25 in (0.6 cm) per side, so the width grows from 5.25 in (13.3 cm) to 5.75 in (14.6 cm). The height grows from 8 in (20.3 cm) to 8.25 in (21.0 cm).
Final Blocking
- Remove the dowel for now.
- Lightly mist the holder with water until it is damp but not soaked.
- Lay it flat on a blocking mat with the RS up.
- Pin it to 5.75 in (14.6 cm) x 8.25 in (21.0 cm).
- Gently stretch the lattice up and down so the diamonds open evenly, then pin the pocket’s top band straight.
- Let it dry completely.
- Unpin it, then slide the dowel back in.
- Wrap each cord tail twice around a dowel end, close to the casing, and knot it firmly. Weave the tails back into the cord.
Final Quality-Control Checklist
- Pocket and back are both 21 sts and 5.25 in (13.3 cm) wide.
- Mesh has 5 full loops on every Mesh A row.
- Conversion row has 21 sc.
- Casing holds the dowel snugly with even overhang on both ends.
- Border Row 1 has 29 sc on each side and 25 sc along the bottom.
- Holder measures 5.75 in (14.6 cm) x 8.25 in (21.0 cm).
- Cord is tied securely, about 14 in (35.6 cm) long.
- All tails are woven in.
Troubleshooting
- The pocket is narrower than the back: Your chain loops are too tight. Work the ch-5s more loosely, or try 6 chains.
- The mesh edges slant: Make sure every Mesh B row starts with ch 5 and ends with dc in the last sc.
- The conversion row has the wrong count: Work exactly 3 sc in each loop and 1 sc in each sc.
- The dowel will not fit: Use a thinner 1/4 in (0.6 cm) dowel, or add 2 casing rows.
- The sides ruffle: You added too many sc. Rework the side with exactly 29 sc.
- The pocket bottom puckers: Your joining tension is too tight. Go up one hook size for Border Row 1.
- The phone slides down too far: Your cotton stretches. Remove one Mesh B/A pair of rows.
Care
Hand wash in cool water with mild soap, press out the water in a towel, and dry flat. Take out the dowel before washing.
Final Notes
The measurements build on each other. The pocket is 21 sts wide and 6 in (15.2 cm) tall. The back panel is 21 sts wide and shows 8 in (20.3 cm) once the casing is folded. The border takes the holder to 5.75 in (14.6 cm) x 8.25 in (21.0 cm). Check your width at each stage and everything will line up stitch for stitch.
Happy crocheting!