

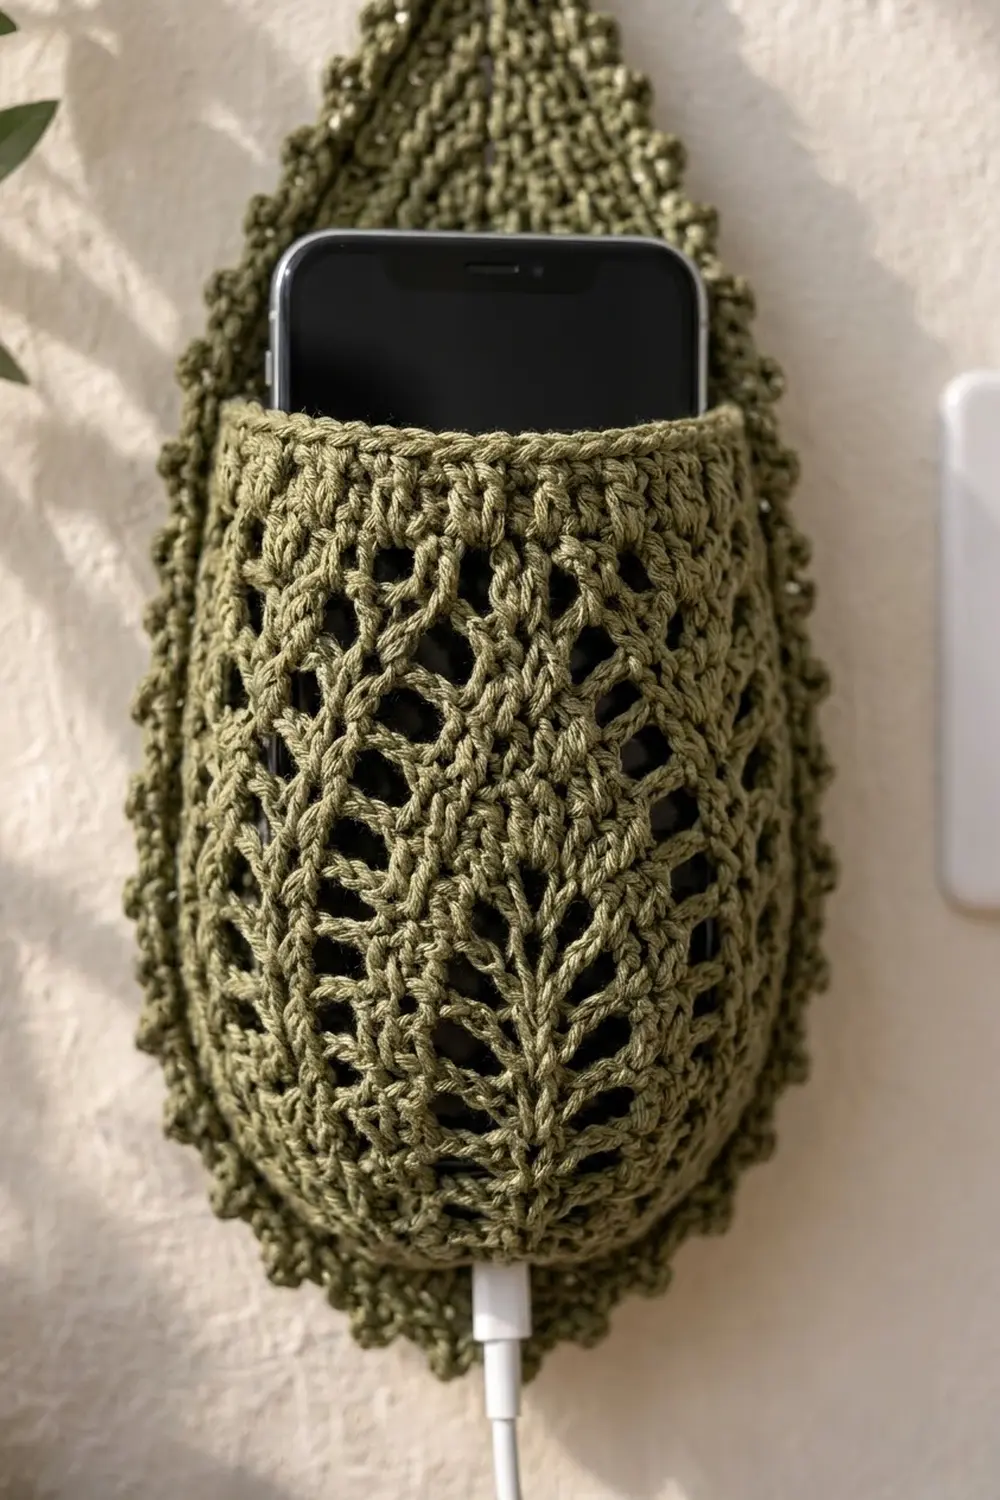
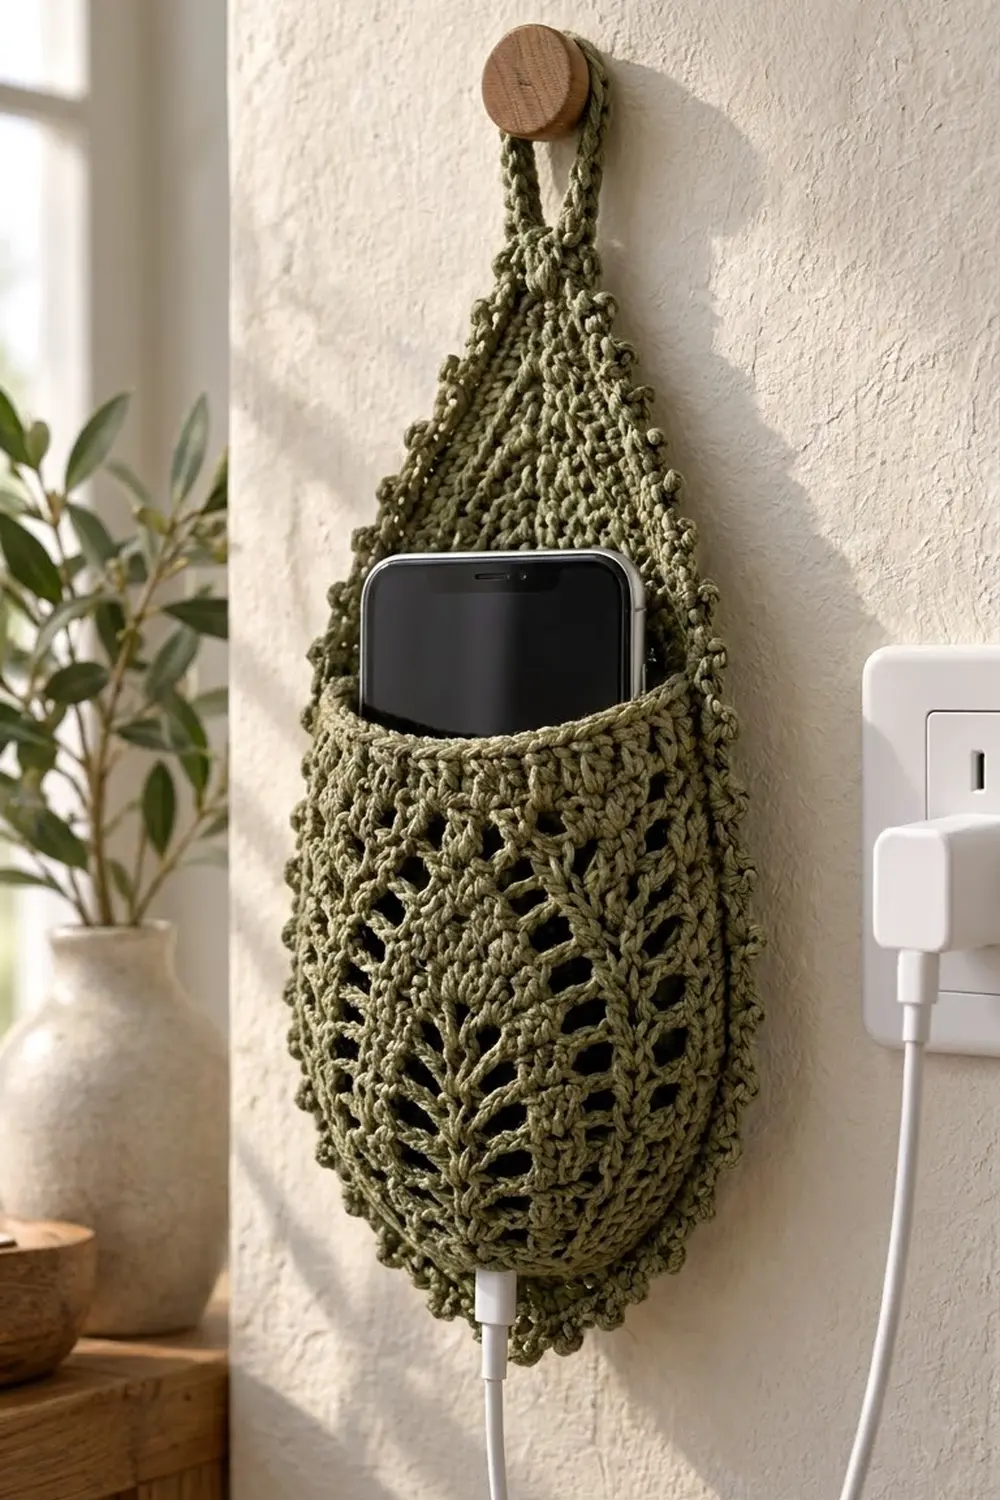
This teardrop phone holder hangs on the wall beside your outlet and keeps your phone upright while it charges. The back panel tapers to a point with a hanging loop, and a rounded pocket covers the lower half. A small picot edge runs around the whole outline.
The sample is made in one color, a soft olive green cotton. Both pieces use an open mesh with a raised center spine, so the fabric looks like a fern leaf. Because the mesh is open, the charging cable passes easily through a hole at the bottom.
The pattern uses US crochet terms. The finished holder measures 6.25 in (15.9 cm) wide and 10 in (25.4 cm) tall, including the loop and border.
Construction is simple. You crochet the back panel and the pocket in rows, starting at the rounded bottom. Then you lay the pocket on the back panel and join the two pieces with a single crochet round through both layers. A picot round finishes the edge.
Finished Size and Construction
- Finished size: 6.25 in wide x 10 in tall (15.9 x 25.4 cm), including the loop
- Skill level: Easy-intermediate
- Terminology: US crochet terms
- Yarn weight: DK (#3) cotton or cotton blend
- Hook: 4.0 mm (G-6)
- Number of pieces: 2 (back panel and front pocket), joined into one item
- Layout: The pocket sits on the lower part of the back panel, with bottom edges and side edges aligned
- Back panel size: 5.25 in x 8 in (13.3 x 20.3 cm), not counting the loop
- Pocket size: 5.25 in x 5.75 in (13.3 x 14.6 cm)
- Size before border: 5.25 in x 8 in (13.3 x 20.3 cm), plus the loop
- Border depth: 0.5 in (1.3 cm) per edge
Materials
Yarn: Use a smooth, mercerized or matte DK cotton. Cotton holds its shape under the weight of a phone and shows the lace clearly. Avoid fuzzy or very stretchy yarns, because the pocket will sag.
- Olive Green: 45 g, about 100 m (109 yd)
This amount includes a margin of about 25 percent, which covers your gauge swatch and any rows you need to redo.
Tools:
– 4.0 mm (G-6) crochet hook
– 4 locking stitch markers
– Tapestry needle
– Scissors
– Blocking mat, rust-proof pins and a spray bottle
– A wall peg or hook to hang the holder
Abbreviations (US Terms)
- ch – chain
- sl st – slip stitch
- sc – single crochet
- dc – double crochet
- dc2tog / dc3tog – double crochet 2 (or 3) stitches together
- FPdc – front post double crochet
- BPdc – back post double crochet
- sk – skip
- sp – space
- st(s) – stitch(es)
- RS / WS – right side / wrong side
Stitch counting: In this pattern, every dc and every ch-1 space counts as 1 stitch. A row of “21 sts” has 11 dc and 10 ch-1 spaces.
Special stitches:
- Spine stitch: Work this into the center dc of every row from Row 2 on. Use FPdc on RS rows and BPdc on WS rows. Both put the raised post on the RS, which forms the leaf vein.
- Picot: Ch 3, then sl st in the 3rd ch from the hook.
- Increase row: Ch 3 (counts as a dc), then (ch 1, dc) in the first dc. Ch 1, sk the next ch-1 sp, dc in the next dc. Repeat from * across. In the top of the turning ch, work (dc, ch 1, dc). Each increase row adds 4 sts.
- Straight row: Ch 3 (counts as a dc). Ch 1, sk the next ch-1 sp, dc in the next dc. Repeat from * across, working the last dc in the top of the turning ch.
- Decrease row: Ch 2, sk the first ch-1 sp, dc in the next dc. This ch-2 and dc count as 1 st. Ch 1, sk the next ch-1 sp, dc in the next dc. Repeat from * until 2 dc remain. Ch 1, sk the next ch-1 sp, then dc2tog over the next dc and the last st, skipping the ch-1 sp between them. Each decrease row removes 4 sts.
Gauge and Checkpoints
Gauge: 16 sts and 9 rows = 4 in (10.2 cm) in the mesh pattern.
Test piece first: Make the pocket before the back panel. The pocket is smaller, and it uses the same rows as the first 12 rows of the back panel, so it works as your gauge swatch.
Checkpoints:
– After Row 1: 5 sts, 1.25 in (3.2 cm) wide
– After Row 3: 13 sts, 3.25 in (8.3 cm) wide
– After Row 5: 21 sts, 5.25 in (13.3 cm) wide and 2.2 in (5.6 cm) tall
– After Row 13 of the back panel: 5.8 in (14.7 cm) tall
– After Row 14 of the pocket: 5.75 in (14.6 cm) tall
– After Row 18 of the back panel: 8 in (20.3 cm) tall
If the piece is too big: Go down one hook size (3.75 mm), or crochet the ch-1 spaces more tightly.
If the piece is too small: Go up one hook size (4.5 mm).
Measure without stretching the fabric. Pin it flat and lightly mist it with water before you measure.
Back Panel
Work in rows, starting at the rounded bottom. Odd-numbered rows are RS rows.
Row 1 (RS): Ch 7. Dc in the 5th ch from the hook. The skipped chs count as the first dc and a ch-1 sp. Ch 1, sk the next ch, dc in the last ch. Turn. (5 sts: 3 dc, 2 ch-1 sps)
Place a marker in the center dc, which is the one you worked in the 5th ch from the hook. Move this marker up to the spine stitch on every row.
Row 2 (WS): Work an increase row, using BPdc for the center st. Turn. (9 sts)
Row 3 (RS): Work an increase row, using FPdc for the center st. Turn. (13 sts)
Row 4 (WS): Work an increase row, using BPdc for the center st. Turn. (17 sts)
Row 5 (RS): Work an increase row, using FPdc for the center st. Turn. (21 sts: 11 dc, 10 ch-1 sps)
The four increase rows make the rounded bottom. Each row adds 2 sts at each edge, so the edges spread out in a smooth curve.
Rows 6–13: Work straight rows. Use the spine stitch on the center dc (the 11th st), with BPdc on even rows and FPdc on odd rows. Turn at the end of each row. (21 sts in each row)
Row 14 (WS): Work a decrease row, with BPdc for the center st. Turn. (17 sts)
Row 15 (RS): Work a decrease row, with FPdc for the center st. Turn. (13 sts)
Row 16 (WS): Work a decrease row, with BPdc for the center st. Turn. (9 sts)
Row 17 (RS): Work a decrease row, with FPdc for the center st. Turn. (5 sts)
Row 18 (WS): Ch 2 (does not count as a st). Dc3tog over the 3 dc, skipping the two ch-1 sps. (1 st)
Hanging loop: Ch 16, then sl st in the top of the dc3tog. Fasten off and weave in the ends.
The spine stays centered because each increase adds the same number of sts on both sides of it, and so does each decrease. The center st is always a dc: it is st 3, 5, 7, 9 or 11, depending on the row.
Front Pocket
Rows 1–12: Work exactly as Rows 1–12 of the back panel, including the spine stitch. (21 sts after Row 12)
Row 13 (RS, trim row): Ch 1. Sc in each dc and in each ch-1 sp across. Turn. (21 sc: 21 sts worked 1 per existing st + 0 added)
Row 14 (WS): Ch 1, sc in each sc across. Fasten off. (21 sc)
These two sc rows make the firm top band of the pocket. Weave in the ends.
Make All Pieces
You need:
– Back panel: 1, Olive Green
– Front pocket: 1, Olive Green
Layout, with both pieces RS facing you:
        (loop)
         /\
        /  \      Back panel, Rows 14–18 (single layer)
       /    \
      |------|    Pocket top band (Rows 13–14)
      |      |
      |      |    Pocket over back panel, Rows 1–13
       \    /     (two layers)
        \__/
Joining
Lay the back panel flat with the RS up. Place the pocket on top of it, also RS up, so the bottom edges and side edges line up. Pocket Rows 1–12 line up with back panel Rows 1–12. Pocket Rows 13–14 (the sc band) line up with back panel Row 13. Pin the pieces together at the bottom and every 1 in (2.5 cm) along both sides.
You join the pieces with Border Round 1. Work through both layers wherever the pocket overlaps the back panel, so the joining and the edging happen in one pass.
Stitch logic: Row 1 has the same 5 bottom sts on both pieces, so they match 1 to 1. Both pieces have the same row structure, so the row-ends also match 1 to 1 up to back panel Row 13.
Tension: Keep your sc relaxed and even. If you pull too tightly, the pocket will pucker and get too tight for the phone.
Size checkpoint: After Round 1, the piece should still be 5.25 in (13.3 cm) wide across Row 10, plus about 0.25 in (0.6 cm) of sc on each edge.
Border
Border gauge:
– 2 sc in each straight-row end
– 3 sc in each shaping-row end (Rows 2–5 and 14–18), because these edges slant and are longer
Round 1 (sc, joining): With the RS facing and the pocket on top, join the yarn at one corner of the bottom edge, working through both layers.
- Bottom: Work 6 sc across the foundation edge of Row 1: 1 sc in each of the 5 base positions, with 2 sc in the center one. Both layers. (6 sc)
- First side, working upward:
- Row 1 end: 2 sc
- Rows 2–5 ends: 3 sc each (12 sc)
- Rows 6–12 ends: 2 sc each (14 sc)
- Row 13 end: 2 sc, worked through back panel Row 13 and pocket Rows 13–14
- These 30 sc go through both layers.
- Rows 14–18 ends: 3 sc each (15 sc), single layer only.
- (45 sc on this side)
- Loop: Work 24 sc into the ch-16 loop. (24 sc)
- Second side, working downward: Work this side as a mirror of the first: 15 sc through the single layer, then 30 sc through both layers. (45 sc)
Join with a sl st to the first sc. (120 sc total: 6 + 45 + 24 + 45)
Round 2 (picot): Ch 1. Sc in the next sc, picot, sc in each of the next 2 sc. Repeat from * around. Join with a sl st to the first sc. Fasten off. (120 sc and 40 picots)
Picots per section:
– Bottom: 2
– Each side: 15
– Loop: 8
Why the math works: Every section count (6, 45, 24 and 45) divides evenly by 3. That means the 3-st picot repeat starts and ends cleanly in each section, and the picots sit evenly around the bottom curve and the loop. The pocket’s top band is not part of this border, so it stays smooth and open for the phone.
Final Blocking
- Weave in all the ends, hiding them in the solid sc rows and the edge.
- Lightly spray the whole holder until it is damp but not dripping.
- Pin it flat, RS up, to 6.25 in x 10 in (15.9 x 25.4 cm).
- Shape the bottom into a smooth curve and the top into an even point.
- Pinch each picot outward so it stands out from the edge.
- Press the spine flat with your fingers so it lies in a straight line.
- Put a folded card about 3 in (7.6 cm) wide into the pocket so the pocket dries slightly open.
- Let it dry completely before you hang it.
Final Quality-Control Checklist
- The back panel has 21 sts across Rows 5–13 and comes to a single st at Row 18.
- The pocket’s sc band has 21 sc.
- The spine runs straight up the center of both pieces, raised on the RS.
- Round 1 has 120 sc, with 45 on each side.
- There are 40 evenly spaced picots.
- The pocket edges are joined through both layers, with no gaps.
- The finished size is 6.25 in x 10 in (15.9 x 25.4 cm).
- The charging plug fits through a bottom mesh hole.
Troubleshooting
- The spine drifts to one side: You skipped or added a st at one edge. Count the sts in each row. The center st should be st 3, 5, 7, 9 or 11.
- The edges ruffle: Work 2 sc in the shaping-row ends instead of 3.
- The edges cup: Use a looser tension, or add 1 sc on the shaping rows. Recount so each section still divides by 3.
- The pocket gapes open: Rework Rows 13–14 with a hook 0.5 mm smaller.
- The loop stretches: Work the 24 sc more tightly, or use 14 ch instead of 16.
- The plug won’t fit through a hole: Gently ease open the center bottom ch-1 sp on both layers.
Care
Hand wash in cool water, press out the water in a towel, and dry flat. Re-pin the shape if needed, and don’t tumble dry.
Final Notes
The measurements build on each other in this order:
1. Gauge of 16 sts = 4 in (10.2 cm).
2. 21 sts = 5.25 in (13.3 cm) of width.
3. 18 rows = 8 in (20.3 cm) of height.
4. The pocket matches the back panel row for row up to 5.75 in (14.6 cm).
5. The 120-st border adds 0.5 in (1.3 cm) all around, for a finished size of 6.25 in x 10 in (15.9 x 25.4 cm).
If you check gauge first and confirm each checkpoint, the pieces will line up when you join them, and the holder will hold your phone securely.
Happy crocheting!