

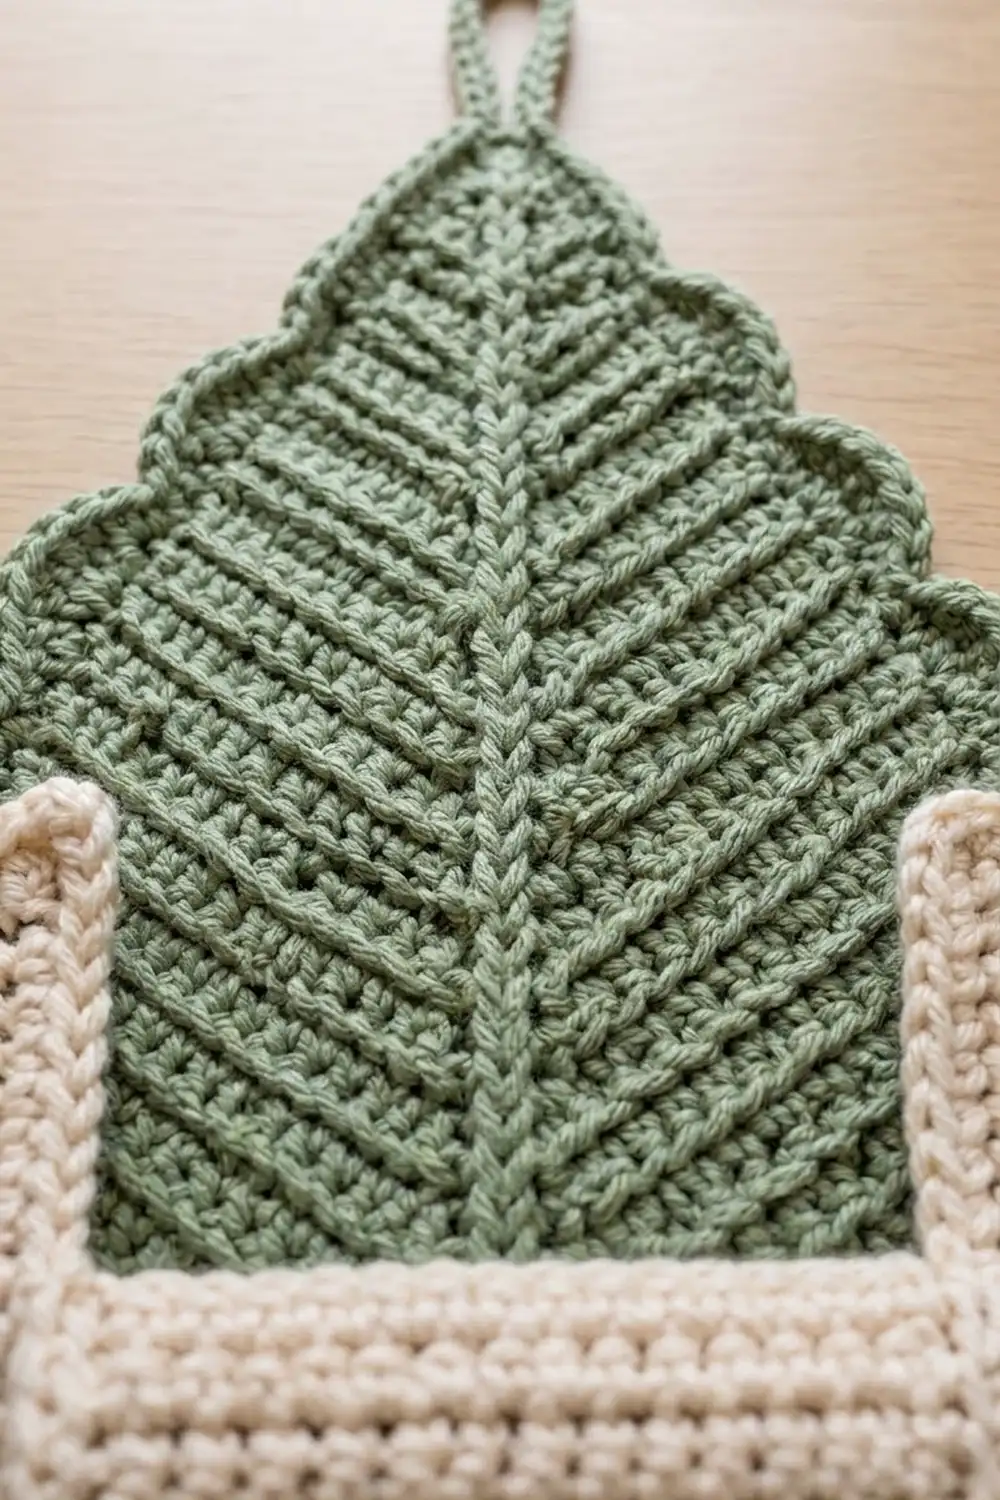
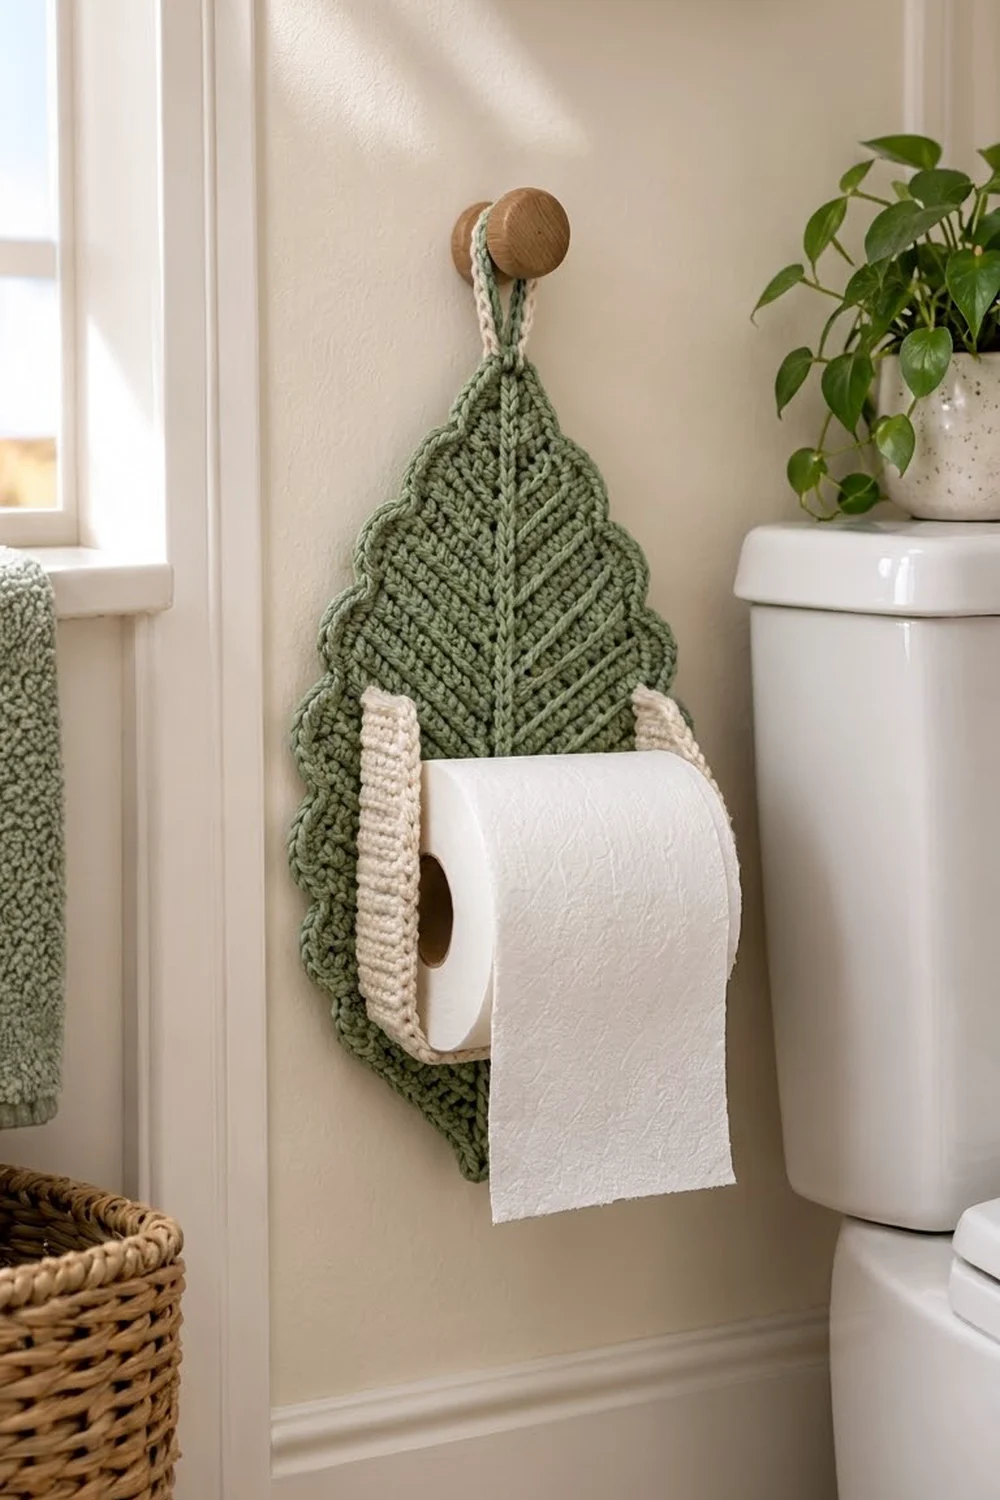
This hanging holder turns a plain spare roll into a small piece of bathroom decor. A sage green leaf hangs from a wall peg by a slim loop, and a cream cradle on its lower half holds one standard roll. The leaf has ribbed, herringbone-style ridges that slant up from a raised center vein, and a soft scalloped edge goes all the way around.
The colors are calm and natural: muted sage for the leaf and warm cream for the cradle. It looks good with wood accents, white fixtures, and green plants.
The pattern uses US crochet terms. The finished leaf measures 8 in (20.3 cm) wide by 13.5 in (34.3 cm) tall without the loop, or 16.5 in (41.9 cm) from the bottom tip to the top of the loop.
Construction: you work the leaf in turned rows around a center foundation chain, using single crochet in the back loop only. A raised vein of surface slip stitches goes up the middle. The cradle is a flat cream strip that you fold in half lengthwise, close, and sew onto the leaf in a U shape. A scalloped border and the hanging loop finish the piece.
Finished Size and Construction
- Finished size: 8 in × 13.5 in (20.3 cm × 34.3 cm), plus a 3 in (7.6 cm) loop
- Skill level: Easy–Intermediate
- Terminology: US
- Yarn weight: Worsted (#4), cotton
- Hook: 4.5 mm (US 7)
- Number of pieces: 2 (1 leaf panel, 1 cradle strip), plus the loop, which you work directly onto the leaf
- Layout: The cradle sits in a U shape, centered on the vein, in the lower half of the leaf
- Leaf body size before border: 6.5 in × 12 in (16.5 cm × 30.5 cm)
- Cradle size: 12 in × 2 in (30.5 cm × 5.1 cm) after folding
- Border depth: 0.75 in (1.9 cm) on every edge
Materials
Use a worsted-weight cotton or cotton blend. Cotton holds its shape, copes with bathroom humidity, and keeps the cradle firm. Avoid soft acrylics, which can stretch under the weight of the roll. These amounts assume about 170 m per 100 g.
- Sage green (leaf, vein, border, loop): 90 g / 153 m
- Cream (cradle): 60 g / 102 m
Tools:
- 4.5 mm (US 7) crochet hook
- Tapestry needle
- 4 locking stitch markers
- Rust-proof pins
- Measuring tape
- Spray bottle and a blocking mat
The quantities include a margin of about 15% for gauge swatches and differences in tension.
Abbreviations (US Terms)
- ch – chain
- sl st – slip stitch
- sc – single crochet
- dc – double crochet
- st(s) – stitch(es)
- sk – skip
- BLO – back loop only
- RS / WS – right side / wrong side
Special technique: surface slip stitch. Hold the working yarn behind the work. Insert the hook from the front between stitches, pull up a loop, and pull it through the loop on the hook. Repeat this along a line to make a raised chain on the surface.
Gauge and Checkpoints
Gauge: 16 sc × 18 rows = 4 in (10.2 cm) in sc BLO with a 4.5 mm hook. The plain sc rows of the cradle use the same gauge.
Make a 20-stitch swatch before you start, or treat the first 7 leaf rows as your test. The leaf takes about an hour to reach the first checkpoint, so measure there before you go on.
Checkpoints:
- After Row 1 of the leaf: the length along the chain is about 9 in (22.9 cm).
- After Row 7: about 3.25 in (8.3 cm) wide and 10.5 in (26.7 cm) long.
- After Row 14: 6.5 in × 12 in (16.5 cm × 30.5 cm).
- Cradle strip, before folding: 12 in × 4 in (30.5 cm × 10.2 cm).
- After the border: 8 in × 13.5 in (20.3 cm × 34.3 cm).
If your piece is too big, go down 0.5 mm in hook size. If it is too small, go up 0.5 mm. A difference of 0.25 in (0.6 cm) is fine. More than that will change the cradle placement, so fix your gauge first.
Leaf Panel
With sage green, ch 37.
Row 1 (RS): Sc in 2nd ch from hook and in next 34 ch, 3 sc in last ch (bottom tip). Rotate the work. Working in the bottom loops of the foundation chain, sc in next 35 ch. Turn. (73 sc)
Place a marker in the center sc of the 3-sc group at the bottom tip. Move this marker up every row. The free end where you started is the top tip.
Row 2: Ch 1 (does not count as a st). Sc BLO in each st up to the marked center st, 3 sc BLO in the marked st, then sc BLO in each st until 3 sts remain. Leave those 3 sts unworked. Turn. (72 sc)
Each row gains 2 sts at the bottom tip and leaves 3 sts unworked at its end, so it has exactly 1 fewer stitch than the row before.
Rows 3–14: Repeat Row 2. Start each row in the last stitch you worked on the previous row.
Stitch counts:
- Row 3: 71
- Row 4: 70
- Row 7: 67
- Row 10: 64
- Row 14: 60
How the shape forms: the 3-sc increase at the bottom builds a sharp point. The unworked groups of 3 alternate from side to side, so they step the top inward into a tapered tip. Because each row wraps around the chain, the BLO ridges slant up and away from the center line. That gives the leaf its herringbone veins.
Fasten off and weave in the ends.
Center Vein
With RS facing and sage green, start at the top tip. Work surface slip stitches along the foundation chain line. Continue down through the center stitches of the tip groups until you reach the bottom point. This is about 50 sl st: 36 along the chain and 1 per row through the tip. Keep the stitches relaxed so the leaf doesn’t curl lengthwise. Fasten off.
Cradle Strip
With cream, ch 49.
Row 1: Sc in 2nd ch from hook and in each ch across. Turn. (48 sc)
Rows 2–18: Ch 1, sc in each st across. Turn. (48 sc)
Checkpoint: 12 in × 4 in (30.5 cm × 10.2 cm).
Row 19 (closing row): Fold the strip in half lengthwise so that Row 18 lies on top of the foundation chain. Working through each stitch of Row 18 and the matching foundation loop together, sl st across. (48 sl st) Fasten off and leave a 12 in (30.5 cm) tail.
The fold is now the smooth front rim. The sl st seam is the edge that will be sewn to the leaf. Whipstitch each short end closed through both layers. Each end is 9 rows per layer.
Mark the seam at st 14 and st 35. This splits the strip into three sections:
- Arm 1: sts 1–14, 3.5 in (8.9 cm)
- Bottom: sts 15–34, 20 sts, 5 in (12.7 cm)
- Arm 2: sts 35–48, 14 sts, 3.5 in (8.9 cm)
Make All Pieces
- Sage green: 1 leaf panel with center vein
- Cream: 1 cradle strip, folded and closed
Layout, seen from the front (leaf body before border):
           /\        top tip (loop here later)
          /  \
         /    \
        |  |   |
        |C | C |     C = cradle arm, 3.5 in tall
        |C | C |
        |CCCCCC|     bottom of cradle, 5 in wide
         \    /      2.25 in above bottom tip
          \  /
           \/        bottom tip
Joining (Attaching the Cradle)
Method: whipstitch, using the cream tail.
- Lay the leaf flat with RS up. Mark a horizontal line 5 in (12.7 cm) wide, centered on the vein, 2.25 in (5.7 cm) above the bottom tip of the body.
- From each end of that line, mark a vertical line 3.5 in (8.9 cm) straight up.
- Pin the cradle seam along this U, with the folded rim pointing out toward you. Line up the marked strip st 15 and st 34 with the two bottom corners of the U.
Stitch-to-stitch logic: the U path is 3.5 + 5 + 3.5 = 12 in (30.5 cm). At 4 sts per inch, that is 48 attachment points, which matches the 48 seam stitches. For each seam stitch, catch one strand of the leaf about 0.25 in (0.6 cm) beyond the previous point. Go back through the arm tops twice so they stay secure.
Tension: pull each stitch snug enough to close any gap, but not so tight that the leaf ripples. Ease the strip around the two corners rather than pleating it.
Checkpoint: the inside of the U measures 5 in (12.7 cm) across. The leaf body still lies flat at 6.5 in × 12 in (16.5 cm × 30.5 cm). There is 0.75 in (1.9 cm) of leaf on each side of the U at its widest point.
Border
Border gauge: Round 1 sc is 4 sts per inch along the edge. Each scallop covers 6 sts, or 1.5 in (3.8 cm).
Round 1: Join sage green at the top tip. Ch 1, 3 sc in the top tip point. Work 51 sc evenly along side 1. 3 sc in the bottom tip, 51 sc evenly along side 2. Sl st to the first sc. (108 sc)
Per side: 3 + 51 + 3 + 51 = 108. Counting from the center sc of the top tip to the center sc of the bottom tip, each side spans 54 sts.
Round 2 (scallops):
- Sl st into the next st, the center sc of the top tip. Ch 1, sc in the same st.
- Sk 2 sts, 5 dc in next st, sk 2 sts, sc in next st. Repeat from * 16 more times.
- Sk 2 sts, 5 dc in next st, sk 2 sts, sl st to the first sc.
Total: 18 scallops, which is 90 dc + 18 sc = 108 sts, with 9 scallops per side.
Why the math works: each scallop uses exactly 6 sts, and 108 ÷ 6 = 18. The center sc of the bottom tip sits 54 sts after the top center, and 54 ÷ 6 = 9. That means both tips fall on a sc, so the points stay sharp and the scallops are the same on both sides.
Hanging loop: in the top sc, ch 24 and sl st back into the same sc. Work 30 sc over the chain loop and sl st to the base. This makes a loop with a 6 in (15.2 cm) circumference that hangs 3 in (7.6 cm) tall. Fasten off and weave in all ends.
Final Blocking
- Lightly mist the leaf until it is damp. Don’t soak the cradle.
- Pin the leaf RS up to 8 in × 13.5 in (20.3 cm × 34.3 cm).
- Pin both tips first, then the widest point, then each scallop at its center dc.
- Run a finger along the vein to straighten it.
- Push a rolled hand towel into the cradle so it dries in a rounded U shape.
- Let it dry completely, usually overnight. Never iron cotton ridges flat.
Final Quality-Control Checklist
- The leaf is 8 in × 13.5 in (20.3 cm × 34.3 cm).
- There are 9 scallops per side, and a sc sits at each tip.
- The vein runs straight from tip to tip.
- The cradle bottom is 5 in (12.7 cm) wide and the arms are 3.5 in (8.9 cm) tall.
- The cradle seam is secure along all 48 stitches.
- The loop is firm and 3 in (7.6 cm) tall.
- All ends are woven in on the WS.
Troubleshooting
- The leaf cups or curls: your tension is tight in the BLO rows. Go up a hook size, or block it a bit harder.
- The top is blunt: make sure you leave exactly 3 sts unworked on every row.
- The scallops ruffle: Round 1 has too many stitches for the edge. Spread the 51 sc more evenly instead of adding more.
- The cradle sags: check that Row 19 joins both layers, and use cotton rather than acrylic.
- The roll falls out: the U is too wide. Re-sew it to exactly 5 in (12.7 cm).
Care
Hand wash cold and lay flat to dry, reshaping the cradle around a rolled towel. Don’t tumble dry.
Final Notes
Every measurement leads to the next one:
- A gauge of 16 sc × 18 rows = 4 in (10.2 cm) gives a 6.5 in × 12 in (16.5 cm × 30.5 cm) leaf body in 14 rows.
- The 48-stitch cradle matches a 12 in (30.5 cm) U path: 3.5 in + 5 in + 3.5 in (8.9 cm + 12.7 cm + 8.9 cm).
- Border Round 1 has 108 sc, which divides into 18 even scallops.
- The 0.75 in (1.9 cm) border brings the leaf to its finished 8 in × 13.5 in (20.3 cm × 34.3 cm).
Check your gauge first, and the rest of the numbers will fall into place. Happy crocheting!