

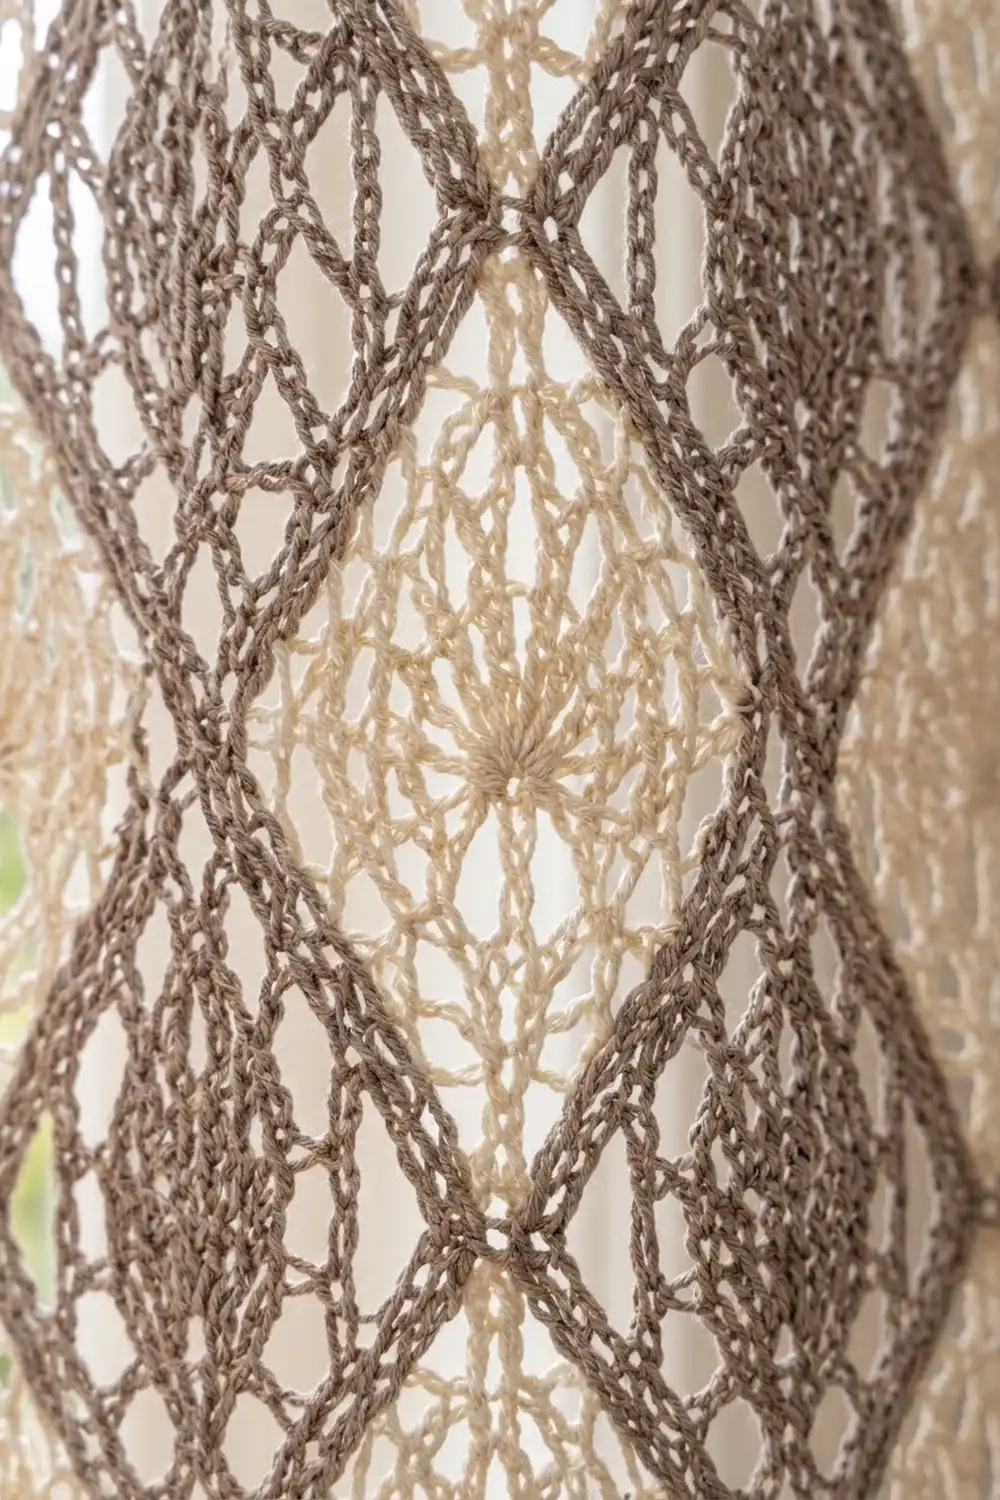
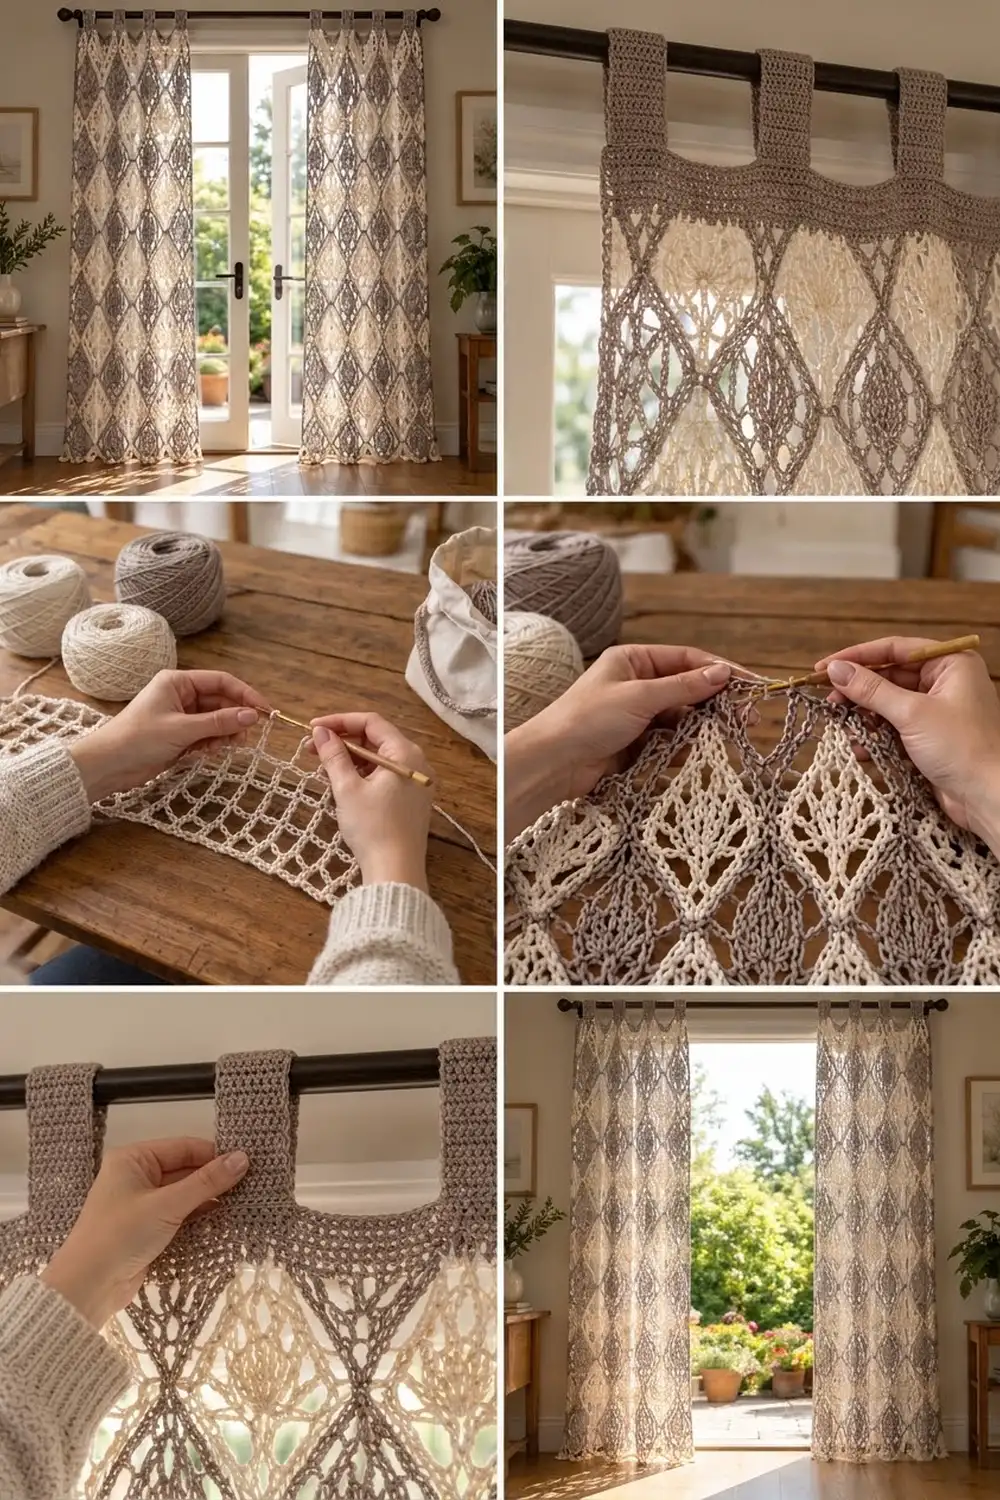
These floor-length curtain panels pair a soft cream lace with a taupe diamond lattice. The lattice lines look like chain links and outline tall diamonds. Inside the lattice, cream diamonds with solid centers alternate with open diamonds holding a smaller taupe diamond. A row of taupe points finishes the hem, and taupe tabs slide over the curtain rod.
The style is relaxed farmhouse with a bit of boho texture. In daylight the mesh glows, and the taupe lines keep the pattern clear from across the room. All instructions use US crochet terms.
Each finished panel measures 24.5 in (62.2 cm) wide by 82.75 in (210.2 cm) long from the top of the band to the hem points. The tab loops add about 3.5 in (8.9 cm) above the band.
Construction is simple. You work the cream body in rows of open and filled mesh squares. Then you add the taupe lattice on the surface with chains and slip stitches, and finish with a taupe top band, side edging, pointed hem, and tabs. Make two identical panels for a pair.
Finished Size and Construction
- Finished size (one panel): 24.5 in x 82.75 in (62.2 cm x 210.2 cm), plus tab loops of about 3.5 in (8.9 cm)
- Skill level: Intermediate
- Terminology: US
- Yarn weight: Worsted (#4) cotton or cotton blend
- Hook: 5.0 mm (H-8)
- Number of pieces: 2 panels, each worked in one piece; the panels are not joined
- Layout: one panel on each side of the window
- Body (mesh) size: 24 in x 80 in (61.0 cm x 203.2 cm), 32 squares wide and 80 rows tall
- Size before border: 24 in x 80.5 in (61.0 cm x 204.5 cm), including the foundation and top sc rows
- Border depth: top band 0.75 in (1.9 cm), sides 0.25 in (0.6 cm) each, hem points 1.5 in (3.8 cm)
Materials
Pick a smooth, firm cotton or cotton-linen blend of about 208 yd (190 m) per 100 g. Cotton holds the mesh square and doesn’t sag as much as acrylic over a long drop. Avoid fuzzy yarns, because they blur the lattice lines.
Amounts for a pair of panels:
- Cream (body): 900 g, about 1,710 m
- Taupe (lattice, borders, tabs): 350 g, about 665 m
For one panel, use half these amounts. These quantities include a margin of about 15% for your swatch and differences in tension.
Tools:
- 5.0 mm (H-8) crochet hook
- Tapestry needle
- Stitch markers (at least 10)
- Tape measure
- Rustproof pins and blocking mats, or a clean carpet covered with a towel
- Spray bottle
Abbreviations (US Terms)
- ch – chain
- sl st – slip stitch
- sc – single crochet
- hdc – half double crochet
- dc – double crochet
- tr – treble crochet (yo twice)
- dtr – double treble crochet (yo 3 times)
- sk – skip
- sp – space
- st(s) – stitch(es)
- RS / WS – right side / wrong side
Special stitches:
- Open square (OS): ch 2, sk next 2 sts (or the ch-2 sp), tr in next tr.
- Filled square (FS): tr in each of next 2 sts (or 2 tr in the ch-2 sp), tr in next tr.
- Junction: the top of a tr where it meets the row above. Number the tr columns 0 to 32 from right to left with the RS facing you. Junction (x, y) is the top of tr column x in Row y, and Row 0 is the foundation row.
- Overlay step (OVS): ch 3, then insert the hook from front to back into the base of the stitch sitting on the next junction, yo, and pull through the fabric and the loop on your hook.
Every row has 97 sts, because each square takes 3 sts and there is 1 extra tr: 32 x 3 + 1 = 97. Open and filled squares always use the same number of stitches.
Gauge and Checkpoints
Gauge: 4 squares (12 sts) = 3 in (7.6 cm) wide; 4 tr rows = 4 in (10.2 cm) tall, blocked.
Test one full diamond repeat first. Ch 26, then sc in the 2nd ch from the hook and in each ch across (25 sc). Work Rows 1–8 below over 8 squares: Row 3 is FS, 6 OS, FS; Rows 4–5 are 2 FS, 4 OS, 2 FS; Row 6 is the same as Row 3. Block the swatch. It should measure 6 in (15.2 cm) wide by 8.25 in (21.0 cm) tall.
Checkpoints:
- After Row 8 of the panel: 24 in x 8.25 in (61.0 cm x 21.0 cm)
- After Row 40: 40.25 in (102.2 cm) tall
- After Row 81: 24 in x 80.5 in (61.0 cm x 204.5 cm)
If your swatch is too wide, go down a hook size. If it’s too narrow, go up. If the width is right but the rows are too short, pull up the first loop of each tr a little more. If the rows are too tall, keep the first loop low. Rows that are only 1/8 in (0.3 cm) too tall will make each panel 10 in (25.4 cm) too long, so fix the gauge before you start.
Part 1: Cream Body
With cream, ch 98.
Foundation row (RS): Sc in 2nd ch from hook and in each ch across, turn. (97 sc)
Row 1: Ch 4 (counts as tr here and throughout), *ch 2, sk 2 sc, tr in next sc; rep from * across, turn. (32 OS, 97 sts)
Row 2: Ch 4, 32 OS, working last tr in top of the turning ch, turn. (32 OS, 97 sts)
Row 3: Ch 4, FS, 6 OS, [2 FS, 6 OS] 3 times, FS, turn. (8 FS + 24 OS, 97 sts)
Row 4: Ch 4, 2 FS, 4 OS, [4 FS, 4 OS] 3 times, 2 FS, turn. (16 FS + 16 OS, 97 sts)
Row 5: Repeat Row 4.
Row 6: Repeat Row 3.
Rows 7–8: Repeat Row 2.
Rows 3–6 make the solid cream diamonds. Each diamond is 2, 4, 4, then 2 squares wide, centered on tr columns 0, 8, 16, 24, and 32. The diamonds at columns 0 and 32 are half diamonds along the side edges. Every row reads the same in both directions, so you don’t need to track the RS.
Rows 9–80: Work 9 more bands of 8 rows each. Each band is Row 2 twice, then Rows 3–8. You now have 10 diamond bands. Place a marker every 8 rows.
Row 81: Ch 1, sc in first tr, *2 sc in ch-2 sp, sc in next tr; rep from * across. (97 sc) Fasten off.
The body now measures 24 in x 80.5 in (61.0 cm x 204.5 cm).
Part 2: Taupe Lattice Overlay
The lattice is made of 8 zigzag lines. Each line runs from the bottom of the panel to the top and makes 80 overlay steps, one for each mesh row. Hold the yarn behind the work and keep the chains on the RS.
Zigzag lines 1, 3, 5, and 7 start at junctions (0, 0), (8, 0), (16, 0), and (24, 0). For each one: join taupe with a sl st at the start junction. *Work 4 OVS up and to the left (one column over and one row up each time), then 4 OVS up and to the right; rep from * 9 more times. (80 OVS) You end at the same column in Row 80. Fasten off.
Zigzag lines 2, 4, 6, and 8 start at junctions (8, 0), (16, 0), (24, 0), and (32, 0). Work them the same way, but start by going up and to the right: *4 OVS up-right, 4 OVS up-left; rep from * 9 more times. (80 OVS)
Neighboring lines share a junction every 4 rows. This closes the lattice into diamonds 8 squares wide by 8 rows tall, which is 6 in x 8 in (15.2 cm x 20.3 cm). Every solid cream diamond sits in the middle of a lattice diamond. Each diagonal step covers about 1.25 in (3.2 cm), and ch 3 covers that distance without pulling.
Part 3: Taupe Inner Diamonds
The open lattice diamonds are centered on columns 4, 12, 20, and 28 at Rows 8, 16, 24, 32, 40, 48, 56, 64, and 72. That’s 36 per panel. For each one, find the center junction (x, y).
Join taupe with a sl st at junction (x, y – 2). Work 2 OVS up-left, 2 OVS up-right, 2 OVS down-right, and 2 OVS down-left, ending with a sl st in the first sl st. (8 OVS) Fasten off.
Each inner diamond is 4 squares wide by 4 rows tall: 3 in x 4 in (7.6 cm x 10.2 cm). Weave in all taupe ends along the overlay chains so they stay hidden.
Border
Border gauge: 16 sc = 4 in (10.2 cm), 4 sc rows = 1 in (2.5 cm). Along the side edges you also need 4 sc per inch.
Step 1 – Top band (Rows 82–84): With RS facing, join taupe in the first sc of Row 81. Ch 1, sc in each sc across, turn. (97 sc) Repeat for 2 more rows. (97 sc each row) Don’t fasten off at the end of Row 84 if you plan to start Tab 1 there.
The band adds 0.75 in (1.9 cm). The panel now measures 81.25 in (206.4 cm).
Step 2 – Side edging: With RS facing, join taupe at the top corner of one side edge. Work 1 sc in each of the 3 taupe row-ends, 1 sc in the end of Row 81, 4 sc around each tr row-end (80 rows), and 1 sc in the foundation row-end. (325 sc) Fasten off. Work the other side the same way, from the bottom up. (325 sc)
Here’s why that works: the side measures 81.25 in (206.4 cm), and 81.25 x 4 = 325. Each tr row is 1 in (2.5 cm) tall and gets 4 sc. Each sc row is 0.25 in (0.6 cm) tall and gets 1 sc. The edging lies flat without flaring or pulling in, and it adds 0.25 in (0.6 cm) on each side, bringing the width to 24.5 in (62.2 cm).
Step 3 – Pointed hem: With RS facing, join taupe with a sl st in the first free loop of the foundation chain. (st 1)
*Sc in next st, hdc in next st, dc in next st, tr in next st, dtr in next st, (dtr, ch 3, dtr) in next st, dtr in next st, tr in next st, dc in next st, hdc in next st, sc in next st, sl st in next st; rep from * 7 more times. (8 points) Fasten off.
The math: 9 sl sts + (8 points x 11 sts) = 97. The sl sts land under tr columns 0, 4, 8, and so on up to 32. Each point is centered under one zigzag line, at columns 2, 6, 10, and so on. Each point hangs about 1.5 in (3.8 cm).
Step 4 – Tabs: You’ll make 6 tabs, each 7 sts wide, with 11 sts between tabs: 6 x 7 + 5 x 11 = 97. The tabs sit on sts 1–7, 19–25, 37–43, 55–61, 73–79, and 91–97 of Row 84.
For each tab: Ch 1, sc in the 7 tab sts, turn. Work 27 more rows of 7 sc. (28 rows, 7 in / 17.8 cm long) Fasten off, leaving a 12 in (30.5 cm) tail. Fold the tab to the WS and whipstitch its last row just below the top of Row 84.
Each tab is 1.75 in (4.4 cm) wide, the gaps between tabs are 2.75 in (7.0 cm), and each loop stands about 3.5 in (8.9 cm) tall. That fits rods up to about 1.5 in (3.8 cm) across.
Make All Pieces
Make 2 panels.
- Per panel: cream 450 g (855 m), taupe 175 g (333 m)
- Per panel: 8 zigzag lines, 36 inner diamonds, 8 hem points, 6 tabs
Layout (front view):
[ Panel 1 ]   | window |   [ Panel 2 ]
 24.5 in wide                24.5 in wide
The panels hang separately and are not joined. The pattern is symmetrical, so they’re interchangeable.
Final Blocking
- Weave in all ends before blocking.
- Soak the panel in cool water for 15 minutes. Press out the water; don’t wring the panel.
- Roll it in towels to remove more water.
- Lay it flat on mats or a towel-covered carpet. If you’re short on space, work in sections of about 24 in (61.0 cm).
- Pin the side edges straight at 24.5 in (62.2 cm) apart, checking every 8 in (20.3 cm).
- Pin each hem point at its ch-3 tip.
- Line up the lattice vertices with a long straightedge.
- Let the panel dry completely, then unpin it.
Final Quality-Control Checklist
- Each panel measures 24.5 in x 82.75 in (62.2 cm x 210.2 cm).
- There are 10 diamond bands, and every band is 8 in (20.3 cm) tall.
- Every zigzag line has 80 OVS and ends in the same column where it started.
- All 36 inner diamonds are closed and centered.
- Each side edge has 325 sc and lies flat.
- There are 8 hem points of equal length.
- The 6 tabs are evenly spaced and securely sewn.
- The two panels match in length within 0.5 in (1.3 cm).
Troubleshooting
- Lattice puckers the mesh: Change to ch 4 per step, or loosen your slip stitches.
- Lattice lines sag: Change to ch 2 per step.
- Wrong stitch count: Make sure the turning ch-4 counts as a tr, and work the last tr into it.
- Diamonds don’t line up: Check that Rows 3 and 4 start with the correct number of FS.
- Hem points curl: Steam them lightly and pin them while they dry.
- Panel grows when hung: Cotton relaxes over time, so block it again and let it dry flat.
Care
Hand wash in cool water with mild detergent and dry flat. Don’t put the panels in the dryer or hang them wet, because their weight will stretch the mesh.
Final Notes
Here is the measurement chain. One square is 0.75 in (1.9 cm) wide and one row is 1 in (2.5 cm) tall. 32 squares make 24 in (61.0 cm), and 8 rows make one 8 in (20.3 cm) diamond band. Ten bands plus the foundation and top rows make 80.5 in (204.5 cm). The borders bring each panel to 24.5 in x 82.75 in (62.2 cm x 210.2 cm). If your swatch matches, every later stage will match too.
Happy crocheting!