

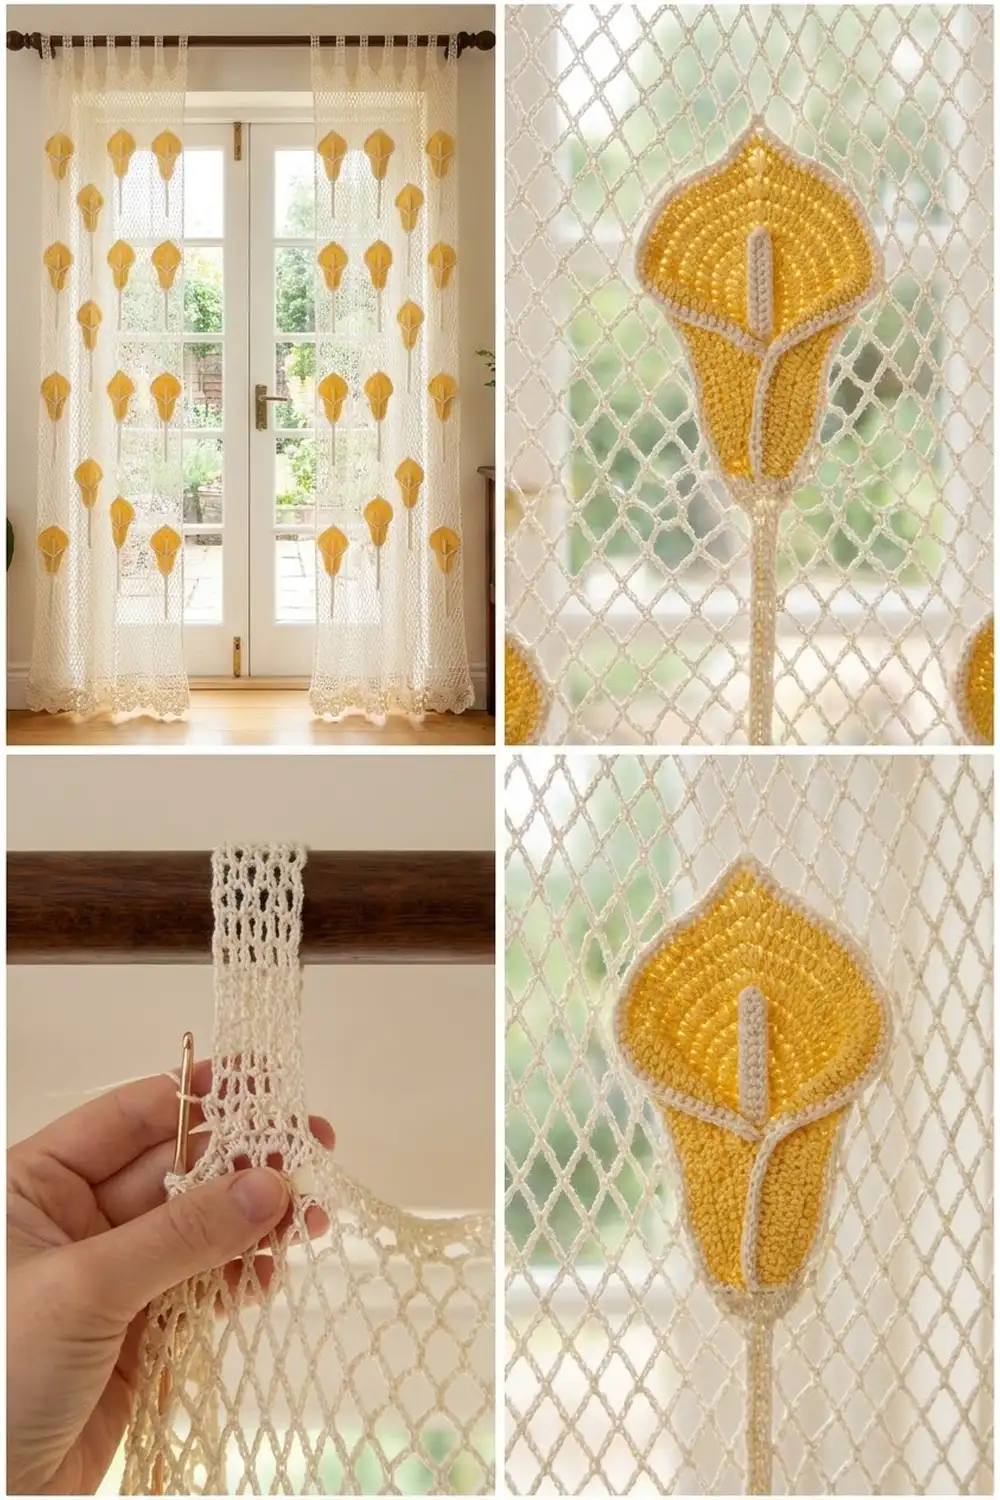
These airy cream lace panels are covered in soft yellow calla lilies. The background is an open diamond net that lets daylight through, and the solid yellow flowers stand out against it. Each lily has a cream outline, a raised cream center line and a slim stem, so the flowers look like they are growing up the curtain.
The pattern makes a matched pair of panels. Each panel is one long rectangle with tab tops for hanging and a scalloped hem. It suits cottage, farmhouse and vintage-inspired rooms, and it works especially well on French doors and tall windows.
All instructions use US crochet terms. Each finished panel measures 32.25 in (81.9 cm) wide and 76.5 in (194.3 cm) long, with the tabs adding about 3.5 in (8.9 cm) above that. Total hanging length is about 80 in (203.2 cm).
Construction overview: first crochet the mesh body flat in rows. Next, work a two-round border that adds a plain edge on the top and sides and scallops along the hem. Then crochet eight tabs directly onto the top edge. Finally, make the lily appliqués and stems separately and sew them onto the blocked panel.
Finished Size and Construction
- Finished panel size: 32.25 in × 76.5 in (81.9 cm × 194.3 cm), plus 3.5 in (8.9 cm) tab loops
- Skill level: Intermediate
- Terminology: US crochet terms
- Yarn weight: Sport (#2) mercerized cotton
- Hook: 3.5 mm (E-4)
- Number of pieces: 2 separate panels (not joined). Each panel has 1 mesh body, 18 lily appliqués and 18 stems.
- Layout: 7 staggered tiers of lilies per panel, alternating 3 and 2 flowers
- Lily size: 4.5 in × 3.75 in (11.4 cm × 9.5 cm)
- Size before border: 31.25 in × 75 in (79.4 cm × 190.5 cm)
- Border depth: 0.5 in (1.3 cm) on the top and sides; 1 in (2.5 cm) on the scalloped bottom
Materials
Use a smooth mercerized cotton or cotton blend in sport weight, about 150 m per 50 g. Cotton gives crisp stitch definition, blocks well and won’t stretch much under its own weight. Avoid fuzzy or very stretchy yarns, because long lace curtains drop over time.
For the pair of panels:
– Cream (main color): 1,100 g / 3,300 m (about 22 balls of 50 g)
– Soft yellow (lilies): 100 g / 300 m (about 2 balls of 50 g)
For one panel, halve these amounts: 550 g / 1,650 m cream and 50 g / 150 m yellow. All quantities include a margin of about 10% for gauge swatches and tails.
Tools:
– 3.5 mm (E-4) crochet hook
– Tapestry needle
– Stitch markers (at least 20)
– Rust-proof pins
– Blocking surface large enough for a 32 in × 77 in (81.3 cm × 195.6 cm) panel, such as foam mats on the floor or a bed with a clean sheet
– Measuring tape and spray bottle
Abbreviations (US Terms)
- ch: chain
- sc: single crochet
- hdc: half double crochet
- dc: double crochet
- tr: treble crochet
- sl st: slip stitch
- sk: skip
- sp: space
- st(s): stitch(es)
- rep: repeat
- RS / WS: right side / wrong side
Surface slip stitch: hold the working yarn behind the piece and insert the hook from front to back through a stitch. Pull up a loop and draw it through the loop on the hook. This makes a raised chain line on the front.
Gauge and Checkpoints
Mesh gauge (blocked): 4 ch-5 loops = 5 in (12.7 cm) wide, and 10 rows = 6 in (15.2 cm) tall.
Lily gauge: 5 sc and 6 rows = 1 in (2.5 cm).
Tab gauge: 4 dc = 1 in (2.5 cm) wide, and 4 dc rows = 2 in (5.1 cm) tall.
Make a mesh swatch before you start. Chain 26 and work Rows 1–3 of the body, repeating Rows 2–3 until you have 12 rows. This gives 6 loops across. Wet block it, pin it flat without stretching, and measure the center 4 loops and 10 rows.
If your swatch is too big, go down 0.25 mm in hook size or chain more tightly. If it is too small, go up 0.25 mm. Lace grows when it hangs, so never stretch the swatch to reach gauge.
Checkpoints for the body (measured flat):
– After Row 1: 31.25 in (79.4 cm) wide
– After Row 20: 12 in (30.5 cm) tall
– After Row 65: 39 in (99.1 cm) tall
– After Row 125: 75 in (190.5 cm) tall
Also make one test lily. After Row 16 it should measure about 4.25 in (10.8 cm) wide and 2.75 in (7.0 cm) tall.
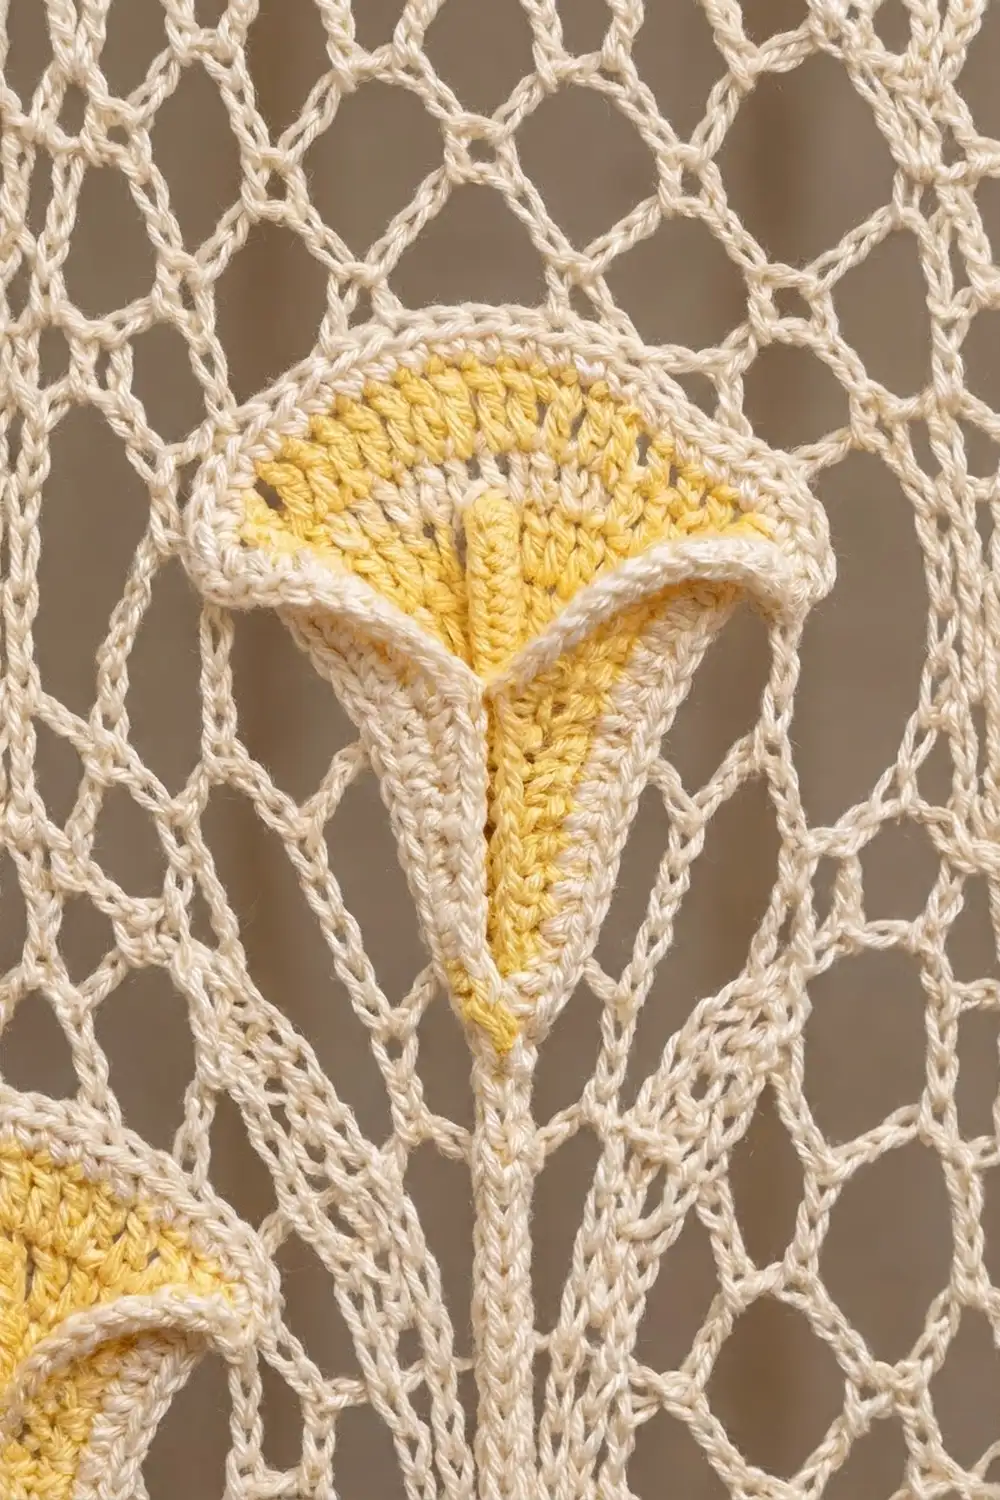
Mesh Body (make 2)
Use cream yarn.
Ch 102.
Row 1: Sc in 6th ch from hook. Ch 5, sk 3 ch, sc in next ch. Rep from * 23 more times (24 repeats in total). Count: 25 ch-5 loops. The beginning chains count as the first loop.
Row 2: Ch 5 (counts as dc + ch 2), turn. Sc in first ch-5 sp. Ch 5, sc in next ch-5 sp. Rep from * 23 more times. Ch 2, dc in last sc. Count: 24 full loops plus 2 half loops (one at each edge).
Row 3: Ch 1, turn. Sc in first dc. Ch 5, sc in next full ch-5 sp. Rep from * 23 more times. Ch 5, sc in 3rd ch of turning ch. Count: 25 ch-5 loops.
Rows 4–125: Rep Rows 2–3 sixty-one more times. You will end on an odd row with 25 loops.
At this point the body measures 31.25 in × 75 in (79.4 cm × 190.5 cm). Do not fasten off; go straight into the border.
Border
The border uses the same rate as the body: 4 sc per inch (2.5 cm). That means 5 sc fit into each 1.25 in (3.2 cm) loop. Work with the RS facing. Go across the top from right to left, down the left side, across the bottom and up the right side.
Round 1: Ch 1. Work 3 sc in the corner sc.
– Top: work 5 sc in each of the 25 loops (125 sc). Work 3 sc in the corner sc.
– Left side: working into the row-ends, follow the sequence 2 sc, 3 sc, 2 sc, 3 sc, 2 sc across each set of 5 rows. That is 12 sc per 5 rows, repeated 25 times (300 sc). Work 3 sc in the corner.
– Bottom: working into the foundation ch, put 5 sc in each of the 25 gaps: the beginning ch-5 plus the 24 three-ch gaps (125 sc). Work 3 sc in the corner.
– Right side: repeat the left-side sequence (300 sc).
– Sl st to the first sc.
Count: top 125, bottom 125 and each side 300 sc between the corner groups, plus 4 corner groups of 3 sc. Total: 862 sc. In this pattern the corner groups are counted separately from the per-side totals.
Why the math works: 125 sc ÷ 4 sc per inch = 31.25 in, which matches the body width. 300 sc ÷ 4 = 75 in, which matches the body length.
Round 2: Sl st into the center sc of the top-right corner. Ch 1, 3 sc in the same st.
– Top: sc in the next 127 sts, then 3 sc in the top-left corner center.
– Left side: sc in the next 302 sts, then 1 sc in the bottom-left corner center.
– Scalloped hem: sc in the next st. Sk 2 sts, 7 dc in the next st, sk 2 sts, sc in the next st. Rep from * 20 more times. Count: 21 scallops. The last sc lands in the first st of the bottom-right corner group.
– 1 sc in the bottom-right corner center.
– Right side: sc in the next 302 sts.
– Sl st to the first sc. Total: 908 sts.
Why the scallops fit: the hem section has 127 sts (1 corner st + 125 + 1 corner st). Each scallop uses 6 sts, plus 1 sc to start, so 21 × 6 + 1 = 127. Each scallop is 1.5 in (3.8 cm) wide and about 0.75 in (1.9 cm) deep.
Fasten off.
Tabs (8 per panel)
Each tab is worked over 8 of the 127 top stitches from Round 2, not counting the corner groups. Leave 9-st gaps between tabs: 8 tabs × 8 sts + 7 gaps × 9 sts = 127. Place a marker on the first st of each tab: sts 1, 18, 35, 52, 69, 86, 103 and 120.
Join cream yarn with the RS facing in the first marked st.
Row 1: Ch 3 (counts as dc), dc in the next 7 sts. Count: 8 dc.
Row 2: Ch 3, turn. Dc in the next 2 sts, ch 2, sk 2 sts, dc in the last 3 sts. Count: 6 dc + 1 ch-2 sp.
Row 3: Ch 3, turn. Dc in the next 2 sts, 2 dc in the ch-2 sp, dc in the last 3 sts. Count: 8 dc.
Rows 4–14: Rep Rows 2–3 five more times, then work Row 2 once more.
The tab measures 7 in (17.8 cm). Fasten off and leave a 12 in (30.5 cm) tail. Fold the tab to the WS and whipstitch Row 14 to the back of the same 8 border sts. This makes a 3.5 in (8.9 cm) loop that fits rods up to 1.5 in (3.8 cm) in diameter.
Lily Appliqué (18 per panel)
Use yellow yarn. Either side can be the RS.
Ch 2.
- Row 1: 3 sc in 2nd ch from hook. (3 sc)
- Row 2: Ch 1, turn, sc in each st. (3)
- Row 3: Ch 1, turn, 2 sc in the first st, sc in each st to the last st, 2 sc in the last st. (5)
- Row 4: Rep Row 2. (5)
- Rows 5–15: Rep Rows 3–4, ending with Row 3. Counts: Row 5 = 7, Row 6 = 7, Row 7 = 9, Row 8 = 9, Row 9 = 11, Row 10 = 11, Row 11 = 13, Row 12 = 13, Row 13 = 15, Row 14 = 15, Row 15 = 17.
- Row 16 (flare): Ch 1, turn. 2 sc in each of the first 2 sts, sc in the next 13 sts, 2 sc in each of the last 2 sts. (21)
- Row 17 (three points): Ch 1, turn. Sc in the next st, hdc in the next st, dc in the next st, (tr, ch 2, tr) in the next st, dc in the next st, hdc in the next st, sc in the next st. Rep from * 2 more times. Count: 24 sts + 3 ch-2 points.
Fasten off yellow.
Outline (cream): Join cream with a sc in the foundation ch at the base, then work 2 more sc in the same place (3 sc at the base).
– Sc in each row-end of Rows 1–17 up one edge (17 sc).
– Across the top, sc in each st and work (sc, ch 2, sc) in each ch-2 point (30 sc + 3 ch-2 sps).
– Sc in each row-end down the other edge (17 sc).
– Sl st to the first sc.
Count: 67 sc + 3 ch-2 sps.
Center line: With cream, work 13 surface slip stitches up the center stitch column, from Row 2 to Row 14.
Stem (18 per panel, cream): Ch 31. Sl st in 2nd ch from hook and in each ch across. Count: 30 sl sts, about 6 in (15.2 cm) long.
Make All Pieces
For the pair:
– Cream: 2 mesh bodies (with border and tabs), 36 stems, and outlines and center lines on all 36 lilies
– Yellow: 36 lily bodies
Layout per panel: the numbers below are loop positions counted from the right edge (25 loops across). Lily bases sit on these rows:
Tier 7  Row 110  66 in (167.6 cm):  loops  5 . . 13 . . 21
Tier 6  Row 95   57 in (144.8 cm):  loops  . 9 . . 17 . .
Tier 5  Row 80   48 in (121.9 cm):  loops  5 . . 13 . . 21
Tier 4  Row 65   39 in (99.1 cm):   loops  . 9 . . 17 . .
Tier 3  Row 50   30 in (76.2 cm):   loops  5 . . 13 . . 21
Tier 2  Row 35   21 in (53.3 cm):   loops  . 9 . . 17 . .
Tier 1  Row 20   12 in (30.5 cm):   loops  5 . . 13 . . 21
Tiers are 9 in (22.9 cm) apart, giving 3 + 2 + 3 + 2 + 3 + 2 + 3 = 18 lilies. Lily centers fall at 5.625 in (14.3 cm), 15.625 in (39.7 cm) and 25.625 in (65.1 cm) from the right edge, or at 10.625 in (27.0 cm) and 20.625 in (52.4 cm). The layout is symmetrical. The top lily tips end 5.25 in (13.3 cm) below the top of the body.
Joining
Block the panel and the lilies before you sew anything on (see Final Blocking). Pin each lily RS up so its base sits on the marked loop. Then pin its stem straight down for 6 in (15.2 cm), which is 10 rows.
Sewing: use a cream tail and whipstitch through the back loop of each outline sc. Catch the nearest mesh chain strand behind it, aiming for about 1 stitch per outline sc. Sew the stem along its center, every 2 sl sts. The ch-2 points stay free so the flower tips can lift slightly.
Tension: pull each stitch only snug enough to close the gap. If you pull harder, the mesh puckers around the flower. Lay the panel flat after every tier.
Size checkpoint: after all lilies are attached, the panel should still measure 32.25 in × 76.5 in (81.9 cm × 194.3 cm). If it has drawn in, loosen the stitches around the most recent tier.
Final Blocking
- Soak the panel in cool water with wool wash for 15 minutes.
- Press out the water. Never wring the lace. Roll the panel in towels to remove more water.
- Lay it flat and pin the corners to 32.25 in × 76.5 in (81.9 cm × 194.3 cm).
- Pin the sides every 4 in (10.2 cm), keeping the edges straight.
- Pin the tip of each scallop so all 21 sit evenly.
- Open the mesh loops into even diamonds with your fingers.
- Flatten the lilies and pin each of the three points.
- Let the panel dry completely, which can take 24–48 hours.
- Repeat for the second panel and compare the two side by side.
Final Quality-Control Checklist
- Body has 125 rows and 25 loops across every odd row
- Border Round 1 has 862 sc and Round 2 has 908 sts
- The hem has 21 even scallops
- There are 8 tabs, each 8 sts wide, with 9-st gaps between them
- Each panel has 18 lilies on the correct rows and loops
- Each lily outline has 67 sc + 3 points, and the center lines are straight
- Both panels match in length to within 0.5 in (1.3 cm)
- All tails are woven in through solid stitches, not through the mesh
Troubleshooting
- The body is narrowing: you skipped the half loop at a row edge. Check each row’s count of 25 loops or 24 loops plus 2 halves.
- The hem ripples: the sc in Round 1 are too tight. Redo Round 1 with a hook 0.5 mm larger.
- The scallops come out uneven: recount the hem section. It must be exactly 127 sts.
- The lilies are cupping: your sc tension is too tight. Go up 0.25 mm in hook size or block the lily harder.
- The mesh puckers around the flowers: remove the whipstitches and resew them more loosely.
- The tabs twist: fold each one straight and sew all 8 sts across.
Care
Hand wash cold, press out the water and dry flat, re-pinning if needed. Avoid hanging the panels wet, because the weight of the water stretches the lace.
Final Notes
The whole pattern follows one measurement chain:
1. The mesh gauge of 4 loops = 5 in (12.7 cm) gives a body of 25 loops = 31.25 in (79.4 cm).
2. The 125 rows give 75 in (190.5 cm).
3. Round 1 converts this at 4 sc per inch into 125 and 300 sts per side.
4. Round 2 turns the 127 hem sts into 21 scallops.
5. The tabs divide the 127 top sts into 8 tabs and 7 gaps.
6. Each panel finishes at 32.25 in × 76.5 in (81.9 cm × 194.3 cm), plus 3.5 in (8.9 cm) tab loops.
Check each stage against its number before moving on, and both panels will match.
Happy crocheting!