

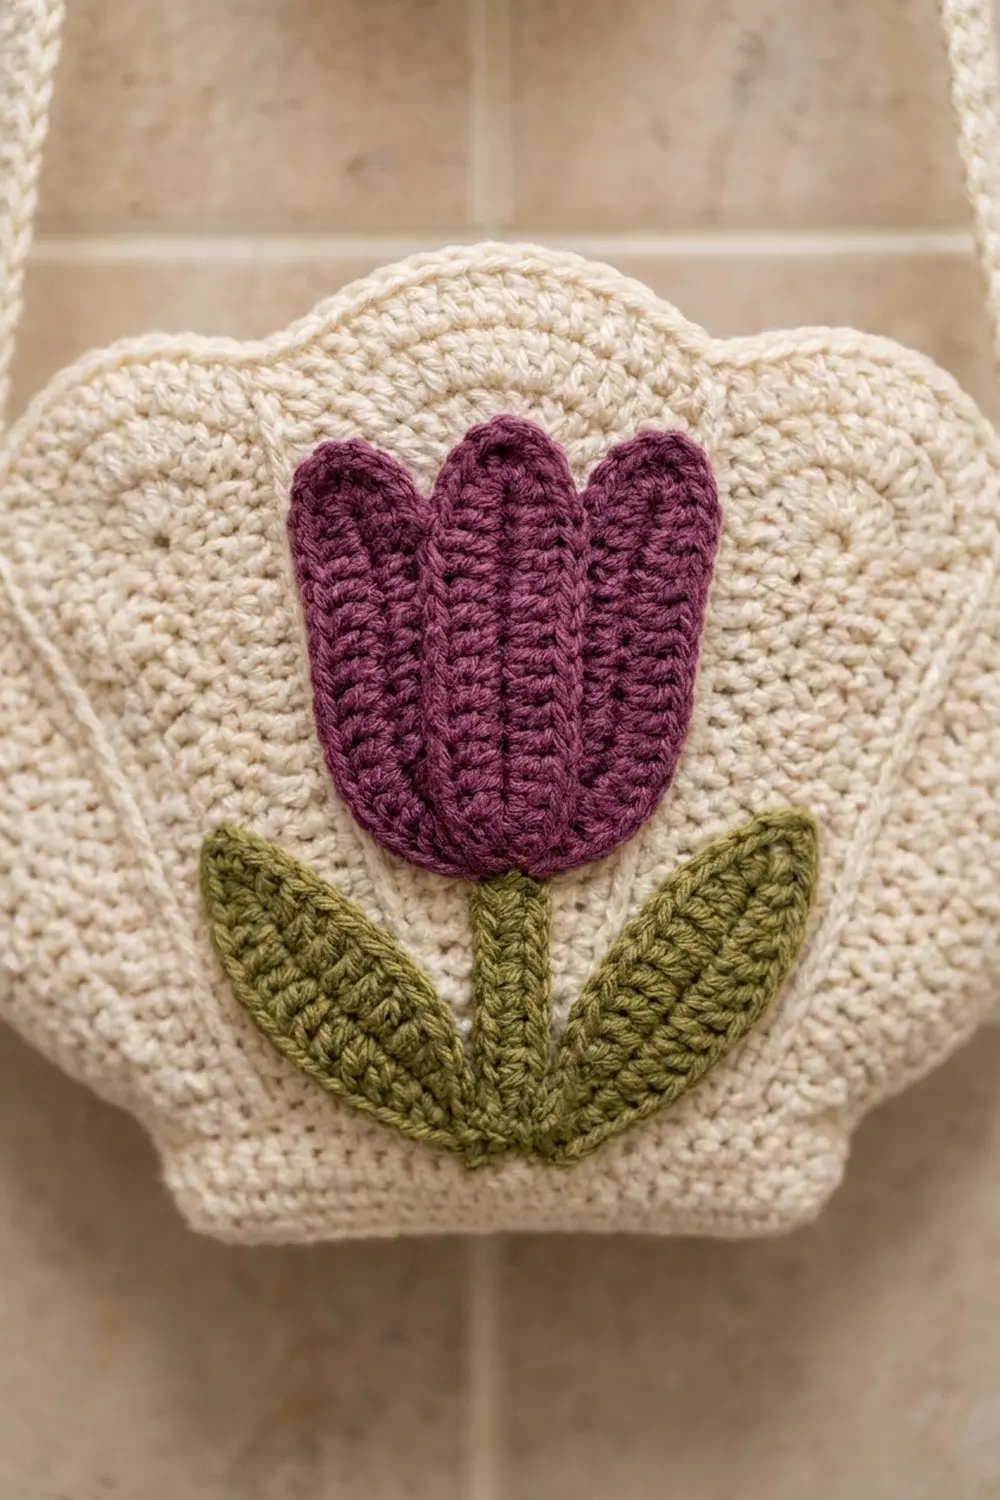
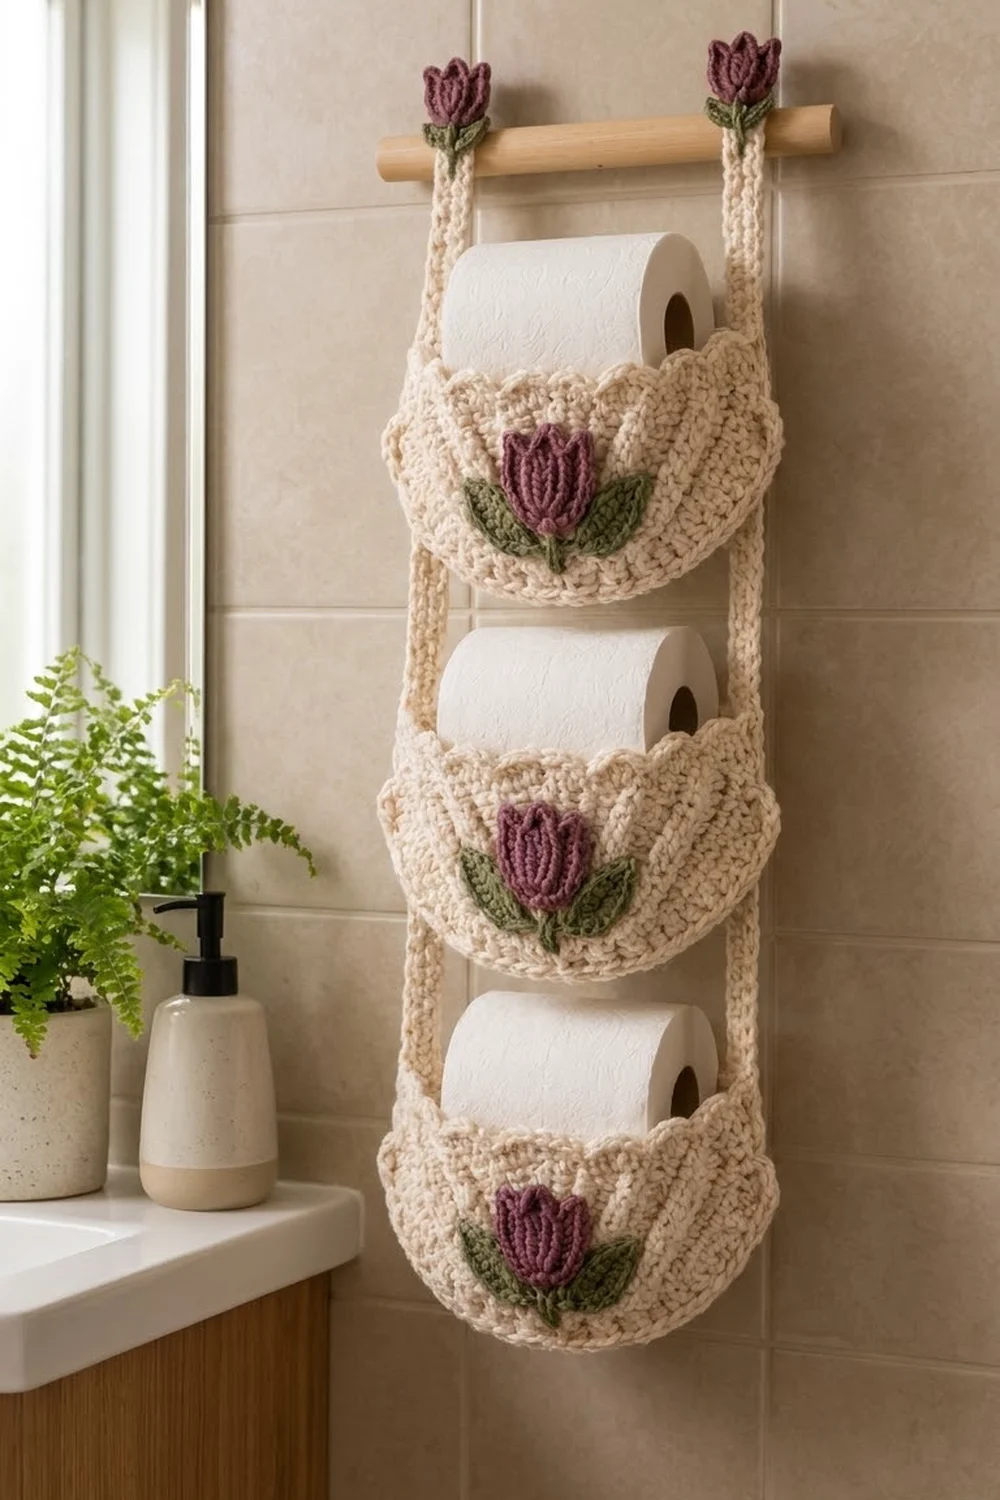
This hanging holder stores three spare rolls in a column of shell-shaped pockets. Each pocket front is a ribbed half-circle fan with a scalloped rim, and a plum tulip with olive-green leaves sits in the center. Two textured straps carry the pockets and loop over a wooden dowel, and a small tulip tops each loop.
The colors are cream for the pockets and straps, plum for the tulips, and olive green for the stems and leaves. It has a soft, cottage-style look.
The pattern uses US crochet terms. Hanging below the dowel, the finished holder measures about 9.75 in (24.8 cm) wide and 25.25 in (64.1 cm) long, or about 27 in (68.6 cm) tall with the tulip toppers.
You’ll make three pockets, each from a ribbed front fan, a plain back fan, and a rectangular base. Then you crochet two straps and the appliqués, sew the pockets together, attach them to the straps, and add a light border to finish.
Finished Size and Construction
- Finished size: 9.75 in (24.8 cm) wide x 25.25 in (64.1 cm) long below the dowel
- Skill level: Intermediate (post stitches, shaping, sewing)
- Terminology: US
- Yarn weight: Worsted (#4) cotton or cotton blend
- Hooks: 5.0 mm (H-8) for the body, 4.0 mm (G-6) for the appliqués
- Number of pieces: 29 (9 pocket pieces, 2 straps, 18 appliqué pieces)
- Layout: 1 column of 3 pockets between 2 straps
- Front fan size: 8.5 in (21.6 cm) wide x 4.75 in (12.1 cm) tall, including the scallops
- Back fan before border: 8.5 in (21.6 cm) wide x 4.25 in (10.8 cm) tall
- Base: 8.5 in (21.6 cm) x 4 in (10.2 cm)
- Border depth: 0.25 in (0.6 cm)
Materials
Use a smooth, firm worsted cotton or cotton blend. It shows the ribs clearly, holds its shape under the weight of the rolls, and copes well with bathroom humidity. Avoid fuzzy yarns, which hide the texture.
- Cream: 250 g, about 425 m (pockets, straps)
- Plum: 40 g, about 68 m (tulips)
- Olive green: 30 g, about 51 m (stems, leaves)
These quantities include a margin of about 25 percent for your gauge swatch and any differences in tension.
Tools:
– 5.0 mm (H-8) and 4.0 mm (G-6) crochet hooks
– Tapestry needle
– Stitch markers
– Wooden dowel, 12 in (30.5 cm) long and about 0.75 in (1.9 cm) thick
– Rust-proof pins and a blocking mat
– Measuring tape
Abbreviations (US Terms)
- ch: chain
- sl st: slip stitch
- sc: single crochet
- hdc: half double crochet
- dc: double crochet
- tr: treble crochet
- BLO: back loop only
- sk: skip
- st(s): stitch(es)
- tch: turning chain
- RS / WS: right side / wrong side
Special stitches:
– FPdc (front post double crochet): Yarn over, insert the hook from front to back to front around the post of the stitch, then finish as a dc.
– BPdc (back post double crochet): Yarn over, insert the hook from back to front to back around the post, then finish as a dc.
– Rib: FPdc on RS rows and BPdc on WS rows. Either way, the rib stands up on the RS.
Gauge and Checkpoints
With the 5.0 mm hook:
– 14 dc and 8 rows = 4 in (10.2 cm)
– 16 sc and 18 rows = 4 in (10.2 cm)
Crochet one front fan before anything else and measure it. It is your gauge test.
Checkpoints:
– After Row 4 of the fan, the straight edge should measure 4.5 in (11.4 cm) wide.
– After Row 8, it should be 8.5 in (21.6 cm) wide, with a 4.25 in (10.8 cm) radius.
– A finished base should be 8.5 in (21.6 cm) x 4 in (10.2 cm).
If your fan comes out too big, go down half a hook size. If it’s too small, go up half a size. If the curved edge ripples, your rows are too short, so loosen your dc. If the fan cups, tighten slightly.
Front Fan (Make 3, Cream)
Work in turned rows from a magic ring. The ch-3 at the start of each row counts as a dc. In each row, the first and last sts are edge sts. Five ribs divide the fan into six wedges.
Row 1 (RS): Make a magic ring, ch 3, then work 6 dc in the ring. Pull the ring closed. Turn. (7 sts: 2 edge sts + 5 rib bases)
Row 2 (WS): Ch 3, dc in the same st. [BPdc around the next st, dc in the top of the same st] 5 times. Dc in the top of the tch. Turn. (13 sts)
Row 3 (RS): Ch 3, dc in the same st, dc in the next st. [FPdc around the next st, dc in the top of the same st, dc in the next st] 5 times. Dc in the top of the tch. Turn. (19 sts)
For Rows 4 to 8, follow this rule: ch 3, dc in the same st, then dc in each of the next X sts. Next, [rib around the next st, dc in the top of the same st, dc in each of the next X sts] 5 times. Finish with a dc in the top of the tch and turn.
- Row 4 (WS): X = 2, using BPdc ribs. (25 sts)
- Row 5 (RS): X = 3, using FPdc ribs. (31 sts)
- Row 6 (WS): X = 4, using BPdc ribs. (37 sts)
- Row 7 (RS): X = 5, using FPdc ribs. (43 sts)
- Row 8 (WS): X = 6, using BPdc ribs. (49 sts)
Each row adds 6 sts, one per wedge, which is about right for a flat dc half circle. Row 8 is set up as 2 edge sts + 5 ribs + 6 wedges of 7 plain dc = 49.
Row 9 (RS, scallop trim): Ch 1, sc in the first st. [Sk 3, 7 dc in the next st, sk 3, sc in the next st] 6 times. The sixth sc goes into the tch. Don’t turn. (49 sts = 7 sc + 42 dc; 6 scallops)
Each scallop is centered over a wedge, and each sc lands on top of a rib, so the ribs run straight into the dips between scallops.
Straight-edge row: Rotate the piece so you can work along the straight edge. Skip the end of Row 9. Work 2 sc into the end of each row from Row 8 down to Row 1, then 2 sc into the center ring. Then work 2 sc into the end of each row from Row 1 up to Row 8 on the other side. Fasten off. (34 sc = 16 + 2 + 16)
Back Fan (Make 3, Cream)
Work Rows 1 to 8 exactly as for the front fan, but use a plain dc instead of each FPdc or BPdc. Row 8 still has 49 sts. Skip Row 9. Work the straight-edge row the same way, for 34 sc. Leave a long tail. The border is added later.
Base (Make 3, Cream)
Ch 35.
Row 1: Sc in the 2nd ch from the hook and in each ch across. Turn. (34 sc)
Rows 2–18: Ch 1, sc in each st across. Turn. (34 sc)
Fasten off. The base measures 8.5 in (21.6 cm) x 4 in (10.2 cm).
Straps (Make 2, Cream)
Ch 121.
Row 1: Sc in the 2nd ch from the hook and in each ch across. Turn. (120 sc)
Rows 2–3: Ch 1, sc BLO in each st across. Turn. (120 sc)
Fasten off. Each strap measures 30 in (76.2 cm) long and about 0.75 in (1.9 cm) wide after the border.
Appliqués (4.0 mm Hook)
Large Tulip (Make 3, Plum)
Ch 8.
Row 1 (WS): Sc in the 2nd ch from the hook and in each ch across. Turn. (7 sc)
Row 2 (RS): Ch 2 (doesn’t count as a st). 2 dc in the first st. [FPdc around the next st, dc in the next st] twice. FPdc around the next st, 2 dc in the last st. Turn. (9 sts)
Row 3 (WS): Ch 2. 2 dc in the first st, dc in the next st. [BPdc around the next st, dc in the next st] 3 times. 2 dc in the last st. Turn. (11 sts)
Row 4 (RS): Ch 2. Dc in each of the first 3 sts. [FPdc around the next st, dc in the next st] twice. FPdc around the next st, dc in each of the last 3 sts. Turn. (11 sts; ribs on sts 4, 6, and 8)
Row 5 (petals): Ch 1. Sc in st 1, sk st 2, 5 dc in st 3, sk st 4, sc in st 5, 7 tr in st 6, sc in st 7, sk st 8, 5 dc in st 9, sk st 10, sc in st 11. (21 sts = 4 sc + 17 shell sts)
Fasten off. The tulip measures about 2.75 in (7.0 cm) wide x 2.5 in (6.4 cm) tall. The center petal sits over the middle rib and rises highest.
Large Leaf (Make 6, Olive)
Ch 9. Working from the 2nd ch from the hook: sc, hdc, 3 dc, hdc, sc (7 sts). Work (sc, ch 2, sc) in the last ch for the tip. Rotate the piece and work along the other side of the chain: sc, hdc, 3 dc, hdc, sc (7 sts). Sl st to the first sc. (16 sts + ch-2 tip)
The foundation chain becomes the center vein. Each leaf is about 2 in (5.1 cm) long.
Stem (Make 3, Olive)
Ch 6. Sl st in the 2nd ch from the hook and in each of the next 4 ch. (5 sl st, 1.25 in / 3.2 cm)
Mini Tulip (Make 2, Plum)
Ch 6.
Row 1: Sc in the 2nd ch from the hook and in each ch across. Turn. (5 sc)
Row 2: Ch 2 (doesn’t count). 2 dc in the first st, dc in each of the next 3 sts, 2 dc in the last st. Turn. (7 sts)
Row 3: Sc in the first st, 3 dc in the next, sc in the next, 5 tr in the next, sc in the next, 3 dc in the next, sc in the last st. (15 sts = 4 sc + 11 petal sts)
Mini Leaf (Make 4, Olive)
Ch 6. Working from the 2nd ch from the hook: sc, hdc, dc, hdc. Work 3 sc in the last ch. Along the other side of the chain: hdc, dc, hdc, sc. Sl st to the first sc. (11 sts, 1.25 in / 3.2 cm)
Layering: Center the stem on each front fan so its lower end sits 0.5 in (1.3 cm) above the straight edge. Sew the tulip head so it overlaps the top of the stem. Then tuck the leaves under the lower corners of the tulip, angling them up and out. Sew around all edges with matching yarn. Sew a mini tulip and two mini leaves to the front of each strap loop, just above the dowel.
Make All Pieces
- Cream: 3 front fans, 3 back fans, 3 bases, 2 straps (11 pieces)
- Plum: 3 large tulips, 2 mini tulips (5 pieces)
- Olive: 6 large leaves, 3 stems, 4 mini leaves (13 pieces)
Layout, viewed from the front:
 [mini tulip]                [mini tulip]
 ( loop over dowel )         ( loop over dowel )
 | strap |  POCKET 1 (top)    | strap |
 | strap |  -- 3.75 in gap -- | strap |
 | strap |  POCKET 2          | strap |
 | strap |  -- 3.75 in gap -- | strap |
 | strap |  POCKET 3          | strap |
Joining
Pocket assembly: Hold a front fan and a base with their WS together. Line up the 34 sc of the straight edge with the 34 sts of Row 1 of the base. Sc through both layers, one stitch to one stitch, for 34 sc. Join the back fan to Row 18 of the base the same way, for another 34 sc.
Because the counts match exactly, the seam stays flat and the base doesn’t flare. The short ends of the base stay open, and the straps close them.
Strap attachment: Fold the top 3.5 in (8.9 cm) of each strap over the dowel to the back and sew it down. This leaves 26.5 in (67.3 cm) hanging. Measuring down from the top of the dowel, place the top of each pocket’s center scallop at 3.5 in (8.9 cm), 12 in (30.5 cm), and 20.5 in (52.1 cm). This leaves a 3.75 in (9.5 cm) gap between pockets.
Center a strap over each side edge of the back fan. Sew it from the bottom corner up 3 in (7.6 cm), then stitch the corner of the base to the strap. Fold the last 1.25 in (3.2 cm) of the strap under the lowest base and sew it in place.
Tension: Use firm, even stitches when sewing. Loose seams will sag once the rolls go in.
Checkpoint: The hanging length should be 25.25 in (64.1 cm), and the width across the straps should be 9.75 in (24.8 cm).
Border
The border gauge is 4 sc per inch, using the 5.0 mm hook.
Back rim (each pocket): Join cream in the first st of Row 8 on the back fan. Ch 1, then sc in each st across. (49 sc = 49 sts worked 1 per st + 0 added)
This brings the back fan to 9 in (22.9 cm) wide and 4.5 in (11.4 cm) tall, so it sits just behind the front scallops.
Strap edging: Work sl st loosely along each long edge of each strap, 1 per st or ch. That’s 120 sl st per side, or 240 per strap, with 0 added at the ends.
Why the math works: Each border row works exactly 1 st into each existing st and adds nothing. The rim gets about 0.25 in (0.6 cm) taller without ruffling, and the straps stay 30 in (76.2 cm) long.
Final Blocking
- Before assembly, lightly mist the appliqués, pin the tulip petals open, and let them dry.
- Pin each front fan to 8.5 in (21.6 cm) wide, with the scallops spread evenly.
- Steam lightly from above without touching the yarn, so the ribs stay raised.
- After assembly, hang the holder on the dowel. While it’s still damp, place a dry roll in each pocket so the pockets set in shape.
- Let it dry completely, which takes about 24 hours.
Final Quality-Control Checklist
- Each front fan has 5 straight ribs and 6 even scallops.
- Every seam has 34 sc, with no gaps.
- The gaps between pockets measure 3.75 in (9.5 cm).
- The tulips are centered and the leaves are symmetric.
- All tails are woven in on the WS.
- The holder hangs straight, 25.25 in (64.1 cm) long.
Troubleshooting
- Ribs wander sideways: You put the post stitch around the wrong stitch. Count wedges after every row.
- Fan ruffles: Your stitches are too tight. Use a larger hook.
- Scallops are uneven: Check that Row 8 has 7 plain dc in each wedge.
- Pockets droop: Use firmer seams and add a second row of sewing at the strap corners.
- Tulip curls: Wet-block it flat before sewing.
Care
Hand wash in cool water, press out the excess, and dry flat. Reshape the pockets with rolls while they’re still damp.
Final Notes
The measurements build on each other. Gauge gives a front fan 8.5 in (21.6 cm) wide. That fan matches the 34-stitch base, the three pockets fit 3.75 in (9.5 cm) apart, and the 30 in (76.2 cm) straps give a holder 25.25 in (64.1 cm) long. If each checkpoint matches, the finished piece will too.
Happy crocheting!