

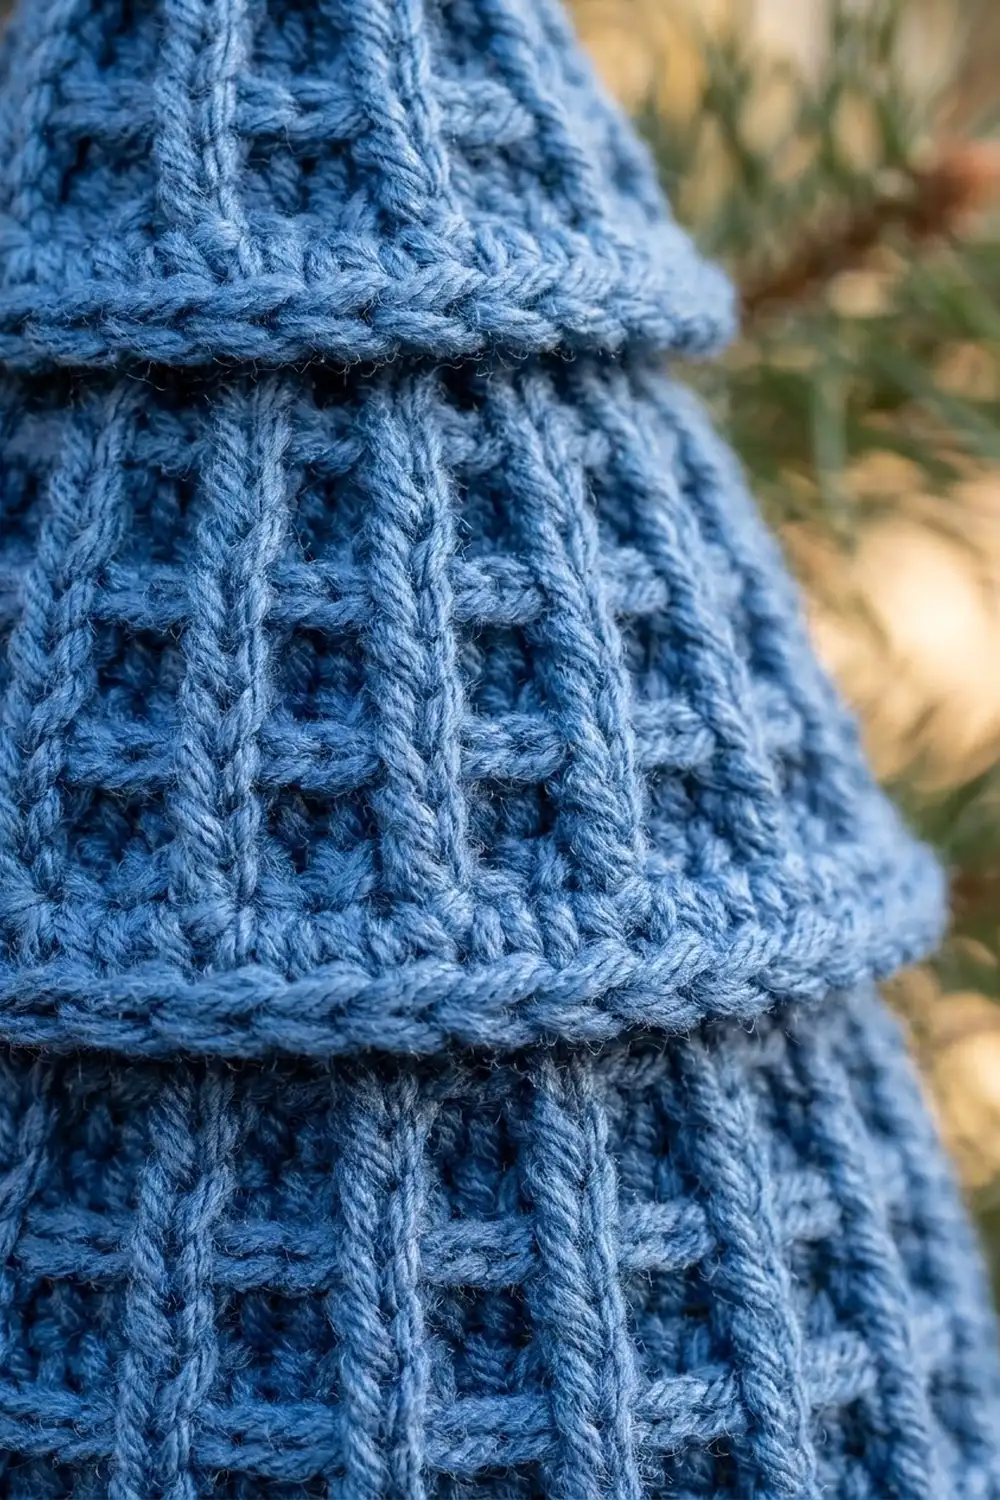
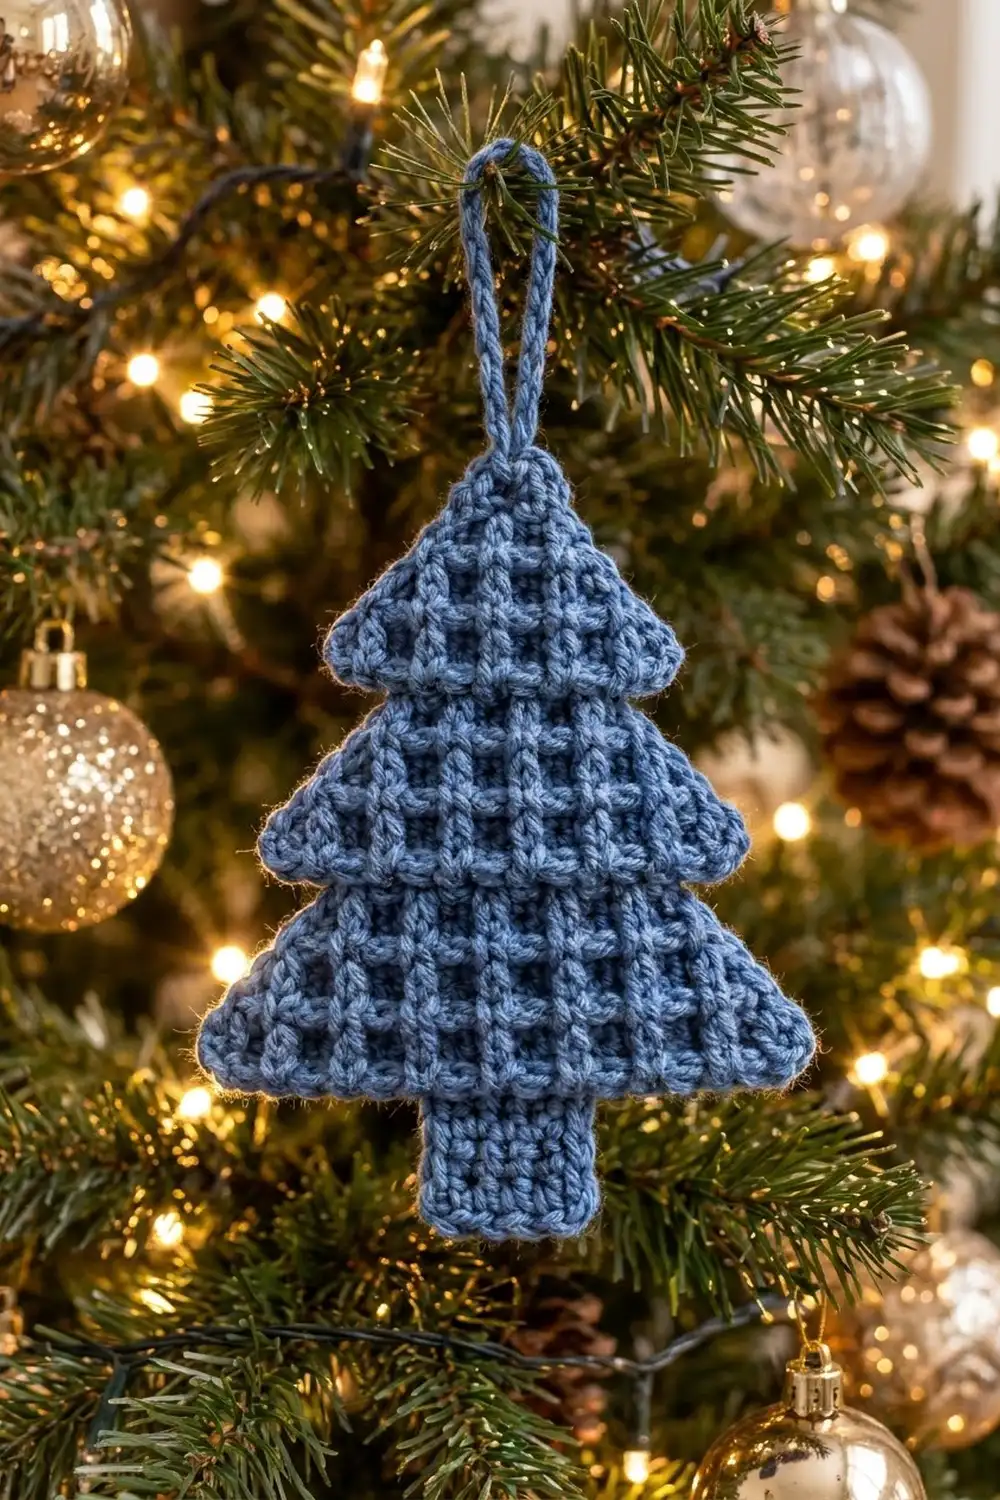
This little tree ornament combines a simple shape with a lot of texture. Three stepped tiers rise from a small square trunk. Every tier is covered in a raised lattice of vertical ribs and horizontal ridges, with small sunken squares between them, so it looks a bit like a waffle.
The sample is made in a single denim blue, which looks great against green branches and warm lights. Make it in classic red or green, or try cream for a snowy look. Because the texture does all the work, a solid yarn shows the grid best.
This pattern uses US crochet terms. The finished ornament measures 6 in (15.2 cm) wide and 5.75 in (14.6 cm) tall, not counting the hanging loop, which adds about 1.75 in (4.4 cm).
You make the tree in one flat piece, working in rows from the top point down. Increases at both edges of every row form each triangular tier. At the start of each new tier, you step in by a few stitches. You then work the trunk on the center stitches, add a single-crochet border around everything, and finish with a reinforced chain loop.
Finished Size and Construction
- Finished size: 6 in (15.2 cm) wide x 5.75 in (14.6 cm) tall
- Hanging loop: about 1.75 in (4.4 cm) above the tip
- Skill level: Easy-Intermediate (post stitches and edge increases)
- Terminology: US
- Yarn weight: Worsted (#4)
- Hook: 4.0 mm (G-6)
- Number of pieces: 1
- Layout: one flat piece worked top-down in rows: 3 tiers plus a trunk
- Piece size before border: 5.75 in (14.6 cm) wide x 5.5 in (14.0 cm) tall
- Border depth: about 0.125 in (0.3 cm) on every edge
Materials
Yarn: Use a smooth worsted-weight cotton, cotton blend, or soft acrylic. Smooth yarn shows the grid crisply. Fuzzy or heavily variegated yarn blurs the windows.
- Denim blue: 25 g, about 50 m (55 yd)
The ornament itself uses about 15 g. The quantity above includes a margin for the gauge check and the loop.
Tools:
– 4.0 mm (G-6) crochet hook
– Tapestry needle
– Scissors
– 2 stitch markers
– Blocking mat and rust-proof pins
– Spray bottle with clean water
Abbreviations (US Terms)
- ch – chain
- sl st – slip stitch
- sc – single crochet
- dc – double crochet
- FPdc – front post double crochet
- BPdc – back post double crochet
- st(s) – stitch(es)
- tch – turning chain
- RS / WS – right side / wrong side
Special technique – Lattice Grid: In the tier rows, post stitches stack on top of post stitches to form raised vertical ribs. Plain dc between them sinks back to form the windows. On RS rows the post stitch is FPdc, and on WS rows it is BPdc. Both push the rib toward the RS, so all the texture ends up on the front.
Edge increase: At the start of a row, ch 3 (counts as a dc), then work 2 dc in the first st. At the end of a row, work 3 dc in the last st. Each edge gains 2 sts, so the row grows by 4 sts.
Gauge and Checkpoints
Gauge: 16 sts and 8 rows = 4 in (10.2 cm) in Lattice Grid. That works out to 4 sts per inch, with each row 0.5 in (1.3 cm) tall.
Because this is a single piece, the top tier is your test swatch. Work Rows 1–3 and then measure before you continue.
Checkpoints (before border):
– After Row 3: 2.75 in (7.0 cm) wide x 1.5 in (3.8 cm) tall
– After Row 6: 4.25 in (10.8 cm) wide x 3 in (7.6 cm) tall
– After Row 9: 5.75 in (14.6 cm) wide x 4.5 in (11.4 cm) tall
– After Row 11: trunk is 1.25 in (3.2 cm) wide x 1 in (2.5 cm) tall; total height is 5.5 in (14.0 cm)
If the tier is too big by more than 0.25 in (0.6 cm), go down half a hook size and start again. If it is too small, go up half a hook size. Row height matters as much as width: if the dc rows run short, the tiers will look squat. Pull up each dc loop to full height.
Pattern
Ch 3 at the start of a row counts as a dc throughout. The “first st” is the stitch at the base of the ch-3.
Tier 1 (Top Tier)
Row 1 (RS): Ch 5. Dc in 4th ch from hook and in the next ch. (3 sts; the skipped 3 ch count as the first dc)
Row 2 (WS): Ch 3, turn. 2 dc in first st, BPdc around next st, 3 dc in top of tch. (7 sts)
Row 3 (RS): Ch 3, turn. 2 dc in first st, [FPdc around next st, dc in next st] 2 times, FPdc around next st, 3 dc in top of tch. (11 sts)
Check the size: 2.75 in (7.0 cm) wide x 1.5 in (3.8 cm) tall.
Tier 2 (Middle Tier)
The next row starts in from the edge so that Tier 1 overhangs Tier 2 by 1 st on each side.
Row 4 (WS): Turn. Sl st in each of the first 4 sts. Ch 3, 2 dc in the same st as the last sl st, dc in next st, BPdc around next st, dc in next st, 3 dc in next st. Leave the last 3 sts unworked. (9 sts)
Row 5 (RS): Ch 3, turn. 2 dc in first st, [dc in next st, FPdc around next st] 3 times, dc in next st, 3 dc in top of tch. (13 sts)
Row 6 (WS): Ch 3, turn. 2 dc in first st, [dc in next st, BPdc around next st] 5 times, dc in next st, 3 dc in top of tch. (17 sts)
Check the size: 4.25 in (10.8 cm) wide x 3 in (7.6 cm) tall overall.
Tier 3 (Bottom Tier)
Row 7 (RS): Turn. Sl st in each of the first 4 sts. Ch 3, 2 dc in the same st as the last sl st, [FPdc around next st, dc in next st] 4 times, FPdc around next st, 3 dc in next st. Leave the last 3 sts unworked. (15 sts)
Row 8 (WS): Ch 3, turn. 2 dc in first st, [BPdc around next st, dc in next st] 6 times, BPdc around next st, 3 dc in top of tch. (19 sts)
Row 9 (RS): Ch 3, turn. 2 dc in first st, [FPdc around next st, dc in next st] 8 times, FPdc around next st, 3 dc in top of tch. (23 sts)
Fasten off. Check the size: 5.75 in (14.6 cm) wide x 4.5 in (11.4 cm) tall overall.
Rib check: The ribs should line up into straight vertical columns from tier to tier. Each edge increase shifts the old stitches over by 2, so each bracket repeat starts on the stitch that sits directly above a rib. If a rib wanders, check the bracket count in that row.
Trunk
Row 10 (WS): With WS facing, skip the first 9 sts of Row 9 and join yarn in the 10th st. Ch 3 (counts as dc), dc in each of the next 4 sts. Leave the last 9 sts unworked. (5 sts)
Row 11 (RS): Ch 3, turn. Dc in each of the next 4 sts. (5 sts)
Fasten off. The trunk is plain dc, so it reads as a smooth contrast to the lattice above it. It should measure 1.25 in (3.2 cm) wide x 1 in (2.5 cm) tall.
Weave in all ends now, before the border covers the edges.
Border
Border gauge: The border keeps the same 4 sts per inch as the body.
– Along the tops and bottoms of stitches, work 1 sc per st (4 sc per inch).
– Along the straight trunk sides, each dc row-end is 0.5 in (1.3 cm), so 2 sc per row-end also gives 4 sc per inch.
– The tier sides are slanted. Each row steps out 0.5 in (1.3 cm) as it drops 0.5 in (1.3 cm), so each slanted row-end is about 0.7 in (1.8 cm) long. That edge needs 3 sc per row-end to stay at roughly 4 sc per inch.
Rnd 1 (RS): With RS facing, join yarn in the first foundation ch at the tip. Work along the underside of the foundation chain as follows.
Tip: Sc in first ch, 3 sc in next ch, sc in last ch. (5 sc)
First side, Tier 1: 3 sc in each of the 3 row-ends (9 sc). Then, in the 3 unworked sts on the underside of Row 3: 3 sc in the first (outer corner) st, sc in each of the next 2 sts (5 sc). (14 sc)
First side, Tier 2: 3 sc in each of the 3 row-ends (9 sc). Then, in the 3 sts on the underside of Row 6: 3 sc in the first st, sc in each of the next 2 sts (5 sc). (14 sc)
First side, Tier 3: 3 sc in each of the 3 row-ends (9 sc). Then, in the 9 sts on the underside of Row 9: 3 sc in the first st, sc in each of the next 8 sts (11 sc). (20 sc)
First trunk side: 2 sc in each of the 2 row-ends. (4 sc)
Trunk bottom: 3 sc in the first st of Row 11, sc in each of the next 3 sts, 3 sc in the last st. (9 sc)
Second side: Mirror the first side, working upward.
– Trunk side: 4 sc.
– Tier 3: sc in each of the first 8 ledge sts, 3 sc in the outer corner st, then 9 sc up the row-ends. (20 sc)
– Tier 2: sc in each of the first 2 ledge sts, 3 sc in the corner st, then 9 sc up the row-ends. (14 sc)
– Tier 1: the same as Tier 2. (14 sc)
The second side totals 52 sc.
Join with a sl st to the first sc. (118 sc)
On the ledges where you slip-stitched across in Rows 4 and 7, work the sc into the sl sts. Do not add extra stitches at the inner corners where a ledge meets the tier or trunk below. Leaving them plain keeps those corners crisp and tucked in.
Why the math works: Each side has 52 sc: 14 + 14 + 20 + 4. Two sides give 104. Add 5 sc at the tip and 9 sc at the trunk bottom for a total of 118. Every straight run uses exactly 1 sc per stitch or 2 sc per straight row-end. Every slanted run uses 3 sc per row-end. Each outer corner gets only 2 extra sc, which are already included in its 3-sc group. Because the stitch density matches the body, the border adds about 0.125 in (0.3 cm) on every edge without ruffling or pulling in. The piece grows from 5.75 in to 6 in (14.6 cm to 15.2 cm) wide and from 5.5 in to 5.75 in (14.0 cm to 14.6 cm) tall.
Hanging Loop
Sl st in each of the next 2 sc so you are in the center sc of the tip group. Ch 14, then sl st in the same center sc to form a loop. To make the loop firm, sl st in each of the 14 ch around the loop, then sl st in the center sc again. Fasten off and weave in the end. The loop hangs about 1.75 in (4.4 cm) above the tip.
Final Blocking
- Lay the ornament RS up on a blocking mat.
- Spritz it evenly with water until it is damp, not soaked.
- Pin the tip, the six outer tier corners, and the four trunk corners.
- Measure 6 in (15.2 cm) across the bottom tier and 5.75 in (14.6 cm) from the tip to the trunk bottom. Adjust the pins until both measurements are right.
- Run a finger down each rib column to straighten it, and press the windows lightly so they sit evenly.
- Pin the loop straight up from the tip.
- Let it dry completely before you unpin it.
Don’t steam acrylic yarn heavily. Steam flattens post stitches, and the lattice would lose its depth.
Final Quality-Control Checklist
- Stitch counts per row: 3, 7, 11 / 9, 13, 17 / 15, 19, 23 / 5, 5
- The ribs line up vertically through all three tiers
- Each upper tier overhangs the tier below by 1 st (0.25 in / 0.6 cm) on each side
- The trunk is centered, with 9 sts unworked on each side of Row 9
- The border has 118 sc and lies flat, with no ruffles
- The outer corners are sharp and the inner corners are tidy
- Finished size is 6 in (15.2 cm) x 5.75 in (14.6 cm)
- The loop is firm and centered at the tip
- All ends are woven in securely
Troubleshooting
The ribs drift sideways. A bracket repeat probably started on the wrong stitch. Count each row’s middle section: it should match the bracket total (for example, 13 sts in Row 8).
The windows don’t sink in. The post stitches are too loose. Work them a little more snugly, and make sure the WS rows use BPdc, not FPdc.
The tiers curl upward. The edge increases are too tight. Relax your tension on the 3-dc groups, or block more firmly.
The tier steps are hard to see. Check that you slip-stitched across exactly 4 sts and left exactly 3 sts unworked in Rows 4 and 7.
The border ruffles on the slants. Your yarn may be thinner than average. Try 5 sc across every 2 row-ends instead of 6 sc, keeping the change the same on both sides.
The border pulls in on the slants. Make sure you are working 3 sc per tier row-end, not 2.
The loop stretches. Make sure you worked the reinforcing round of sl sts around the chain.
Care
Hand wash in cool water, press out the moisture in a towel, and dry flat, reshaping the tiers. Store flat or hung by the loop so the corners stay crisp.
Final Notes
The measurement chain is short and easy to track:
– 4 sts and 2 rows per inch in Lattice Grid
– 2.75 in (7.0 cm) after Tier 1
– 4.25 in (10.8 cm) after Tier 2
– 5.75 in (14.6 cm) after Tier 3
– A 1.25 in (3.2 cm) trunk brings the height to 5.5 in (14.0 cm)
– A 118-sc border brings the finished ornament to 6 in x 5.75 in (15.2 cm x 14.6 cm)
If the top tier matches gauge, everything after it will fall into place. Make one for every branch, or tie one onto a gift as a tag that lasts.
Happy crocheting!