

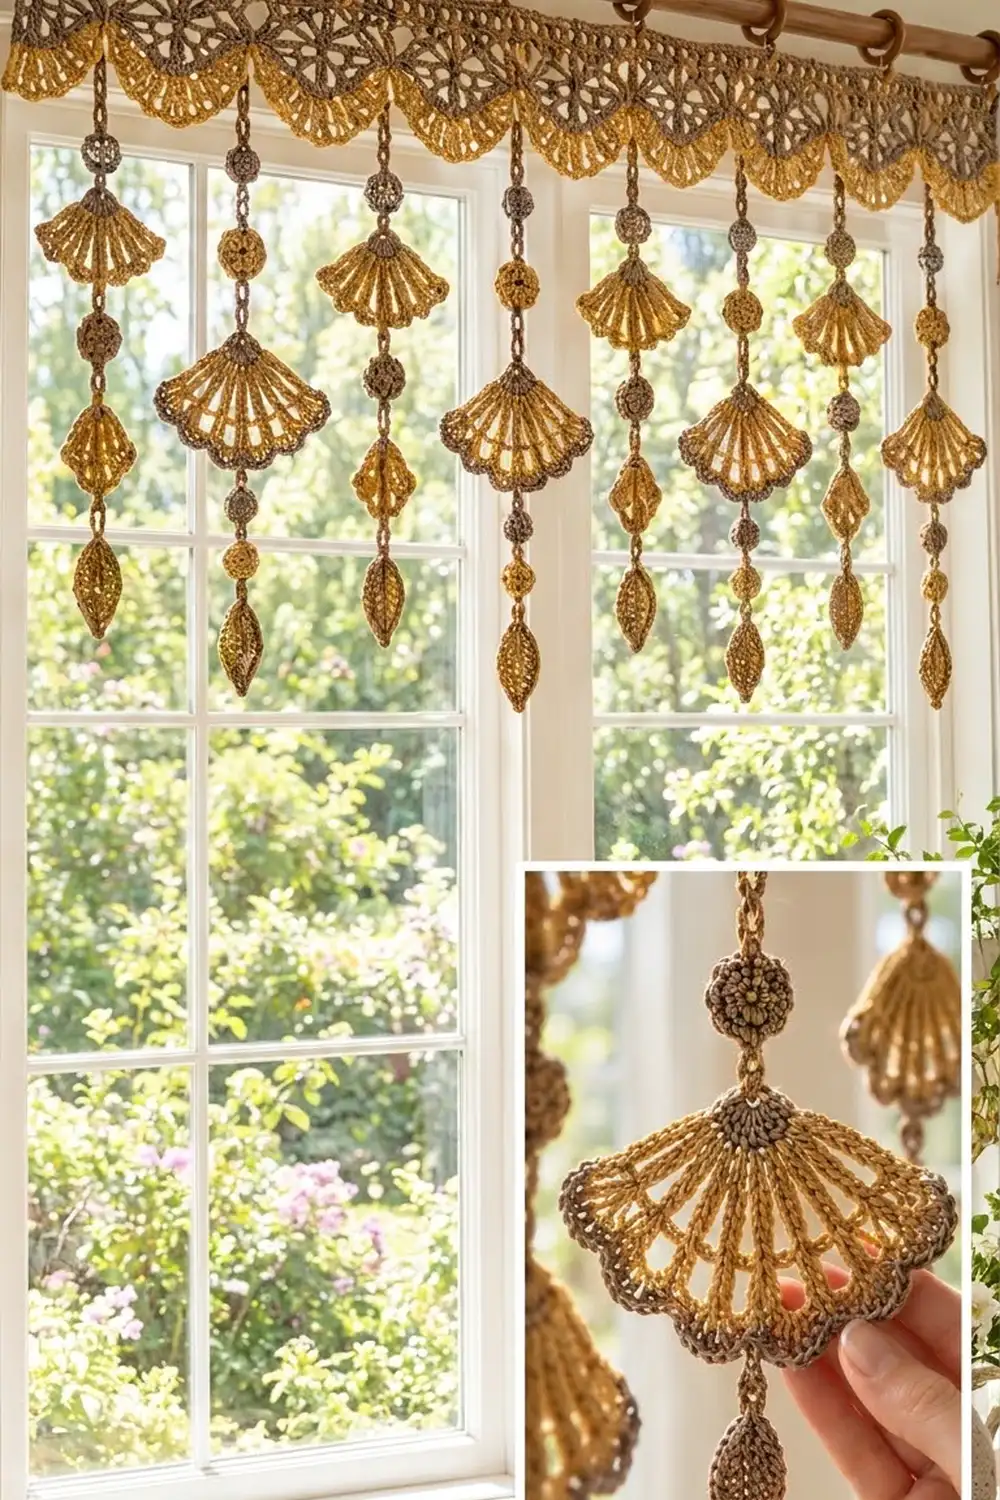
This valance pairs a soft taupe lace header with strands of mustard-gold fans, round beads, and pointed leaves. In a sunny window, light comes through the openwork and the fans throw small shadows. The look is warm and boho, a little vintage, and good in a kitchen or reading nook.
Only two colors are used. Taupe is for the lace squares, the cords, the beads, the fan rings, and the outline on the large fans. Mustard is for the fan bodies, the scalloped header edge, and some of the beads and leaves.
The pattern uses US crochet terms. The header is 37 in (94.0 cm) wide and 5.25 in (13.3 cm) deep. Strands hang 13 in (33.0 cm) and 17.5 in (44.5 cm) below it, so the longest total drop is 22.75 in (57.8 cm).
You’ll make nine lace squares and join them in a row, then add a two-round border that ends in mustard shells. After that you make the small pieces and chain them into nine strands. Last, you attach the wooden rings.
Finished Size and Construction
- Finished header: 37 in x 5.25 in (94.0 cm x 13.3 cm)
- Longest drop: 22.75 in (57.8 cm)
- Skill level: Intermediate
- Terminology: US
- Yarn weight: DK (#3) cotton or cotton blend
- Hook: 4.0 mm (G-6)
- Number of pieces: 9 lace squares plus 46 strand pieces
- Layout: 9 squares in a single row (1 x 9), with 9 strands below
- Square size: 4 in (10.2 cm)
- Size before border: 36 in x 4 in (91.4 cm x 10.2 cm)
- Border depth: 0.5 in (1.3 cm) on the top and sides, about 0.75 in (1.9 cm) on the bottom including the shells
Materials
Pick a smooth, mercerized cotton or a cotton-linen blend. It shows stitch definition, holds the fan spokes open, and won’t stretch much as it hangs. Each 50 g ball should have about 115 m.
- Taupe: 200 g (about 460 m)
- Mustard: 150 g (about 345 m)
These amounts include a margin of about 25% for gauge swatches and differences in tension.
Tools:
– 4.0 mm (G-6) crochet hook
– 10 wooden curtain rings, 1.25 in (3.2 cm)
– Tapestry needle
– Stitch markers
– Small amount of scrap yarn or fiberfill for the beads
– Blocking mat, rustproof pins, spray bottle
– Measuring tape
Abbreviations (US Terms)
- ch – chain
- sl st – slip stitch
- sc – single crochet
- hdc – half double crochet
- dc – double crochet
- tr – treble crochet
- sc2tog – single crochet 2 together
- BLO – back loop only
- sp(s) – space(s)
- RS / WS – right side / wrong side
Special stitch – Shell: 5 dc in the stitch or space given.
Gauge and Checkpoints
Gauge: 19 sc = 4 in (10.2 cm), measured along the last round of one square. Chains: 5 relaxed ch = 1 in (2.5 cm).
Make one lace square before you do anything else. Block it lightly and measure it.
- After Rnd 2: about 2 in (5.1 cm) across
- After Rnd 4: about 3.75 in (9.5 cm) side to side
- After Rnd 5: 4 in (10.2 cm) square
If your square comes out larger than 4.25 in (10.8 cm), go down to a 3.5 mm hook. If it’s smaller than 3.75 in (9.5 cm), go up to a 4.5 mm hook. An error of 0.25 in (0.6 cm) on each square adds up to 2.25 in (5.7 cm) across nine squares, so check gauge before you go on.
Lace Square (make 9, taupe)
Rnd 1: Make a magic ring. Ch 3 (counts as dc) and work 15 dc in the ring. Join with a sl st to the top of ch-3. (16 dc)
Rnd 2: Ch 6 (counts as dc + ch 3). Skip the next dc. Dc in the next dc, ch 3, skip the next dc. Repeat from * to * 6 more times. Join to the 3rd ch of ch-6. (8 dc, 8 ch-3 sps)
Rnd 3: Sl st into the first ch-3 sp. Ch 3, then work (2 dc, ch 3, 3 dc) in the same sp to make a corner. Ch 1, 3 dc in the next sp, ch 1, (3 dc, ch 3, 3 dc) in the next sp. Repeat twice. Ch 1, 3 dc in the last sp, ch 1, and join. (36 dc: 9 dc per side, 4 corner ch-3 sps, 8 ch-1 sps)
Rnd 4: Sl st across to the corner ch-3 sp. Ch 3, then work (2 dc, ch 3, 3 dc) in the corner. [Ch 1, 3 dc in the next ch-1 sp] twice, ch 1, (3 dc, ch 3, 3 dc) in the corner. Repeat twice. Then [ch 1, 3 dc in the next ch-1 sp] twice, ch 1, and join. (48 dc: 12 dc and 3 ch-1 sps per side)
Rnd 5 (conversion round): Ch 1. Sc in each dc and each ch-1 sp, and work 3 sc in each corner ch-3 sp. Join and fasten off.
Count: 60 sc worked one per existing dc and ch-1 sp (15 per side) + 12 sc in the corners = 72 sc.
Per-side count: 19 sc. This includes both corner stitches, which are the middle sc of each 3-sc corner group (1 + 1 + 15 + 1 + 1). Check: 4 x 19 – 4 shared corners = 72.
Make All Pieces
Strand pieces:
- Beads: 14 taupe, 4 mustard
- Large fans: 4 (mustard with a taupe ring and outline)
- Small fans: 10 (mustard with a taupe ring)
- Leaves: 4 taupe, 10 mustard
Bead: Make a magic ring and work 6 sc in it (6). Rnd 2: 2 sc in each st (12). Rnd 3: sc in each st (12). Rnd 4: sc2tog 6 times (6). Stuff firmly with scrap yarn and close the hole. It should measure 0.75 in (1.9 cm).
Fan ring (for every fan, taupe): Ch 8 and join into a ring. Ch 1, work 16 sc in the ring, and join. (16 sc) Fasten off. The ring is about 1 in (2.5 cm) wide. On the joining round, put a marker in sc 1. That sc is the top of the fan.
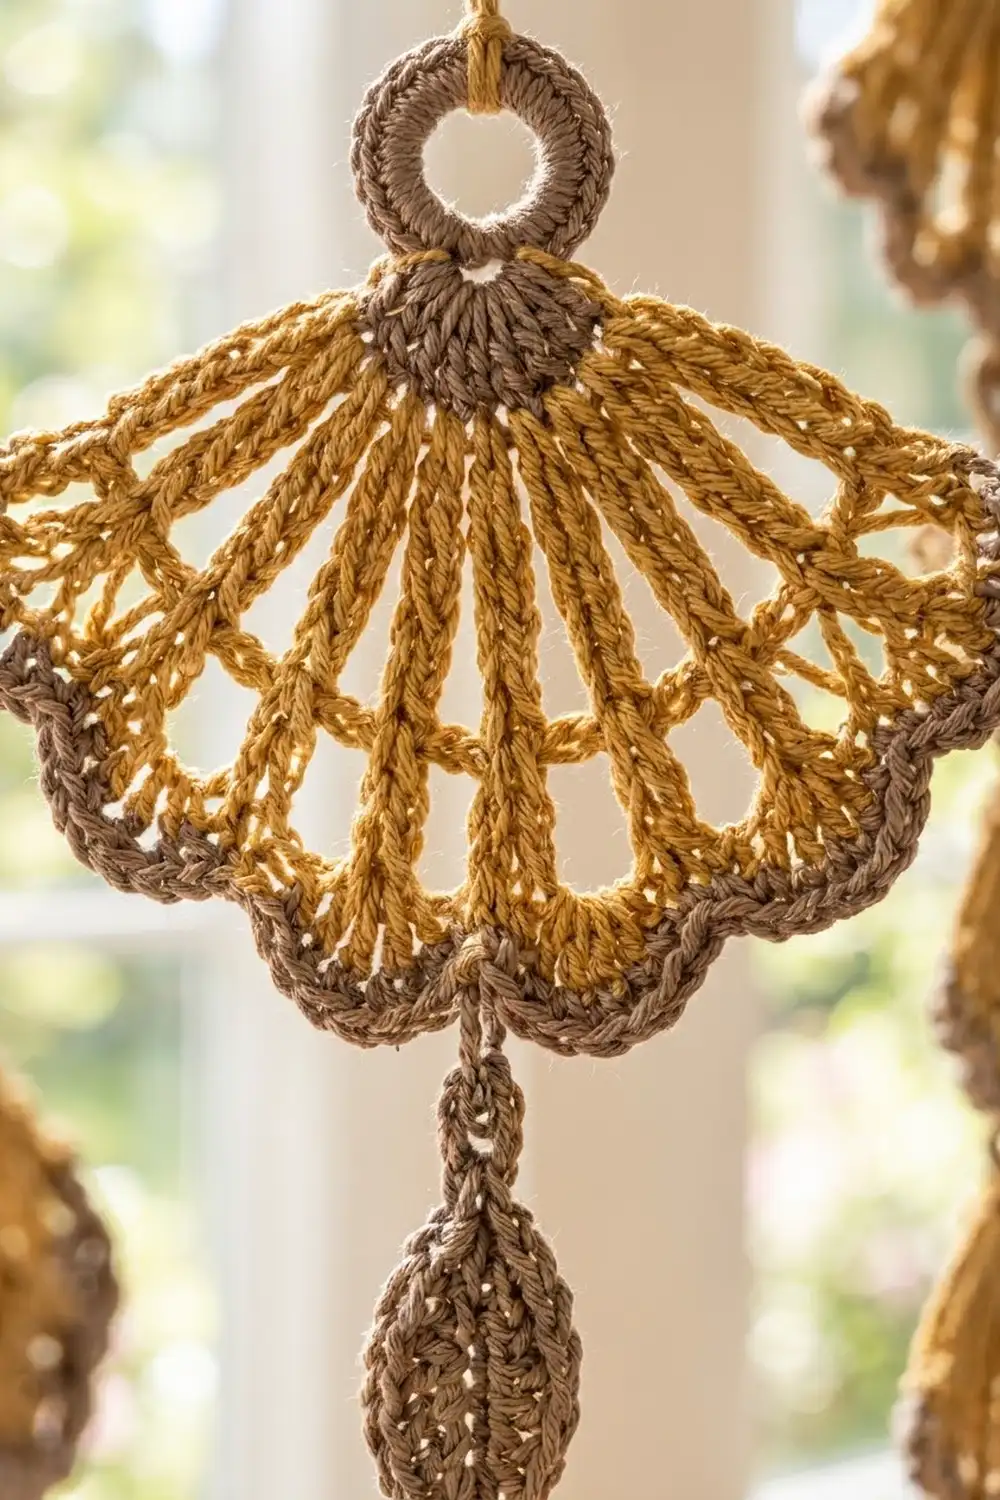
Large fan (mustard), worked in rows along the lower half of the ring:
– Row 1: Join mustard in sc 4. Ch 5 (counts as tr + ch 1). Tr in the next sc, ch 1. Repeat 9 times; the last tr goes into sc 14. (11 tr, 10 ch-1 sps) Turn.
– Row 2: Ch 6 (counts as tr + ch 2). Tr in the next tr, ch 2. Repeat 8 times, then tr in the 4th ch of the turning ch. (11 tr, 10 ch-2 sps) Turn.
– Row 3: Ch 7 (counts as tr + ch 3). Tr in the next tr, ch 3. Repeat 8 times, then tr in the turning ch. (11 tr, 10 ch-3 sps) Turn.
– Row 4: Ch 1, sc in the first tr. Shell in the next ch-3 sp, sc in the next tr. Repeat 9 more times. (10 shells, 11 sc = 61 sts) Fasten off.
– Row 5 (taupe outline, trim row): With RS facing, join taupe in the first sc. Ch 1, sc in each st across, and work 2 sc in the center dc of each shell. Count: 61 sc worked one per st + 10 extra = 71 sc. Fasten off.
The large fan is 5 in (12.7 cm) wide and 3.5 in (8.9 cm) tall, ring included.
Small fan (mustard): Join in sc 5 of the ring.
– Row 1: Ch 5, then tr in the next sc, ch 1. Repeat 8 times. (9 tr, 8 ch-1 sps)
– Row 2: Ch 6, then tr in the next tr, ch 2. Repeat 7 times, then tr in the turning ch. (9 tr, 8 ch-2 sps)
– Row 3: Ch 1, sc in the first tr. Shell in the next sp, sc in the next tr. Repeat 7 more times. (8 shells, 9 sc = 49 sts)
There’s no outline. The small fan is 3.5 in (8.9 cm) wide and 2.5 in (6.4 cm) tall.
Leaf:
– Ch 10.
– Rnd 1: Sc in the 2nd ch from the hook, then hdc, 4 dc, hdc, and sc in the next 7 ch. In the last ch, work (sc, ch 2, sc) for the tip. Working along the other side of the foundation ch, sc, hdc, 4 dc, hdc, sc. Join to the first sc. (18 sts + tip ch-2 sp)
– Rnd 2: Sl st in the BLO of each st around, and sl st into the tip sp. This makes a raised, pointed outline.
Both ends come to a point, and the leaf is 2 in (5.1 cm) long.
Layout grid (positions 1–9, left to right):
[ 1 ][ 2 ][ 3 ][ 4 ][ 5 ][ 6 ][ 7 ][ 8 ][ 9 ]
  B    A    B    A    B    A    B    A    B
Strand A (long cord, large fan; positions 2, 4, 6, 8):
15 ch (3 in / 7.6 cm), taupe bead, 5 ch (1 in / 2.5 cm), mustard bead, 5 ch, large fan, 5 ch, taupe leaf. Drop: 13 in (33.0 cm).
Strand B (two small fans; positions 1, 3, 5, 7, 9):
10 ch (2 in / 5.1 cm), small fan, 5 ch, taupe bead, 5 ch, mustard leaf, 5 ch, taupe bead, 5 ch, small fan, 5 ch, mustard leaf. Drop: 17.5 in (44.5 cm).
Joining
Lay the squares out in one row, RS up. Hold two squares WS together. With taupe, join them with sl sts through the BLO of both layers. Start at one corner stitch and work 19 stitches into 19 stitches, matching corner to corner. Fasten off after each seam. You’ll make 8 seams.
The stitch counts match one-to-one, so the seam stays flat with no puckers. Keep your sl sts as loose as your sc; if a seam is pulled in, it will shorten the header.
Checkpoint: The joined strip should measure 36 in x 4 in (91.4 cm x 10.2 cm).
Border
Border gauge: Same as the squares, 19 sc = 4 in (10.2 cm).
Starting counts: The long sides have 9 squares x 19 sts = 171 sts each. The short sides have 19 sts each. At each seam, both corner stitches are worked, and no stitches are added at the seams. The four outer corners are shared, so the perimeter is 2 x 171 + 2 x 19 – 4 = 376 sts.
Border Rnd 1 (taupe, conversion round): Join in any stitch. Sc in each st around, with 3 sc in each of the 4 outer corner sts. Join.
Count: 376 worked one per existing stitch + 8 extra = 384 sc.
Per side, corners included: long sides 173 sc each, short sides 21 sc each. Check: 2 x 173 + 2 x 21 – 4 = 384.
Border Rnd 2 (mustard): Join in the bottom-left corner sc.
– Bottom edge: Sc in the corner sc. Skip 1, shell in the next st, skip 1, sc in the next st. Repeat 43 times. The last sc lands in the bottom-right corner. (43 shells, 44 sc)
– Right side: Sc in each of the next 19 sts, then work 3 sc in the top corner.
– Top edge: Sc in each of the next 171 sts, then work 3 sc in the top corner.
– Left side: Sc in each of the next 19 sts, and join.
Per side, corners included: top 175 sc, each short side 22 sc.
Why the math works: The bottom edge has 173 stitches, corner to corner. One shell repeat uses 4 stitches, and the sc at the start takes 1 more, so 1 + 4 x 43 = 173. That fits exactly with no stitches left over. You get about 4.8 shells across each square.
Rings: With taupe, sc 12 around each wooden ring. Sew one ring at each top corner and one at the top of each of the 8 seams (10 rings in total).
Strands: Find the sc between shells that’s closest to the center of each square. Join taupe there and work each strand from the top down. Chain the stated length, sl st into the top of the next piece, and fasten off. Then rejoin at the bottom center of that piece and chain to the next one. Attach fans by the marked sc of their rings.
Final Blocking
- Spray the header until it’s damp, but not soaking.
- Pin it to 37 in x 5.25 in (94.0 cm x 13.3 cm), with straight edges and square corners.
- Pin out each shell along the bottom.
- Pin each fan flat. Spread the spokes evenly, and pin every scallop.
- Pinch each leaf to a point at both ends.
- Let everything dry completely before you unpin it.
- Hang the valance and let the strands settle for a day.
Final Quality-Control Checklist
- Each square measures 4 in (10.2 cm), with 19 sc per side
- The joined strip measures 36 in (91.4 cm) before the border
- Border Rnd 1 has 384 sc
- The bottom edge has exactly 43 shells
- There are 10 rings, evenly spaced
- Strands alternate B, A, B, A, B, A, B, A, B
- All tails are woven in and trimmed
- The beads are firm and closed
Troubleshooting
- Square cups: Your Rnd 3 ch-1s are too tight. Work them more loosely.
- Square ruffles: Go down a hook size.
- Header too short: The seams are tight. Redo them with a looser sl st, or use a larger hook just for seams.
- Shells don’t fit the edge: Recount Border Rnd 1 so each long side has 173 stitches.
- Fan spokes collapse: Block with spray starch.
- Strands twist: Steam them lightly and hang a clip on the bottom while they dry.
- Beads look lumpy: Use less stuffing and pull the closing tail tighter.
Care
Hand wash in cool water with a mild soap, press out the water in a towel, and dry flat with the fans pinned open. Keep it out of the dryer.
Final Notes
Everything in this valance comes from one measurement. When you have 19 sc per 4 in (10.2 cm), each square is 4 in (10.2 cm), and nine of them make a 36 in (91.4 cm) strip. The border adds 0.5 in (1.3 cm) at each end for a 37 in (94.0 cm) header. Its 173-stitch bottom edge takes exactly 43 shells. The 5-ch-per-inch cords give drops of 13 in (33.0 cm) and 17.5 in (44.5 cm). Check your gauge early, and the rest of the pattern will work out.
Happy crocheting!