

The Palmette Arch Lace Bedspread is an heirloom-style coverlet built from one repeating motif: a corded teardrop arch framing a ribbed fan on a leafy stem. Repeated in columns, the arches line up into a soft lattice that looks lovely over a bed.
It is worked in one color, a warm oatmeal or linen beige cotton. Because there is only one color, the texture does all the work: raised spokes on the fans, a braided-look outline, and open chain lattice between the motifs. The style is classic, a little vintage, and calm.
This pattern uses US crochet terms. The finished bedspread measures 84 x 94 in (213.4 x 238.8 cm), measured to the border points.
Construction overview: you make the fan first, then the stem and leaves, then the teardrop outline around them. Two framing rounds turn the teardrop into a rectangular block. You join 90 blocks in a 10 x 9 grid and finish with a three-round pointed-scallop border.
Finished Size and Construction
- Finished size: 84 x 94 in (213.4 x 238.8 cm), measured to the points
- Skill level: Intermediate to experienced
- Terminology: US crochet terms
- Yarn weight: Worsted (#4) cotton
- Hook: 4.0 mm (G-6)
- Number of pieces: 90 identical blocks
- Layout: 10 blocks wide x 9 blocks long
- Block size: 8 x 10 in (20.3 x 25.4 cm)
- Size before border: 80 x 90 in (203.2 x 228.6 cm)
- Border depth: 2 in (5.1 cm) on each side
Materials
Yarn: Use a smooth, firmly plied worsted-weight cotton or cotton blend. Tight plies give crisp cords and sharp picots. Soft, splitty yarns blur the lattice.
- Oatmeal/linen beige: 2,200 g (about 3,740 m), for example 22 balls of 100 g / 170 m
These quantities include a margin of roughly 10% for swatching and joining.
Tools:
- 4.0 mm (G-6) crochet hook
- 3.5 mm and 4.5 mm hooks for gauge adjustment
- 10 locking stitch markers
- Tapestry needle
- Scissors
- Measuring tape
- Blocking mats, rust-proof pins and a spray bottle
Abbreviations (US Terms)
- ch: chain
- sl st: slip stitch
- sc: single crochet
- hdc: half double crochet
- dc: double crochet
- tr: treble crochet
- sp: space
- st(s): stitch(es)
- BLO / FLO: back loop only / front loop only
- RS / WS: right side / wrong side
Special stitches:
- FPtr (front post treble): Yarn over twice, then insert the hook from front to back to front around the post of the stitch. Complete as a tr.
- trtr (triple treble): Yarn over four times, then insert the hook in the stitch. Work [yarn over, pull through 2 loops] five times.
- Picot: Ch 3 (or ch 4 where stated), then sl st in the first of those chains.
Gauge and Checkpoints
Base gauge: 16 sc = 4 in (10.2 cm).
Make one complete block before you start the batch. The block is the real gauge, because every later number depends on it.
- Fan (after Row 4): about 4.5 in (11.4 cm) wide x 2.75 in (7.0 cm) tall
- Teardrop (after Round 3): about 6.5 in (16.5 cm) wide x 8.5 in (21.6 cm) tall
- Block (after Round 5), lightly pinned: 8 x 10 in (20.3 x 25.4 cm)
If your block is too big, go down to a 3.5 mm hook. If it is too small, go up to a 4.5 mm hook. Do not change the stitch counts, because the joining and border math depends on them.
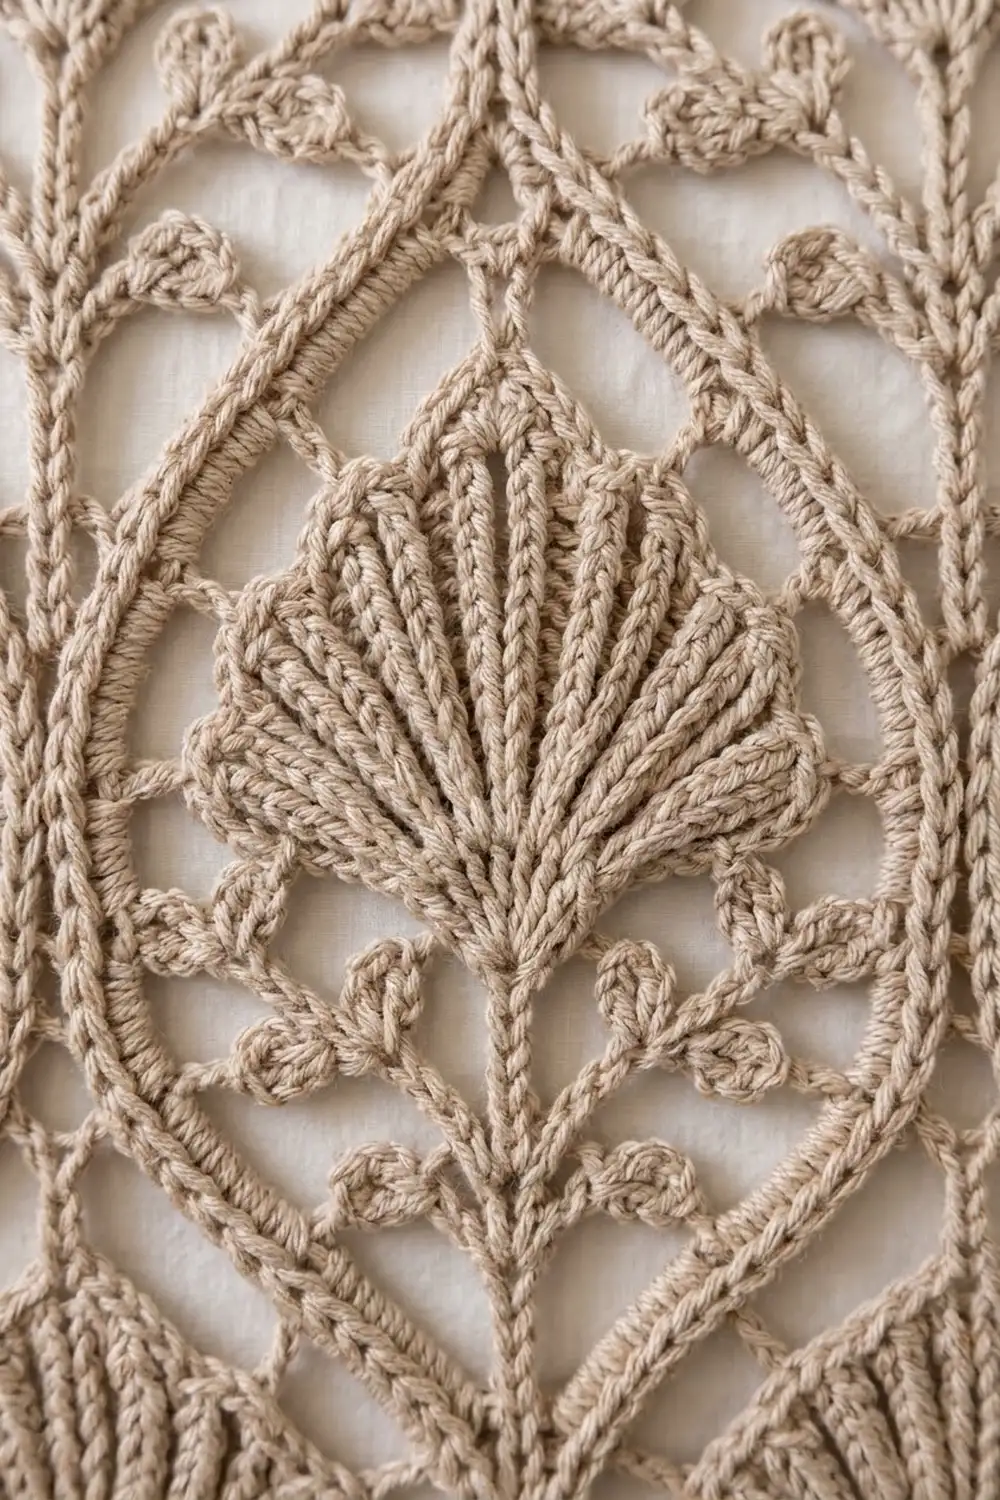
Block Pattern
Fan
Row 1 (RS): Ch 4, then work 8 dc in the 4th ch from the hook. The skipped ch-3 counts as a dc, so you have 9 dc. Turn.
Row 2 (WS): Ch 3 (counts as dc). Dc in the same st, then 2 dc in each st across. (18 dc) Turn.
Row 3 (RS): Ch 3 (counts as dc). [FPtr around the next st, 2 dc in the next st] 8 times, then FPtr around the last st. (26 sts: 9 FPtr ribs, 17 dc) Turn.
Row 4 (WS): Ch 1. Sc in each st across, and work a ch-3 picot right after each sc made into a FPtr. (26 sc, 9 picots) Fasten off.
The 9 FPtr ribs are the raised spokes of the palmette. The picots make its scalloped tips.
Stem and Leaves
With RS facing, join the yarn at the base of the fan, in the foundation ch at the center of Row 1. Ch 17.
Work back along the chain: sl st in the 2nd ch from the hook and in each of the next 3 ch.
Leaf pair: Ch 5. Sl st in the 2nd ch from the hook, then sc, hdc and dc in the next 3 ch. Sl st in the same stem ch to finish one leaf. Repeat for a second leaf on the other side of the stem. Sl st in each of the next 4 stem ch.
Work the leaf pair 3 times in total. This works all 16 stem chains (4 + 3 x 4) and makes 6 leaves. Sl st into the fan base and fasten off. The stem should be about 4 in (10.2 cm) long.
Teardrop Outline
Round 1 (chain frame): With RS facing, join the yarn at the stem tip. Ch 26 and sl st in the first fan picot. Ch 37 and sl st in the last (9th) fan picot. Ch 26 and sl st in the stem tip.
Round 2: Ch 1, then:
- Sc in each of the 26 ch.
- Sc in the first 18 ch of the arch, then (sc, ch 3, sc) in the next ch.
- Sc in the last 18 arch ch.
- Sc in each of the 26 ch.
- Join to the first sc.
(90 sc, plus a ch-3 point)
Number these stitches 1 to 90, starting at the stem tip. The point sits between sc 45 and sc 46. Place markers in sc 1, 9, 15, 20, 27, 34 and 41. Mirror stitches are found as 91 minus the number, so sc 9 mirrors sc 82.
Round 3 (cord): Sl st loosely in the FLO of each sc around, and ch 3 across the point. (90 sl sts) Fasten off.
This round makes the raised braided cord. The back loops stay free for Round 4.
Squaring Rounds
Round 4: Work into the free BLO of Round 2, behind the cord. Join at sc 1.
- Bottom center: Ch 3 (counts as dc), ch 2, dc in the same st.
- First lower corner: Ch 12, then (trtr, ch 4, trtr) in sc 9.
- First side: Ch 8, dc in sc 15. Ch 6, sc in sc 20. Ch 8, dc in sc 27.
- First upper corner: Ch 11, then (trtr, ch 4, trtr) in sc 34.
- Top: Ch 7, dc in sc 41. Ch 4, then (hdc, ch 2, hdc) in the Round 2 point sp. Ch 4, dc in sc 50.
- Second upper corner: Ch 7, then (trtr, ch 4, trtr) in sc 57.
- Second side: Ch 11, dc in sc 64. Ch 8, sc in sc 71. Ch 6, dc in sc 76.
- Second lower corner: Ch 8, then (trtr, ch 4, trtr) in sc 82.
- Finish: Ch 12 and sl st in the 3rd ch of the beginning ch-3.
Count check: Count the stitches and chains between corner ch-4 spaces.
- Bottom: 1 + 12 + 1 + 2 + 1 + 12 + 1 = 30
- Each side: 1 + 8 + 1 + 6 + 1 + 8 + 1 + 11 + 1 = 38
- Top: 1 + 7 + 1 + 4 + 1 + 2 + 1 + 4 + 1 + 7 + 1 = 30
The two sides are mirror images, so both total 38.
Round 5: Ch 1. Work 1 sc in each st and each ch around, and work (sc, ch 2, sc) in each corner ch-4 sp. Join and fasten off.
Count: 32 sc on the top and bottom (30 + 2 corner sc) and 40 sc on each side (38 + 2 corner sc). That is 144 sc in total, plus 4 corner ch-2 sps.
Each side count already includes its 2 corner sc. At 16 sc = 4 in, 32 sc = 8 in (20.3 cm) and 40 sc = 10 in (25.4 cm).
Make All Pieces
Make 90 blocks in oatmeal/linen beige. That is the only color. Every block points the same way: arch tip up, stem down.
Row 9: B B B B B B B B B B
Row 8: B B B B B B B B B B
Row 7: B B B B B B B B B B
Row 6: B B B B B B B B B B
Row 5: B B B B B B B B B B
Row 4: B B B B B B B B B B
Row 3: B B B B B B B B B B
Row 2: B B B B B B B B B B
Row 1: B B B B B B B B B B
       (10 columns = 80 in / 203.2 cm)
Joining
Method: Flat slip-stitch join from the RS, worked through the back loops.
- Hold two blocks side by side, RS up.
- Sl st through the corner ch-2 sps of both blocks.
- Work 1 sl st through each matched pair of sc, one-to-one. A side seam joins 40 sc to 40 sc. A top-to-bottom seam joins 32 sc to 32 sc.
- Finish with a sl st through the next pair of corner ch-2 sps.
First join the blocks into 9 horizontal strips of 10, then join the strips together. Carry the yarn through the shared corner ch-2 sps where four blocks meet.
Tension: Keep the slip stitches as loose as the Round 5 sc. If a seam is shorter than the block edge beside it, go up a hook size for joining.
Checkpoint: Each strip should measure 80 in (203.2 cm). The joined panel should measure 80 x 90 in (203.2 x 228.6 cm).
Border
Border gauge: The same 16 sc = 4 in (10.2 cm). No stitches are added at seams. The joined corner ch-2 sps are held by the join and are not worked.
Starting counts:
- Top and bottom edges: 10 blocks x 32 sc = 320 sc
- Each long side: 9 blocks x 40 sc = 360 sc
Round 1: Join in any sc. Sc in each sc, and work (sc, ch 2, sc) in each outer corner ch-2 sp.
- Top and bottom: 320 + 2 = 322 sc
- Sides: 360 + 2 = 362 sc
Round 2: Ch 3 (counts as dc). Dc in each sc, and work (dc, ch 2, dc) in each corner sp.
- Top and bottom: 322 + 2 = 324 dc
- Sides: 362 + 2 = 364 dc
Round 3 (pointed scallops): This is a trim round. Along each side, work sc in the first 2 sts. Then work the pointed scallop:
- Pointed scallop: Sc, hdc, dc and tr in the next 4 sts. Ch 4 and sl st in the 4th ch from the hook (a picot). Then tr, dc, hdc and sc in the next 4 sts.
Repeat the scallop across, then sc in the last 2 sts. At each corner sp, work (sc, ch 5, sc).
- Top and bottom: 324 sts worked one per stitch, plus 40 picot points
- Each long side: 364 sts worked one per stitch, plus 45 picot points
Join and fasten off.
Why the math works:
- Each scallop uses 8 sts, and both block edges divide evenly by 8: 32 = 4 x 8 and 40 = 5 x 8.
- Rounds 1 and 2 add exactly 2 sts at each end of every side. Round 3 uses those as the 2 + 2 plain sc.
- On the top and bottom, 2 + (40 x 8) + 2 = 324.
- On the sides, 2 + (45 x 8) + 2 = 364.
The border adds about 0.25 in (0.6 cm) for Round 1, 0.5 in (1.3 cm) for Round 2 and 1.25 in (3.2 cm) to the points for Round 3. That totals 2 in (5.1 cm) per side.
Final Blocking
- Weave in all ends along the cords, where they hide best.
- Soak the bedspread in cool water for 15 minutes. Press the water out gently; never wring it.
- Roll it in towels to remove more water.
- Lay it flat on mats or a clean sheet over the carpet.
- Pin the outer rectangle to 80 x 90 in (203.2 x 228.6 cm) at the seam line, which is the edge of the joined blocks inside the border.
- Pin each picot point outward so the border reaches 84 x 94 in (213.4 x 238.8 cm).
- Open each fan and teardrop arch with your fingers.
- Let it dry completely before you unpin it.
Final Quality-Control Checklist
- Every block measures 8 x 10 in (20.3 x 25.4 cm) and has 144 sc in Round 5.
- All arches point the same way.
- The seams lie flat with no puckering.
- The border counts are 322/362, then 324/364.
- There are 170 picot points in total: 40 + 40 + 45 + 45.
- All four corners are square.
- All ends are secured.
Troubleshooting
- The block cups: The Round 4 chains are too tight. Loosen your tension or go up a hook size for Round 4 only.
- The block ruffles: The chains are too loose. Go down a hook size for Rounds 4 and 5.
- The teardrop is lopsided: Check the Round 2 markers. Every Round 4 anchor must mirror its partner (91 minus the stitch number).
- The cord looks flat: Work Round 3 more loosely and make sure it is in the FLO only.
- The border flares: Recount Round 1. It should be 1 sc per sc with nothing added at the seams.
- The points curl: Re-wet the border and pin each picot while it dries.
Care
Hand wash or machine wash on a gentle cycle in a mesh bag with cool water. Reshape and dry flat. Never hang the bedspread wet, because the weight of the cotton will stretch the lattice.

Final Notes
The whole bedspread follows one measurement chain:
- Fan: 4.5 in (11.4 cm) wide
- Teardrop: 6.5 x 8.5 in (16.5 x 21.6 cm)
- Block: 32 x 40 sc, or 8 x 10 in (20.3 x 25.4 cm)
- Joined panel: 320 x 360 sc, or 80 x 90 in (203.2 x 228.6 cm)
- Border: 2 in (5.1 cm) per side
- Finished bedspread: 84 x 94 in (213.4 x 238.8 cm)
If you check your size at each stage, the next stage will come out right. Happy crocheting!