

This little tree is made for gifting. It’s worked in deep navy with a woven basketweave texture, with a sandy beige trunk and a crisp cream outline. It looks just as good on a branch, tied to a gift as a tag, or hanging from a rearview mirror.
The navy body has three tiers. Each tier steps out a little from the one above, which gives the tree a classic stacked-pine outline. Small 2-stitch blocks of front and back post stitches create the woven look. One round of cream single crochet frames the whole shape and finishes with a padded hanging loop.
This pattern uses US crochet terms. The finished ornament measures about 3.6 in (9.1 cm) wide and 5.6 in (14.2 cm) tall. With the loop it’s about 6.6 in (16.8 cm) tall.
You’ll work the tree body flat in rows from the bottom edge up to the tip. Then you’ll add the trunk into the free loops of the foundation chain. A one-round border finishes the piece and forms the loop at the top.
Finished Size and Construction
- Finished size: 3.6 in (9.1 cm) wide x 5.6 in (14.2 cm) tall, plus a 1 in (2.5 cm) loop
- Skill level: Intermediate (post stitches, decreases, working into free loops)
- Terminology: US crochet terms
- Yarn weight: DK / light worsted (#3), cotton or cotton blend
- Hook: 3.5 mm (E-4)
- Number of pieces: 1 (single flat ornament)
- Layout: tree body with 3 tiers, centered trunk, one-round border
- Tree body size: 3.2 in (8.1 cm) wide at the base x 4.4 in (11.2 cm) tall
- Trunk size: 0.8 in (2.0 cm) wide x 0.8 in (2.0 cm) tall
- Size before border: 3.2 in (8.1 cm) wide x 5.2 in (13.2 cm) tall
- Border depth: 0.2 in (0.5 cm) on every edge
Materials
Use a smooth, tightly plied cotton so the basketweave blocks show clearly. Fuzzy or loosely spun yarn will blur the texture. A DK cotton of about 115 m per 50 g is ideal. Cotton also holds its shape well after blocking, which matters for the tier steps.
- Navy (tree body): 8 g, about 18 m
- Light beige (trunk): 2 g, about 5 m
- Cream (border and loop): 4 g, about 9 m
Tools:
- 3.5 mm (E-4) crochet hook
- Tapestry needle
- Scissors
- Stitch markers (2)
- Rust-proof pins and a blocking mat or folded towel
- Spray bottle with water
All quantities include a margin of about 25% for checking gauge and weaving in ends.
Abbreviations (US Terms)
- ch: chain
- sc: single crochet
- dc: double crochet
- dc2tog: double crochet 2 together
- FPdc: front post double crochet
- BPdc: back post double crochet
- sl st: slip stitch
- st(s): stitch(es)
- RS / WS: right side / wrong side
Special stitches: R and S. The basketweave is written by how each stitch looks from the RS.
- R (raised): On RS rows, work FPdc. On WS rows, work BPdc.
- S (sunken): On RS rows, work BPdc. On WS rows, work FPdc.
Work every R and S around the post of the stitch directly below.
Turning chain: The ch 2 at the start of each row does not count as a stitch.
Pattern note: All increases and decreases happen in the plain dc edge stitches, never in the post stitches. This keeps the block columns in place and the sides smooth. When a dc2tog sits next to a post stitch, work the dc2tog into the tops of the stitches as usual, then reach around the post for the next stitch.
Gauge and Checkpoints
Gauge: 20 dc and 11 rows = 4 in (10.2 cm). For sc, 5 sc and 5 rows = 1 in (2.5 cm).
This ornament works as its own test piece, so you don’t need a separate swatch. Work Rows 1–4 and measure before you go on. If the numbers are off, it’s quicker to restart now than after the border.
- After Row 1: 16 dc, 3.2 in (8.1 cm) wide
- After Row 4: top edge 10 sts, 2.0 in (5.1 cm) wide; body 1.5 in (3.8 cm) tall
- After Row 5: 12 sts, 2.4 in (6.1 cm) wide
- After Row 8: body 2.9 in (7.4 cm) tall
- After Row 9: 8 sts, 1.6 in (4.1 cm) wide
- After Row 12: body 4.4 in (11.2 cm) tall, 2 sts at the tip
If Row 1 is wider than 3.3 in (8.4 cm), go down to a 3.25 mm hook. If it’s narrower than 3.1 in (7.9 cm), go up to a 3.75 mm hook. Post stitches pull in slightly, so always check width on Row 1, which is plain dc.
If the width is right but the body is too tall or too short, your row height is off. Change how far you pull up the first loop of each dc rather than changing hooks.
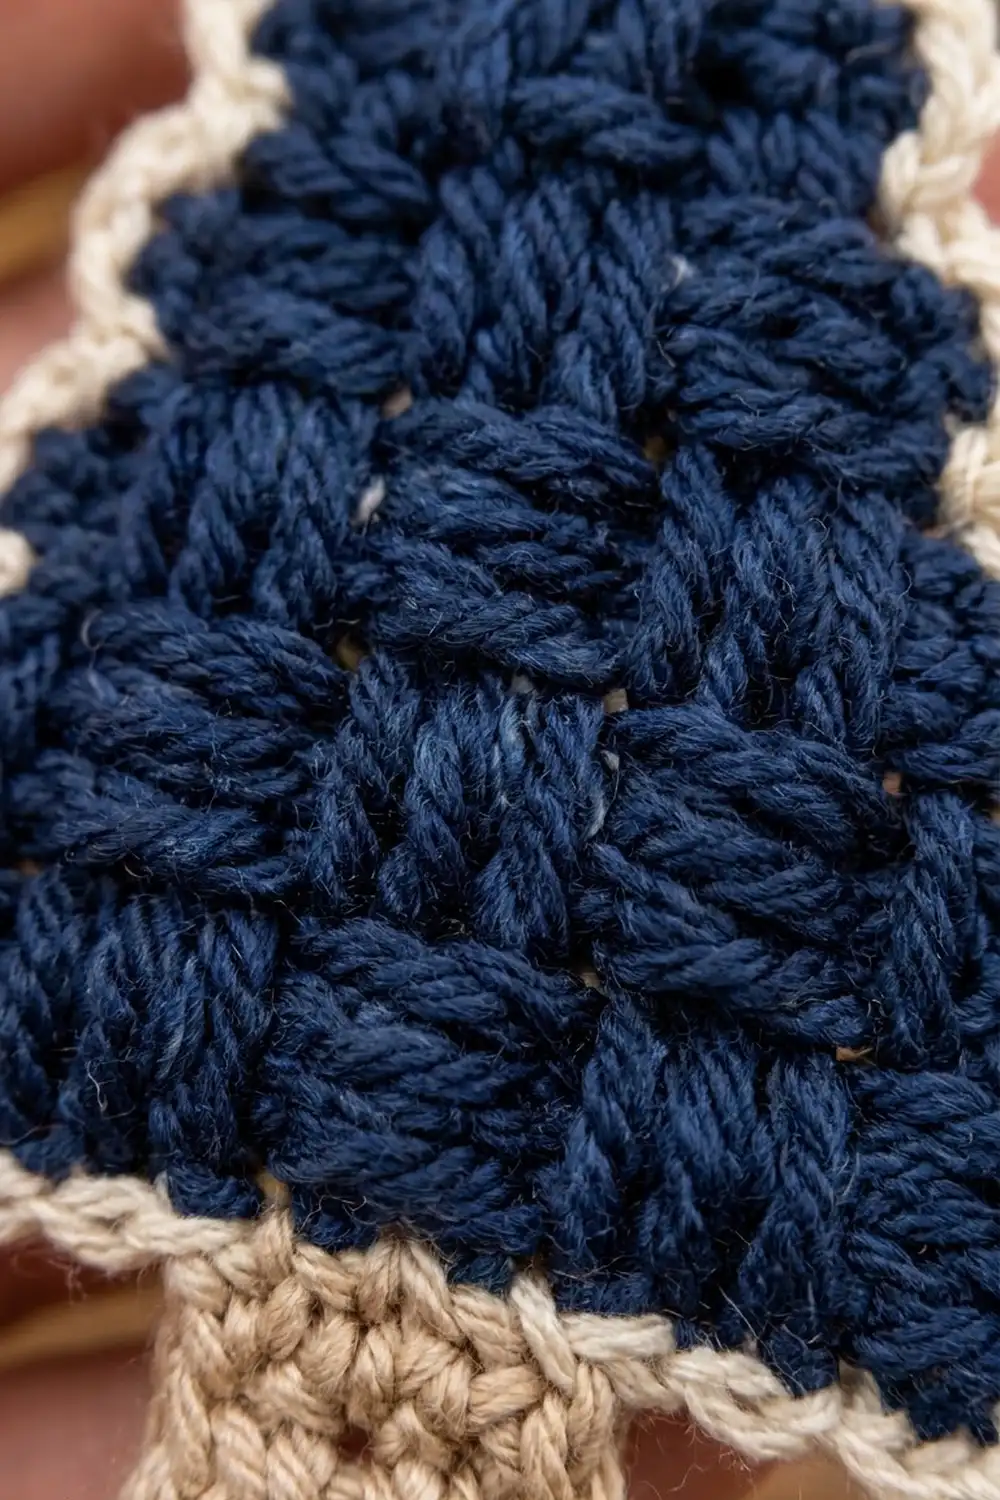
Tree Body
Use navy. Work in rows, turning at the end of each row.
Foundation: Ch 18.
Row 1 (RS): Dc in the 3rd ch from the hook and in each ch across. Turn. (16 dc)
Count the 16 dc of Row 1 from the start of the row. Place a marker in the free loop at the base of the 7th dc and another at the base of the 10th dc. These mark where the trunk goes.
Tier 1 (Rows 2–4)
Row 2 (WS): Ch 2, dc2tog over the first 2 sts, [1 S, 2 R, 2 S, 2 R, 2 S, 2 R, 1 S], dc2tog over the last 2 sts. Turn. (14 sts: 2 dc2tog + 12 post sts)
Row 3 (RS): Ch 2, dc2tog, [2 R, 2 S, 2 R, 2 S, 2 R], dc2tog. Turn. (12 sts)
Row 4 (WS): Ch 2, dc2tog, [1 S, 2 R, 2 S, 2 R, 1 S], dc2tog. Turn. (10 sts)
Tier 2 (Rows 5–8)
Row 5 (RS, step-out row): Ch 2, 2 dc in the first st, [1 S, 2 R, 2 S, 2 R, 1 S], 2 dc in the last st. Turn. (12 sts: 4 edge dc + 8 post sts)
This row moves each edge back out by 1 stitch, which forms the first tier step.
Row 6 (WS): Ch 2, dc2tog over the 2 edge dc, [1 R, 2 S, 2 R, 2 S, 1 R], dc2tog over the last 2 edge dc. Turn. (10 sts)
Row 7 (RS): Ch 2, dc2tog, [2 S, 2 R, 2 S], dc2tog. Turn. (8 sts)
Row 8 (WS): Ch 2, dc2tog, [1 R, 2 S, 1 R], dc2tog. Turn. (6 sts)
Tier 3 (Rows 9–12)
Row 9 (RS, step-out row): Ch 2, 2 dc in the first st, [1 R, 2 S, 1 R], 2 dc in the last st. Turn. (8 sts: 4 edge dc + 4 post sts)
Row 10 (WS): Ch 2, dc2tog over the 2 edge dc, [1 S, 2 R, 1 S], dc2tog over the last 2 edge dc. Turn. (6 sts)
Row 11 (RS): Ch 2, dc2tog, [2 R], dc2tog. Turn. (4 sts)
Row 12 (WS): Ch 2, dc2tog, dc2tog. (2 sts)
Fasten off and weave in the ends.
Why the blocks line up: The post stitches always sit over the same central columns of Row 1, and the center pair stays in place all the way up. Each band of 2 rows swaps R and S, so the blocks form a checkerboard. The bands are Rows 2–3, 4–5, 6–7, 8–9, and 10–11. The edge stitches stay plain dc so the sides are smooth for the border.
Trunk
Use light beige. Hold the body RS facing, with the foundation chain at the top.
Row 1: Join beige with a sl st in one marked free loop. Ch 1 (doesn’t count), sc in the same loop and in the next 3 free loops, ending in the other marked loop. Turn. (4 sc)
Rows 2–4: Ch 1, sc in each st across. Turn. (4 sc)
Fasten off after Row 4 and remove the markers.
Checkpoint: The trunk measures 0.8 in (2.0 cm) square and is centered, with 6 free loops on each side. The whole piece now measures 3.2 in (8.1 cm) wide x 5.2 in (13.2 cm) tall.
Border
Use cream. Border gauge: 5 sc = 1 in (2.5 cm).
Round 1 (RS): Join cream with a sl st in the first st at the tip (top of Row 12). Then work as follows:
- Tip: Ch 1, sc in the same st, ch 12, sc in the next st. (2 sc + ch-12 loop)
- First side: Work 2 sc in the side of each row end from Row 12 down to Row 1. (24 sc)
- Bottom edge, first half: Work 2 sc in the corner free loop, then sc in each of the next 5 free loops up to the trunk. (7 sc)
- Trunk side: Sc once in each row end. (4 sc)
- Trunk bottom: 3 sc in the first st, sc in the next 2 sts, 3 sc in the last st. (8 sc)
- Trunk side: Sc once in each row end. (4 sc)
- Bottom edge, second half: Sc in each of the next 5 free loops, then 2 sc in the corner free loop. (7 sc)
- Second side: Work 2 sc in the side of each row end from Row 1 up to Row 12. (24 sc)
Join with a sl st to the first sc. (80 sc + ch-12 loop)
Count check: 2 + 24 + 7 + 4 + 8 + 4 + 7 + 24 = 80 sc.
Loop finish: Sl st into the ch-12 space and work 18 sc into it. Sl st into the next sc at the tip and fasten off.
Why the math works:
- Each dc row moves 1 stitch inward and climbs one row. That’s 0.2 in (0.5 cm) across and about 0.36 in (0.9 cm) up, so each row end has a slanted edge of about 0.4 in (1.0 cm). At 5 sc per inch, 2 sc cover 0.4 in (1.0 cm), so the sides lie flat without ruffling or cupping.
- Along the bottom, each half has 6 free loops and gets 7 sc. The extra sc turns the corner.
- The trunk gets 1 sc per row end because its sc rows are about as tall as an sc is wide.
- At the step-out rows (5 and 9), the same 2 sc per row end follow the jog, so the border shows each tier.
Checkpoint: The ornament now measures 3.6 in (9.1 cm) wide and 5.6 in (14.2 cm) tall. The loop stands about 1 in (2.5 cm) above the tip.
Final Blocking
- Weave in any remaining tails through stitches of the same color.
- Mist the ornament lightly with water until it’s damp but not soaked.
- Lay it RS up on a blocking mat or towel.
- Pin the base corners 3.6 in (9.1 cm) apart.
- Pin the tip so the ornament is 5.6 in (14.2 cm) from the trunk bottom to the tip.
- Pin out each tier step so the two sides mirror each other.
- Press the basketweave blocks flat with your fingertips. Don’t stretch them.
- Shape the loop into an even oval and pin it upright.
- Let it dry completely before unpinning, usually 4–6 hours.
Final Quality-Control Checklist
- Row 1 has 16 dc and Row 12 has 2 sts.
- Rows 5 and 9 each step out by 1 stitch on both sides.
- The basketweave blocks form an even checkerboard, mirrored left to right.
- The trunk is 4 sc wide and centered, with 6 free loops on each side.
- The border has exactly 80 sc, and the loop has 18 sc.
- The sides don’t cup or ruffle.
- Finished size is 3.6 in (9.1 cm) x 5.6 in (14.2 cm), plus the loop.
- All ends are woven in securely and hidden.
Troubleshooting
The blocks look blurred. You may have mixed up R and S on a WS row. Remember that on WS rows, R is BPdc.
The tree curls forward. The post stitches are too tight. Work them more loosely and block firmly.
The sides lean unevenly. Check that each row starts and ends with the same edge stitch: dc2tog at both ends, or 2 dc at both ends.
The tier steps barely show. Make sure Rows 5 and 9 have 2 dc in each edge stitch, and pin out each step when blocking.
The border ruffles. Your sc is looser than gauge. Go down a hook size for the border only.
The border cups or pulls in. Your sc is too tight. Go up a hook size for the border only.
The trunk is off-center. Count the free loops again. There must be 6 on each side of the trunk.
The loop is floppy. Pack 20 sc into the ch-12 space instead of 18.
Care
Hand wash in cool water with mild soap. Press out the water in a towel and dry flat; don’t wring it or tumble dry it.
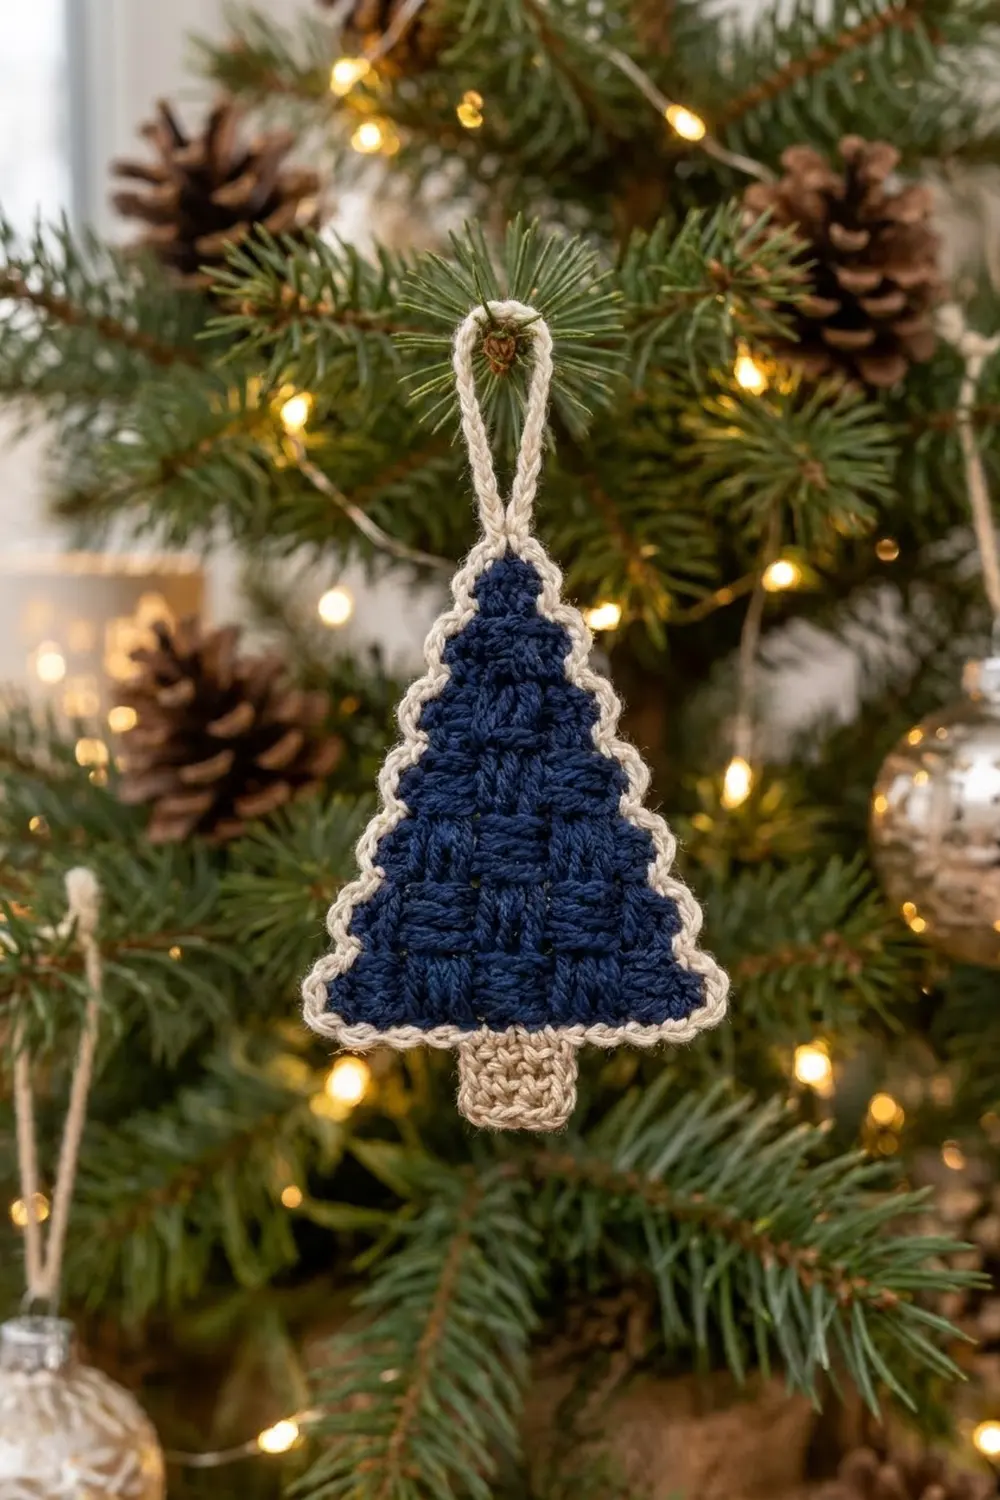
Final Notes
Each stage builds on the one before. A 16-dc Row 1 measuring 3.2 in (8.1 cm) gives a 4.4 in (11.2 cm) tree body over 12 rows. The 0.8 in (2.0 cm) trunk brings the piece to 5.2 in (13.2 cm). The 0.2 in (0.5 cm) border finishes it at 3.6 in (9.1 cm) x 5.6 in (14.2 cm), with a 1 in (2.5 cm) loop on top. If each checkpoint matches, the finished tree will too.
Happy crocheting!