

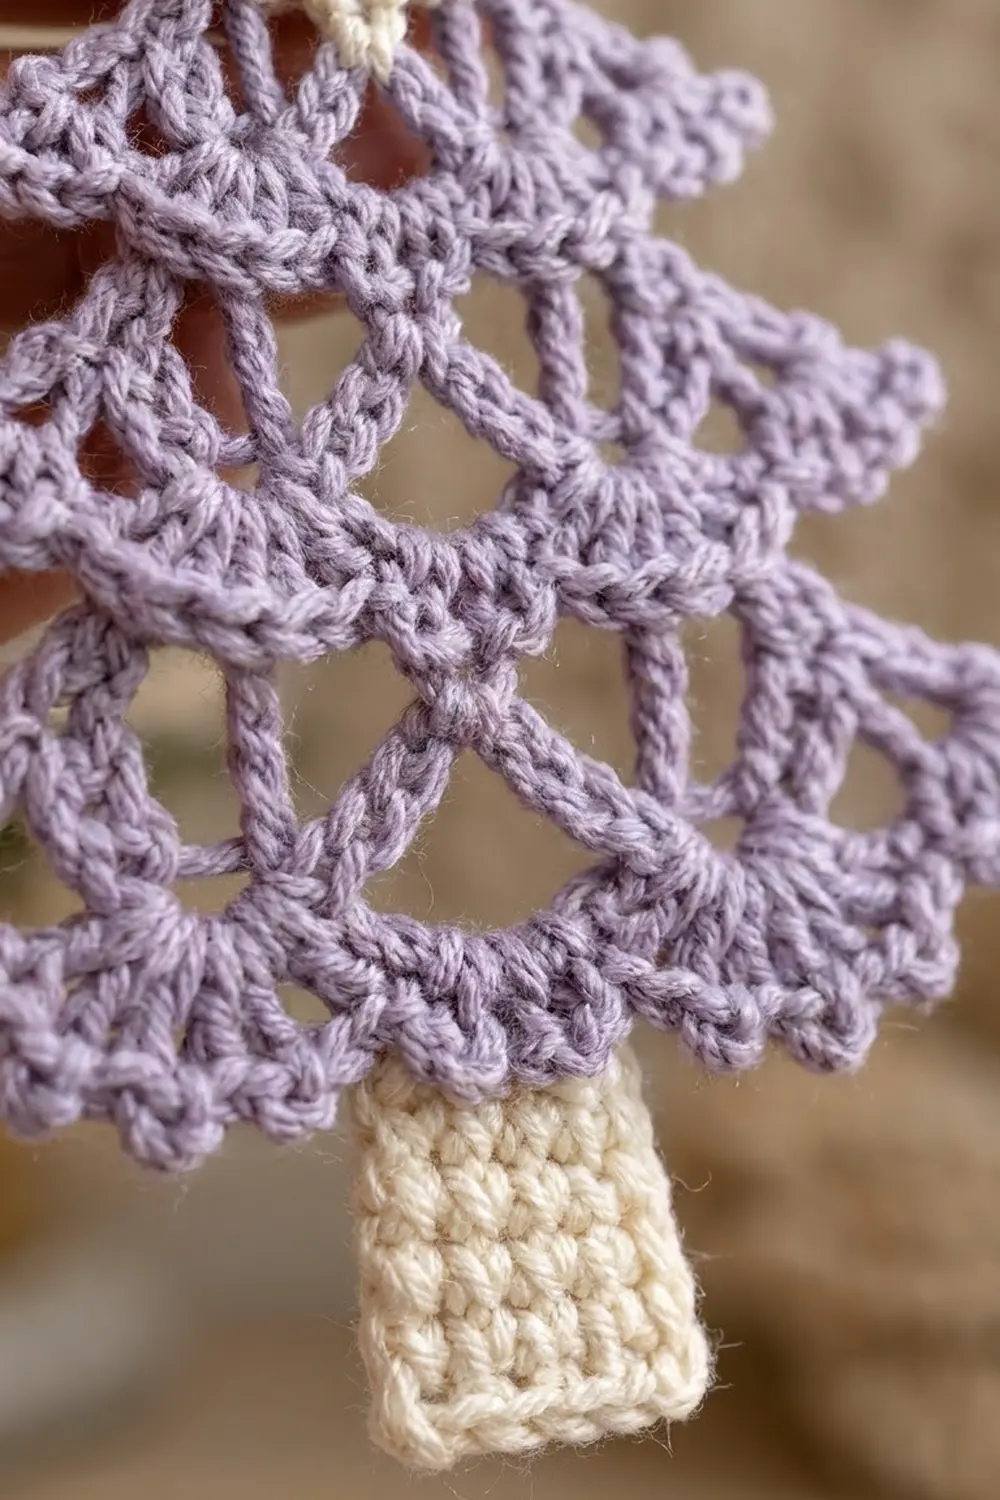
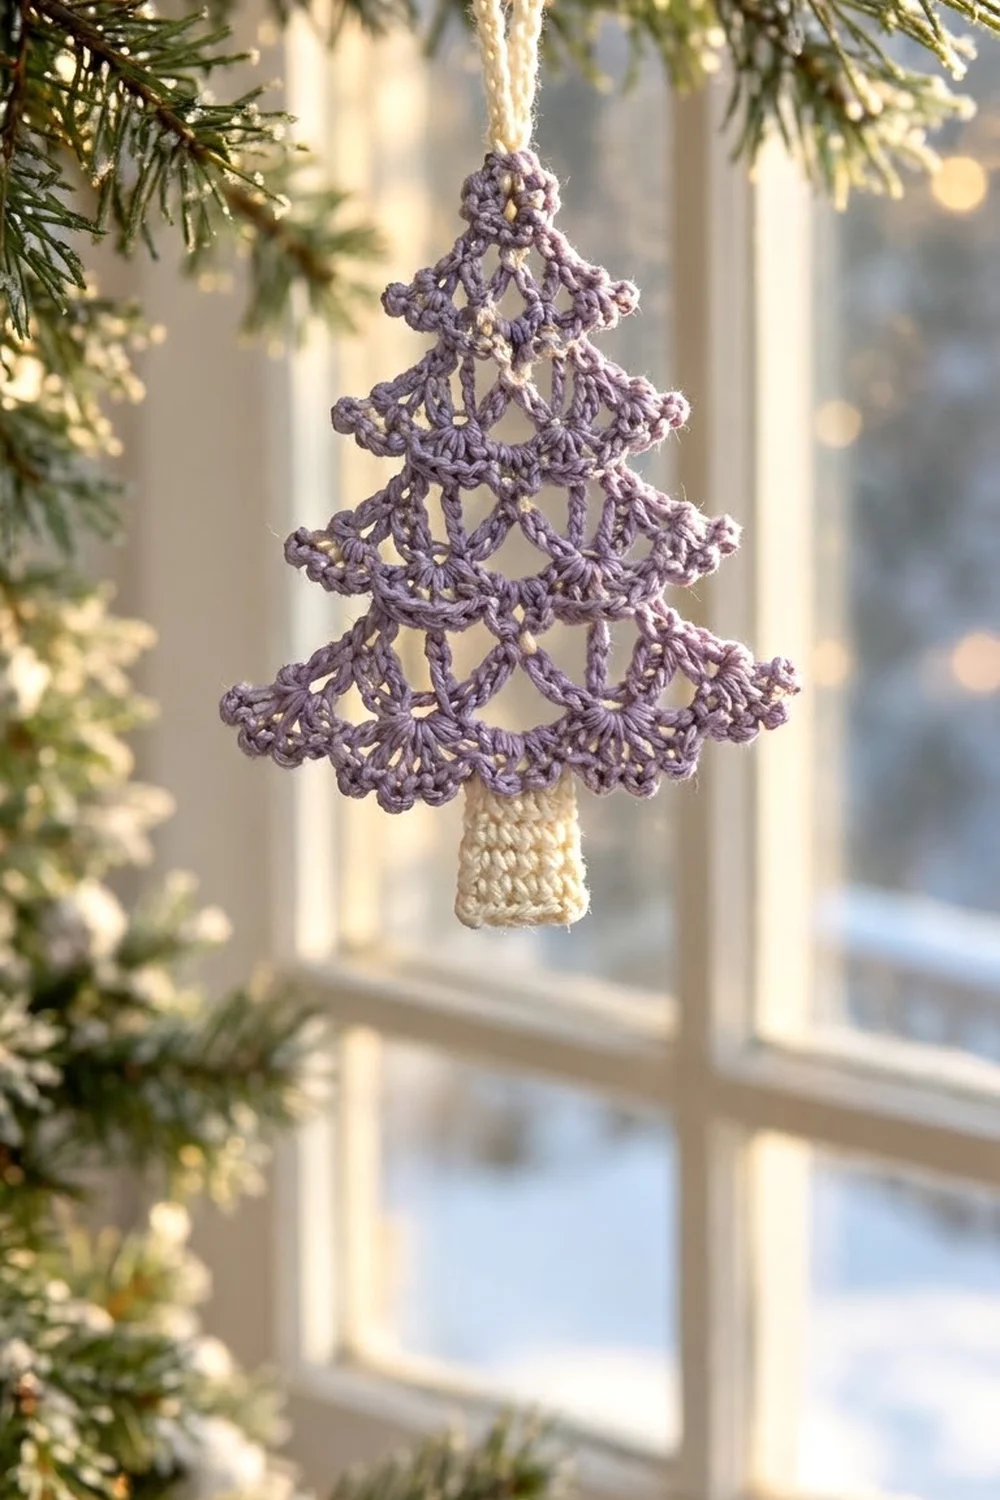
This lacy tree ornament is light and airy, made from tiers of downward-opening fans and long open arches. Each tier ends in a row of rounded scallops, and the tiers step outward to give a classic fir-tree outline. A tidy single crochet edging frames the lace, a small cream trunk anchors the bottom, and a cream loop at the top lets it hang.
The lavender and cream colors give the ornament a soft, frosty, Scandinavian feel. It looks good hanging on a tree, tied to a gift, or hung in a row across a window.
This pattern uses US crochet terms. The finished ornament measures 3.5 in (8.9 cm) wide and 4.5 in (11.4 cm) tall including the trunk, plus a 1.25 in (3.2 cm) hanging loop.
Construction overview: The tree body is worked flat in rows from the tip down, and each tier adds one fan. A single edging round goes around the whole outline. The trunk is a small rectangle sewn on behind the bottom center, and the loop is worked at the tip.
Finished Size and Construction
- Finished size: 3.5 in (8.9 cm) wide × 4.5 in (11.4 cm) tall, plus a 1.25 in (3.2 cm) loop
- Skill level: Easy-intermediate
- Terminology: US
- Yarn weight: #1 super fine (fingering) mercerized cotton
- Hook: 2.5 mm
- Number of pieces: 1 ornament (a tree body, plus a small sewn-on trunk and a worked loop)
- Layout: Tip plus 4 tiers, with 1, 2, 3, 4 and 5 fans from top to bottom
- Tree body before edging: 3.25 in (8.3 cm) wide × 3.5 in (8.9 cm) tall
- Tree body after edging: 3.5 in (8.9 cm) wide × 3.75 in (9.5 cm) tall
- Edging depth: 0.125 in (0.3 cm) on every edge
- Visible trunk: 0.75 in (1.9 cm)
Materials
Choose a smooth mercerized cotton in fingering weight, about 170 m per 50 g. Mercerized cotton shows the fan stitches crisply and holds its shape well after starching. Avoid fuzzy or very stretchy fibers, because they blur the arches.
- Lavender (tree): 8 g, about 27 m
- Cream (trunk and loop): 3 g, about 10 m
These quantities include a margin of roughly 30% for your gauge test and for weaving in ends.
Tools:
– 2.5 mm crochet hook
– Tapestry needle
– Scissors
– Rustproof pins and a blocking board or foam mat
– Spray starch, or a fabric stiffener diluted 1:1 with water
– Ruler or tape measure
Abbreviations (US Terms)
- ch – chain
- sl st – slip stitch
- sc – single crochet
- dc – double crochet
- st(s) – stitch(es)
- sp – space
- RS – right side
Special stitch – Fan: 7 dc worked into the same stitch. When a fan starts a row, ch 3 (this counts as the first dc), then work 6 dc into the same stitch.
Arch: a ch-7 loop anchored by sc at each end.
Gauge and Checkpoints
Gauge matters less here than it would for a garment. Still, it controls how the tiers sit, so test before you commit.
Test piece: Work Rows 1–3 (the tip plus the first tier). This should measure 1.3 in (3.3 cm) wide and 1.25 in (3.2 cm) tall. Each fan should be about 0.65 in (1.7 cm) across at its widest point.
Trunk gauge: 10 sc and 9 rows = 1 in (2.5 cm).
Edging gauge: about 10 sc per 1 in (2.5 cm) along the edge.
Checkpoints (unblocked, laid flat):
– After Row 1: 0.5 in (1.3 cm) tall
– After Row 3: 1.3 in (3.3 cm) wide, 1.25 in (3.2 cm) tall
– After Row 5: about 1.95 in (5.0 cm) wide, 2 in (5.1 cm) tall
– After Row 7: 2.6 in (6.6 cm) wide, 2.75 in (7.0 cm) tall
– After Row 9: 3.25 in (8.3 cm) wide, 3.5 in (8.9 cm) tall
If your piece is too big: go down to a 2.25 mm hook, or tighten your chains so each arch lies flat rather than drooping.
If your piece is too small: go up to a 2.75 mm hook. Tight fans also tend to cup, which is a second sign you need a bigger hook.
Tree Body
Use the lavender yarn. Every row is turned. Each tier is two rows: an arch row, then a fan row.
The pattern repeats in a set way. A fan row with F fans is followed by an arch row with F arches and F + 1 anchor sc. The next fan row then has F + 1 fans and F sc. That gives a total of 8F + 7 sts in the new fan row.
Tip
Row 1: Ch 4. Work 6 dc in the 4th ch from the hook. The skipped ch-3 counts as the first dc. Turn. (7 dc = 1 fan)
All 7 dc grow from a single chain, which forms the point of the tree. The fan opens downward.
Tier 2
Row 2 (arch row): Ch 1. Sc in the first dc, ch 7, sc in the top of the turning ch. Turn. (2 sc, 1 arch)
Row 3 (fan row): Ch 3 (counts as dc), then 6 dc in the same sc. Sc in the ch-7 arch. Work 7 dc in the last sc. Turn. (2 fans, 1 sc = 15 sts)
Tier 3
Row 4 (arch row): Ch 1. Sc in the first dc, ch 7, sc in the next sc (between the fans), ch 7, sc in the top of the turning ch. Turn. (3 sc, 2 arches)
Row 5 (fan row): Ch 3, then 6 dc in the same sc. Sc in the next arch, 7 dc in the next sc; repeat from * to * 2 times. Turn. (3 fans, 2 sc = 23 sts)
Tier 4
Row 6 (arch row): Ch 1. Sc in the first dc. Ch 7, sc in the next sc between fans; repeat from * to * 2 times. Ch 7, sc in the top of the turning ch. Turn. (4 sc, 3 arches)
Row 7 (fan row): Ch 3, then 6 dc in the same sc. Sc in the next arch, 7 dc in the next sc; repeat from * to * 3 times. Turn. (4 fans, 3 sc = 31 sts)
Tier 5
Row 8 (arch row): Ch 1. Sc in the first dc. Ch 7, sc in the next sc between fans; repeat from * to * 3 times. Ch 7, sc in the top of the turning ch. Turn. (5 sc, 4 arches)
Row 9 (fan row): Ch 3, then 6 dc in the same sc. Sc in the next arch, 7 dc in the next sc; repeat from * to * 4 times. (5 fans, 4 sc = 39 sts)
Do not fasten off. Check the stitch count: 5 fans × 7 dc = 35 dc, plus 4 sc, equals 39. ✓
Why the tiers step outward: Each arch row is anchored at the very first and last stitch of the fan row below it. The next fan row then puts a full fan on each of those end anchors. Each tier therefore extends about half a fan beyond the tier above on each side. That is what creates the stepped fir-tree silhouette.
Border (Edging Round)
Keep using lavender, continuing straight from the end of Row 9. Do not turn.
Border gauge: about 10 sc per 1 in (2.5 cm).
Round 1: Ch 1. Rotate the work to sew up the side edge.
- Side 1 (19 sc): Work up the row ends from the bottom to the tip:
- 3 sc around the dc post at the end of Row 9, and 1 sc in the sc at the end of Row 8
- Repeat the same for Rows 7–6, 5–4 and 3–2, giving 4 sc per tier and 16 sc in total
- 3 sc around the post at the side of Row 1
- Top (3 sc): 3 sc in the tip point (the foundation ch holding the Row 1 dc).
- Side 2 (19 sc): Work down the opposite side the same way: 3 sc for the Row 1 post, then (1 sc in the arch-row end, 3 sc around the fan-row post) 4 times.
- Bottom (54 sts): Work across Row 9. In each fan: sc in the first 2 dc, 2 sc in each of the next 3 dc, sc in the last 2 dc (10 sc). Sl st in the sc between fans. Repeat for all 5 fans. Do not sl st after the last fan. That gives 5 × 10 sc + 4 sl st = 54 sts.
Join with a sl st to the first sc of Side 1. Total: 19 + 3 + 19 + 54 = 95 sts. Fasten off.
Corners: No separate corner stitches are added. The first and last dc of Row 9 are already counted in the bottom section, and the 3 sc around the same post are counted in the side section. The turn happens naturally at the outer fan.
Why the math works: A fan opens into a near-semicircular scallop about 0.65 in (1.7 cm) across. Its outer curve is about 1 in (2.5 cm) long, which matches 10 sc at the border gauge. The sl st between fans keeps each valley sharp. On the sides, 3 sc around a dc post and 1 sc on an sc row end cover the edge without ruffling. The round adds 0.125 in (0.3 cm) on every edge, so the body grows from 3.25 × 3.5 in (8.3 × 8.9 cm) to 3.5 × 3.75 in (8.9 × 9.5 cm).
Trunk
Use the cream yarn.
Row 1: Ch 7. Sc in the 2nd ch from the hook and in each ch across. Turn. (6 sc)
Rows 2–8: Ch 1, sc in each st across, turn. (6 sc)
Fasten off, leaving a 10 in (25.4 cm) tail. The trunk should measure 0.6 in (1.5 cm) wide × 0.9 in (2.3 cm) tall.
Attach the trunk: Center the trunk behind the middle (3rd) fan of the bottom edge. Its top 0.15 in (0.4 cm), about 1.5 rows, should overlap behind the edging. Whipstitch the top edge of the trunk to the back of the fan’s dc stitches, keeping your stitches hidden from the RS. Visible trunk: 0.75 in (1.9 cm). Weave in the tail.
Hanging Loop
Use the cream yarn.
- Join with a sl st in the center sc of the 3 top sc.
- Ch 20, which is about 2.5 in (6.4 cm). Sl st in the same st to form a loop.
- Work 26 sc into the loop to cover the chain completely. Sl st in the same st at the tip.
- Fasten off and weave in the end through the back of the tip.
The covered loop stands 1.25 in (3.2 cm) above the tip and is firm enough to keep its shape.
Final Blocking
- Weave in all ends except the trunk and loop tails, which you have already secured.
- Wet the ornament with cool water and press it gently in a towel.
- Lay it face up on the blocking board.
- Pin the tip, then pin the two bottom corners so the body measures 3.5 in (8.9 cm) across.
- Pin the center of each bottom scallop so the fans open evenly.
- Use a pin to open each arch into a smooth curve.
- Check that the body is 3.75 in (9.5 cm) tall from the tip to the bottom scallops.
- Spray with starch, or dab on the diluted stiffener. Leave it to dry completely, at least 6 hours.
- Unpin it and make sure the loop stands upright.
Final Quality-Control Checklist
- [ ] Row 9 has 39 sts (5 fans, 4 sc)
- [ ] All arches are the same length, ch 7 each
- [ ] The edging has 95 sts: 19 + 3 + 19 + 54
- [ ] The body measures 3.5 × 3.75 in (8.9 × 9.5 cm) after blocking
- [ ] The trunk is centered under the middle fan, with 0.75 in (1.9 cm) showing
- [ ] The sewing stitches can’t be seen from the RS
- [ ] The loop is firm, centered and 1.25 in (3.2 cm) tall
- [ ] The total height without the loop is 4.5 in (11.4 cm)
- [ ] All ends are woven in securely
Troubleshooting
Fans cup or ruffle: The arches are too long for your tension. Try ch 6 arches or a smaller hook.
Tiers pull inward and look narrow: The arches are too tight. Loosen your chains, or try ch 8.
The edging waves along the bottom: Your sts are tight. Change the 2-sc increases to 1 sc in the 2nd and 6th dc of each fan.
The edging puckers on the sides: Work 2 sc around each dc post instead of 3.
The trunk is off-center: Remove it, find the 4th dc of the middle fan, and center the trunk below that stitch.
The loop flops over: Pack the sc more tightly into the loop, or stiffen the loop separately.
Care
Hand wash in cool water and lay flat to dry. Re-starch after washing if needed. Store flat in tissue so the scallops keep their shape.
Final Notes
The measurements build in a simple chain. Rows 1–3 should measure 1.3 in (3.3 cm) wide. Each tier adds one fan, about 0.65 in (1.7 cm), until Row 9 reaches 3.25 in (8.3 cm). The 95-st edging brings the body to 3.5 × 3.75 in (8.9 × 9.5 cm). The trunk adds 0.75 in (1.9 cm) for a total of 4.5 in (11.4 cm), and the loop adds 1.25 in (3.2 cm) on top. Once you know your gauge, you can make a full set of matching ornaments in an evening.
Happy crocheting!