

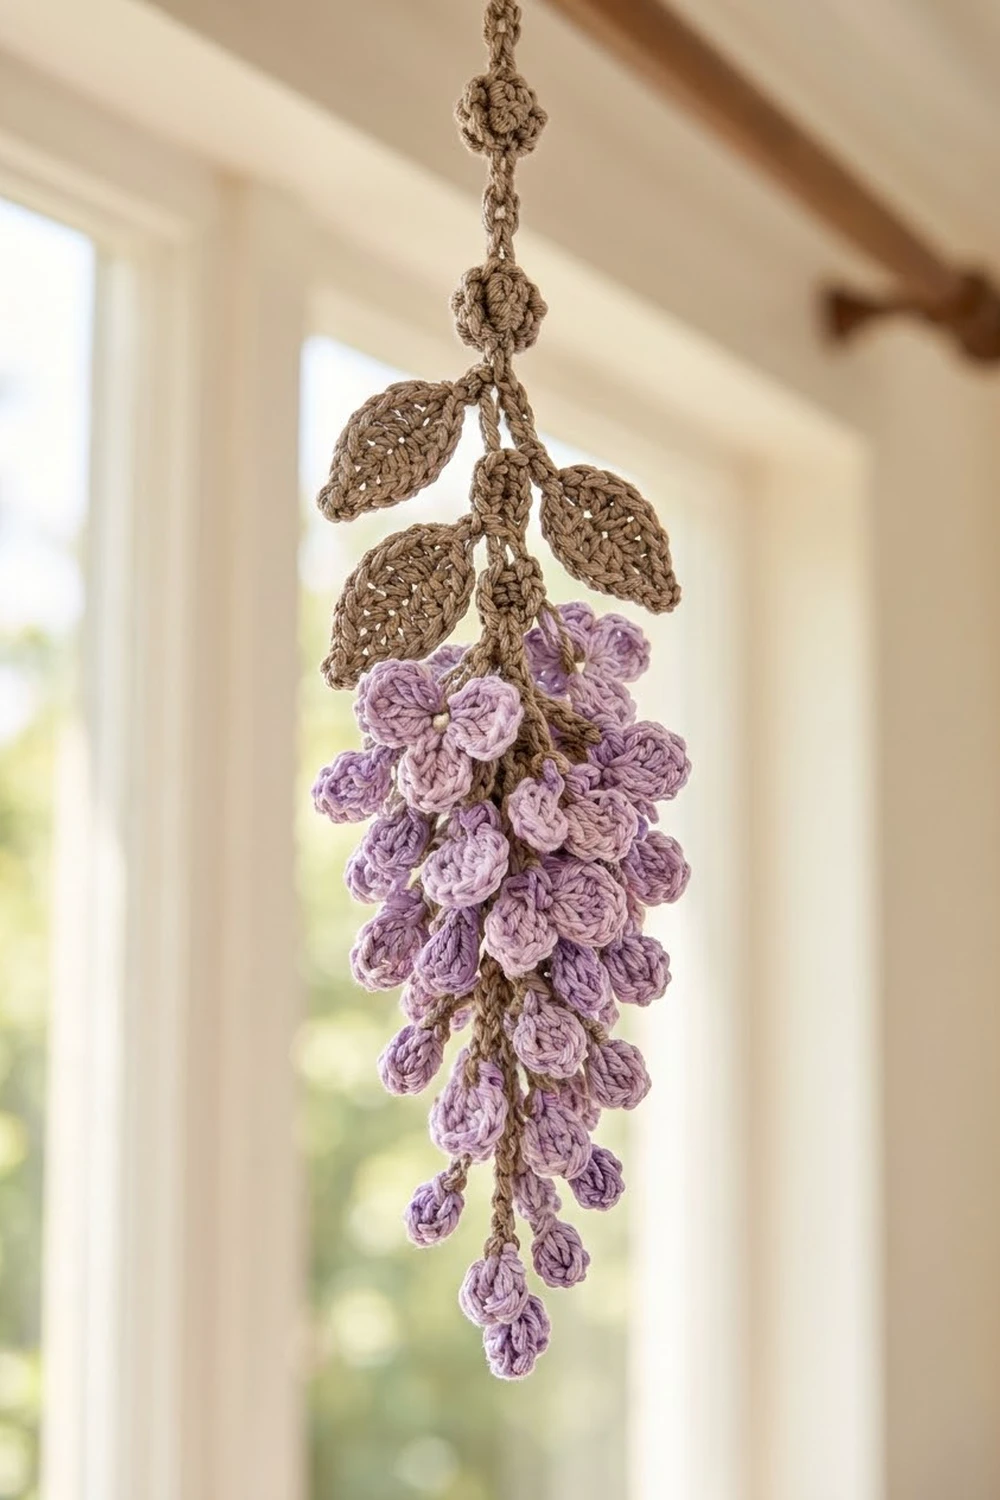
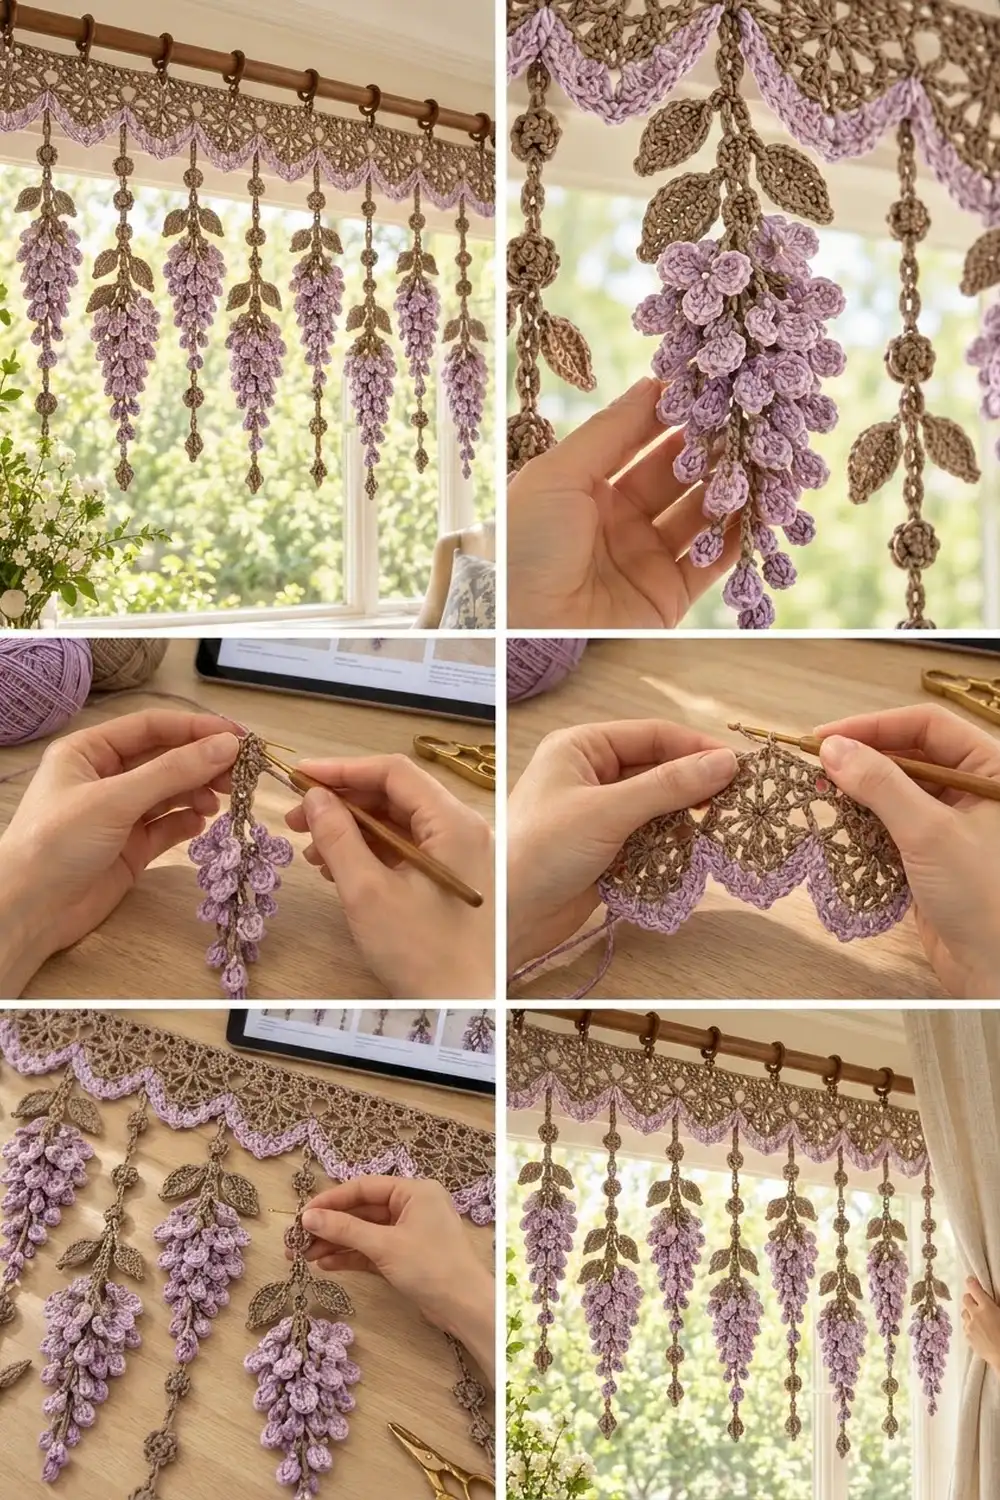
The Wisteria Cascade Valance brings a spring garden to your window. A lacy taupe header sits along the rod, edged with soft lilac scallops. Below it, eight wisteria strands hang down, each with beaded cords, a pair of leaves, and a tapering cluster of cupped lilac blossoms.
You only need two colors: a warm taupe for the lace, cords and leaves, and a lavender for the scallops and flowers. In a sunny window the lace casts small shadows, and the cupped petals catch the light on both sides.
This pattern uses US crochet terms. The finished valance is about 32.5 in (82.6 cm) wide. It measures 5.5 in (14.0 cm) deep at the header and about 23 in (58.4 cm) from the top edge to the tip of each strand.
To build it, you make eight square lace motifs and join them in one row. Next you add a taupe border round and a lilac scalloped edge. Finally you work each wisteria strand straight down from the center of a scallop, so the strands need no sewing.
Finished Size and Construction
- Finished size: 32.5 in (82.6 cm) wide × 23 in (58.4 cm) total drop
- Skill level: Intermediate
- Terminology: US
- Yarn weight: DK (#3) cotton or cotton blend
- Hook: 4.0 mm (G-6)
- Number of pieces: 8 lace motifs + 8 wisteria strands
- Layout: 1 row × 8 motifs
- Motif size: 4 in (10.2 cm) square
- Header size before border: 32 in × 4 in (81.3 cm × 10.2 cm)
- Border depth: taupe round 0.25 in (0.6 cm). Lilac scallops are 0.5 in (1.3 cm) deep at their ends and 1 in (2.5 cm) deep at their centers.
- Strand length: about 17.5 in (44.5 cm)
Materials
Choose a smooth, mercerized DK cotton of about 115 m per 50 g. Cotton holds the cupped petals and pointed leaves crisply and won’t stretch much on the rod. Avoid fuzzy yarns, because they blur the lace.
- Taupe: 110 g / 253 m, for the motifs, the border round, cords, beads and leaves
- Lavender: 90 g / 207 m, for the scallops and flowers
- 4.0 mm (G-6) crochet hook
- Tapestry needle
- 4 locking stitch markers
- Scissors
- Blocking mats and rust-proof pins
- 9 curtain clip rings, plus a curtain rod
Both quantities include a margin of about 25% for gauge differences and swatching.
Abbreviations (US Terms)
- ch – chain
- sl st – slip stitch
- sc – single crochet
- hdc – half double crochet
- dc – double crochet
- tr – treble crochet
- rsc – reverse single crochet (crab stitch)
- sp – space
- st(s) – stitch(es)
- RS / WS – right side / wrong side
- rep – repeat
Special Stitches
- 3-dc cluster (3-dc cl): [Yo, insert hook into the stitch, yo and pull up a loop, yo and pull through 2 loops] 3 times in the same stitch, then yo and pull through all 4 loops on the hook.
- Bobble bead (BB): Ch 3. In the 3rd ch from the hook, work a 5-dc cluster (the same as the 3-dc cl, but repeated 5 times; finish by pulling through all 6 loops). Ch 1 to lock. This makes a round knob, about 0.5 in (1.3 cm), sitting on the cord.
- Leaf:
- Ch 9. Starting in the 2nd ch from the hook, work sc, hdc, dc, tr, tr, dc, hdc.
- In the last ch, work (sc, ch 2, sc) to form the tip.
- Working along the other side of the foundation chain, work hdc, dc, tr, tr, dc, hdc, sc.
- Sl st into the spine ch at the leaf’s base.
Each leaf has 16 sts plus a ch-2 tip, and is about 1.8 in (4.6 cm) long. The foundation chain forms the raised center vein.
– Bud: Sl st in the next spine ch, ch 3, 3-dc cl in the 3rd ch from the hook, sl st in the same spine ch.
– Cup Petal: Sl st in the next spine ch, ch 3, 5 dc in the 3rd ch from the hook, sl st in the same spine ch.
– Blossom: Sl st in the next spine ch, ch 4, 7 dc in the 4th ch from the hook, sl st in the same spine ch.
Each Bud, Cup Petal and Blossom uses exactly one spine chain.
Gauge and Checkpoints
Gauge: one finished motif measures 4 in (10.2 cm) square, which is 18 sc per side over 4 in (10.2 cm), or 4.5 sc per inch. The chain gauge is 9 ch = 2 in (5.1 cm).
Make one complete motif before you start the others. Measure it at each stage:
- After Round 1: 1.25 in (3.2 cm) across
- After Round 2: 2.75 in (7.0 cm) across
- After Round 3: 3.25 in (8.3 cm) square
- After Round 4: 3.75 in (9.5 cm) square
- After Round 5: 4 in (10.2 cm) square, within ±1/8 in (0.3 cm)
If your motif is too big, go down to a 3.75 mm hook. If it is too small, go up to a 4.5 mm hook. A difference of 1/4 in (0.6 cm) per motif adds up to 2 in (5.1 cm) across the full header, so it’s worth checking.
Lace Motif (Make 8, Taupe)
Round 1: Make a magic ring. Ch 3 (counts as a dc), then work 11 dc in the ring. Join with a sl st to the top of the ch-3. (12 dc)
Round 2: Ch 6 (counts as a dc plus a ch 3). Dc in the next dc, ch 3. Rep from * to * 10 more times. Join with a sl st to the 3rd ch of the ch-6. (12 dc, 12 ch-3 sps)
These twelve spokes form the open wheel at the center of the motif.
Round 3:
1. Sl st into the first ch-3 sp. Ch 3 (counts as a dc), then work (2 dc, ch 2, 3 dc) in the same sp. This is the first corner.
2. Work 3 dc in each of the next 2 sps.
3. (3 dc, ch 2, 3 dc) in the next sp, then 3 dc in each of the next 2 sps. Rep from * to * 2 more times.
4. Join with a sl st.
(48 dc: 12 dc per side between the corner ch-2 sps, plus 4 corner ch-2 sps)
Round 4: Ch 3 (counts as a dc). Work 1 dc in each dc to the corner, and (2 dc, ch 2, 2 dc) in each corner ch-2 sp. Join with a sl st. (48 dc worked one in each existing dc + 16 dc added at the corners = 64 dc. That gives 16 dc per side and 4 ch-2 corner sps.)
Round 5: Ch 1. Work 1 sc in each dc, and (sc, ch 2, sc) in each corner sp. Join with a sl st and fasten off. (64 sc worked one in each existing dc + 8 sc added at the corners = 72 sc.)
After Round 5, each side has 18 sc, including its 2 corner sc, and there are 4 corner ch-2 sps.
Make All Pieces
- Taupe: 8 lace motifs, about 6 g each
- Taupe and lavender: 8 wisteria strands. You will work these onto the header after the border is done. Each uses about 4 g of taupe and 8 g of lavender.
Layout (header, viewed from the RS):
[M1][M2][M3][M4][M5][M6][M7][M8]
  |   |   |   |   |   |   |   |
  S1  S2  S3  S4  S5  S6  S7  S8
M = motif, S = strand. Each strand hangs from the center of the scallop below its own motif.
Joining the Motifs
Method: Slip stitch join, worked on the WS through the back loops only. This leaves a neat, flat ridge on the back and a clean line on the front.
- Place 2 motifs RS together and line up their corners.
- Join taupe with a sl st through both corner ch-2 sps.
- Sl st through the back loop of each sc pair along the side. That is 18 sl sts, matching 18 sc to 18 sc.
- Sl st through the next pair of corner sps.
- Fasten off, or continue to the next motif.
Because both sides have exactly 18 sts, the seam matches stitch for stitch with nothing left over. Join M1 to M2, then M2 to M3, and so on until all 8 are joined in one row.
Tension: Keep your sl sts as loose as your sc. If the seams are tight, the header will pucker and curve. If needed, go up a hook size just for joining.
Checkpoint: The joined header should measure 32 in × 4 in (81.3 cm × 10.2 cm).
Border
Border gauge: 4.5 sc per inch, the same as Round 5 of the motif.
Round 1 (Taupe, All Around)
With RS facing, join taupe in the top-right outer corner ch-2 sp.
- Ch 1, and work (sc, ch 2, sc) in the corner sp.
- Along each long edge, work 1 sc in each motif sc. At each seam, skip the two seam corner sps. Go straight from the last sc of one motif to the first sc of the next, and add no stitches at the seams.
- Along each short edge, work 1 sc in each of the 18 sc.
- Work (sc, ch 2, sc) in each of the remaining 3 outer corner sps.
- Join with a sl st and fasten off.
Counts per side, each including its 2 corner sc:
- Each long side: (8 motifs × 18 sc) + 2 corner sc = 146 sc
- Each short side: 18 sc + 2 corner sc = 20 sc
- Total: (324 sc worked one in each existing sc + 8 sc added at the corners) = 332 sc
Row 2 (Lavender, Bottom Edge Only, Scallops)
With RS facing, join lavender in the first corner sc at the right-hand end of the bottom edge. This is stitch 1 of 146.
- Ch 1, and sc in the same st.
- Scallop: sc in the next st, hdc in each of the next 2 sts, dc in each of the next 3 sts, tr in each of the next 6 sts, dc in each of the next 3 sts, hdc in each of the next 2 sts, sc in the next st. That is 18 sts.
- Rep the scallop from * to * 7 more times.
- Sc in the last corner sc. (1 + 144 + 1 = 146 sts, 8 scallops)
Do not turn.
Row 3 (Lavender, Rope Edge)
Ch 1. Work 1 rsc in each st back across the row. (146 rsc) Fasten off.
Why the math works: The bottom edge has 146 sts. The 2 corner sc frame the 144 motif sts, and 144 ÷ 18 = 8 exactly. Each scallop uses one motif’s 18 sts, so every scallop sits centered under its own motif. The center of each scallop falls between its 3rd and 4th tr, which are stitches 9 and 10 of the repeat. The rope edge from the reverse sc gives the twisted texture along the lilac band.
Checkpoint: The header now measures 32.5 in (82.6 cm) wide. It is 5.5 in (14.0 cm) deep at the scallop centers and 5 in (12.7 cm) deep where the scallops meet.
Wisteria Strands (Make 8, Worked Onto the Header)
Spine (Taupe)
With RS facing, join taupe with a sl st into the center of a scallop, between its 3rd and 4th tr, just above the rope edge.
- Upper cord: Ch 7, BB, ch 7, BB, ch 7, BB, ch 4. (25 ch + 3 BB, about 7 in / 17.8 cm)
- Leaf pair 1: Leaf, Leaf. Anchor both leaves in the last ch so they angle out on opposite sides.
- Ch 5, then Leaf pair 2: Leaf, Leaf. (Leaf section about 1 in / 2.5 cm, plus the leaves)
- Cluster section: Ch 30. Place marker T in the 1st of these chs and marker B in the 30th. (About 6.75 in / 17.1 cm)
- Tip: Ch 4, BB, ch 4, BB. Fasten off and weave in the end. (8 ch + 2 BB, about 2.75 in / 7.0 cm)
The spine uses 68 ch in total.
Flowers (Lavender)
Pass 1 (going up the back bumps): Join lavender with a sl st in the back bump of the tip ch just below marker B. Number the cluster chs from the bottom up: B is ch 1 and T is ch 30.
- Work Bud 8 times, in chs 1–8.
- Work Cup Petal 10 times, in chs 9–18.
- Work Blossom 12 times, in chs 19–30.
(30 petals)
Pass 2 (coming down the top loops): Ch 1 (does not count). Working under both top loops of the same 30 chs, start at ch 30 and work down.
- Work Blossom 12 times, in chs 30–19.
- Work Cup Petal 10 times, in chs 18–9.
- Work Bud 8 times, in chs 8–1.
(30 petals)
Sl st into the tip ch and fasten off.
Per strand: 24 Blossoms, 20 Cup Petals and 16 Buds, for 60 petals. Since each pass puts a petal on every chain, the cluster fills both sides. It is about 2.5 in (6.4 cm) wide under the leaves and narrows to about 1 in (2.5 cm) at the buds.
Checkpoint: Each strand is about 17.5 in (44.5 cm) long: 7 + 1 + 6.75 + 2.75 in (17.8 + 2.5 + 17.1 + 7.0 cm). Repeat for all 8 scallops.
Final Blocking
- Weave in all ends along seams or inside the solid rounds.
- Soak the valance in cool water for 10 minutes, then press out the water in a towel. Don’t wring it.
- Pin the header flat to 32.5 in (82.6 cm) wide. Pin each motif square to 4 in (10.2 cm), and open up the spokes at the centers.
- Pin each scallop into a smooth curve, 1 in (2.5 cm) deep at its center.
- Let the strands hang off the edge of the mat, or lay them straight. Don’t press the petals flat. Pinch each blossom into a cup shape and pinch each leaf to a point.
- Let it dry completely, then clip on 9 rings: one at each end and one at each seam, every 4 in (10.2 cm).
Final Quality-Control Checklist
- [ ] 8 motifs, each 4 in (10.2 cm) square, with 18 sc per side
- [ ] Seams flat, matched stitch for stitch
- [ ] Border Round 1: 146 / 20 / 146 / 20 sc
- [ ] 8 scallops of 18 sts each, centered under the motifs
- [ ] Rope edge even across all 146 sts
- [ ] Each strand has 5 BB, 4 leaves and 60 petals
- [ ] Strands all hang at about 17.5 in (44.5 cm)
- [ ] All ends secured
Troubleshooting
- Motif cups or ruffles: Your Round 4 or 5 tension is off. Redo that round with a smaller or larger hook.
- Header curves: The joining sl sts are too tight. Rework the seam with a larger hook.
- Scallops lean to one side: Count each 18-st repeat again. One extra or missing st shifts every scallop after it.
- Cluster looks sparse: Make sure every spine ch received a petal in both passes. Count 30 petals per pass.
- Strands differ in length: Chains stretch. Count chains rather than measuring them, and block all strands the same way.
- Beads look flat: Pull the cluster loops snug, and nudge each bead to the front before you continue chaining.
Care
Hand wash in cool water with mild soap, press dry in a towel, and reshape the petals while damp. Keep the valance out of strong direct sun for long periods so the lavender doesn’t fade.
Final Notes
Here is the measurement chain from start to finish:
- Each motif is 18 sc per side, or 4 in (10.2 cm).
- Eight joined motifs make a header 32 in (81.3 cm) wide.
- The border round adds 2 corner sc per side, giving 146 sts per long side and a width of 32.5 in (82.6 cm).
- The 144 motif sts divide into 8 scallops of 18 sts each.
- Each scallop holds one 68-chain strand of 60 petals, about 17.5 in (44.5 cm) long, for a total drop of 23 in (58.4 cm).
Check your measurements at each step, and the valance will hang straight and even.
Happy crocheting!