

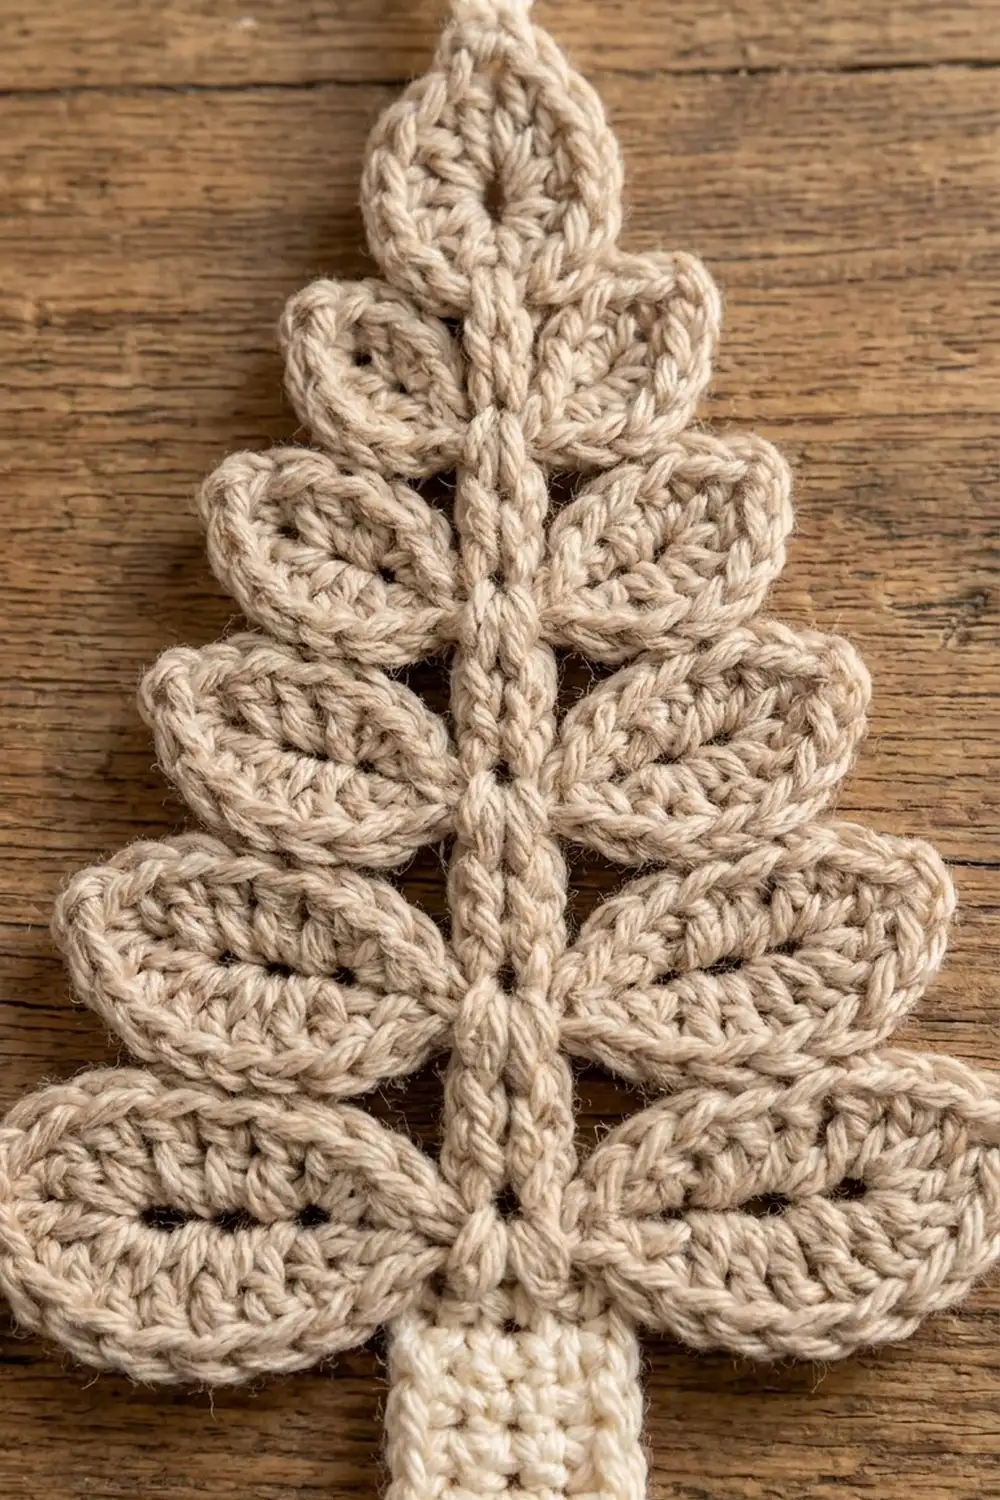
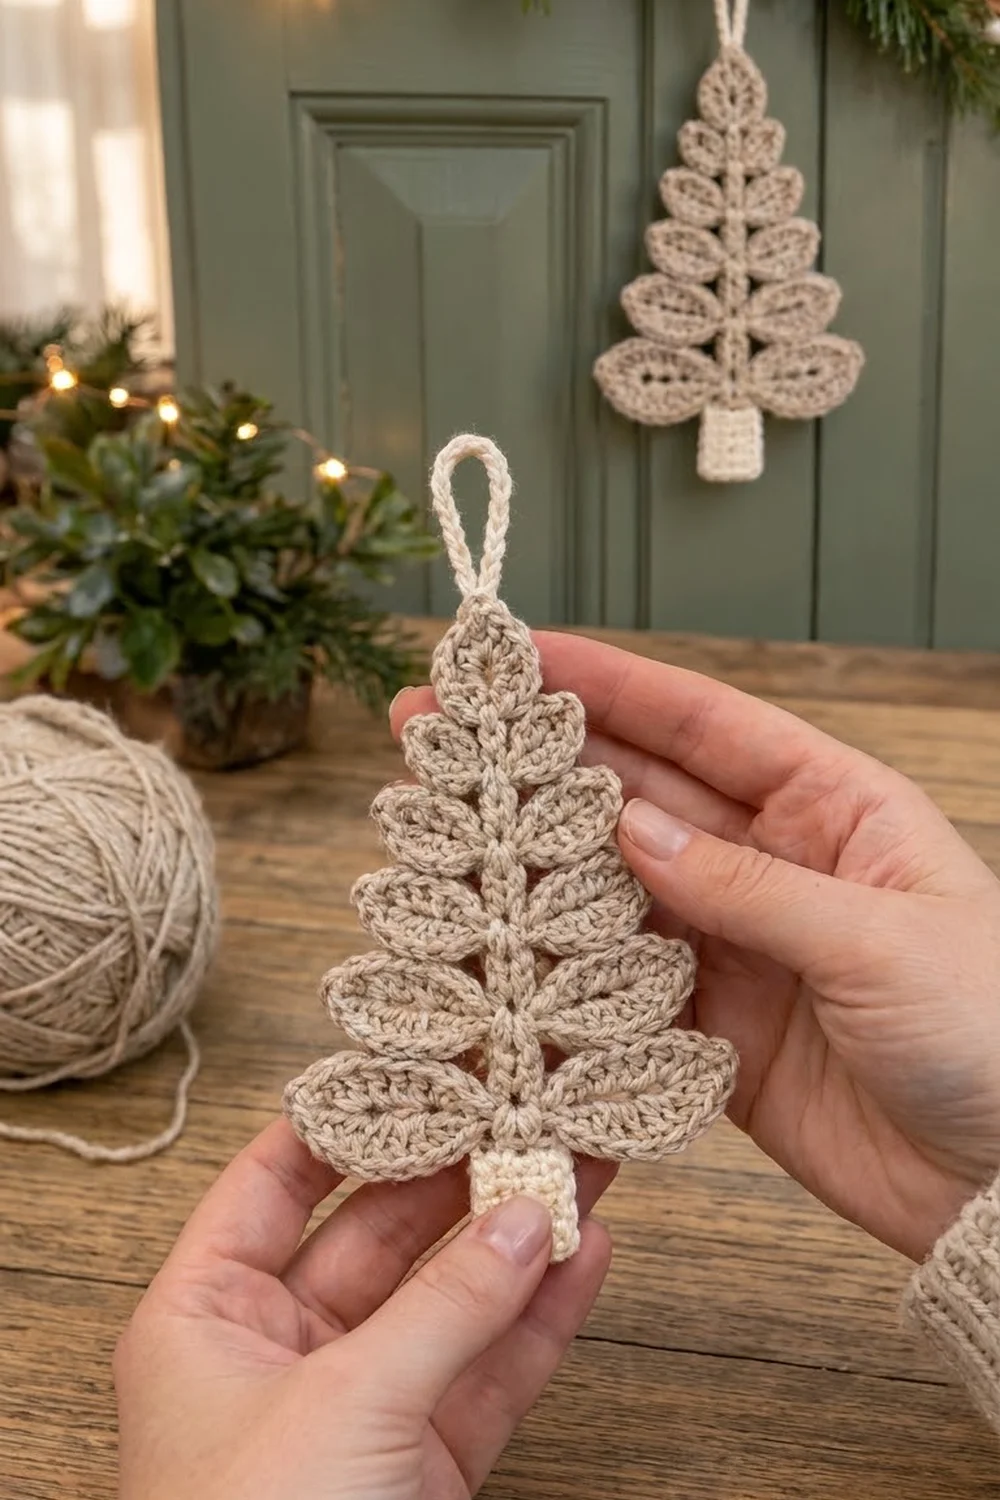
The Woodland Sprig Tree is a leafy Christmas tree ornament worked as one flat piece. Five pairs of open-centered leaves branch from a raised center stem. They get smaller toward the top, and a single upright leaf finishes the tip. A small square trunk anchors the base, and a slim chain loop at the top lets it hang from a doorknob, branch, or gift.
The palette is quiet and rustic: oatmeal beige for the leaves and stem, soft cream for the trunk and hanging loop. Matte cotton shows the stitches clearly, so every leaf reads as a crisp little shape with a slit down its middle.
This pattern uses US crochet terms. The finished ornament measures about 6 in (15.2 cm) tall without the loop and 4 in (10.2 cm) wide across the bottom leaves. The hanging loop adds about 1.6 in (4.1 cm).
Construction is simple and continuous. You crochet the cream trunk in rows and edge it. Then you join beige at the top center of the trunk and chain up the stem. Each pair of leaves is worked over chain loops anchored at a stem node. At the top you slip stitch back down the stem to firm it up. A cream hanging loop finishes the piece.
Finished Size and Construction
- Finished size: about 6 in (15.2 cm) tall x 4 in (10.2 cm) wide, without the loop
- Skill level: easy to intermediate
- Terminology: US crochet terms
- Yarn weight: DK (weight 3) cotton or cotton blend
- Hook: 3.5 mm (US E-4)
- Number of pieces: 1 (a single ornament, worked in one continuous piece with a color change)
- Layout: single standalone tree; no joining
- Piece size: trunk 1.3 x 1.3 in (3.3 x 3.3 cm) after edging; bottom leaves about 1.9 in (4.8 cm) long
- Trunk size before border: 1 x 1 in (2.5 x 2.5 cm)
- Border depth: one sc round, about 0.15 in (0.4 cm) on each side of the trunk
Materials
Choose a smooth, matte DK cotton or cotton blend. Cotton holds the leaf points and blocks flat. Acrylic works too, but the leaves will curl more and need firmer blocking. Avoid fuzzy yarns, which hide the open slits in the leaves.
- Beige / oatmeal (MC): 10 g, about 23 m (leaves and stem)
- Cream (CC): 3 g, about 7 m (trunk, trunk edging, hanging loop)
These amounts are based on a yarn of about 230 m per 100 g. They include a margin for tails, a gauge test, and a little frogging.
Tools:
- 3.5 mm (US E-4) crochet hook
- Tapestry needle
- Scissors
- 2 stitch markers
- Rust-proof pins and a blocking mat or folded towel
- Spray bottle with water
- Ruler or tape measure
Abbreviations (US Terms)
- ch – chain
- sl st – slip stitch
- sc – single crochet
- hdc – half double crochet
- dc – double crochet
- tr – treble crochet
- st(s) – stitch(es)
- sp – space
- MC / CC – main color / contrast color
Special technique – leaf loop: Chain the number given, then sl st into the stem node chain. This makes a closed chain loop. Work all leaf stitches over the loop, into its center, not into individual chains. Work one side, ch 2 for the tip, then work the second side back toward the stem. When you pull the leaf flat, the loop folds in half and leaves a narrow open slit down the middle.
Gauge and Checkpoints
Gauge: 20 sc and 24 rows = 4 in (10.2 cm) in sc rows. Chains: 6 ch = 1 in (2.5 cm).
Gauge matters here because leaf length depends on chain length. Make the trunk first and treat it as your test piece.
Checkpoints:
- Trunk before edging: 5 sts x 6 rows should measure 1 x 1 in (2.5 x 2.5 cm).
- Trunk after edging: about 1.3 x 1.3 in (3.3 x 3.3 cm).
- First leaf (Leaf A): about 1.9 in (4.8 cm) from stem to tip and about 0.8 in (2.0 cm) wide.
- After Tier 3: about 3.4 in (8.6 cm) across that tier, tip to tip.
- Finished tree: about 6 in (15.2 cm) tall and 4 in (10.2 cm) wide.
If your piece is too big: use a 3.25 mm (US D-3) hook, or chain more tightly. If it is too small: use a 3.75 mm (US F-5) hook. Long, floppy leaves usually mean loose chains. Short, cupped leaves usually mean tight chains or too many stitches crowded onto the loop.
Pattern
Part 1: Trunk (CC, cream)
With CC, ch 6.
Row 1: Sc in 2nd ch from hook and in each ch across. Turn. (5 sc)
Rows 2–6: Ch 1, sc in each st across. Turn. (5 sc per row)
Checkpoint: 1 x 1 in (2.5 x 2.5 cm). Don’t fasten off. Work the trunk edging from the Border section now, then come back to Part 2.
Part 2: Stem Start (MC, beige)
Hold the edged trunk with the right side facing you and its top edge uppermost. The top side has 7 sts from corner to corner. Place a marker in the 4th (center) st.
Join MC with a sl st in the marked st. Ch 1, sc in the same st. This sc is the stem anchor.
Each stem segment is a short chain. Its last chain is called the node, and both leaves of a tier are worked from it.
Part 3: Tier 1 (Leaf A pair, largest)
Segment 1: Ch 3. The 3rd ch is Node 1.
Left Leaf A: Ch 22, sl st in Node 1 to form the leaf loop. Working over the loop: sc, hdc, 2 dc, 3 tr, 2 dc, hdc, sc (11 sts). Ch 2 for the tip. Continue over the loop on the second side: sc, hdc, 2 dc, 3 tr, 2 dc, hdc, sc (11 sts). Sl st in Node 1. (22 sts + ch-2 tip)
Right Leaf A: Repeat Left Leaf A, anchoring again in Node 1. (22 sts + ch-2 tip)
Tier 1 total: 44 sts plus 2 tips. Slide the stitches so they cover each half of the loop evenly. The center slit should stay open and the tip should come to a point.
Part 4: Tier 2 (Leaf B pair)
Segment 2: Ch 4. The 4th ch is Node 2.
Leaf B (make 2, both anchored in Node 2): Ch 20, sl st in Node 2. Over the loop: sc, hdc, 2 dc, 2 tr, 2 dc, hdc, sc (10 sts), ch 2, sc, hdc, 2 dc, 2 tr, 2 dc, hdc, sc (10 sts), sl st in Node 2. (20 sts + ch-2 tip per leaf)
Tier 2 total: 40 sts. Leaf length: about 1.8 in (4.6 cm).
Part 5: Tier 3 (Leaf C pair)
Segment 3: Ch 4. The 4th ch is Node 3.
Leaf C (make 2 in Node 3): Ch 18, sl st in Node 3. Over the loop: sc, hdc, 2 dc, tr, 2 dc, hdc, sc (9 sts), ch 2, sc, hdc, 2 dc, tr, 2 dc, hdc, sc (9 sts), sl st in Node 3. (18 sts + ch-2 tip per leaf)
Tier 3 total: 36 sts. Leaf length: about 1.6 in (4.1 cm). Checkpoint: about 3.4 in (8.6 cm) across this tier.
Part 6: Tier 4 (Leaf D pair)
Segment 4: Ch 4. The 4th ch is Node 4.
Leaf D (make 2 in Node 4): Ch 16, sl st in Node 4. Over the loop: sc, hdc, 4 dc, hdc, sc (8 sts), ch 2, sc, hdc, 4 dc, hdc, sc (8 sts), sl st in Node 4. (16 sts + ch-2 tip per leaf)
Tier 4 total: 32 sts. Leaf length: about 1.4 in (3.6 cm).
Part 7: Tier 5 (Leaf E pair)
Segment 5: Ch 4. The 4th ch is Node 5.
Leaf E (make 2 in Node 5): Ch 14, sl st in Node 5. Over the loop: sc, hdc, 3 dc, hdc, sc (7 sts), ch 2, sc, hdc, 3 dc, hdc, sc (7 sts), sl st in Node 5. (14 sts + ch-2 tip per leaf)
Tier 5 total: 28 sts. Leaf length: about 1.3 in (3.3 cm). Width across the tier: about 2.8 in (7.1 cm).
Part 8: Top Leaf (Leaf F)
Segment 6: Ch 3. The 3rd ch is Node 6.
Leaf F (make 1): Ch 12, sl st in Node 6. Over the loop: sc, hdc, 2 dc, hdc, sc (6 sts), ch 2, sc, hdc, 2 dc, hdc, sc (6 sts), sl st in Node 6. (12 sts + ch-2 tip)
This leaf points straight up and is about 1.1 in (2.8 cm) long. Place a marker in its ch-2 tip for the hanging loop.
Part 9: Stem Return
The stem has 3 + 4 + 4 + 4 + 4 + 3 = 22 chains. Work down toward the trunk, putting a sl st into the back bump of each stem ch, nodes included. That’s 22 sl sts. Sl st into the stem anchor, for 23 sl sts total. Fasten off and weave the end into the back of the trunk.
The return row gives the stem its raised, braided look and stops the tree from stretching. The stem should measure about 3.6 in (9.1 cm) from the top of the trunk to Node 6.
Leaf stitch summary: 44 + 40 + 36 + 32 + 28 + 12 = 192 leaf sts, plus 11 ch-2 tips.
Border: Trunk Edging and Hanging Loop
Border gauge: same as the trunk. Use 5 sc per 1 in (2.5 cm) along stitch edges and 1 sc per row end along the sides.
Trunk Edging (CC, worked right after Row 6)
Round 1: Turn. Ch 1.
- Top edge: 3 sc in the first st (corner), sc in the next 3 sts, 3 sc in the last st (corner).
- Side 1: 1 sc in each of the 6 row ends.
- Bottom edge: working into the free loops of the foundation ch, 3 sc in the first ch (corner), sc in the next 3 ch, 3 sc in the last ch (corner).
- Side 2: 1 sc in each of the 6 row ends.
Sl st to the first sc. Fasten off CC. (30 sc)
Count per side, corner sts included: top 7, side 10, bottom 7, side 10. Each corner st belongs to two sides, so 7 + 10 + 7 + 10 − 4 = 30. ✓
Why the math works: The top and bottom edges each have 5 sts. The 3 middle sts take 1 sc each, and the 2 end sts take 3 sc each. That puts 3 + (2 x 3) = 9 sc on each edge. Each side has 6 row ends with 1 sc each. Total: 9 + 6 + 9 + 6 = 30. The extra sc on either side of each corner st turn the bend, so the sides lie flat and the trunk stays square at about 1.3 x 1.3 in (3.3 x 3.3 cm).
Hanging Loop (CC)
Join CC with a sl st in the marked ch-2 tip of Leaf F. Ch 16, sl st in the same ch-2 sp. Sl st once more into the tip to lock it. Fasten off and weave the ends down into the leaf. The loop rises about 1.6 in (4.1 cm) above the tip.
Final Blocking
- Weave in all ends along the stem and inside the leaf stitches, never across the open slits.
- Lay the tree face up on a blocking mat.
- Pin the trunk square to 1.3 x 1.3 in (3.3 x 3.3 cm).
- Pin the stem straight up, 3.6 in (9.1 cm) from the trunk to Node 6.
- Pin each leaf tip so the leaves angle slightly upward, mirroring each pair across the stem.
- Open each leaf slit with a pin or toothpick.
- Check the full size: 6 in (15.2 cm) tall and 4 in (10.2 cm) wide across Tier 1.
- Mist until damp, not soaked. Let it dry completely before unpinning.
- For extra stiffness, mist lightly with diluted fabric stiffener and let it dry again.
Final Quality-Control Checklist
- Trunk edging has 30 sc and square corners.
- Stem has 22 chains and 23 return sl sts, and it lies straight.
- There are 11 leaves: five pairs plus one top leaf.
- Leaf counts: A 22, B 20, C 18, D 16, E 14, F 12 sts each.
- Every leaf has a visible open slit and a pointed ch-2 tip.
- Each pair is a mirror image, and the sizes step down evenly.
- Finished size is about 6 x 4 in (15.2 x 10.2 cm).
- The hanging loop is secure and centered above the top leaf.
- No ends show on the front.
Troubleshooting
Leaves ruffle or wave: the loop is too short for the stitches. Add 2 ch to the loop, or check your chain gauge.
Leaves are limp with a wide gap: the loop is too long or the chains are loose. Remove 2 ch, or chain more firmly.
The slit closed up: you worked into the chains instead of over the loop. Rework, inserting the hook through the loop’s center.
Pairs don’t match: count both sides of each leaf. The usual cause is an extra dc or tr on one side.
Tree leans: the anchor sc is off-center. Re-join MC in the 4th of the 7 top-edge sts.
Stem stretches: the return sl sts were skipped or worked too loosely. Rework them with firm, even tension.
Trunk corners round off: make sure each corner has 3 sc worked into one st.
Care
Hand wash in cool water with mild soap, press out the water in a towel, and reshape flat to dry. Store the ornament flat or hanging, away from direct sunlight, to keep the cream from yellowing.
Final Notes
The measurement chain is short and easy to check:
- A 1 x 1 in (2.5 x 2.5 cm) trunk grows to 1.3 x 1.3 in (3.3 x 3.3 cm) with its 30-sc edging.
- A 22-ch stem rises 3.6 in (9.1 cm).
- The leaves step down from 1.9 in (4.8 cm) to 1.1 in (2.8 cm).
- The finished tree is 6 x 4 in (15.2 x 10.2 cm), with a 1.6 in (4.1 cm) loop on top.
Check each stage against these numbers and every tree will match. Make one for the door, or a whole row for the mantel.
Happy crocheting!