

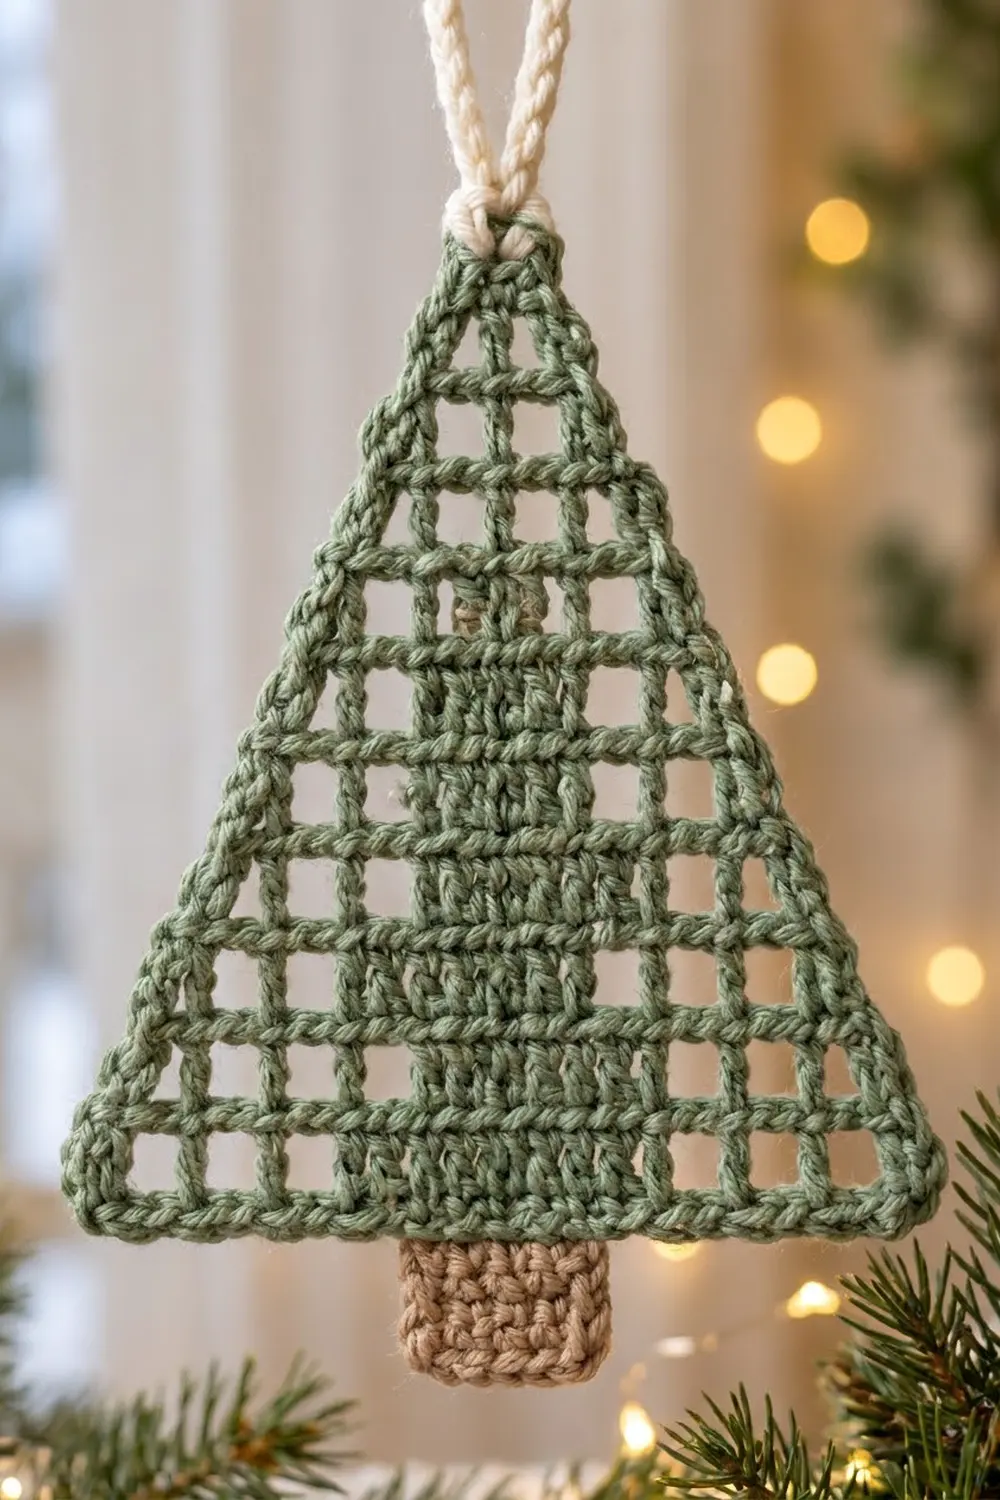
This little filet crochet tree is a quick, cozy ornament with a modern, Scandinavian feel. A sage green open-mesh grid forms the triangle, and a smaller “inner tree” of solid blocks runs up the center. A tidy single-crochet edging frames the whole shape. A short tan trunk and a chunky cream hanging loop finish it off.
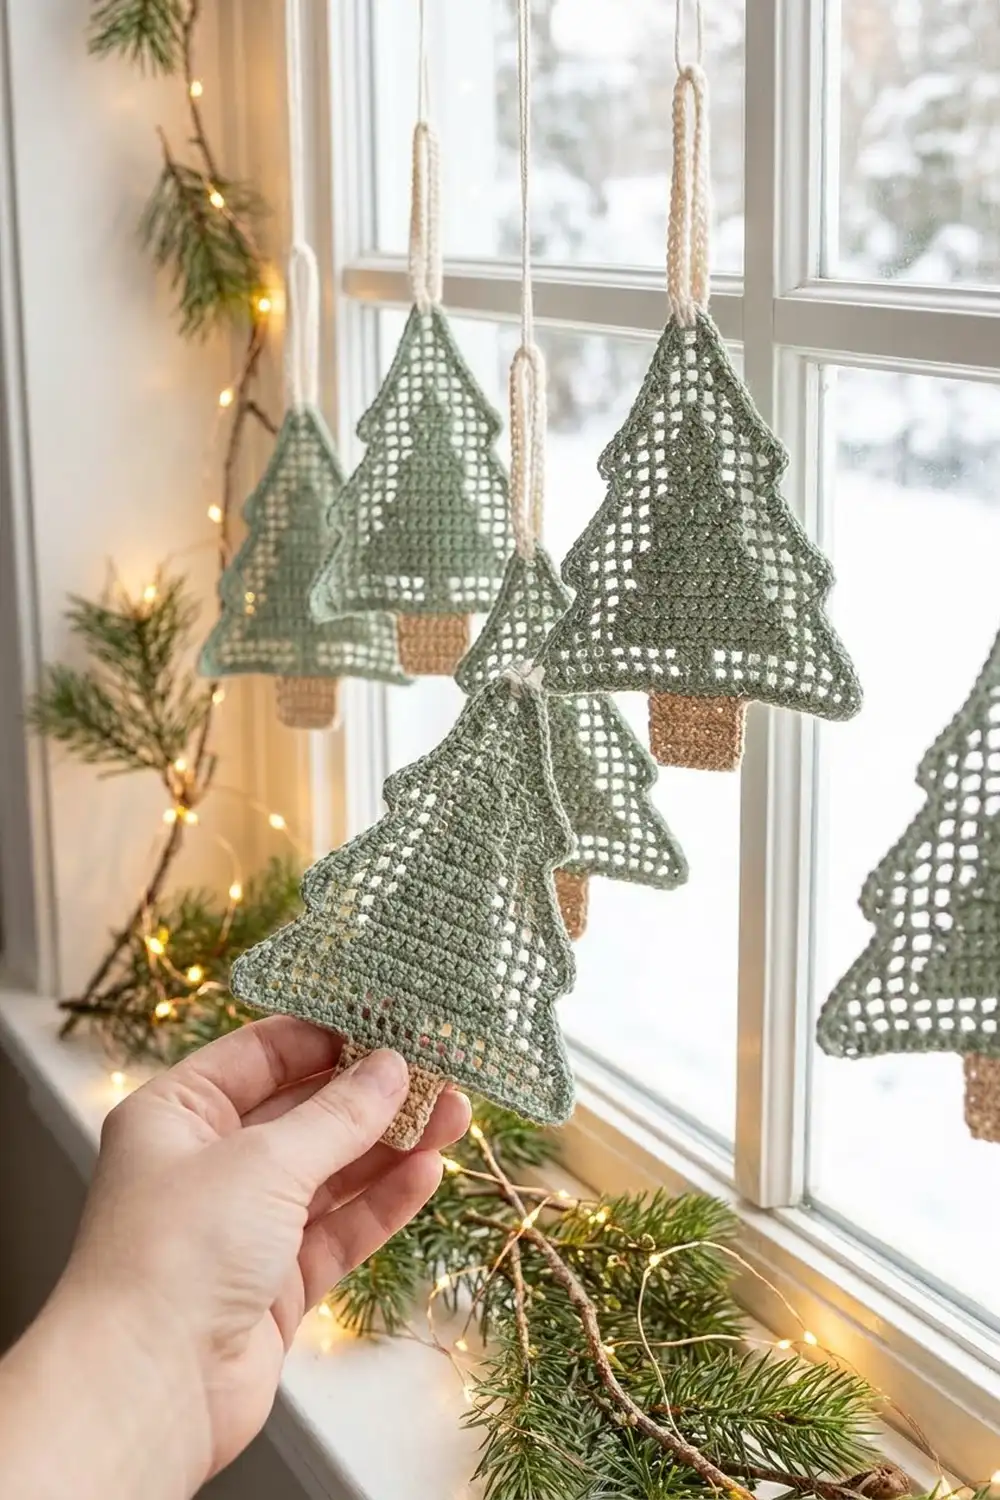
The palette is three soft, natural colors: sage green for the tree, tan for the trunk, and cream for the loop. The open meshes let window light shine through, which is why these trees look so good hanging against glass or in front of fairy lights.
The pattern is written in US crochet terms. The finished ornament measures about 5.0 in (12.7 cm) wide and 5.7 in (14.5 cm) tall, not counting the loop. The loop adds about 1.75 in (4.4 cm).
Construction is simple. You work the tree flat from the bottom row up in filet mesh, leaving the last square unworked at the end of every row. Because you turn after each row, the decreases alternate sides and form an even, stepped triangle. Next you work one round of green single crochet around the whole triangle. Then you add the trunk in rows on the bottom edge and finish with the cream loop at the tip.
Finished Size and Construction
- Finished size: 5.0 in wide × 5.7 in tall (12.7 × 14.5 cm), plus a 1.75 in (4.4 cm) loop
- Skill level: Easy / advanced beginner (basic filet)
- Terminology: US crochet terms
- Yarn weight: DK (#3)
- Hook: 3.5 mm (E-4)
- Number of pieces: 1 (single ornament)
- Layout: One triangle with the trunk and loop worked directly onto it
- Mesh triangle before edging: 4.6 in wide × 4.4 in tall (11.7 × 11.2 cm)
- Edging depth: 0.2 in (0.5 cm) on each edge
- Trunk: 1.0 in wide × 0.9 in tall (2.5 × 2.3 cm)
Materials
Yarn: Use a smooth DK yarn in cotton, cotton blend, or soft acrylic. Crisp, plied yarns show the filet grid best. Fuzzy or heavily brushed yarns blur the meshes.
- Sage green (tree and edging): 10 g / 25 m
- Tan or light brown (trunk): 2 g / 5 m
- Cream (hanging loop): 2 g / 5 m
These amounts include a small safety margin for your gauge swatch and weaving in ends.
Tools:
– 3.5 mm (E-4) crochet hook
– Tapestry needle
– Scissors
– Stitch markers (2–3)
– Blocking mat and rust-proof pins
– Spray bottle with water
Abbreviations (US Terms)
- ch: chain
- sc: single crochet
- dc: double crochet
- sl st: slip stitch
- sk: skip
- sp: space
- st(s): stitch(es)
- RS / WS: right side / wrong side
Special stitches:
– Mesh (M): ch 1, sk the next st or ch-1 sp, dc in the next dc. This makes one open square.
– Block (B): dc in the next st or ch-1 sp, dc in the next dc. This makes one filled square.
Each square uses 2 sts, plus 1 closing post per row. A row of n squares therefore has (2 × n) + 1 sts. The turning ch-3 always counts as the first dc (post).
Gauge and Checkpoints
Filet gauge: 20 sts and 10 rows = 4 in (10.2 cm) in mesh. This means each square is 0.4 in × 0.4 in (1.0 × 1.0 cm).
Single-crochet gauge: 20 sc and 22 rows = 4 in (10.2 cm).
Make the ornament itself as your test piece. After a few rows you’ll know whether your gauge works.
Checkpoints:
– After Row 1: 23 sts, 4.6 in (11.7 cm) wide
– After Row 5: 15 sts, 3.0 in (7.6 cm) wide on top; total height 2.0 in (5.1 cm)
– After Row 11: triangle 4.4 in (11.2 cm) tall
– After edging: 5.0 in × 4.8 in (12.7 × 12.2 cm)
– After trunk: 5.7 in (14.5 cm) total height
If your piece is too big, go down to a 3.25 mm hook. If it is too small, go up to a 3.75 mm hook. If your squares come out taller than they are wide, keep your ch-1 a little looser or use shorter dc by pulling up a lower loop.
Pattern: Filet Tree
Use green. In the rows below, the square sequence is given in working order, from the start of the row to the end.
Foundation: Ch 26.
Row 1 (RS): Dc in the 6th ch from hook. The skipped chs count as dc and ch-1. Ch 1, sk 1 ch, dc in next ch; repeat from * 9 more times. Turn. (11 squares, all mesh; 23 sts)
From now on, every row begins with ch 3 (counts as first dc). Every row ends by leaving the last square of the previous row unworked, which leaves 2 sts at the end of the row unworked. Then turn.
Row 2: Ch 3, M 3 times, B 5 times, M 2 times. Leave last square unworked, turn. (10 squares; 21 sts)
Row 3: Ch 3, M 3 times, B 3 times, M 3 times. Leave last square unworked, turn. (9 squares; 19 sts)
Row 4: Ch 3, M 2 times, B 5 times, M 1 time. Leave last square unworked, turn. (8 squares; 17 sts)
Row 5: Ch 3, M 2 times, B 3 times, M 2 times. Leave last square unworked, turn. (7 squares; 15 sts)
Row 6: Ch 3, M 2 times, B 3 times, M 1 time. Leave last square unworked, turn. (6 squares; 13 sts)
Row 7: Ch 3, M 1 time, B 3 times, M 1 time. Leave last square unworked, turn. (5 squares; 11 sts)
Row 8: Ch 3, M 2 times, B 1 time, M 1 time. Leave last square unworked, turn. (4 squares; 9 sts)
Row 9: Ch 3, M 1 time, B 1 time, M 1 time. Leave last square unworked, turn. (3 squares; 7 sts)
Row 10: Ch 3, M 2 times. Leave last square unworked, turn. (2 squares; 5 sts)
Row 11: Ch 3, M 1 time. (1 square; 3 sts) Fasten off.
Why the shape stays centered: If you number Row 1’s squares 1–11 in working order, the rows cover these squares: 1–11, 11–2, 2–10, 10–3, 3–9, 9–4, 4–8, 8–5, 5–7, 7–6, and finally square 6. Each side therefore steps in once every 2 rows, and the tip lands right above square 6, the center of the base.
The blocks also stay centered on square 6. They cover squares 4–8 in Rows 2 and 4, and squares 5–7 in Rows 3, 5, 6, and 7. They narrow to square 6 alone in Rows 8 and 9. This gives you the solid inner-tree outline.
Edging
Each side of the triangle has 11 row-end posts and 5 “steps.” A step is the exposed top of a square left unworked at a row end.
Edging gauge: 2 sc around each dc row-end fills 0.4 in (1.0 cm). That matches the sc gauge of 5 sc per inch (2.5 cm), so the edges lie flat.
Edging Round (RS): With RS facing, join green in the ch-1 sp of Row 11.
1. Tip: 3 sc in the ch-1 sp. (3 sc)
2. Side A: Working down the first side, work 2 sc around each row-end post and 1 sc in the exposed ch-1 sp at each step. (22 + 5 = 27 sc)
3. Bottom edge: Working into the underside of the foundation chain, 3 sc in the first ch (corner), 1 sc in each of the next 21 ch, 3 sc in the last ch (corner). (21 + 6 = 27 sc)
4. Side B: Working up the second side, same as Side A. (27 sc)
Sl st to the first sc. (84 sc total: 3 + 27 + 27 + 27) Fasten off.
Why the math works: The bottom edge has 1 sc per foundation ch (23), plus 2 extra sc at each corner, for 27. The sides put 2 sc on each of the 11 rows and 1 sc on each of the 5 steps. That eases the staircase into a straight diagonal without ruffling. Both sides have exactly 11 rows and 5 steps, so Side A and Side B match.
Trunk
Turn the ornament upside down with RS facing, so the bottom edge is on top. Count the 27 bottom-edge sc starting from the first sc of the corner group. The 14th sc is the center.
Row 1: Join tan in the 12th sc. Ch 1, sc in the same st and in each of the next 4 sc. Turn. (5 sc)
Rows 2–5: Ch 1, sc in each sc across. Turn. (5 sc)
Fasten off. The trunk measures 1.0 in wide × 0.9 in tall (2.5 × 2.3 cm) and sits right under the center square of the tree.
Hanging Loop
With RS facing, join cream in the center sc of the 3 tip sc. Ch 18 and sl st in the same sc to form a ring. Work 24 sc around the chain ring (into the ring, not into the chains) so the loop is fully covered and padded. Sl st in the first sc. Fasten off, leaving a 4 in (10.2 cm) tail.
Wrap the tail tightly 3–4 times around the base of the loop to make the neat “knot” collar. Then thread the tail down into the edging and weave it in. The loop stands about 1.75 in (4.4 cm) tall.
Final Blocking
- Weave in all ends along the edging or through the solid blocks, never across open meshes.
- Lightly mist the ornament with water until it is damp but not dripping.
- Lay it RS up on the blocking mat.
- Pin the 2 bottom corners 5.0 in (12.7 cm) apart.
- Pin the tip so the total height from the base edging to the tip is 4.8 in (12.2 cm).
- Pin along both sides every 0.4 in (1.0 cm) to make them straight diagonals.
- Nudge each mesh square open with a fingertip so the squares are even.
- Pin the trunk straight and square below the center.
- Let it dry completely, at least 6–8 hours.
- For extra stiffness, mist it with a light fabric stiffener and let it dry again.
Final Quality-Control Checklist
- Row 1 has 11 open squares and 23 sts.
- Each row has one fewer square than the row below, ending with 1 square in Row 11.
- The solid blocks form a centered inner tree. The widest rows are Rows 2 and 4, and the single blocks are in Rows 8 and 9.
- The edging round has 84 sc, with 27 on each side and bottom and 3 at the tip.
- The trunk is 5 sc wide and 5 rows tall, starting at the 12th bottom sc.
- The loop is centered on the tip and wrapped neatly at its base.
- The ornament is 5.0 in × 5.7 in (12.7 × 14.5 cm) without the loop.
- All ends are hidden and no meshes are distorted.
Troubleshooting
The triangle leans to one side. You probably left the last square unworked on some rows and not others. Check that every row from Row 2 on ends with 2 sts unworked.
The squares look like tall rectangles. Your dc is tall compared with your ch-1. Loosen the ch-1 slightly, or pull up a slightly shorter loop on each dc.
The edges ruffle. You’re adding too many sc on the sides. Use exactly 2 sc per row-end and 1 per step.
The edges pull in or cup. Your sc tension is too tight. Go up 0.25 mm for the edging round only.
The trunk is off-center. Recount the bottom edge from the first sc of the corner group. The trunk should cover sc 12–16, centered on the 14th.
The loop flops over. Pack the sc around the chain ring firmly, and make the wrapped collar tighter.
Care
Hand wash in cool water with mild soap, press out the water in a towel, and reshape and pin flat to dry. Store flat or hanging so the tip and loop keep their shape.
Final Notes
Here is the full measurement chain. Each square is 0.4 in (1.0 cm), so Row 1’s 23 sts measure 4.6 in (11.7 cm). Eleven rows give a 4.4 in (11.2 cm) triangle. The 0.2 in (0.5 cm) edging brings the tree to 5.0 in × 4.8 in (12.7 × 12.2 cm). The 0.9 in (2.3 cm) trunk brings the total to 5.7 in (14.5 cm), with a 1.75 in (4.4 cm) loop on top. If you check each step as you go, every tree in your window will come out the same size.
Happy crocheting!