

The Teal Ginkgo Lattice Bedspread is made of open, lacy square motifs. Each square holds one ribbed ginkgo-style fan with a scalloped top edge. A slim chain stem drops from the base of the fan and splits into two long chain loops. Joined together, the stems and loops form a branching lattice, and the fans line up in neat rows across the bed.
The whole bedspread is worked in a single deep teal. A solid color lets the post-stitch ribs and open chain spaces show clearly, and the fans look like a pattern of leaves or shells against white sheets underneath. All instructions use US crochet terms.
The finished bedspread measures 94 x 112 in (238.8 x 284.5 cm) after the border, which is about queen size laid over the top of the bed. Each motif is 9 in (22.9 cm) square.
You crochet the fan in short turned rows, frame it with chain loops and the stem, then square it off with two rounds. You join 120 motifs with slip stitches, and a three-round scalloped fan border finishes the edge.
Finished Size and Construction
- Finished size: 94 x 112 in (238.8 x 284.5 cm)
- Skill level: Intermediate (post stitches, working into chain loops, joining)
- Terminology: US crochet terms
- Yarn weight: Worsted weight (#4)
- Hook: 5.0 mm (US H-8)
- Number of pieces: 120 identical square motifs
- Layout: 10 motifs across x 12 motifs long
- Motif size: 9 in (22.9 cm) square, 30 dc per side
- Size before border: 90 x 108 in (228.6 x 274.3 cm)
- Border depth: 2 in (5.1 cm) on all sides
Materials
Choose a smooth worsted-weight cotton or cotton blend in deep teal. Cotton shows the ribs and scallops crisply and blocks flat. Look for roughly 170 m (186 yd) per 100 g.
- Teal: 3,800 g, about 6,460 m (7,065 yd)
This total covers 120 motifs (about 25 g each), joining (about 150 g), and the border (about 255 g). It includes a margin of roughly 10% for gauge differences and swatching. Buy all your yarn from the same dye lot.
Tools:
- 5.0 mm (US H-8) crochet hook
- Tapestry needle
- Stitch markers
- Scissors
- Measuring tape
- Blocking mats and rust-proof pins
- Spray bottle
Abbreviations (US Terms)
- ch – chain
- sl st – slip stitch
- sc – single crochet
- hdc – half double crochet
- dc – double crochet
- st(s) – stitch(es)
- sp – space
- sk – skip
- RS / WS – right side / wrong side
- FPdc – front post double crochet: yo, insert hook from front to back to front around the post of the stitch, then complete as a dc.
- BPdc – back post double crochet: yo, insert hook from back to front to back around the post, then complete as a dc.
- FPsc – front post single crochet: insert hook from front to back to front around the post, then complete as a sc.
Shell: 5 dc in the same stitch.
Gauge and Checkpoints
Gauge: 10 dc = 3 in (7.6 cm) in Round 8 of the motif. One complete motif = 9 in (22.9 cm) square before blocking.
Make one full motif and measure it before going further. With 120 motifs, small errors add up. A motif only 0.25 in (0.6 cm) too big makes the bedspread 2.5 in (6.4 cm) too wide and 3 in (7.6 cm) too long.
Checkpoints:
- After Row 3: the fan is about 4.25 in (10.8 cm) wide across the base.
- After Row 5: the fan is about 6.5 in (16.5 cm) wide and 3.25 in (8.3 cm) tall.
- After Round 7: the motif is about 8.25 in (21.0 cm) square.
- After Round 8: the motif is 9 in (22.9 cm) square.
Too big? Go down to a 4.5 mm hook. Too small? Go up to a 5.5 mm hook. If only the fan is slightly off but Round 8 still measures 9 in (22.9 cm), keep your hook.
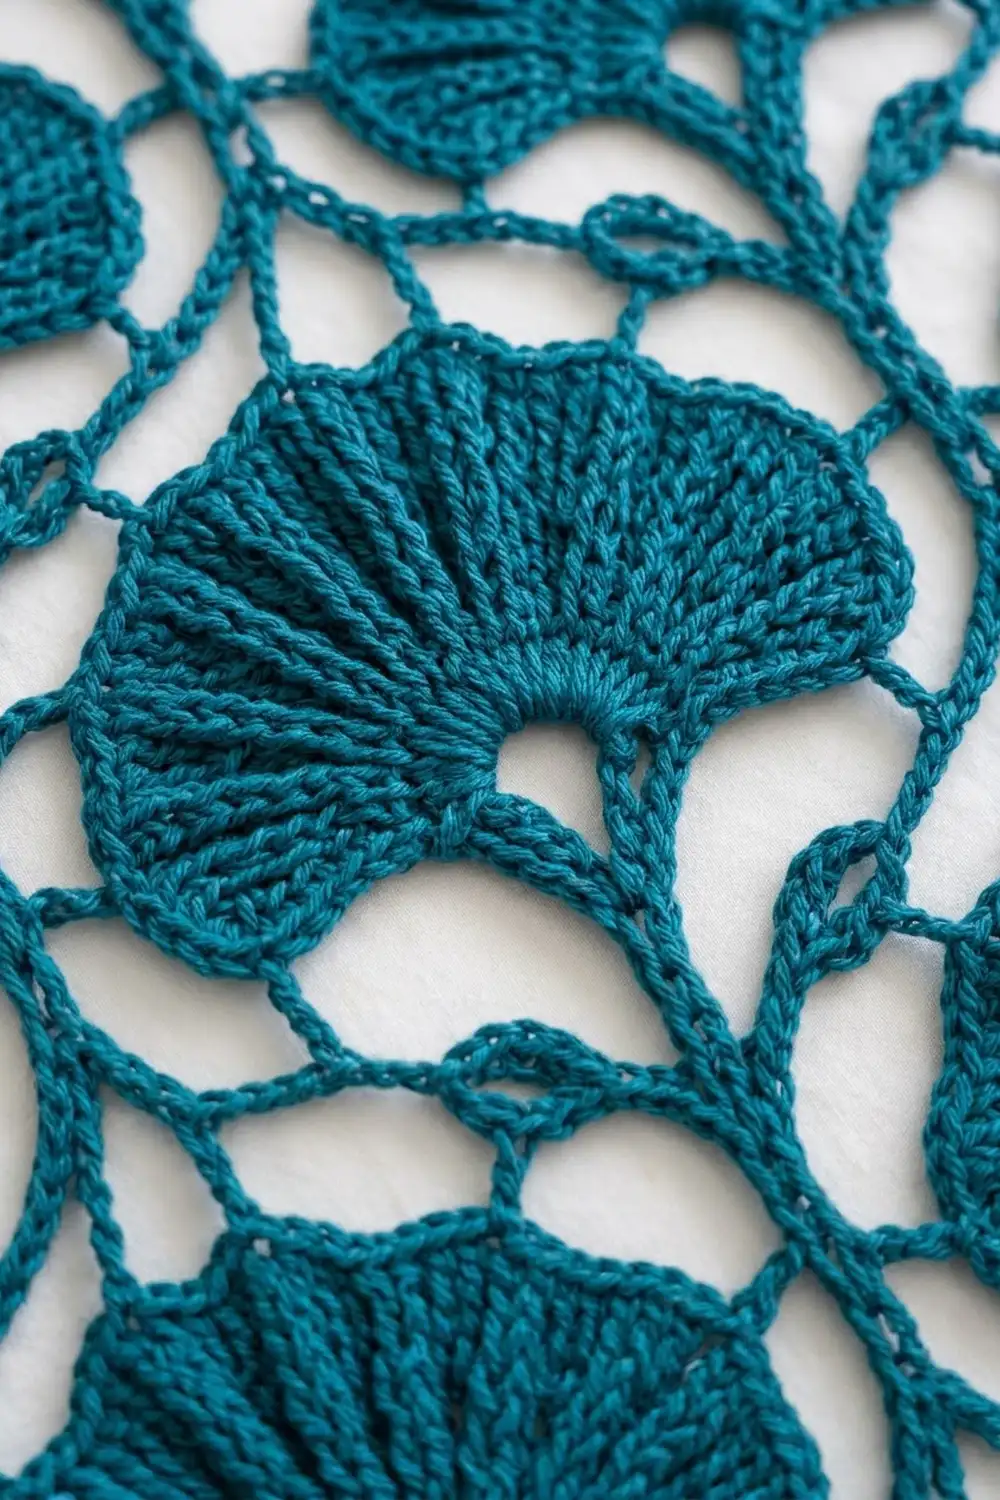
Motif (Make 120)
Part 1: The Ginkgo Fan
The fan is a half circle worked in turned rows. The post stitches stack from row to row to form ribs that fan out on the RS.
Ring: Ch 5, sl st in first ch to form a ring.
Row 1 (RS): Ch 2 (does not count as a st), 12 dc in ring. Turn. (12 dc)
Row 2 (WS): Ch 2 (does not count), dc in next st, BPdc around the post of the same st; rep from * across. Turn. (24 sts: 12 dc, 12 BPdc)*
The BPdc pops toward the RS and starts each rib.
Row 3 (RS): Ch 2 (does not count), FPdc around next post st, 2 dc in next dc; rep from * across. Turn. (36 sts: 12 FPdc, 24 dc)*
Row 4 (WS): Ch 2 (does not count), 2 dc in next dc, dc in next dc, BPdc around next post st; rep from * across. Turn. (48 sts: 36 dc, 12 BPdc)*
Row 5 (RS, scalloped edge): Ch 1, FPsc around next post st, sk next dc, shell in next dc, sk next dc; rep from * across. Do not turn. (72 sts: 12 FPsc, 12 shells of 5 dc)*
Each shell forms one rounded lobe, and each FPsc ends a rib between lobes. Shells are numbered 1 to 12 in the order you made them. Shell 1 is at the far right with the RS facing.
Part 2: Stem and Frame Loops
Round 6 (RS): Ch 1, sc into the side of the last dc made (left base corner). Ch 21 (Loop A). Ch 10 for the stem, sl st around the lower half of the beginning ring at its center, then sl st back down in each of the 10 stem ch. Ch 21 (Loop B), then sc in the side of the first st of Row 5 (right base corner).
Ch 9, sc in center dc of Shell 1 (Loop C). Ch 9, sc in center dc of Shell 2 (Loop D). Ch 11, sc in center dc of Shell 3 (Loop E, corner). [Ch 3, sc in center dc of next shell] 7 times (Loops F to L, ending at Shell 10). Ch 11, sc in center dc of Shell 11 (Loop M, corner). Ch 9, sc in center dc of Shell 12 (Loop N). Ch 9 (Loop O), sl st in first sc.
(15 loops: two ch-21, two ch-11, four ch-9, seven ch-3; plus the 10-ch stem)
Loops A and B branch from the stem tip in a Y and swing out to the bottom corners, which creates the lattice.
Part 3: Squaring Rounds
Round 7: Ch 1. Work into the loops in this order:
- Loop A: 5 sc, ch 2 (corner), 14 sc
- Loop B: 14 sc, ch 2 (corner), 5 sc
- Loops C and D: 9 sc in each
- Loop E: 5 sc, ch 2 (corner), 5 sc
- Loops F to L: 3, 2, 3, 2, 3, 2, 3 sc
- Loop M: 5 sc, ch 2 (corner), 5 sc
- Loops N and O: 9 sc in each
Sl st in first sc. (112 sc and 4 corner ch-2 sps)
Per-side check:
– Bottom: 14 + 14 = 28
– Right: 5 + 9 + 9 + 5 = 28
– Top: 5 + 18 + 5 = 28
– Left: 5 + 9 + 9 + 5 = 28
Each side has 28 sc, including the sc at each end.
Round 8: Ch 3 (counts as dc), dc in each sc around, working (dc, ch 2, dc) in each corner ch-2 sp. Sl st in top of ch-3. Fasten off and weave in ends.
(120 dc and 4 corner ch-2 sps. Each side has 30 dc: 28 worked into the sc plus 1 corner dc at each end.)
Make All Pieces
Make 120 motifs in teal, about 25 g each (3,000 g total).
Layout grid (10 across x 12 long; M = one motif, all fans pointing toward the head of the bed):
Row 1:  M M M M M M M M M M
Row 2:  M M M M M M M M M M
Row 3:  M M M M M M M M M M
 ...    (repeat)
Row 12: M M M M M M M M M M
Keeping every fan pointing the same way lines up the stems and loops into continuous branches.
Joining
Method: slip-stitch join through the outer loops.
Hold two motifs WS together (RS facing out), corners matched. Sl st through both corner ch-2 sps. Sl st through the outer loop of each matching pair of dc, 30 sl sts in all. Finish with a sl st through both of the next corner ch-2 sps.
Stitch-to-stitch logic: every motif side has exactly 30 dc, so each dc meets exactly one dc. Nothing is skipped or doubled.
- Join the motifs into 12 strips of 10 motifs each. Work each strip continuously, carrying the yarn from one pair to the next.
- Join the strips along the long seams in the same way. Where four corners meet, sl st through all the corner sps together.
Tension: keep the sl sts as loose as the dc. Tight joins pucker the lace and shorten the bedspread. Use a 5.5 mm hook for joining if needed.
Size checkpoint: two joined motifs = 18 in (45.7 cm). One strip = 90 in (228.6 cm). The full joined piece = 90 x 108 in (228.6 x 274.3 cm).
Border
Border gauge: same as the motifs, 10 sts = 3 in (7.6 cm). The border adds 2 in (5.1 cm) on every side.
Round 1: Join with sc in the first dc after any outer corner. Sc in each dc along the side, skipping the joined corner sps at every seam. *At the outer corner, ch 2, then sc in each dc along the next side; rep from * twice more. At the last corner, ch 1, then hdc in the first sc (the ch-1 and hdc stand in for the final ch-2 corner sp).
- Short sides: 10 motifs x 30 = 300 sc
- Long sides: 12 motifs x 30 = 360 sc
- Total: 1,320 sc and 4 corner sps
No stitches are added at the seams. The 30 sts per motif already include that motif’s corner dc.
Round 2 (shells): Ch 3 (counts as dc), 8 dc in the corner sp. *[Sk 2 sc, 7 dc in next sc, sk 2 sc, sc in next sc] across the side, then 9 dc in next corner sp; rep from * around, leaving out the last corner. Sl st in top of ch-3.
- Short sides: 50 shells + 50 sc
- Long sides: 60 shells + 60 sc
- Corners: 4 fans of 9 dc
Round 3 (open fans): Ch 4 (counts as dc and ch 1), [dc in next dc, ch 1] 7 times, dc in next dc to finish the corner fan. *[(Dc in next dc, ch 1) 6 times, dc in next dc, sc in next sc] across the side. At the corner, [dc in next dc, ch 1] 8 times, dc in next dc; rep from * around, leaving out the last corner. Sl st in 3rd ch of ch-4. Fasten off.
- Each side fan: 7 dc and 6 ch-1 sps
- Each corner fan: 9 dc and 8 ch-1 sps
Why the math works: each shell repeat uses 6 sts. One motif side has 30 sts, and 30 ÷ 6 = 5, so every motif edge carries exactly 5 scallops. On the full sides, 300 ÷ 6 = 50 and 360 ÷ 6 = 60, so each side ends on a complete repeat right before the corner fan.
Final Blocking
- Weave in all ends securely.
- Lay the bedspread on blocking mats, a clean carpet, or a towel-covered bed. Block in sections if space is limited.
- Spray evenly until damp, not soaked.
- Pin the four outer corners to 94 x 112 in (238.8 x 284.5 cm).
- Pin along each edge, with one pin in the center dc of every border fan.
- Open each motif fan and smooth the ribs so they spread evenly. Straighten the chain loops.
- Let it dry completely, at least 24 hours, before unpinning.
Final Quality-Control Checklist
- Every motif is 9 in (22.9 cm) square with 30 dc per side.
- All 12 lobes on each fan are even, with ribs raised on the RS.
- All fans point the same way.
- Seams lie flat, with no puckers or gaps.
- Border Round 1 has 300 sc on each short side and 360 sc on each long side.
- Every motif edge carries 5 border scallops.
- Corners lie flat.
- Finished size is 94 x 112 in (238.8 x 284.5 cm).
- All ends are woven in and trimmed.
Troubleshooting
Ribs don’t line up: Work FP stitches on RS rows and BP stitches on WS rows, always around the post stitch below.
Fan cups or ruffles: Your tension is changing between rows. Redo Row 4 more evenly.
Motif isn’t square: Recount the Round 7 sc in each loop. Each side must total 28.
Seams pucker: Join more loosely, or use a larger hook.
Border ripples or cups: Recount Round 1. Extra sc cause waves, and missing sc pull the edge in.
Corners curl: Check for a corner sp in Round 1 and a 9-dc fan in Round 2 at every corner.
Care
Hand wash, or machine wash on a cool gentle cycle in a large mesh bag. Lay flat to dry and reshape. Don’t hang it while wet, because the weight will stretch the lace.
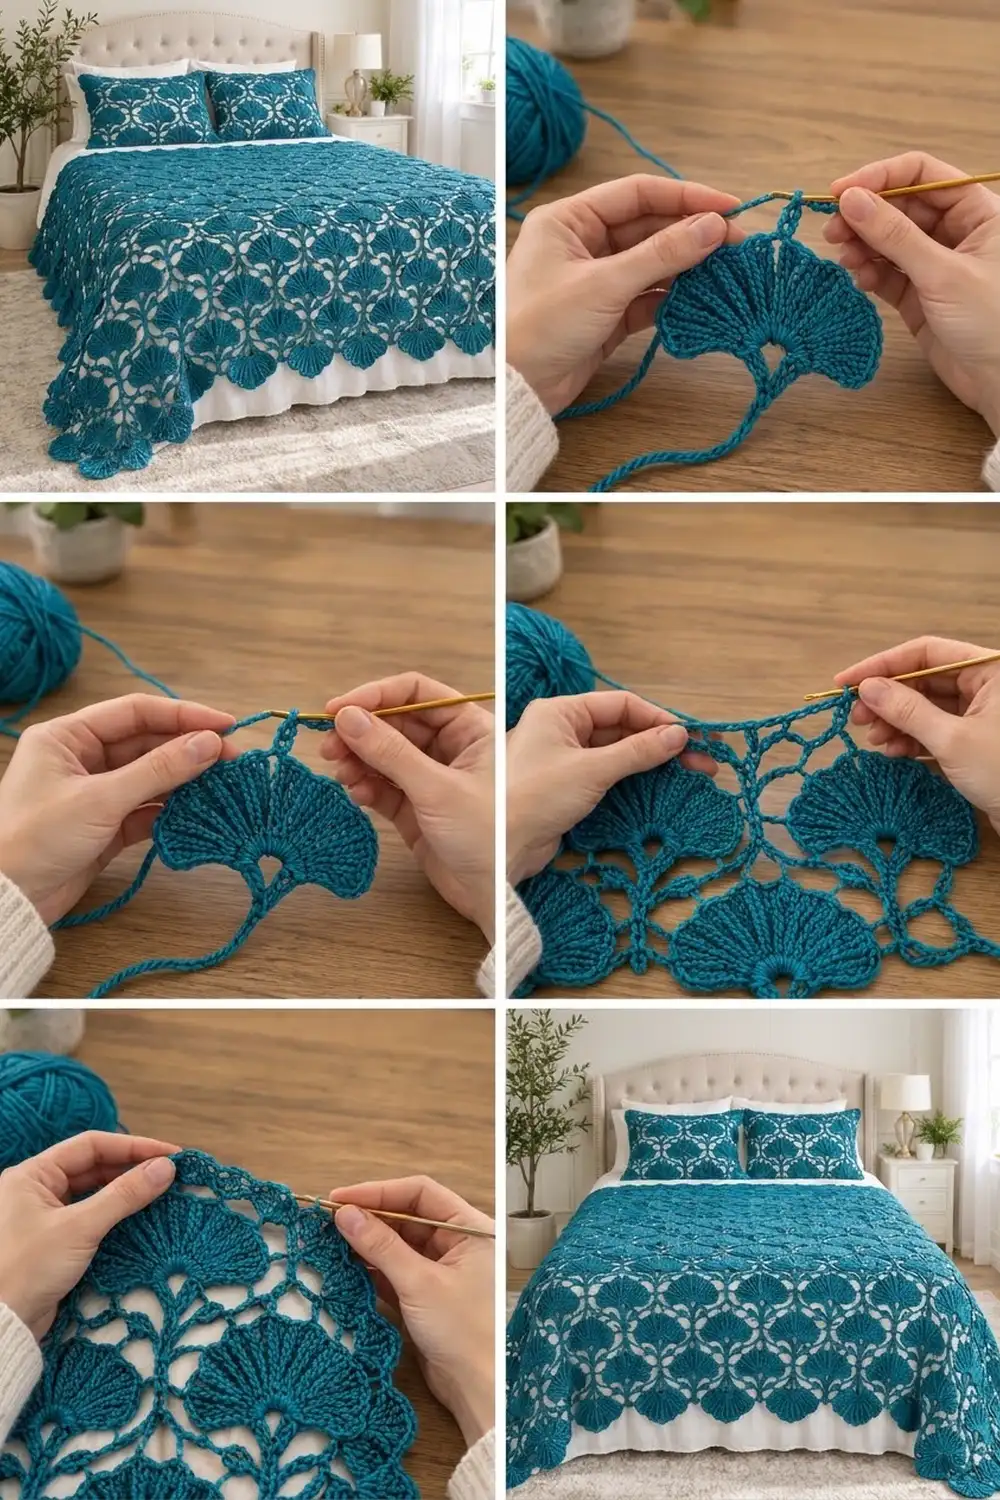
Final Notes
The measurement chain works like this. Ten dc make 3 in (7.6 cm), so 30 dc per side makes a 9 in (22.9 cm) motif. Ten by twelve motifs gives 90 x 108 in (228.6 x 274.3 cm). The 2 in (5.1 cm) border brings the bedspread to 94 x 112 in (238.8 x 284.5 cm). Get the first motif right, and every number after it follows.
Happy crocheting!