

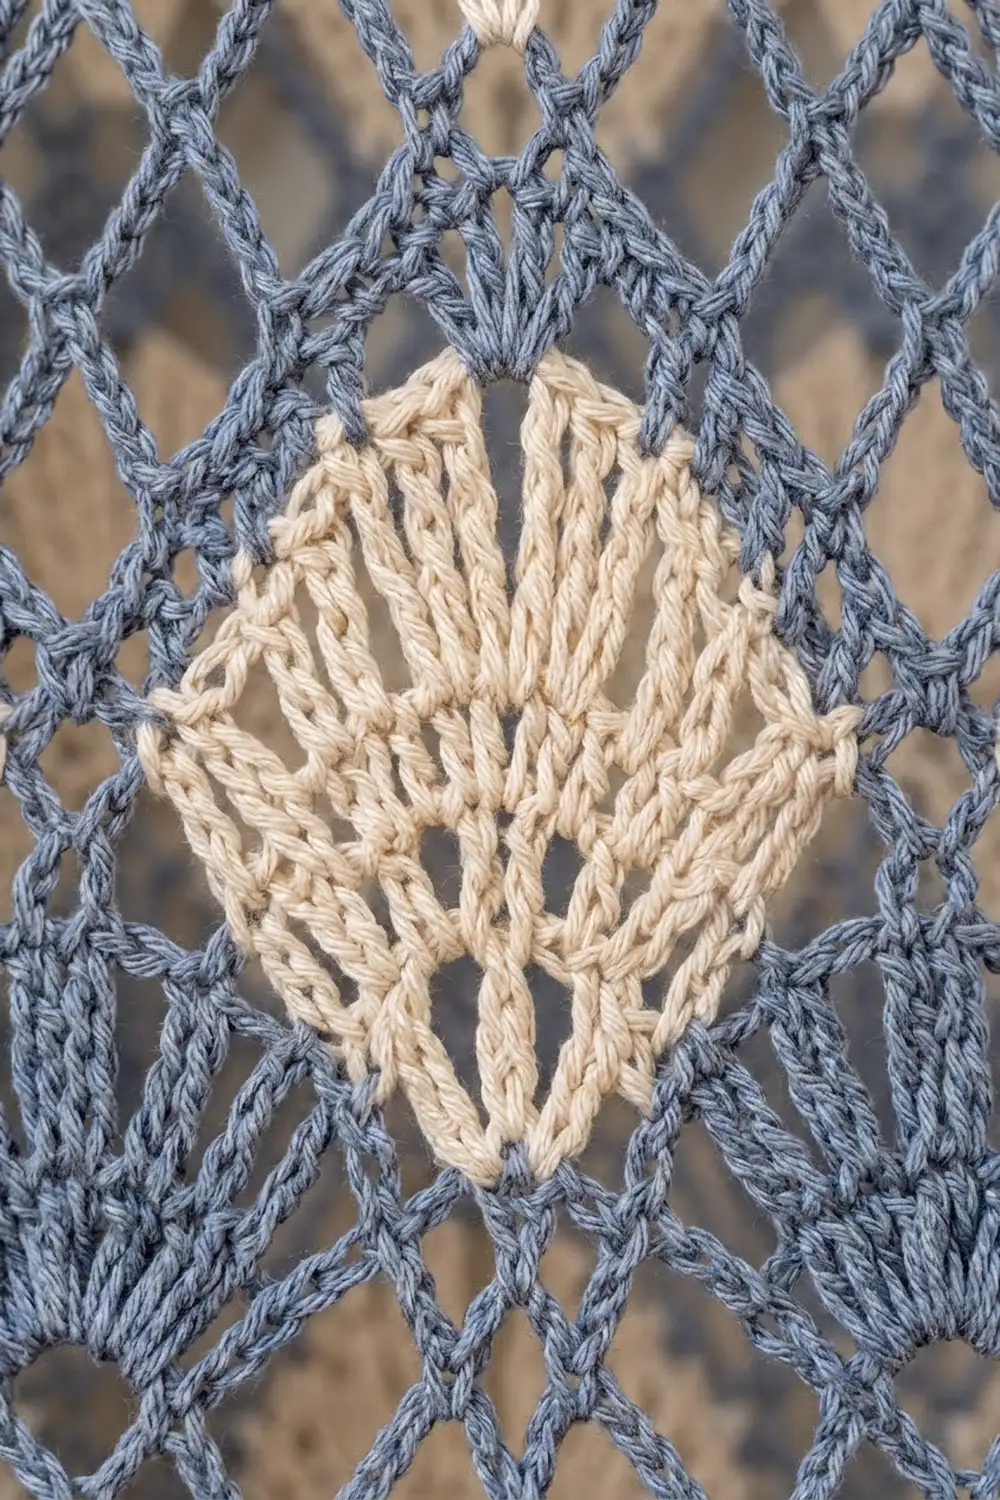
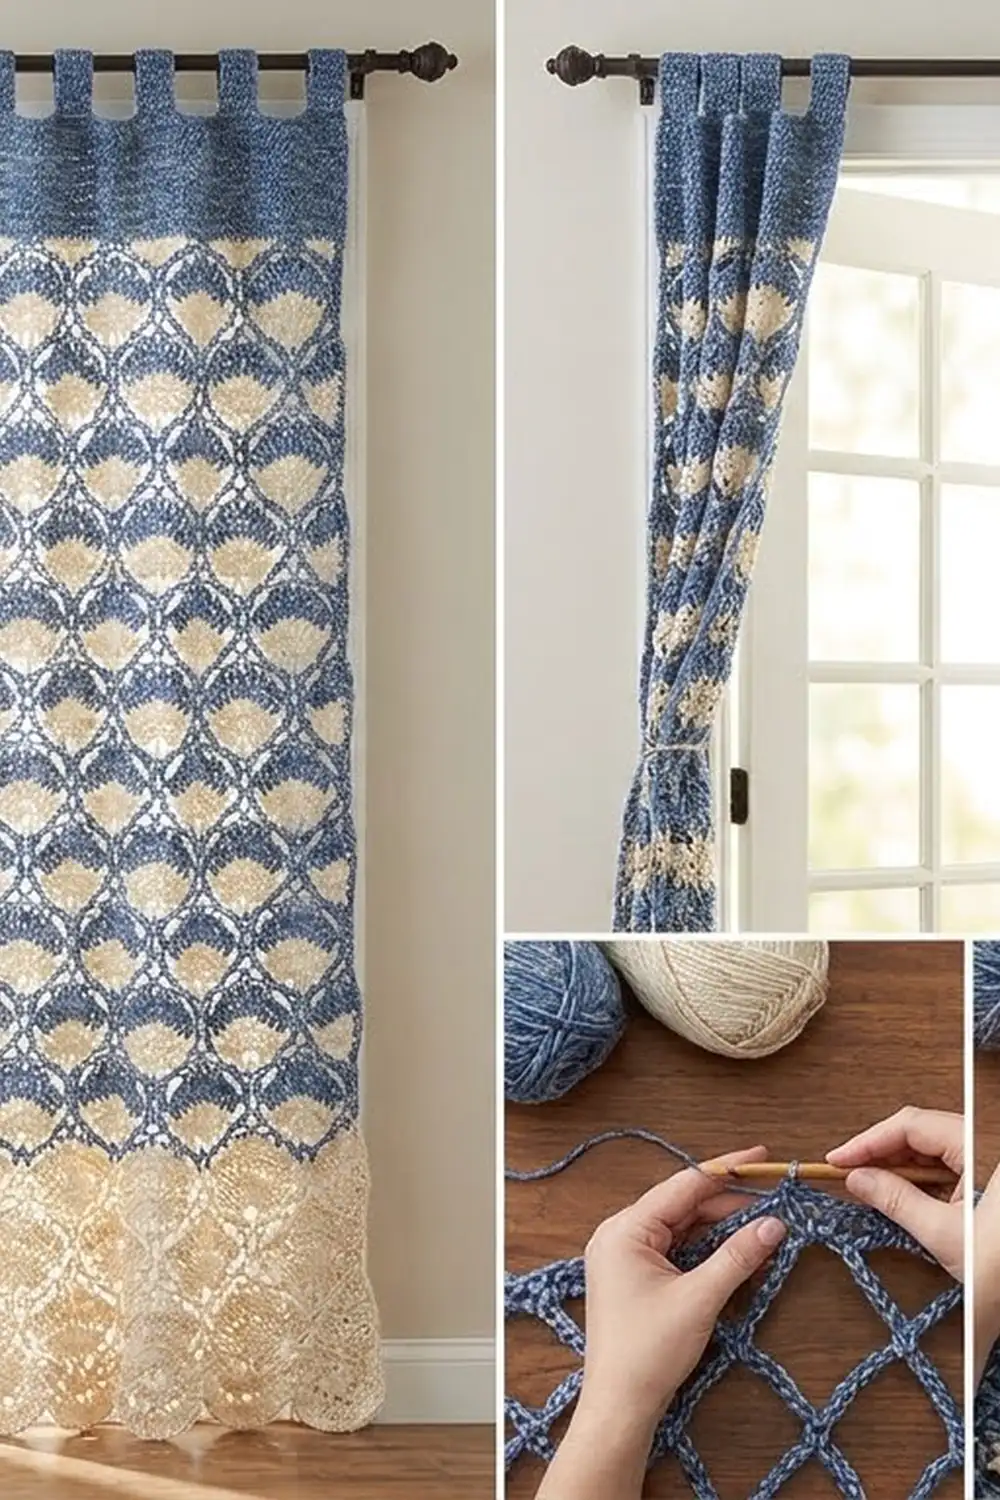
This tab-top curtain panel pairs dusty denim blue with soft natural cream in a staggered pattern of fans. Cream fans and blue fans alternate up the panel, and each one is framed by a blue chain lattice that forms clear diamond outlines. Deep cream scallops finish the hem, and a solid blue header with folded tabs slips straight onto a curtain rod.
The style is relaxed and cottage-coastal. In daylight the lattice lets light through while the fans add texture and weight, so the panel hangs straight.
The pattern uses US crochet terms. One finished panel measures 33 in (83.8 cm) wide and 83 1/4 in (211.5 cm) long from the top of the tab loops to the scallop tips. The photo shows a matching pair, so make two identical panels.
Construction is simple: you work the body in rows from the bottom up, then add a solid header and six tabs. After that you add a scalloped edging along the foundation chain and a narrow single-crochet border down each side. There are no motifs and no seams.
Finished Size and Construction
- Finished size (one panel): 33 in (83.8 cm) wide × 83 1/4 in (211.5 cm) long, including tabs and scallops
- Skill level: Intermediate
- Terminology: US
- Yarn weight: Aran / heavy worsted (#4) cotton or cotton blend
- Hook: 6.0 mm (J-10)
- Number of pieces: 1 per panel (make 2 for a pair)
- Layout: One rectangular panel worked in rows, 8 fan repeats wide and 19 bands tall
- Body size before border: 32 in (81.3 cm) wide × 76 1/4 in (193.7 cm) long
- Header: 2 in (5.1 cm) deep. Tab loops: 3 in (7.6 cm) tall
- Border depth: 1/2 in (1.3 cm) on each side, plus a 2 in (5.1 cm) scalloped hem
Materials
Choose a smooth, mercerized or matte cotton in aran weight. Cotton drapes well, holds the fan shapes, and survives sunlight and washing better than acrylic. Avoid fuzzy yarns, which blur the lattice.
Yarn for one panel (aran cotton, about 170 m / 186 yd per 100 g):
- Color A, dusty denim blue: 750 g, about 1,275 m (1,394 yd)
- Color B, natural cream: 350 g, about 595 m (651 yd)
For a pair: 1,500 g of Color A (about 2,550 m / 2,789 yd) and 700 g of Color B (about 1,190 m / 1,301 yd).
These quantities include roughly a 10% margin for your gauge swatch, color-change tails, and small differences in tension.
Tools:
- 6.0 mm (J-10) crochet hook
- Tapestry needle
- Stitch markers (at least 10)
- Measuring tape at least 60 in (152.4 cm) long
- Rust-proof pins and blocking mats (or a clean bed or carpet with a towel)
- Spray bottle
Abbreviations (US Terms)
- ch: chain
- sc: single crochet
- dc: double crochet
- tr: treble crochet
- sp: space
- st(s): stitch(es)
- RS / WS: right side / wrong side
Special stitches:
- Fan: 9 dc in the same stitch.
- Half fan: 5 dc in the same stitch. At the start of a row, ch 3 counts as the first dc.
Counting note: In the lattice rows, every chain counts as a stitch. This is what keeps every lattice row at exactly 97 stitches.
Gauge and Checkpoints
Pattern gauge: One 12-stitch fan repeat = 4 in (10.2 cm) wide. One band (Rows A–D) = 4 in (10.2 cm) tall.
Single crochet gauge: 12 sc and 14 rows = 4 in (10.2 cm).
Make a test swatch first. Ch 26 and work Row 1 (25 sc). Then work 2 full bands (Rows A–D twice). This gives 2 fan repeats.
- Swatch width: 8 in (20.3 cm)
- Swatch height: 8 1/4 in (21.0 cm)
Block the swatch lightly before you measure it.
If the swatch is too big, switch to a 5.5 mm (I-9) hook. If it is too small, switch to a 6.5 mm (K-10.5) hook. A half-inch error per 8 in (1.3 cm per 20.3 cm) grows to 2 in (5.1 cm) across the full width, so fix your gauge before you start.
Checkpoints during the work:
- After Row 1: 32 in (81.3 cm) wide
- After 5 bands: 20 1/4 in (51.4 cm) long
- After 10 bands: 40 1/4 in (102.2 cm) long
- After 19 bands: 76 1/4 in (193.7 cm) long
- After the header: 78 1/4 in (198.8 cm) long
Body
Foundation: With Color A, ch 98.
Row 1 (RS): Sc in 2nd ch from hook and in each ch across, turn. (97 sc)
Fasten off Color A at the end of Row 1. Leave 6 in (15.2 cm) tails at every color change. You will enclose these tails when you work the side border.
Band Rows (Rows A–D)
Row A (Color B, cream fans): Join Color B in the first st. Ch 1, sc in same st, skip 5 sts, fan in next st, skip 5 sts, sc in next st; rep from * 7 more times. Fasten off. (8 fans + 9 sc = 81 sts)*
Row B (Color A, lattice): Without turning, join Color A in the last sc of Row A, so that the first st is at the edge where Row A ended. Ch 4 (counts as tr), ch 5, sc in 5th (center) dc of next fan, ch 5, tr in next sc; rep from * 7 more times. Turn. (1 + 8 × 12 = 97 sts)*
The tall tr stitches sit between the fans and the sc sits at each fan’s peak. The ch-5 arches between them outline the top half of a diamond around each cream fan.
Row C (Color A, blue fans): Ch 3 (counts as dc), 4 dc in first st (half fan made), skip ch-5, sc in next sc, skip ch-5, fan in next tr; rep from * 6 more times, skip ch-5, sc in next sc, skip ch-5, 5 dc in top of beginning ch-4 (half fan). Turn. (5 + 7 × 10 + 1 + 5 = 81 sts: 7 fans and 2 half fans)*
These blue fans sit between the cream fans below, which creates the staggered diamond layout.
Row D (Color A, lattice): Ch 1, sc in first dc, ch 5, tr in next sc, ch 5, sc in 5th dc of next fan; rep from * 6 more times, ch 5, tr in next sc, ch 5, sc in top of turning ch-3. Fasten off Color A. (1 + 8 × 12 = 97 sts)*
Row D closes the diamonds around the blue fans. Each tr now sits exactly where the next cream fan will be worked.
Repeat
Work Rows A–D 18 more times, for 19 bands total. Rows A always place their fans into the tr stitches of the Row D below.
Checkpoint: 32 in (81.3 cm) wide × 76 1/4 in (193.7 cm) long. Lay the panel flat and measure it in three places. All three should be within 1/2 in (1.3 cm) of each other.
Header and Tabs
Header Row 1 (Color A): Join Color A in the first st of the last Row D. Ch 1, sc in each sc, tr and ch across, turn. (97 sc)
Header Rows 2–7: Ch 1, sc in each st across, turn. (97 sc)
Checkpoint: The header is 2 in (5.1 cm) deep, and the panel now measures 78 1/4 in (198.8 cm) long.
Tab placement: Place markers so that six tabs of 7 sts are separated by five gaps of 11 sts. Mark sts 1–7, 19–25, 37–43, 55–61, 73–79 and 91–97. Check: 6 × 7 + 5 × 11 = 97 ✓
Tab 1: Continuing from Header Row 7, ch 1, sc in first 7 sts, turn. Work 27 more rows of 7 sc, for 28 rows in total. The tab should measure 8 in (20.3 cm). Fasten off, leaving a 16 in (40.6 cm) tail.
Tabs 2–6: With the same side facing, join Color A in the first marked st of each tab and work exactly as for Tab 1.
Fold the tabs: Fold each tab to the WS. Sew its last row across the WS of Header Row 1, stitch by stitch, using the long tail.
Because the 2 in (5.1 cm) header is covered in the fold, an 8 in (20.3 cm) tab leaves a 3 in (7.6 cm) loop above the header. That fits rods up to about 1 1/4 in (3.2 cm) in diameter.
Border
Border gauge: 3 sc per 1 in (2.5 cm), which matches the sc gauge of 12 sc per 4 in (10.2 cm).
Scalloped Hem (Color B)
Work across the free loops of the foundation chain with RS facing.
Edge Row 1: Join Color B in the first free loop. Ch 1, sc in same loop, ch 5, skip 5 loops, sc in next loop; rep from * 15 more times, turn. (17 sc + 16 ch-5 sps = 97 sts)*
Edge Row 2: Ch 1, sc in first sc, 5 dc in next ch-5 sp, dc in next sc, 5 dc in next ch-5 sp, sc in next sc; rep from * 7 more times, turn. (8 scallops of 11 dc + 9 sc = 97 sts)*
Edge Row 3: Ch 1, sc in first sc, [ch 3, skip 1 dc, sc in next dc] 5 times, ch 3, skip last dc, sc in next sc; rep from * 7 more times. Fasten off. (48 ch-3 loops, 49 sc)*
The center dc of each scallop is worked into the sc directly below a cream fan column. That is why each scallop lines up under the fans, just like in the finished panel. The hem is 2 in (5.1 cm) deep.
Side Borders (Color A)
Work each long side separately with RS facing. Start at the foundation edge, not along the scallops, and work up to the top of the header. Hold the color-change tails along the edge and work over them.
Side Row 1: Join Color A and work these sc into the row-ends:
- 1 sc in the end of Row 1
- In each band: 2 sc in the Row A end, 4 sc in the Row B (tr) end, 3 sc in the Row C end and 3 sc in the Row D end, for 12 sc per band
- 1 sc in each of the 7 header row-ends
Turn. (1 + 19 × 12 + 7 = 236 sc)
Side Row 2: Ch 1, sc in each sc across. Fasten off. (236 sc)
Why the math works: Each band is 4 in (10.2 cm) tall, so 12 sc per band equals 3 sc per inch, which is exactly the border gauge. The edge lies flat without rippling or pulling in. Two sc rows add 1/2 in (1.3 cm) per side, so the finished width is 32 + 1/2 + 1/2 = 33 in (83.8 cm).
Weave in all remaining ends along the side borders.
Final Blocking
- Soak the panel in cool water with a little wool wash for 15 minutes.
- Gently press out the water without wringing, then roll the panel in towels.
- Lay it flat on blocking mats, working in sections if space is limited.
- Pin the width to 33 in (83.8 cm) every 12 in (30.5 cm) along the length.
- Pin the length to 80 1/4 in (203.8 cm) from the scallop tips to the top of the header. The tab loops are not included.
- Pin the center tip of each scallop so it points straight down.
- Open each fan with your fingers so the 9 dc spread evenly.
- Let the panel dry completely, which takes 24 to 48 hours.
- Hang the panel for a day. Gravity will settle the lattice.
Final Quality-Control Checklist
- Each lattice row has 97 sts, and each fan row has 81 sts.
- All 19 bands are complete, with cream fans in Rows A and blue fans in Rows C.
- Fans form a clean staggered diamond pattern from edge to edge.
- The header is flat with 97 sc, and all six tabs are evenly spaced.
- Every tab loop is the same height, 3 in (7.6 cm).
- There are eight scallops, each centered under a cream fan column.
- Each side border has 236 sc and lies flat.
- The width is 33 in (83.8 cm) at the top, middle and bottom.
- All tails are enclosed or woven in, with none visible on the RS.
Troubleshooting
Fans curl or cup: Your tension is too tight on the dc. Go up a hook size for the fan rows only.
Lattice sags or looks stretched: Your ch-5 arches are too loose. Chain more firmly or use 4-ch arches only if you also re-check the width.
Panel narrows toward the top: Check that every lattice row has 97 sts. Skipping the beginning ch-4 or the last st is the usual cause.
Fans don’t stagger: You probably worked Row C fans into the sc instead of the tr. Fans always go into the tall stitches.
Side edges ripple: You added too many sc. Rework Side Row 1 at exactly 12 sc per band.
Tabs are uneven: Count the rows on each tab. All tabs need 28 rows.
Care
Machine wash cold on a gentle cycle in a mesh bag, or hand wash. Lay flat to dry, then reshape and re-hang while slightly damp so it drapes straight.
Final Notes
The measurement chain is simple. Make sure one 12-st repeat measures 4 in (10.2 cm) and one band measures 4 in (10.2 cm). From those two numbers:
- 8 repeats give a 32 in (81.3 cm) body width.
- 19 bands give a body length of 76 1/4 in (193.7 cm).
- The 2 in (5.1 cm) header, the 2 in (5.1 cm) scalloped hem and the 1/2 in (1.3 cm) side borders bring the panel to 33 in (83.8 cm) wide.
- The 3 in (7.6 cm) tab loops complete a hanging length of 83 1/4 in (211.5 cm).
Check your gauge first, count each lattice row, and your pair of panels will hang evenly side by side.
Happy crocheting!