

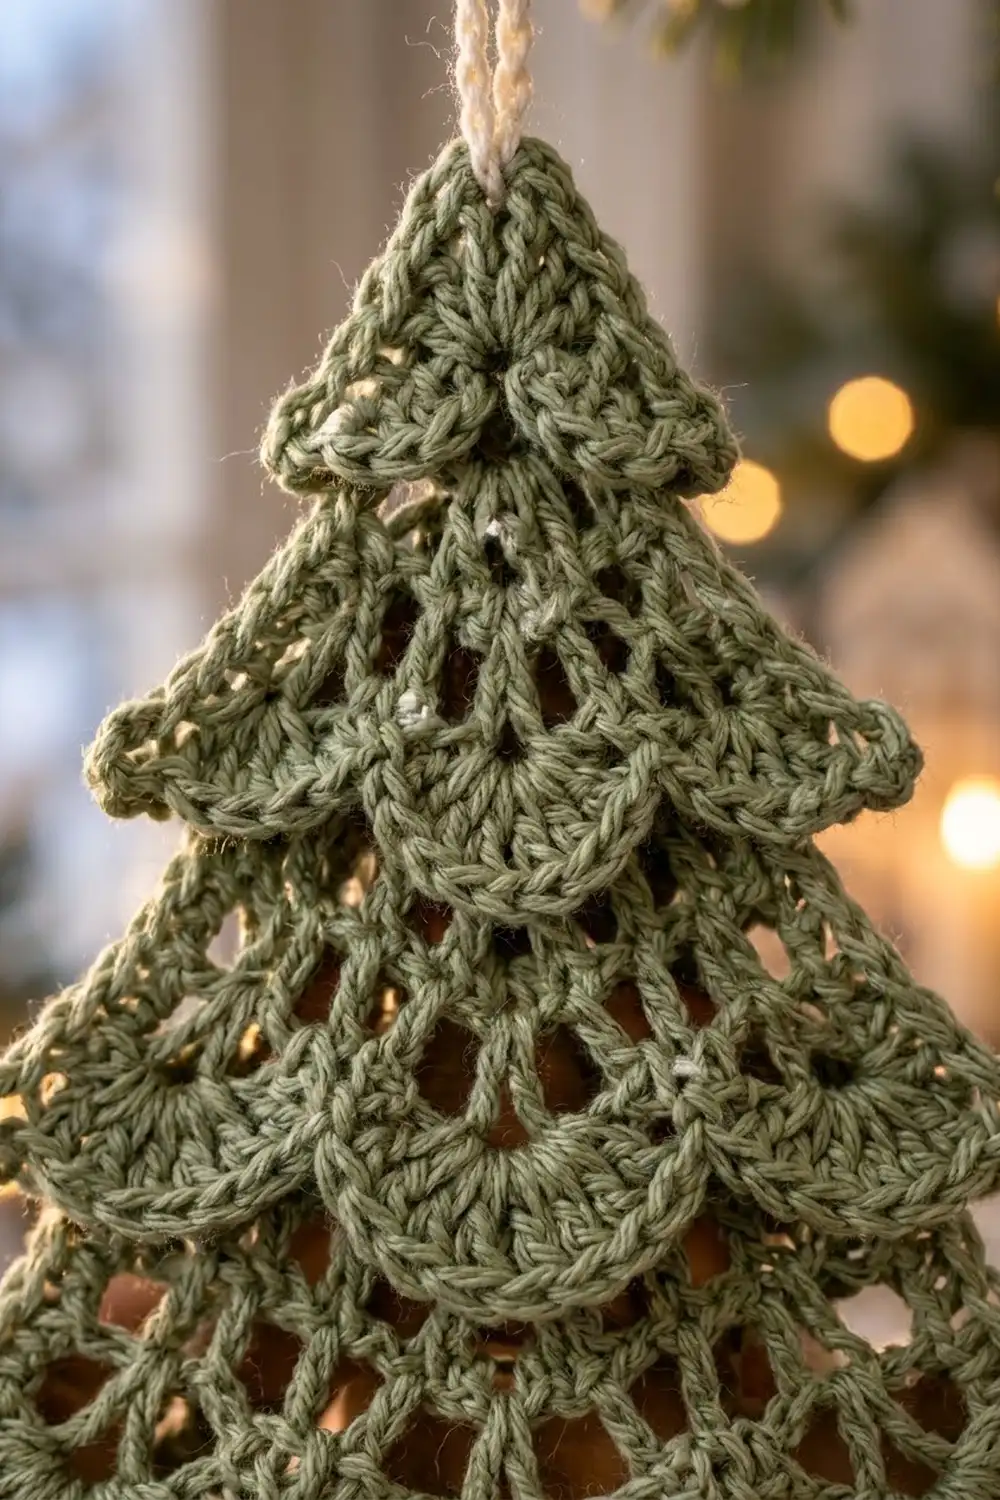
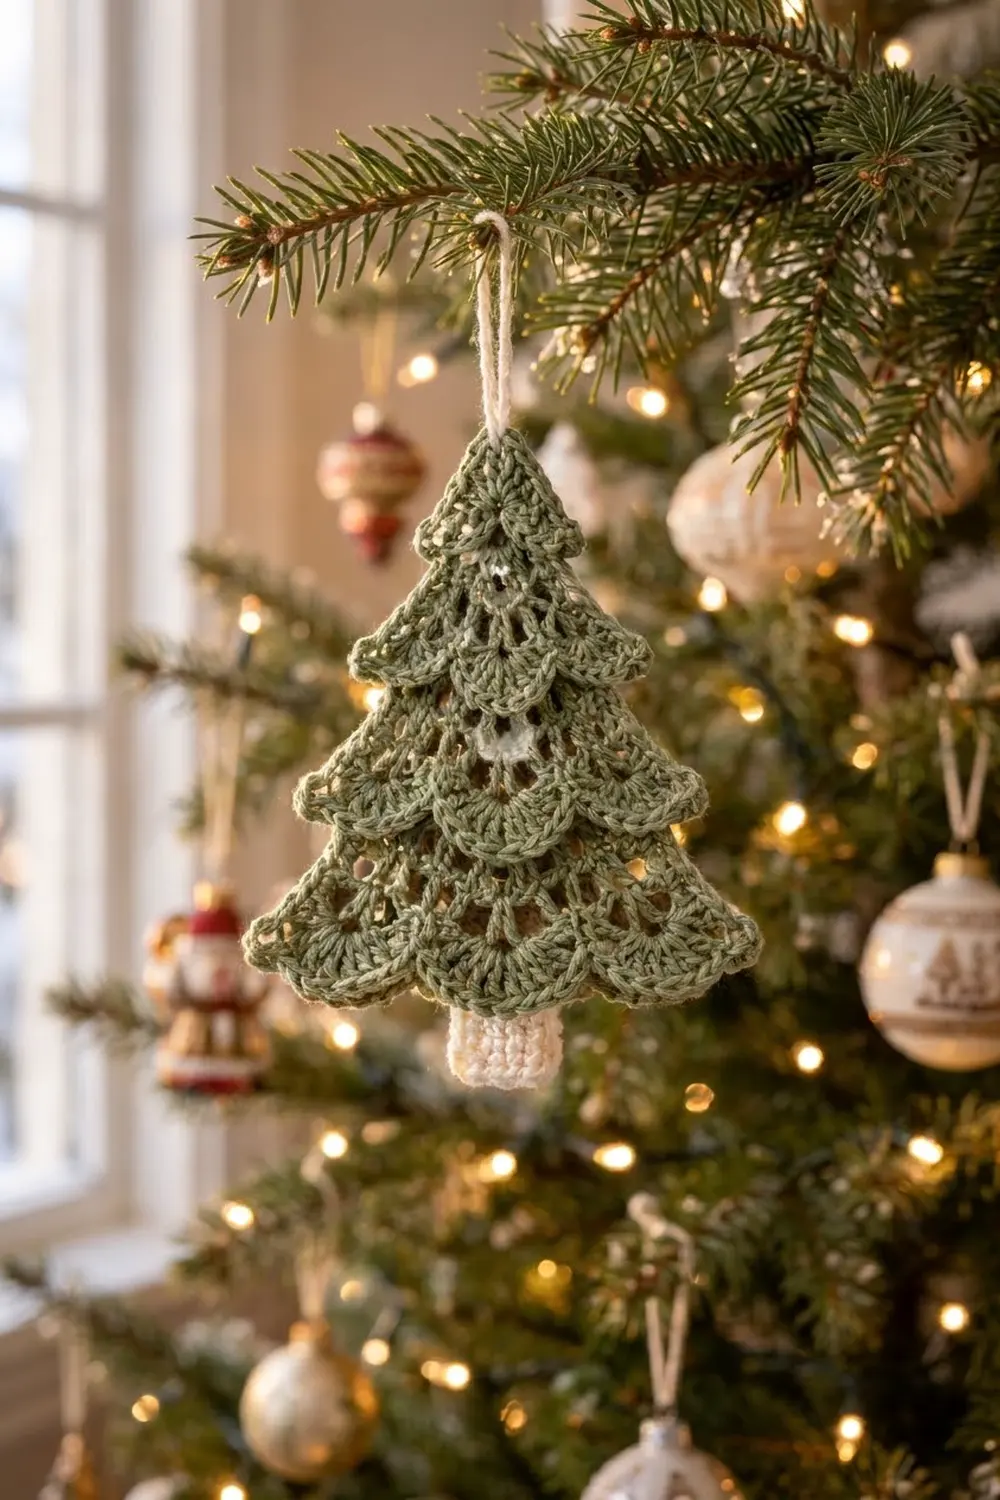
This lacy little tree has four scalloped tiers stacked one over the next, like the boughs of a real fir. The body is an open mesh of double crochet and chain spaces, so window light and fairy lights shine through it. Each tier ends in a row of soft, rounded shells that overlaps the tier below.
The palette is quiet and Scandinavian in feel: sage green for the tree and cream for the small trunk and hanging loop. It looks lovely on a real tree, in a window, or tied to a gift.
The pattern uses US crochet terms. The finished ornament is about 4.5 in (11.4 cm) wide and 5.8 in (14.7 cm) tall, including the trunk, plus a hanging loop about 1.75 in (4.4 cm) tall.
The tree is worked in one piece from the top down, in turned rows. Each new tier is worked behind the scallops of the tier above, into the stitches those scallops leave free. That is what gives the layered, overlapping look. The trunk is added in cream, and a final row of shells across the bottom finishes the edge.
Finished Size and Construction
- Finished size: 4.5 in (11.4 cm) wide x 5.8 in (14.7 cm) tall, plus the loop
- Skill level: Intermediate (the “working behind” rows need some care)
- Terminology: US
- Yarn weight: DK (weight 3), cotton or cotton blend
- Hook: 3.5 mm (E-4)
- Number of pieces: 1 tree, worked in one piece with the trunk and loop added
- Layout: Four stacked tiers with 3, 4, 5, and 6 scallops
- Piece size before the bottom scallop edge: 4.3 in (10.9 cm) wide x 4.8 in (12.2 cm) tall
- Border (bottom scallop row) depth: about 0.5 in (1.3 cm)
Materials
Yarn: A smooth, mercerized or matte DK cotton gives crisp stitches and scallops that block well. Acrylic works too, but it holds the scallop shape less firmly.
- Sage green (tree): 10 g, about 24 m (26 yd)
- Cream (trunk and loop): 3 g, about 7 m (8 yd)
These quantities include a small safety margin for your gauge swatch and weaving in ends.
Tools:
- 3.5 mm (E-4) crochet hook
- Tapestry needle
- Scissors
- 2 locking stitch markers
- Rustproof pins and a blocking mat or folded towel
- Spray bottle
Abbreviations (US Terms)
- ch: chain
- sl st: slip stitch
- sc: single crochet
- dc: double crochet
- st(s): stitch(es)
- sp: space
- RS / WS: right side / wrong side
- rep: repeat
Special stitch: Shell. Work 5 dc in the same ch-1 space.
Increase mesh row: Ch 4 (counts as dc + ch 1), dc in the st at the base of the ch-4. *Ch 1, dc in next dc; rep from * to the last st. Ch 1, then work (dc, ch 1, dc) in the 3rd ch of the beginning ch-4. Each increase row adds 2 dc and 2 ch-1 spaces.
Gauge and Checkpoints
Gauge in mesh: 3 ch-1 spaces (dc, ch 1 repeats) = 1 in (2.5 cm) wide, and 5 dc rows = 2 in (5.1 cm) tall.
Gauge in sc (trunk): 7 sc and 7 rows = 1 in (2.5 cm).
Your best gauge test is Tier 1 itself (Rows 1–4). It only takes a few minutes, so make it first and measure:
- After Row 3: 2.3 in (5.9 cm) wide x 1.2 in (3.0 cm) tall
- After Row 7: 3 in (7.6 cm) wide x 2.4 in (6.1 cm) tall
- After Row 11: 3.7 in (9.4 cm) wide x 3.6 in (9.1 cm) tall
- After Row 15: 4.3 in (10.9 cm) wide x 4.8 in (12.2 cm) tall
If Tier 1 is too big, go down to a 3.25 mm (D-3) hook. If it’s too small, go up to a 3.75 mm (F-5) hook. If the width is right but the rows are too tall, pull up each dc a little less (a common habit with cotton).
Pattern
The tree is worked from the top down in turned rows. Row 1 is the RS. All shell rows are worked on the WS, then folded down onto the RS before the next row, so every scallop ends up on the front.
Tier 1 (Top)
With sage green, ch 4 and sl st to the first ch to form a ring.
Row 1 (RS): Ch 4 (counts as dc + ch 1). [Dc in ring, ch 1] 2 times, then dc in ring. Turn. (4 dc, 3 ch-1 sps)
Row 2 (WS): Work an increase mesh row. Turn. (6 dc, 5 ch-1 sps)
Row 3 (RS): Work an increase mesh row. Turn. (8 dc, 7 ch-1 sps)
Row 4 (WS, shell row): Ch 1, sc in the first ch-1 sp. Shell in the next ch-1 sp, sc in the next ch-1 sp; rep from * across. (3 shells + 4 sc)*
Checkpoint: Tier 1 should measure 2.3 in (5.9 cm) across Row 3.
Tier 2
Row 5 (RS, behind row): Turn. Fold Row 4 down toward you so the shells lie flat against the RS. This exposes the tops of the Row 3 dc, which Row 4 left free because it was worked into the spaces.
Working behind Row 4 and into the Row 3 dc only, sl st in the next dc (the 2nd dc from the edge). Ch 4 (counts as dc + ch 1). Dc in the next dc, ch 1; rep from * 3 more times, then dc in the next dc. Leave the last dc unworked. Turn. (6 dc, 5 ch-1 sps)*
Skipping the outer dc on each side is what steps the new tier in under the scallops.
Row 6 (WS): Work an increase mesh row. Turn. (8 dc, 7 ch-1 sps)
Row 7 (RS): Work an increase mesh row. Turn. (10 dc, 9 ch-1 sps)
Row 8 (WS, shell row): Ch 1, sc in the first sp. Shell in the next sp, sc in the next sp; rep from * across. (4 shells + 5 sc)*
Tier 3
Row 9 (RS, behind row): Turn and fold Row 8 down onto the RS. Working into the Row 7 dc only, sl st in the 2nd dc from the edge. Ch 4. Dc in the next dc, ch 1; rep from * 5 more times, then dc in the next dc. Leave the last dc unworked. Turn. (8 dc, 7 ch-1 sps)*
Row 10 (WS): Work an increase mesh row. Turn. (10 dc, 9 ch-1 sps)
Row 11 (RS): Work an increase mesh row. Turn. (12 dc, 11 ch-1 sps)
Row 12 (WS, shell row): Ch 1, sc in the first sp. Shell in the next sp, sc in the next sp; rep from * across. (5 shells + 6 sc)*
Tier 4 (Bottom Body)
Row 13 (RS, behind row): Turn and fold Row 12 down onto the RS. Working into the Row 11 dc only, sl st in the 2nd dc from the edge. Ch 4. Dc in the next dc, ch 1; rep from * 7 more times, then dc in the next dc. Leave the last dc unworked. Turn. (10 dc, 9 ch-1 sps)*
Row 14 (WS): Work an increase mesh row. Turn. (12 dc, 11 ch-1 sps)
Row 15 (RS): Work an increase mesh row. (14 dc, 13 ch-1 sps)
Do not fasten off. Pull up a long loop and secure it with a locking marker so it can’t unravel. Measure now: 4.3 in (10.9 cm) wide x 4.8 in (12.2 cm) tall.
Trunk
Hold the tree RS facing with Row 15 at the bottom. Count across the 14 dc of Row 15 and mark the 6th and 9th dc. This leaves 5 dc free on each side, so the trunk is centered.
Trunk Row 1 (RS): Join cream with a sl st in the 6th dc. Ch 1, sc in the same dc. [Sc in the next ch, sc in the next dc] 3 times. (7 sc)
For each “sc in the next ch,” insert the hook into the chain stitch itself, not under it into the space. The ch-1 spaces need to stay open for the bottom scallop row.
Trunk Rows 2–7: Ch 1, turn, sc in each sc across. (7 sc)
Fasten off and weave in the ends. The trunk measures 1 in (2.5 cm) wide x 1 in (2.5 cm) long.
Hanging Loop
With cream, join with a sl st around the starting ring at the top point of the tree. Ch 20, then sl st in the same place. Fasten off, leaving a 6 in (15.2 cm) tail. Use the tail to stitch the loop’s base through the ring once more so it can’t twist loose, then weave it in. The loop stands about 1.75 in (4.4 cm) tall.
Border: Bottom Scallop Edge
The bottom scallop row is the only true border. It uses the same shell gauge as the other tiers: one shell plus one sc covers 2 ch-1 spaces, about 0.67 in (1.7 cm) of width, and the shells hang about 0.5 in (1.3 cm) deep.
Put the live green loop from the marker back on your hook.
Row 16 (WS, border): Turn so the WS faces you. Ch 1, sc in the first ch-1 sp of Row 15. Shell in the next sp, sc in the next sp; rep from * across. (6 shells + 7 sc = 37 sts)*
Fasten off and weave in the end. Fold the shells down over the top of the trunk on the RS.
Why the math works: Every shell row is worked into a row with an odd number of spaces, 2S + 1, where S is the number of shells. It starts and ends with a sc and alternates sc and shell between. The four tiers line up like this:
- Tier 1: Row 3 has 7 spaces, which gives 3 shells.
- Tier 2: Row 7 has 9 spaces, which gives 4 shells.
- Tier 3: Row 11 has 11 spaces, which gives 5 shells.
- Tier 4: Row 15 has 13 spaces, which gives 6 shells.
Each tier adds 2 spaces because its behind row removes 2 dc (one from each edge) and its two increase rows add 4. That nets +2 dc and +2 spaces per tier, which is exactly one more shell.
On the bottom row, the center space (the 7th) gets a sc, with a shell on each side of it. Those two center shells fall right over the trunk, which sits under spaces 6–8, so the trunk comes out centered.
Final Blocking
- Weave in all the ends along the dc posts on the WS so they don’t show through the mesh.
- Soak the ornament in cool water for 10 minutes, then gently squeeze it out (don’t wring it). Roll it in a towel to remove the extra water.
- Lay it RS up on the blocking mat. Pin the top point and the two bottom corners so the bottom edge is 4.5 in (11.4 cm) wide.
- Pin the total height to 5.8 in (14.7 cm), from the top of the ring to the bottom of the trunk.
- Smooth each scallop row so it lies flat over the tier below. Pin the outermost shell of each tier slightly outward to sharpen the stepped silhouette.
- Open the mesh spaces with your fingertips so they look even.
- Straighten the trunk into a neat rectangle and pin its two lower corners.
- Let it dry completely, at least 12 hours. For a stiffer ornament, mist it lightly with fabric stiffener before drying.
Final Quality-Control Checklist
- Each tier has the right number of scallops: 3, 4, 5, and 6.
- Every scallop sits on the RS, and none are flipped behind.
- The edge dc of Rows 3, 7, and 11 are unworked and tucked under the outer shells.
- The trunk is 7 sc wide, centered under the 2 middle shells, and shows about 0.5 in (1.3 cm) below the scallops.
- The width measures 4.5 in (11.4 cm) at the bottom tier.
- The loop is firmly anchored at the top point.
- No ends are visible through the mesh.
Troubleshooting
The scallops ruffle or cup. Your shells are too tight for the space, or your gauge is too loose. Try working the shell dc slightly shorter, or go down a hook size.
The tiers don’t step in. You likely worked into the edge dc on a behind row. Each behind row must start in the 2nd dc and end in the 2nd-to-last dc.
The shell count doesn’t fit. Count the spaces in the row below. It must be an odd number: 7, 9, 11, or 13. If it’s even, an increase was missed or doubled.
The trunk is off-center. Recount Row 15 from either edge. There should be 5 dc free on each side of the trunk.
The tree leans to one side. Check that every increase row has a (dc, ch 1, dc) at both ends. Then block it firmly with pins at the 3 corners.
The mesh looks uneven. Keep every ch-1 the same size by pulling your chains up to match your hook’s shank.
Care
Hand wash in cool water with mild soap, press out the water, and dry flat, reshaping the scallops. Store it flat or hang it from its loop, away from damp.
Final Notes
The measurement chain is simple:
- Your mesh gauge of 3 spaces = 1 in (2.5 cm) sets each tier’s width: 2.3 in (5.9 cm), 3 in (7.6 cm), 3.7 in (9.4 cm), and 4.3 in (10.9 cm).
- The 2S + 1 space count puts 3, 4, 5, and 6 shells on the tiers.
- The bottom scallops bring the finished width to 4.5 in (11.4 cm).
- The 0.5 in (1.3 cm) bottom border and the trunk bring the height to 5.8 in (14.7 cm).
Check your size after Tier 1 and you can trust the rest of the tree. Make one for every branch, or a set of three for a window.
Happy crocheting!