

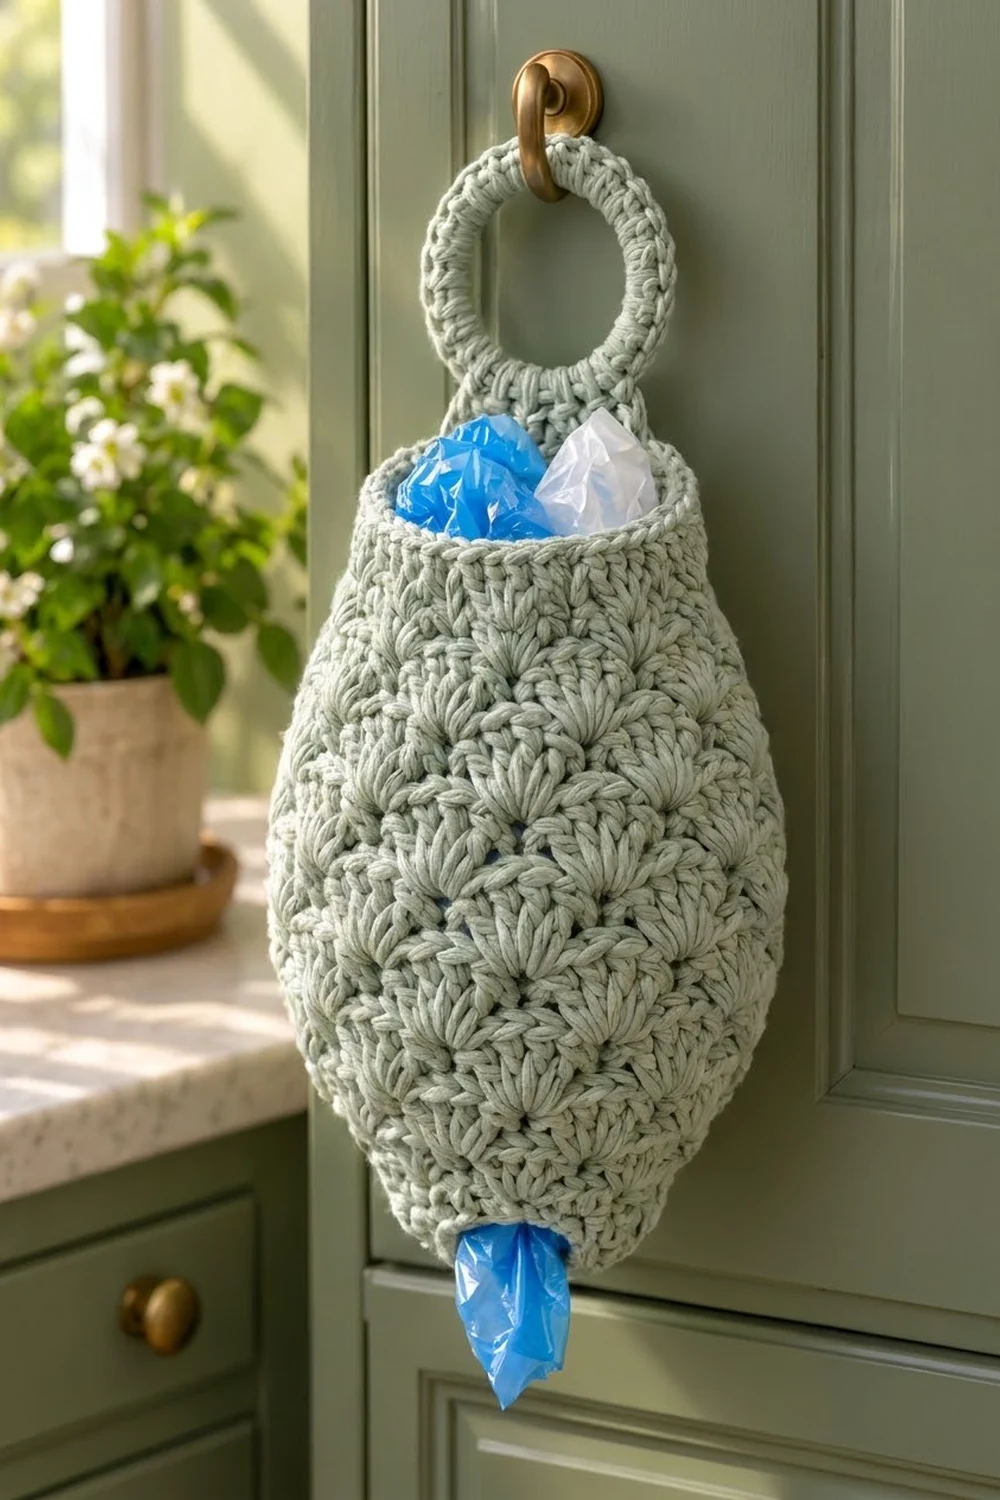
This grocery bag holder is a soft, egg-shaped dispenser covered in rows of offset shells. You push plastic bags in through the wide top opening and pull them out one at a time through the small hole at the bottom. A round hanging ring at the top slips over a cabinet knob, door hook or pantry peg.
The sample uses one solid sage green cotton. The color is calm and looks good against painted kitchen cabinets. The shell stitches give the fabric a gentle scalloped look, and the single crochet band at the top keeps the opening neat and firm.
This pattern uses US crochet terms. The finished body is about 12.25 in (31.1 cm) tall and 8.75 in (22.2 cm) wide when laid flat at its widest point. With the tab and ring, the holder hangs about 17 in (43.2 cm) long.
The construction is simple and has no seams. You start at the bottom opening with a chain ring and work the body upward in joined rounds of shells. Changing the shell size creates the egg shape. A single crochet band finishes the top. You then work a short tab in rows off the band and cover the ring in single crochet directly from the tab, so there is nothing to sew.
Finished Size and Construction
- Finished size: body 12.25 in (31.1 cm) tall x 8.75 in (22.2 cm) wide flat; 17 in (43.2 cm) overall with ring
- Skill level: Easy / Intermediate
- Terminology: US crochet terms
- Yarn weight: worsted (#4), cotton or cotton blend
- Hook: 5.0 mm (US H-8)
- Number of pieces: 1 (body, tab and ring are one continuous piece)
- Layout: single tube worked bottom-up in joined rounds; no joining
- Piece size: 8.75 in (22.2 cm) flat width at widest
- Size before border (top band): 11.5 in (29.2 cm) tall after the last shell round
- Border depth: top band 0.75 in (1.9 cm); the bottom trim is a slip-stitch edge that adds no height
- Hanging tab: 1.5 in (3.8 cm); covered ring 3.25 in (8.3 cm) outer diameter
Materials
Choose a smooth worsted weight cotton or cotton blend. Cotton holds the shell shape well, stretches little under the weight of stuffed bags and washes easily. Avoid very fuzzy or loosely plied yarns, which hide the shells.
- Sage green: 170 g (about 300 m / 328 yd)
Tools:
- 5.0 mm (US H-8) crochet hook
- 2.75 in (7.0 cm) plastic or wooden ring (a macramé ring works well)
- 1 stitch marker
- Tapestry needle
- Scissors
- Measuring tape
The yarn amount includes a margin of about 20 percent for your gauge test and small tension differences. The sample used about 140 g.
Abbreviations (US Terms)
- ch – chain
- sl st – slip stitch
- sc – single crochet
- dc – double crochet
- sc2tog – single crochet 2 together
- st(s) – stitch(es)
- rnd(s) – round(s)
Special stitches:
- 3-dc shell: work 3 dc in the same stitch. The center dc is the 2nd dc.
- 5-dc shell: work 5 dc in the same stitch. The center dc is the 3rd dc.
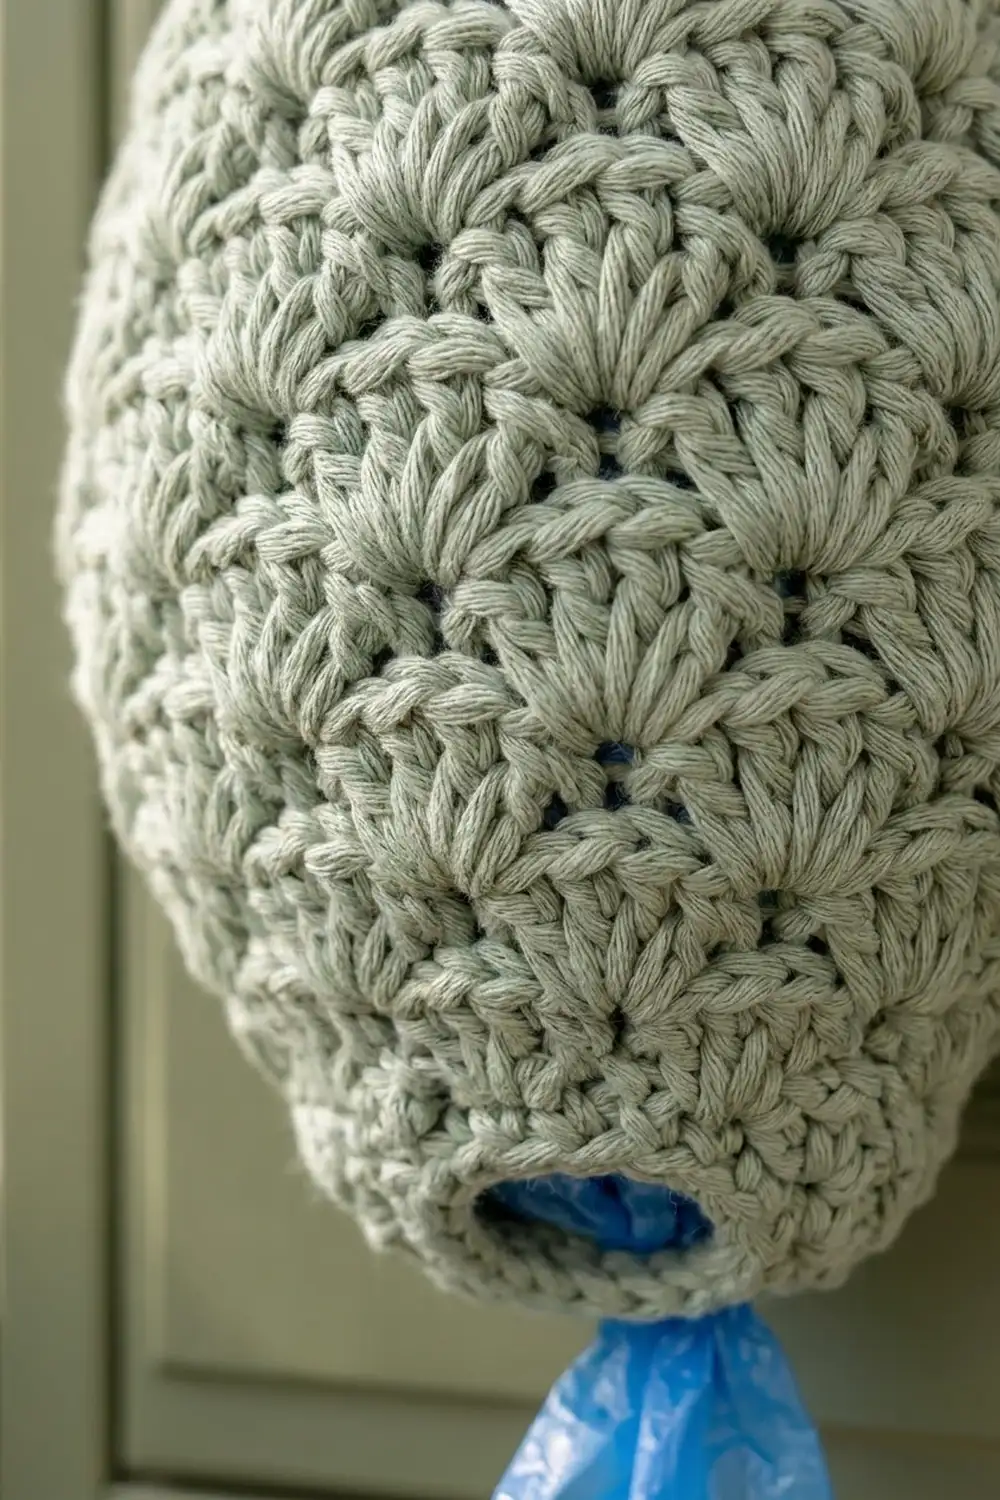
Every shell round has 10 sc and 10 shells. Each shell sits on top of an sc from the round before, and each sc sits in the center dc of a shell from the round before. That offset creates the staggered scallop texture.
Gauge and Checkpoints
Gauge matters here because the shell size shapes the body, not the number of repeats.
- Shell gauge (5-dc shells): 2 repeats (12 sts) = 3.5 in (8.9 cm); 4 rnds = 3 in (7.6 cm), so each shell rnd is about 0.75 in (1.9 cm) tall
- Single crochet gauge: 14 sc and 16 rows = 4 in (10.2 cm)
Test the first few rounds before going further. Work Rnds 1–6, then lay the tube flat and measure. At 60 sts, the flat width should be about 8.75 in (22.2 cm).
Measurement checkpoints:
- After Rnd 1: flat width 4.3 in (10.9 cm)
- After Rnd 4: height about 2.5 in (6.4 cm)
- After Rnd 14: height 10 in (25.4 cm), flat width 8.75 in (22.2 cm)
- After Rnd 16: height 11.5 in (29.2 cm)
- After Rnd 19: height 12.25 in (31.1 cm), top flat width 5.7 in (14.5 cm)
If your piece is too big, go down one hook size (4.5 mm). If it is too small, go up one size (5.5 mm). Change hooks rather than stitch counts, because the counts depend on the 10-repeat structure.
Body
Work in joined rounds with the right side always facing you. Do not turn. The slip stitches at the start of each shell round move you to the center of the first shell. Do not count them as stitches.
Foundation: Ch 30 and sl st to the first ch to form a ring, without twisting the chain. This ring is the bottom bag opening.
Rnd 1: Ch 1, sc in each ch around, sl st to first sc to join. (30 sc)
The opening should lie flat at about 4.3 in (10.9 cm) wide. That is about 2.7 in (6.9 cm) across when it is open.
Rnd 2 (set-up shell round): Ch 1, sc in first st, skip 1 st, 3-dc shell in next st, sc in next st, skip 1 st, 3-dc shell in next st; rep from * around, sl st to first sc to join. (10 sc + 10 3-dc shells = 40 sts)*
Each repeat uses 3 sts of Rnd 1, so 10 repeats use all 30 sc.
Rnd 3: Sl st in next 2 dc (you are now in the center dc of the first shell), ch 1, sc in same dc, 3-dc shell in next sc, sc in center dc of next shell, 3-dc shell in next sc; rep from * around, sl st to first sc to join. (10 sc + 10 3-dc shells = 40 sts)*
The last shell of the round goes into the first sc of Rnd 2.
Rnd 4 (growth round): Sl st in next 2 dc, ch 1, sc in same dc, 5-dc shell in next sc, sc in center dc of next shell, 5-dc shell in next sc; rep from * around, sl st to first sc to join. (10 sc + 10 5-dc shells = 60 sts)*
This is where the egg shape widens. There are still 10 repeats, but each shell gains 2 dc.
Rnds 5–14: Sl st in next 3 dc (center of 5-dc shell), ch 1, sc in same dc, 5-dc shell in next sc, sc in center dc of next shell, 5-dc shell in next sc; rep from * around, sl st to first sc to join. (60 sts each round)*
That makes 10 rounds at full width. Checkpoint: the body is 10 in (25.4 cm) tall and 8.75 in (22.2 cm) wide flat.
Rnd 15 (shaping round): Sl st in next 3 dc, ch 1, sc in same dc, 3-dc shell in next sc, sc in center dc of next shell, 3-dc shell in next sc; rep from * around, sl st to first sc to join. (10 sc + 10 3-dc shells = 40 sts)*
Rnd 16: Sl st in next 2 dc, ch 1, sc in same dc, 3-dc shell in next sc, sc in center dc of next shell, 3-dc shell in next sc; rep from * around, sl st to first sc to join. (40 sts)*
The body is now 11.5 in (29.2 cm) tall and curves in toward the top, matching the narrower bottom.
Top Band, Bottom Trim, Tab and Ring
Top Band
The top band is the “border” of this piece. It uses the single crochet gauge: 14 sc = 4 in (10.2 cm).
Rnd 17 (conversion round): Ch 1, sc in same st as join, sc in each dc and each sc around, sl st to first sc to join. (40 sts worked 1-per-stitch + 0 added = 40 sc)
Rnds 18–19: Ch 1, sc in each st around, sl st to first sc to join. (40 sc each round)
Do not fasten off.
Why the math works: Rnd 16 has exactly 40 stitches, and Rnd 17 places one sc in each, so the count doesn’t change. At 14 sc per 4 in (10.2 cm), 40 sc gives a circumference of about 11.4 in (29.0 cm), or a flat width of 5.7 in (14.5 cm). That is about two-thirds of the widest part of the body, which gives the rounded, slightly closed-in top. Three sc rounds at 0.25 in (0.6 cm) each add 0.75 in (1.9 cm), bringing the body to 12.25 in (31.1 cm).
Hanging Tab
The tab starts at the join of Rnd 19. That join becomes the back of the holder.
Row 1: Ch 1, sc in same st as join and in next 5 sts, turn. (6 sc)
Rows 2–4: Ch 1, sc in each st across, turn. (6 sc)
Row 5: Ch 1, sc2tog, sc in next 2 sts, sc2tog, turn. (4 sc)
Row 6: Ch 1, sc in each st across. (4 sc) Do not turn.
Six rows at 0.25 in (0.6 cm) each give a 1.5 in (3.8 cm) tab that narrows slightly toward the ring.
Covered Ring
Hold the ring directly above the tab.
Ring Rnd: Ch 1. Working over the ring and into the tab at the same time, sc in each of the 4 tab sts. This locks the ring to the tab. Then work sc over the ring only, all the way around, for 36 more sc. Sl st to the first sc to join. (4 anchored sc + 36 free sc = 40 sc)
Push the stitches together as you go so the ring is fully hidden. If the ring still shows, add sc in pairs (up to 44 total) until it is covered. Fasten off and weave the end in through the tab.
The covered ring is about 3.25 in (8.3 cm) across, and the holder hangs about 17 in (43.2 cm) long overall.
Bottom Trim
Turn the holder upside down. Join yarn to any free loop of the foundation chain. Sl st in each of the 30 free loops, then sl st to the first sl st to join. (30 sl sts)
This firms up the dispensing hole so it doesn’t stretch out as bags are pulled through. The count matches the 30-ch foundation exactly, so the opening stays at 4.3 in (10.9 cm) flat. Fasten off and weave in all ends.
Final Blocking
- Weave in every end on the inside of the tube, following the dc posts so the tails stay hidden.
- Fill a basin with cool water and a little gentle wash.
- Soak the holder for 10–15 minutes, then press the water out. Do not wring.
- Roll it in a towel to remove extra moisture.
- Stuff the body loosely with a plastic bag or small towel to form the egg shape.
- Check the widest point: the flat width should be about 8.75 in (22.2 cm), and the body height 12.25 in (31.1 cm).
- Shape the shells with your fingers so each scallop stands up and is evenly spaced.
- Lay the ring flat and round it out.
- Let it dry completely, turning it once, before hanging.
Final Quality-Control Checklist
- Rnd 1 has 30 sc, and the bottom opening is 4.3 in (10.9 cm) flat.
- Every shell round has exactly 10 sc and 10 shells.
- Rnds 2–3 and 15–16 have 40 sts; Rnds 4–14 have 60 sts.
- Shells sit on sc and sc sit in shell centers, so the scallops are clearly staggered.
- The top band has 40 sc in each of its 3 rounds.
- The tab starts at the join seam, at the back of the holder.
- The ring is fully covered, with no plastic or wood showing.
- The bottom trim has 30 sl sts and the opening doesn’t ruffle.
- Body height is 12.25 in (31.1 cm); overall length is 17 in (43.2 cm).
- All ends are woven in on the inside.
Troubleshooting
The shells lean or spiral. You probably worked the first sc into the wrong dc. Recount the slip stitches: 2 for 3-dc shells, 3 for 5-dc shells.
A round has too many or too few shells. Count the sc, not the dc. Every shell round should have 10 sc. Rip back to the round where the count changed.
The bottom opening is too tight for bags. Your foundation chain may be tight. Start again and use a hook one size larger for the chain only.
The bottom opening is too loose. Work the bottom trim with a smaller hook, or add a second round of sl sts.
The top flares instead of curving in. Your sc band may be too loose. Work Rnds 17–19 with a 4.5 mm hook.
The ring shows through. Add sc around the ring in pairs and pack them tightly.
The holder sags when full. Cotton relaxes over time. Crochet at a tighter gauge, or don’t stuff it beyond the widest round.
Care
Machine wash cold on a gentle cycle in a laundry bag, or hand wash. Reshape it while damp, then lay it flat or hang it to dry.
Final Notes
Here is how the measurements build. The 30-stitch opening is about 4.3 in (10.9 cm) flat. It grows to 40 stitches, then to 60 stitches at 8.75 in (22.2 cm) wide. Ten full-width rounds bring the body to 10 in (25.4 cm). Two rounds of smaller shells narrow it back to 40 stitches at 11.5 in (29.2 cm). Three sc rounds finish the body at 12.25 in (31.1 cm). The 1.5 in (3.8 cm) tab plus the 3.25 in (8.3 cm) ring bring the total length to 17 in (43.2 cm).
If your gauge matches at the first checkpoint, every other number should follow. Hang it on a cabinet hook, fill it with bags and enjoy a tidier kitchen.
Happy crocheting!