

The Starlight Lattice Curtain is a pair of airy tab-top panels made from hollow six-pointed star outlines. Short corded chains join each star to its neighbors, so the finished curtain reads as an open lattice. Daylight pours through, but the window still looks framed.
Everything is worked in a single soft denim blue. The style is calm and graphic, a little Scandinavian: one color, one motif, lots of negative space. A solid single crochet header with six tabs slides straight onto a curtain rod.
This pattern uses US crochet terms. Each finished panel is about 25 in (63.5 cm) wide at the header. It is 80 in (203.2 cm) long from the top of the header to the lowest star point, plus the tabs.
The construction is simple and repetitive:
1. Make 60 star motifs per panel.
2. Join them into 5 vertical columns with corded chains.
3. Link the columns sideways with longer corded chains.
4. Work the header band across the top points of the first row of stars, then add the tabs.
Finished Size and Construction
- Finished panel size: about 25 in (63.5 cm) wide x 80 in (203.2 cm) long, plus tabs
- Skill level: Easy (simple stitches, large repetitive project)
- Terminology: US crochet terms
- Yarn weight: worsted (#4), cotton or cotton blend
- Hook: 5.0 mm (H-8)
- Number of pieces: 60 stars and 1 header per panel (120 stars for the pair)
- Layout per panel: 5 columns x 12 rows of stars
- Star size: 5 in (12.7 cm) point to point vertically, 4.3 in (10.9 cm) across the side points
- Lattice size before header: about 24 in (61.0 cm) wide x 76.5 in (194.3 cm) long
- Header depth: 3.5 in (8.9 cm), plus 5 in (12.7 cm) tabs folded into loops
Materials
Choose a smooth cotton in worsted weight, either mercerized or matte. Cotton holds the star points crisply, hangs straight, and washes well. Avoid very fuzzy yarns, which blur the open outline.
- Denim Blue: 700 g / 1,400 m for the pair (350 g / 700 m per panel). That is 7 balls of a 100 g / 200 m yarn.
These quantities include a margin of about 15% for gauge differences, joining tails, and swatching.
Tools:
- 5.0 mm (H-8) crochet hook
- Tapestry needle
- Stitch markers
- Scissors and measuring tape
- Rust-proof pins and a blocking mat
- Spray bottle with water (light spray starch is optional)
Abbreviations (US Terms)
- ch – chain
- sl st – slip stitch
- sc – single crochet
- sc3tog – single crochet 3 together: (insert hook in next st, yo, pull up a loop) 3 times, yo, pull through all 4 loops on hook
- st(s) – stitch(es)
- sp – space
- rep – repeat
- RS / WS – right side / wrong side
Corded chain: Ch the stated number and sl st into the target st. Then sl st back into each ch to the starting point. This doubles the chain into a firm cord that won’t stretch under the curtain’s weight.
Gauge and Checkpoints
Gauge: 16 sc and 16 rows = 4 in (10.2 cm) in sc rows.
Make and measure one star before you commit to 120 of them.
- Foundation ring: 60 ch. Each 5-ch edge is about 1.25 in (3.2 cm).
- After Rnd 1: about 4 in (10.2 cm) point to point.
- After Rnd 2 (finished star, blocked): 5 in (12.7 cm) point to point and 4.3 in (10.9 cm) across the side points. Straight across between the two mid-height valleys is about 2.9 in (7.4 cm).
If your star is too big, go down a hook size or work the foundation chain more firmly. If it is too small, go up a hook size. An error of just 0.25 in (0.6 cm) per star adds up to 3 in (7.6 cm) over a 12-star column, so this check matters.
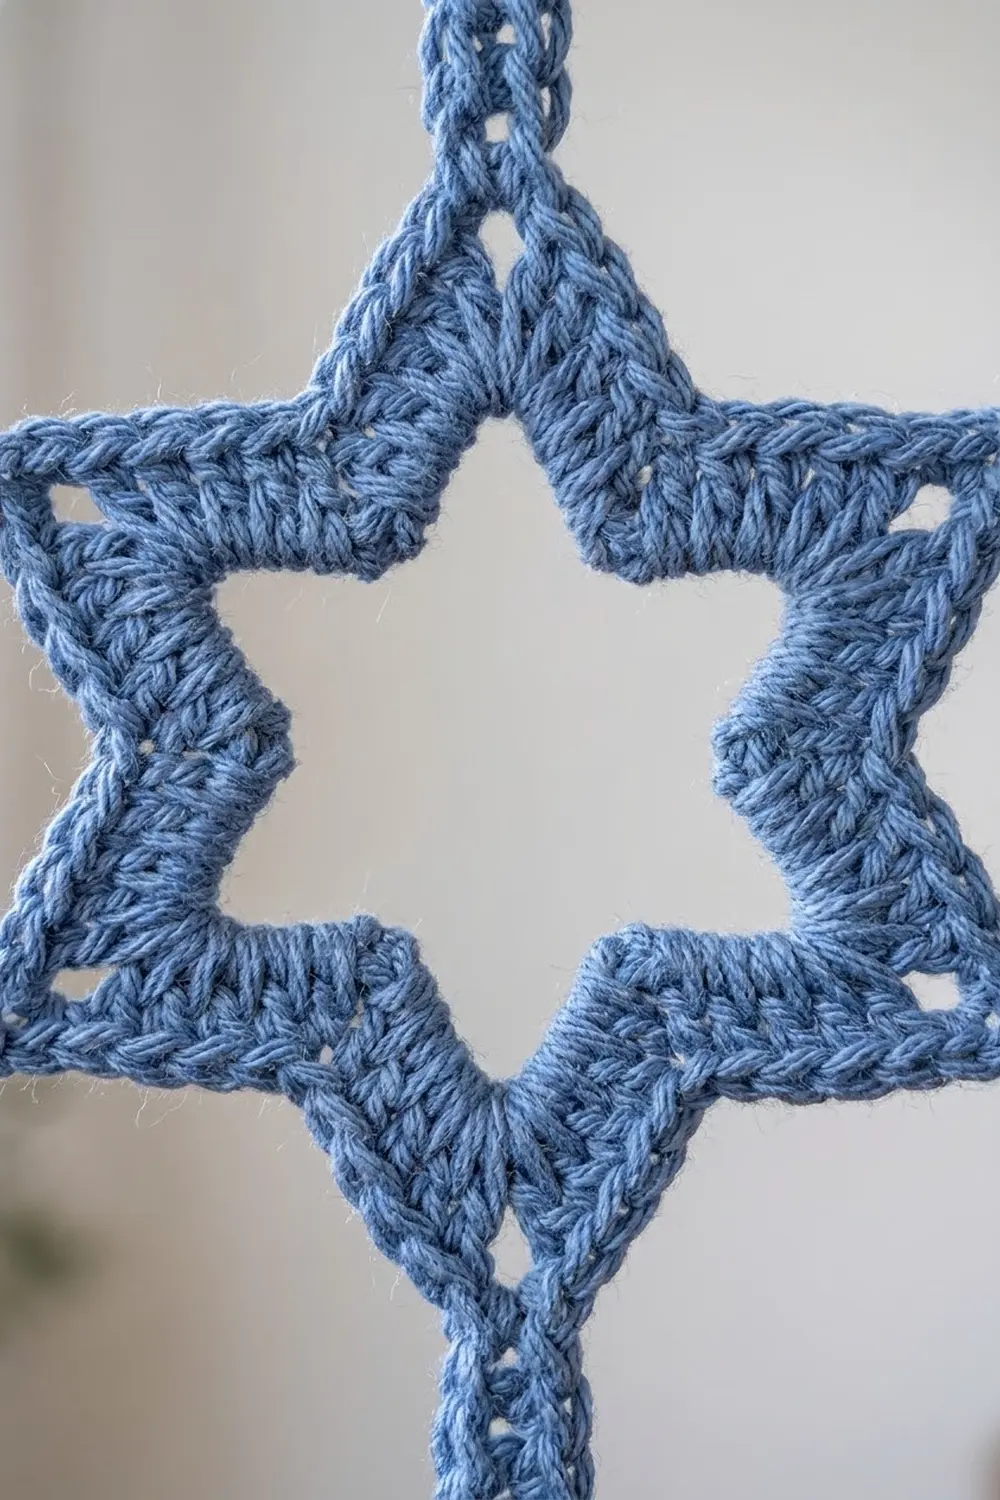
Star Motif (make 120)
The star is a hollow outline. A chain ring forms the base, and two rounds of sc shape it. Increases form the 6 outer points, and sc3tog decreases form the 6 inner valleys.
Foundation: Ch 60 and sl st to the first ch to form a ring, taking care not to twist.
Rnd 1: Ch 1 (does not count as a st), *sc in next 3 ch, (sc, ch 2, sc) in next ch, sc in next 3 ch, sc3tog over next 3 ch; rep from * 5 more times; join with sl st to first sc. (54 sts: 48 sc and 6 sc3tog, plus 6 ch-2 sps)
Each repeat uses exactly 10 ch (3 + 1 + 3 + 3), and 6 repeats x 10 = 60 ch. Each repeat makes 9 sts (3 + 2 + 3 + 1), and 6 x 9 = 54.
Rnd 2: Ch 1, skip first sc, sc in next 3 sc, (2 sc, ch 2, 2 sc) in ch-2 sp, sc in next 3 sc, *sc3tog over next 3 sts, sc in next 3 sc, (2 sc, ch 2, 2 sc) in ch-2 sp, sc in next 3 sc; rep from * 4 more times; sc3tog over last sc, last sc3tog, and the skipped first sc; join with sl st to first sc. Fasten off. (66 sts: 60 sc and 6 sc3tog, plus 6 ch-2 sps)
Each repeat now makes 11 sts (1 + 3 + 4 + 3). Each sc3tog sits centered on a Rnd 1 valley and keeps the inner corner sharp. The (2 sc, ch 2, 2 sc) clusters push the 6 points outward.
Weave in the ends on the WS. Lightly steam or spray-block each star flat, pinning the 6 points evenly, before you join. Blocked stars join much more neatly.
Orientation: Hold each star with one point straight up.
– The ch-2 sps at the top and bottom points are the vertical joining points.
– The mid-height valleys on the left and right are the horizontal joining points. On each side, this is the second sc3tog counting down from the top point.
Make All Pieces
All stars are worked in Denim Blue.
- Per panel: 60 stars (5 columns x 12 rows)
- For the pair: 120 stars
Here is the layout for one panel. Each S is a star, | is a vertical corded chain, and – is a horizontal corded chain:
Row 1:   S – S – S – S – S
         |   |   |   |   |
Row 2:   S – S – S – S – S
         |   |   |   |   |
 ...   (repeat to Row 12)
Row 12:  S – S – S – S – S
Row 1 sits at the top, under the header. Row 12 hangs free at the bottom.
Joining
The stars are linked with corded chains rather than sewn edge to edge. This keeps the lattice open and lets every star hang flat.
Vertical connectors (11 per column, 55 per panel):
1. Place the upper star’s bottom point facing the lower star’s top point.
2. Join yarn with sl st in the ch-2 sp of the upper star’s bottom point.
3. Ch 6, then sl st in the ch-2 sp of the lower star’s top point.
4. Sl st in each of the 6 ch back up, then sl st in the starting ch-2 sp. Fasten off.
The cord measures 1.5 in (3.8 cm). Join all 5 columns of 12 stars first. Each column measures 12 x 5 in + 11 x 1.5 in = 76.5 in (194.3 cm).
Horizontal connectors (4 per row, 48 per panel):
1. Lay the 5 columns side by side.
2. Join yarn with sl st in the right mid-height valley sc3tog of a star.
3. Ch 8, then sl st in the left mid-height valley sc3tog of the matching star in the next column.
4. Sl st in each of the 8 ch back, then sl st in the starting sc3tog. Fasten off.
The cord measures 2 in (5.1 cm).
Stitch-to-stitch logic: Every connector attaches to one defined stitch or space only: a point ch-2 sp or a valley sc3tog. That keeps the grid square. The pitch from one column to the next is about 2.9 in + 2 in = 4.9 in (12.4 cm). The side points of neighboring stars stay about 0.5 in (1.3 cm) apart.
Tension advice: Keep the return sl sts as loose as the chains. Tight sl sts shorten the cord and pull the stars out of line. Leave 6 in (15.2 cm) tails and weave each one into a star outline, never into a cord.
Size checkpoint: Lay the joined lattice flat. It should be about 24 in (61.0 cm) wide across the outermost side points (4 x 4.9 in + 4.3 in = 23.9 in). It should be 76.5 in (194.3 cm) long.
Header Band (Border)
You work the header directly across the top points of Row 1, then work the tabs up from it.
Header gauge: 16 sc and 16 rows = 4 in (10.2 cm). Each st is 0.25 in (0.6 cm) wide.
Row 1 (RS): Make a slip knot, ch 8, 4 sc in the top-point ch-2 sp of the first star in Row 1, *ch 16, 4 sc in the top-point ch-2 sp of the next star; rep from * 3 more times, ch 8. (100 sts: 20 sc and 80 ch)
The count is 8 + 5 x 4 + 4 x 16 + 8 = 100.
Row 2: Ch 1, turn, sc in each st across, working into every ch and every sc. End with sc in each of the 8 starting ch. (100 sc)
Rows 3–14: Ch 1, turn, sc in each st across. (100 sc)
The header now measures 25 in (63.5 cm) wide and 3.5 in (8.9 cm) deep. Fasten off.
Why the math works:
– Each star column owns one 20-st module (ch 8, 4 sc, ch 8). Neighboring modules share their chains as one ch 16.
– So 5 columns x 20 sts = 100 sts, and 100 sts ÷ 4 sts per in = 25 in (63.5 cm).
– Each module is 5 in (12.7 cm), only 0.1 in wider than the 4.9 in lattice pitch. That gives gentle ease without gathering.
– At each end, the 8 ch plus 2 of the 4 sc make 10 sts, or 2.5 in (6.4 cm). That is just more than the outer star’s half-width of about 2.2 in (5.6 cm).
Tabs (make 6 per panel): With RS facing, divide the 100 sts of Row 14 into 6 tabs of 10 sts and 5 gaps of 8 sts: 6 x 10 + 5 x 8 = 60 + 40 = 100.
- Tab Row 1: Join yarn in the first st of the tab position, ch 1, sc in same st and next 9 sts. (10 sc)
- Tab Rows 2–20: Ch 1, turn, sc in each st. (10 sc)
Fasten off with a 12 in (30.5 cm) tail. Skip 8 sts of Row 14 and work the next tab. The tabs sit at sts 1–10, 19–28, 37–46, 55–64, 73–82, and 91–100.
Each tab is 2.5 in (6.4 cm) wide and 5 in (12.7 cm) long. Fold each tab to the WS and whipstitch its last row across Row 12 of the header. The loop fits rods up to 1.5 in (3.8 cm) in diameter.
Final Blocking
- Weave in any remaining ends along star outlines or inside the header.
- Lay the panel flat on clean towels or a large mat. If space is short, work one section at a time.
- Spray the stars and cords until damp but not soaked.
- Pin the header straight to 25 in (63.5 cm) wide.
- Pin each column straight below its header module. Each star should be 5 in (12.7 cm) point to point, and each vertical cord 1.5 in (3.8 cm).
- Check that each row of stars sits level, with horizontal cords at 2 in (5.1 cm).
- For crisper points, apply light spray starch to the stars.
- Let the panel dry completely, then hang it. Gravity finishes the blocking within a day.
Final Quality-Control Checklist
- Every star has 66 sts plus 6 ch-2 sps in Rnd 2.
- All 6 points are sharp and all 6 valleys are crisp.
- Each panel has 60 stars in 5 columns x 12 rows.
- Each panel has 55 vertical cords of 1.5 in (3.8 cm) and 48 horizontal cords of 2 in (5.1 cm).
- The header has 100 sts in every row and measures 25 in x 3.5 in (63.5 cm x 8.9 cm).
- There are 6 tabs of 10 sts with 8-st gaps, all sewn at the same depth.
- The two panels match in length within 0.5 in (1.3 cm).
Troubleshooting
Star cups or ripples: Your sc3tog decreases are too tight or your point clusters are too loose. Block firmly and check your counts: 54 sts in Rnd 1, 66 in Rnd 2.
Points look rounded: Make sure the ch-2 sps are worked as written. Spray starch helps.
Lattice leans sideways: A horizontal cord is attached to the wrong valley. Check that it uses the second valley down from the top point.
Panel grows longer after hanging: The return sl sts on the vertical cords were too loose. Cotton relaxes slightly. Reblock, or redo the worst cords as ch 5.
Header much wider than the lattice: About 1 in (2.5 cm) of ease is intentional. If yours is wider, rework the header with a hook one size smaller, keeping all 100 sts.
Panels differ in length: Measure all the columns before you attach the header, and replace any cord that is too short or too long.
Care
Hand wash in cool water, or machine wash on a gentle cycle in a mesh bag. Lay flat to dry and reblock, and don’t hang the curtain while it’s wet, because the weight will stretch the cords.
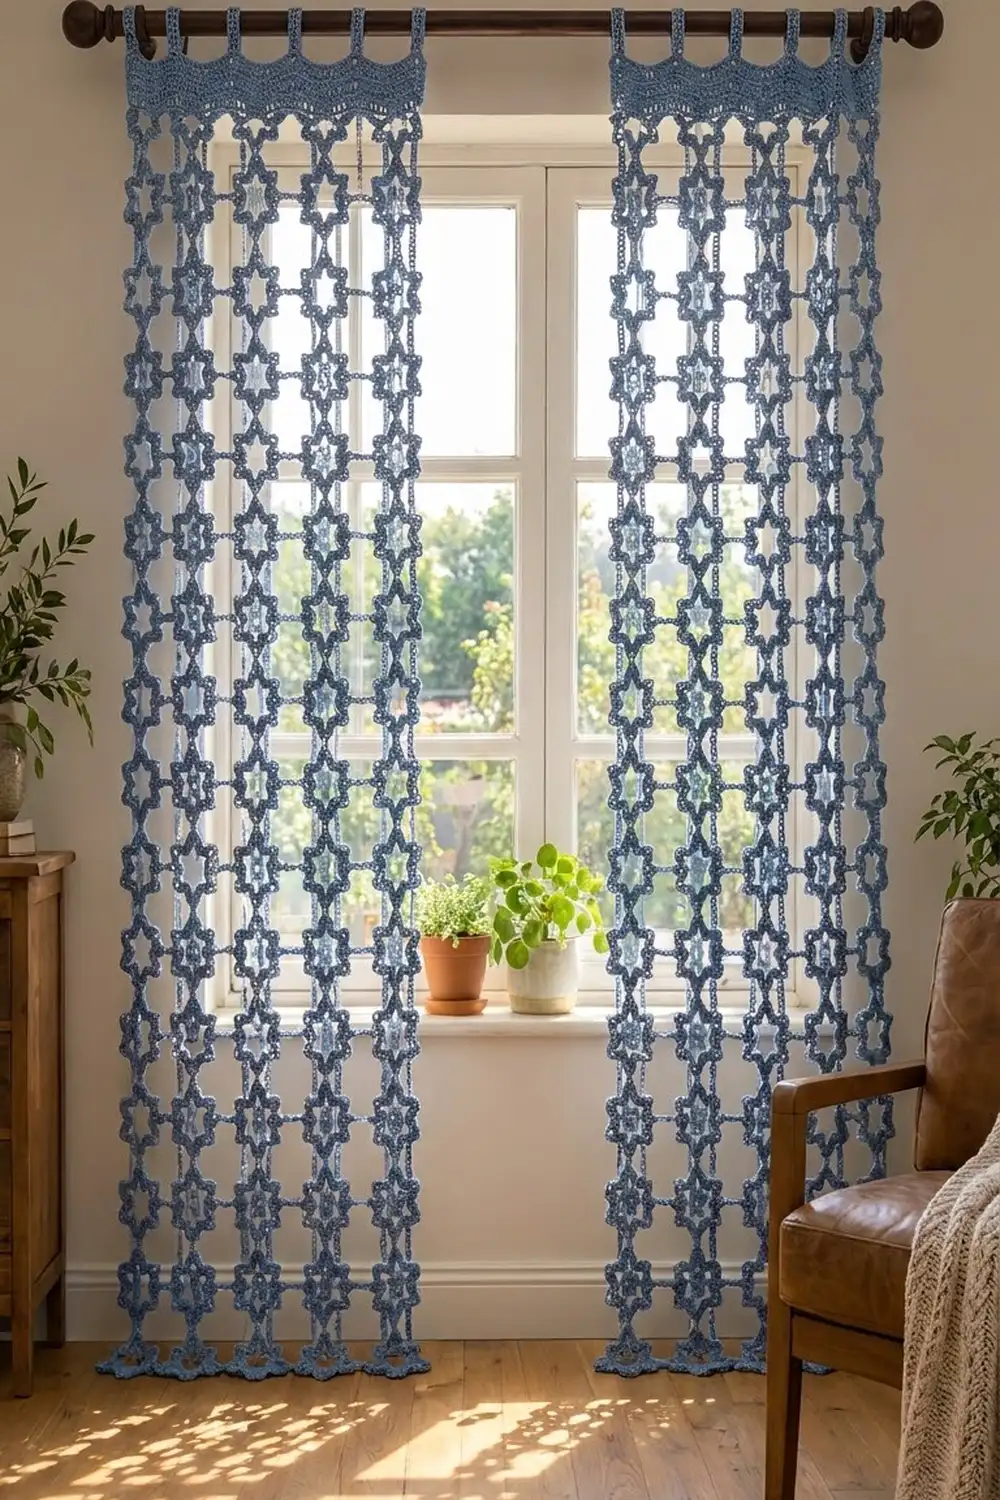
Final Notes
The whole curtain depends on one chain of measurements:
– A 60-ch ring makes a 5 in (12.7 cm) star.
– Twelve stars plus eleven 1.5 in (3.8 cm) cords make a 76.5 in (194.3 cm) column.
– Five columns joined with 2 in (5.1 cm) cords make a 24 in (61.0 cm) lattice.
– Five 20-st modules make a 100-st header, 25 in (63.5 cm) wide. That brings the panel to 80 in (203.2 cm) before the tabs.
Check your first star, and every later number falls into place.
Happy crocheting!