

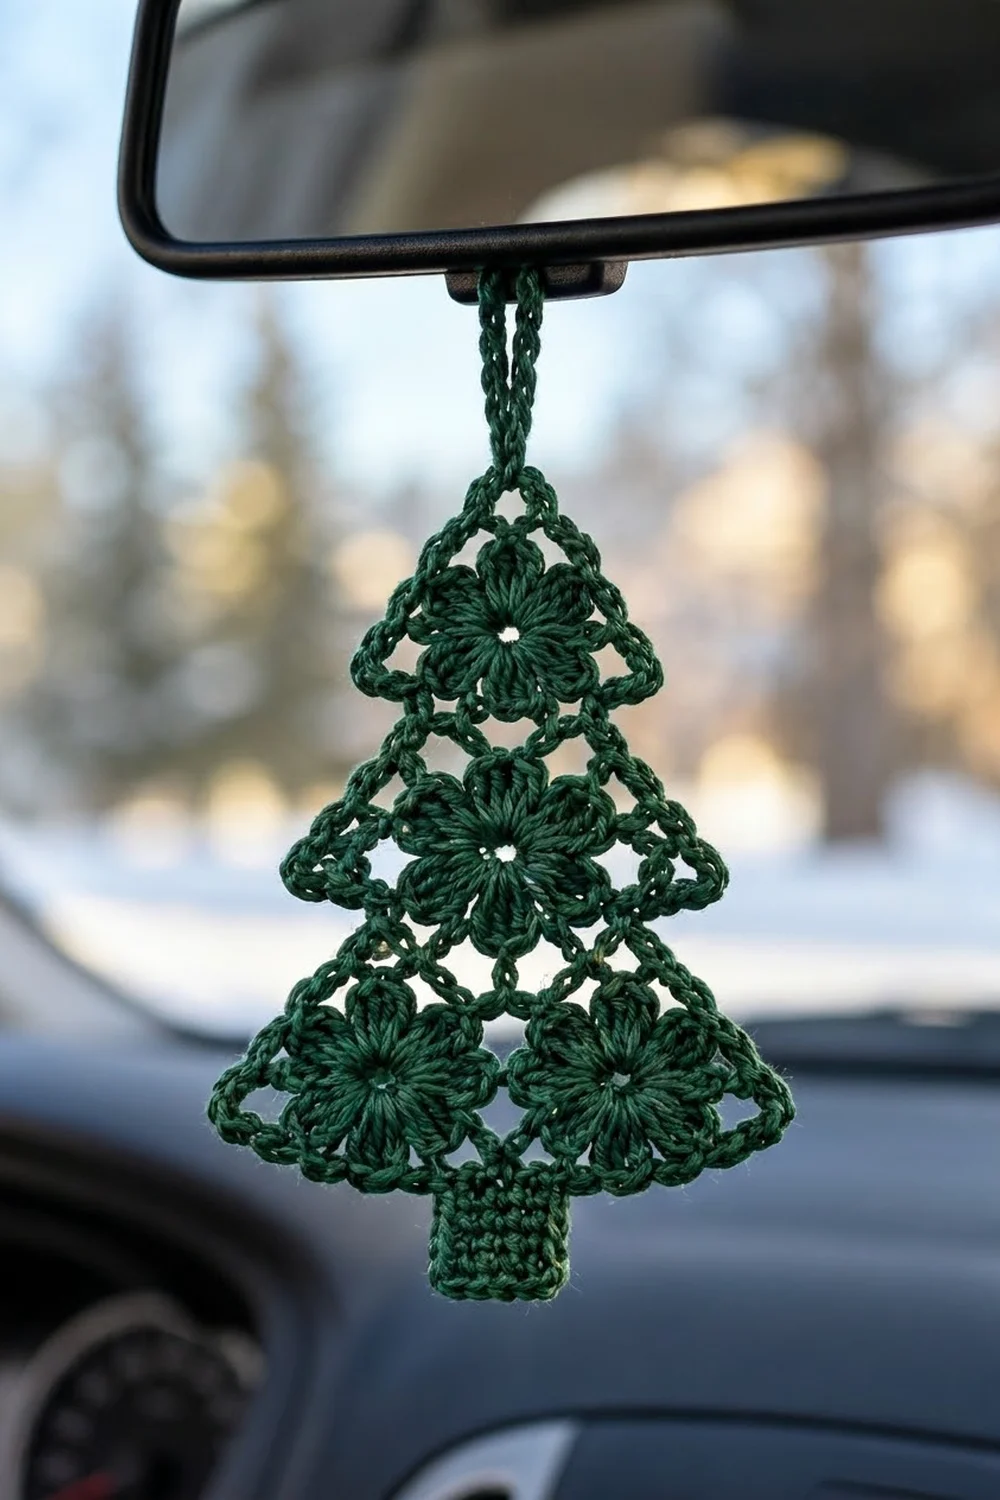
This little lace tree is made to hang from a rearview mirror, a window latch or a branch of your real tree. Four small flowers are stacked into a classic pyramid, and an open chain frame wraps around them to draw a three-tier tree shape with crisp points.
The ornament uses a single color, a deep forest green, in fine mercerized cotton. The cotton shows each stitch clearly, holds its shape after blocking and doesn’t fuzz when it swings in the car.
The pattern is written in US crochet terms. The finished tree measures about 3.5 in (8.9 cm) wide and 4.5 in (11.4 cm) tall including the trunk, plus a hanging loop that drops about 2 in (5.1 cm).
Construction is simple and has no seams. You make four flowers, joining each new one to the earlier ones as you go. Then you work two frame rounds around the whole group, add a small trunk in rows and finish with a chain hanging loop.
Finished Size and Construction
- Finished size: about 3.5 in (8.9 cm) wide x 4.5 in (11.4 cm) tall, plus a 2 in (5.1 cm) hanging loop
- Skill level: Intermediate (join-as-you-go, working into petal tips)
- Terminology: US crochet terms
- Yarn weight: Super fine (#1) fingering-weight mercerized cotton
- Hook: 2.25 mm (US B-1)
- Number of pieces: 1 ornament. The four flowers are joined as you go, so there is no sewing.
- Layout: 1 flower on top, 1 in the middle, 2 side by side at the bottom
- Single flower size: 1.25 in (3.2 cm) across the petal tips
- Size before frame: about 3 in (7.6 cm) wide x 3.4 in (8.6 cm) tall
- Frame depth: about 0.25 in (0.6 cm) on the sides, more at the tier points
Materials
Choose a smooth, tightly twisted fingering-weight cotton or a size 3 crochet thread. Mercerized cotton is ideal because it blocks sharply and stays crisp. Avoid fuzzy or very stretchy yarns, which blur the lace and let the points droop.
- Forest green: 10 g, about 34 m (37 yd)
Tools:
- 2.25 mm (US B-1) crochet hook
- Tapestry needle
- Rust-proof pins and a foam blocking mat
- Spray bottle with water
- Small scissors
- Ruler or tape measure
The yarn amount includes a comfortable margin for a gauge swatch and weaving in ends. The ornament itself uses about 6 g.
Abbreviations (US Terms)
- ch = chain
- sl st = slip stitch
- sc = single crochet
- dc = double crochet
- st(s) = stitch(es)
- sp = space
- RS = right side
- P = petal (P1 to P8, numbered in the order you work them)
Shell: 5 dc in the same st. The 3rd dc of each shell is the petal tip.
Drop-loop join:
1. Make the 3rd dc of a shell, then take the hook out of the loop.
2. Insert the hook from front to back through the top of the matching petal tip on the neighboring flower.
3. Pick up the dropped loop and pull it through.
4. Continue with the 4th dc.
This join adds no stitches.
Gauge and Checkpoints
- 8 sc and 9 rows = 1 in (2.5 cm)
- About 8 relaxed ch = 1 in (2.5 cm)
- One flower = 1.25 in (3.2 cm) across the petal tips
Make one flower first and measure it before going on. Checkpoints:
- Flower Rnd 1: 0.6 in (1.5 cm) across
- Flower Rnd 2: 1.25 in (3.2 cm) across the petal tips
- Four flowers joined: 3 in (7.6 cm) wide x 3.4 in (8.6 cm) tall
- After frame Rnd 2: 3.5 in (8.9 cm) wide x 3.75 in (9.5 cm) tall
- With trunk: 4.5 in (11.4 cm) tall
If your flower is bigger than 1.25 in (3.2 cm), go down to a 2.0 mm hook. If it’s smaller, go up to a 2.5 mm hook. Being off by 0.125 in (0.3 cm) per flower adds up to about 0.5 in (1.3 cm) across the finished tree, so it’s worth checking.
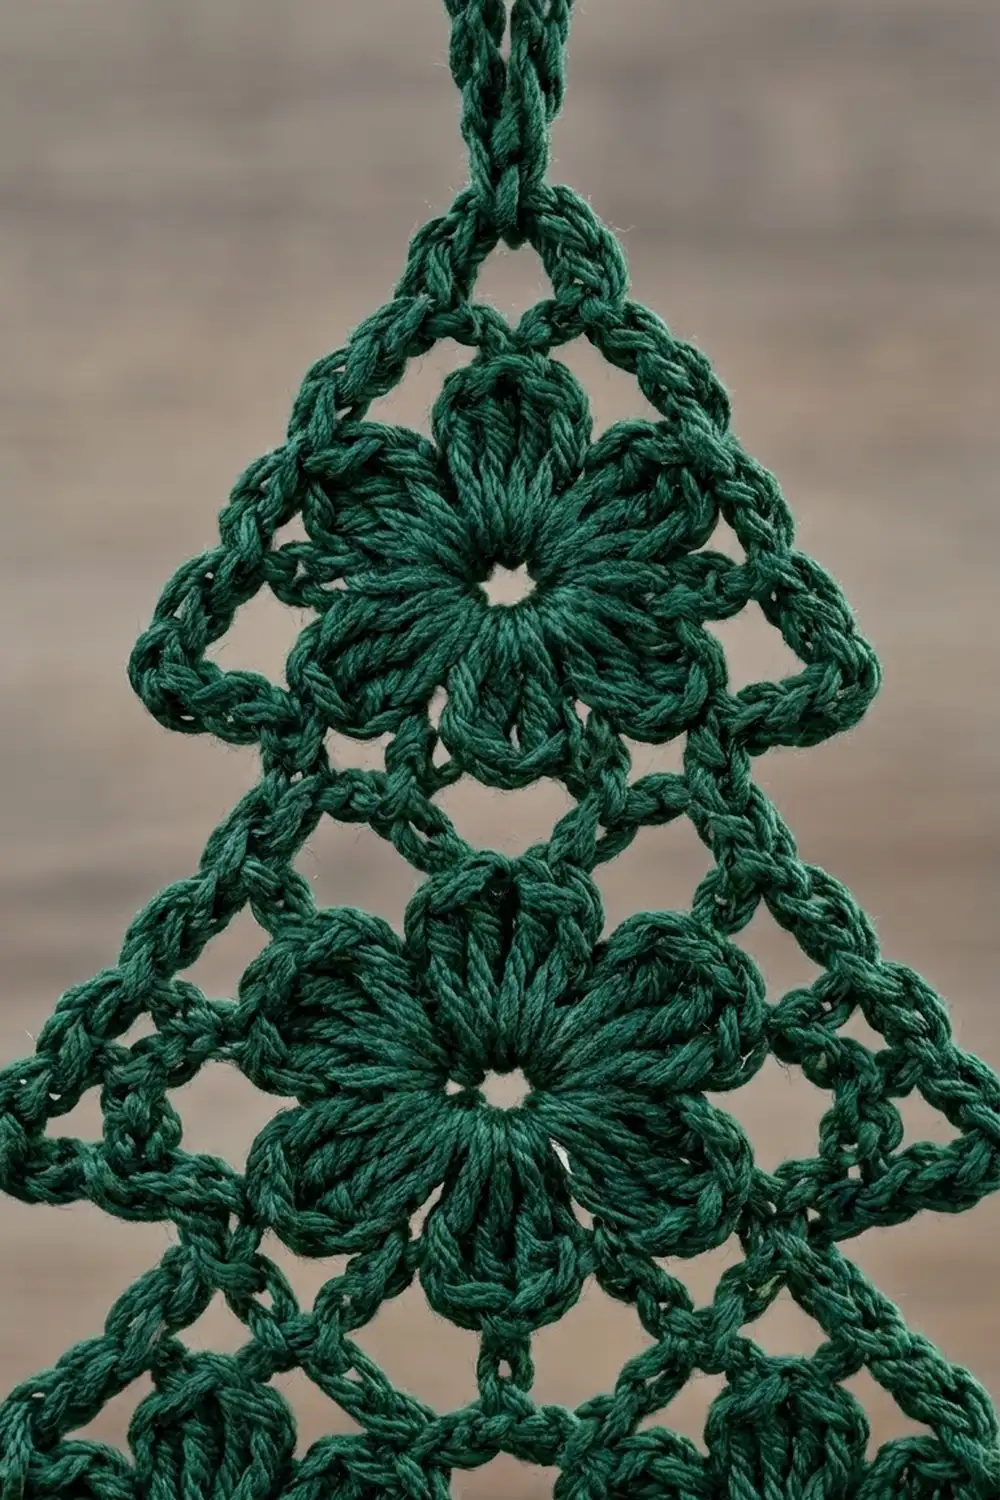
Flower Motif (Make 4)
Flower 1 (Top)
Make a magic ring.
Rnd 1: Ch 3 (counts as dc), 15 dc in ring, sl st to top of ch-3. Pull the ring closed, but leave a small open center. (16 dc)
Rnd 2: Ch 1, sc in same st as join, shell in next st, sc in next st, shell in next st; repeat from * 6 more times, sl st to first sc. (8 shells, 8 sc, 48 sts)*
Fasten off and weave in the ends.
Lay the flower RS up with a petal at the top. Name the petals by clock position: 12, 1:30, 3, 4:30, 6, 7:30, 9 and 10:30. Use these positions for all joins and for the frame.
Flower 2 (Middle)
Work Rnd 1 as for Flower 1.
Rnd 2 (joining): Ch 1, sc in same st as join. For P1, work 3 dc in next st, drop-loop join to the 6 o’clock tip of Flower 1, then 2 dc in the same st. Complete the round as for Flower 1. (48 sts)
P1 is now Flower 2’s 12 o’clock petal. Because you work counterclockwise, P4 sits at 7:30 and P6 at 4:30. Leave both free for now. Fasten off.
Flower 3 (Bottom Left)
Work Rnd 1 as before.
Rnd 2 (joining): Ch 1, sc in same st as join. For P1, work 3 dc in next st, drop-loop join to the 7:30 tip of Flower 2, then 2 dc in the same st. Complete the round as normal. (48 sts)
Flower 3’s P1 sits at 1:30. Its last petal, P8, is at 3 o’clock. Fasten off.
Flower 4 (Bottom Right)
Work Rnd 1 as before.
Rnd 2 (joining): Ch 1, sc in same st as join.
- P1: 3 dc in next st, drop-loop join to the 4:30 tip of Flower 2, 2 dc in the same st. P1 sits at 10:30.
- P2 (bridge): Sc in next st, 3 dc in next st, ch 2, sl st in the 3 o’clock tip of Flower 3, ch 2, sl st in top of the dc just made, 2 dc in the same st. P2 sits at 9 o’clock.
- Complete the round as normal and fasten off. (48 sts; the bridge ch and sl sts are not counted)
Checkpoint: The joined group should measure 3 in (7.6 cm) wide x 3.4 in (8.6 cm) tall. The bridge spans the 0.5 in (1.3 cm) gap between the two bottom flowers.
Tip Map for the Frame
Lay the group RS up. The frame attaches only to these free petal tips (F1 to F4 = Flowers 1 to 4):
- F1: 12 (apex), 10:30, 9, 7:30, 4:30, 3, 1:30
- F2: 10:30, 9, 3, 1:30
- F3: 12, 10:30, 9, 7:30, 6, 4:30
- F4: 7:30, 6, 4:30, 3, 1:30, 12
Frame (Border)
The frame has two rounds. Rnd 1 is a chain mesh that builds the stepped tree shape. Rnd 2 is a solid sc edge that firms it up.
Border gauge: 8 sc = 1 in (2.5 cm). You work 1 sc for every chain of Rnd 1, which keeps the edge flat.
Frame Rnd 1
With RS facing, join the yarn with sc in the 12 o’clock tip of F1. Then work down the left side:
- Ch 3, sc in the same tip (apex).
- Ch 4, sc in F1 10:30.
- Ch 4, sc in F1 9.
- Ch 4, (sc, ch 5, sc) in F1 7:30 (tier 1 point).
- Ch 2, sc in F2 10:30.
- Ch 4, (sc, ch 7, sc) in F2 9 (tier 2 point).
- Ch 3, sc in F3 12.
- Ch 4, sc in F3 10:30.
- Ch 4, sc in F3 9.
- Ch 4, (sc, ch 5, sc) in F3 7:30 (tier 3 point).
- Ch 4, sc in F3 6.
- Ch 4, sc in F3 4:30.
Next, cross the bottom:
- Ch 8, sc in F4 7:30 (trunk base).
Then go up the right side:
- Ch 4, sc in F4 6.
- Ch 4, (sc, ch 5, sc) in F4 4:30 (tier 3 point).
- Ch 4, sc in F4 3.
- Ch 4, sc in F4 1:30.
- Ch 4, sc in F4 12.
- Ch 3, (sc, ch 7, sc) in F2 3 (tier 2 point).
- Ch 4, sc in F2 1:30.
- Ch 2, (sc, ch 5, sc) in F1 4:30 (tier 1 point).
- Ch 4, sc in F1 3.
- Ch 4, sc in F1 1:30.
- Ch 4, sl st to first sc.
Count: 30 sc, 23 connecting ch-sps (90 ch) and 7 point loops (37 ch).
The short ch-2 and ch-3 spans pull the edge in at the notches between tiers. The longer ch-5 and ch-7 loops push the points out. Together they create the stepped tree shape.
Frame Rnd 2
Ch 1, sc in first sc. Work (2 sc, ch 3, 2 sc) in the apex ch-3 sp, then sc in next sc.
Continue around:
- Sc in each sc.
- Work 1 sc per chain in each connecting sp: 4 sc in each ch-4 sp, 3 sc in each ch-3 sp, 2 sc in each ch-2 sp and 8 sc in the bottom ch-8 sp.
- Work (3 sc, ch 2, 3 sc) in each ch-5 point loop.
- Work (4 sc, ch 2, 4 sc) in each ch-7 point loop.
Sl st to first sc to join. Fasten off.
Counts:
- Each side, from apex to bottom ch-8: 14 sc over Rnd 1 sc + 41 sc in connecting sps + 20 sc in point loops = 75 sc
- Apex: 2 sc over Rnd 1 sc + 4 sc in the loop = 6 sc, plus a ch-3 sp
- Bottom: 8 sc
- Total: 75 + 75 + 6 + 8 = 164 sc, plus 1 ch-3 sp and 6 ch-2 point sps
Why the math works:
– One sc per chain matches the chain gauge (8 ch = 1 in) to the sc gauge (8 sc = 1 in), so the edge neither ruffles nor cups.
– Each point gets 1 more sc than it has chains (6 sc over 5 ch, 8 sc over 7 ch), plus a ch-2 that turns the corner sharply.
– Both sides use the same counts, so the tree stays symmetrical.
Checkpoint: 3.5 in (8.9 cm) across the bottom points and 3.75 in (9.5 cm) tall.
Trunk
With RS facing, skip the first sc of the 8 sc along the bottom edge. Join yarn in the 2nd sc.
Row 1: Ch 1, sc in same st and in next 5 sc, turn. (6 sc)
Rows 2-7: Ch 1, sc in each st across, turn. (6 sc)
This leaves 1 sc unworked on each side of the trunk, so it sits centered. Fasten off.
Checkpoint: The trunk measures 0.75 in (1.9 cm) wide x 0.75 in (1.9 cm) tall.
Hanging Loop
Join yarn with sl st in the apex ch-3 sp. Ch 32, then sl st in the same ch-3 sp to form the loop.
Sl st in the back bump of each of the 32 ch to make a firm cord, then sl st in the ch-3 sp again. Fasten off.
The loop is about 4 in (10.2 cm) around and hangs about 2 in (5.1 cm).
Final Blocking
- Weave in all ends along the frame chains or the backs of the flowers, then trim.
- Soak the ornament in cool water for 10 minutes, then roll it in a towel to press out the extra water.
- Lay it RS up on the blocking mat.
- Pin the apex and the two tier 3 points first, aiming for 3.5 in (8.9 cm) across the bottom.
- Pin the tier 2 points about 2.25 in (5.7 cm) apart and the tier 1 points about 1.75 in (4.4 cm) apart.
- Pin the notches between tiers slightly inward so the steps show clearly.
- Pin the trunk square to 0.75 in (1.9 cm), and pin the open centers of the flowers round.
- Let it dry completely. For extra stiffness, mist it with diluted fabric stiffener before it dries.
Final Quality-Control Checklist
- Each flower has 8 petals and 48 sts.
- All four drop-loop joins and the bridge are secure.
- Frame Rnd 2 has 75 sc on each side.
- The left and right tier points mirror each other.
- The trunk is 6 sc wide and centered.
- The ornament measures 3.5 in (8.9 cm) x 4.5 in (11.4 cm).
- The hanging loop is firm and centered at the apex.
- No ends show on the RS.
Troubleshooting
The petals cup or ruffle: Check that Rnd 1 has exactly 16 dc. If the count is right, your dc may be too tall, so try a smaller hook.
The frame pulls tight and the flowers buckle: Your chains are too tight. Work Rnd 1 more loosely, or go up 0.25 mm for that round only.
The frame edge waves: Your chains are loose compared with your sc. Work Rnd 2 a little more firmly.
The tier points are rounded: Make sure you worked the ch-2 at the center of each point loop. Then re-block, pinning right through that ch-2.
The trunk is off-center: Count the 8 bottom sc again and start the trunk in the 2nd one.
The tree twists while hanging: Block it again, and make sure the hanging loop starts in the exact center of the apex ch-3 sp.
Care
Hand wash in cool water with mild soap and lay flat to dry, re-pinning the points if needed. Don’t leave it on the dashboard in strong summer sun for long, or the color may fade.
Final Notes
The measurements build up step by step. Each flower is 1.25 in (3.2 cm), and the four joined flowers measure 3 in (7.6 cm) x 3.4 in (8.6 cm). The frame takes the tree to 3.5 in (8.9 cm) x 3.75 in (9.5 cm), and the trunk brings it to 4.5 in (11.4 cm) tall, with a 2 in (5.1 cm) hanging loop above. If you check your first flower, keep the frame chains relaxed and block the points firmly, every tree you make will match.
Happy crocheting!