

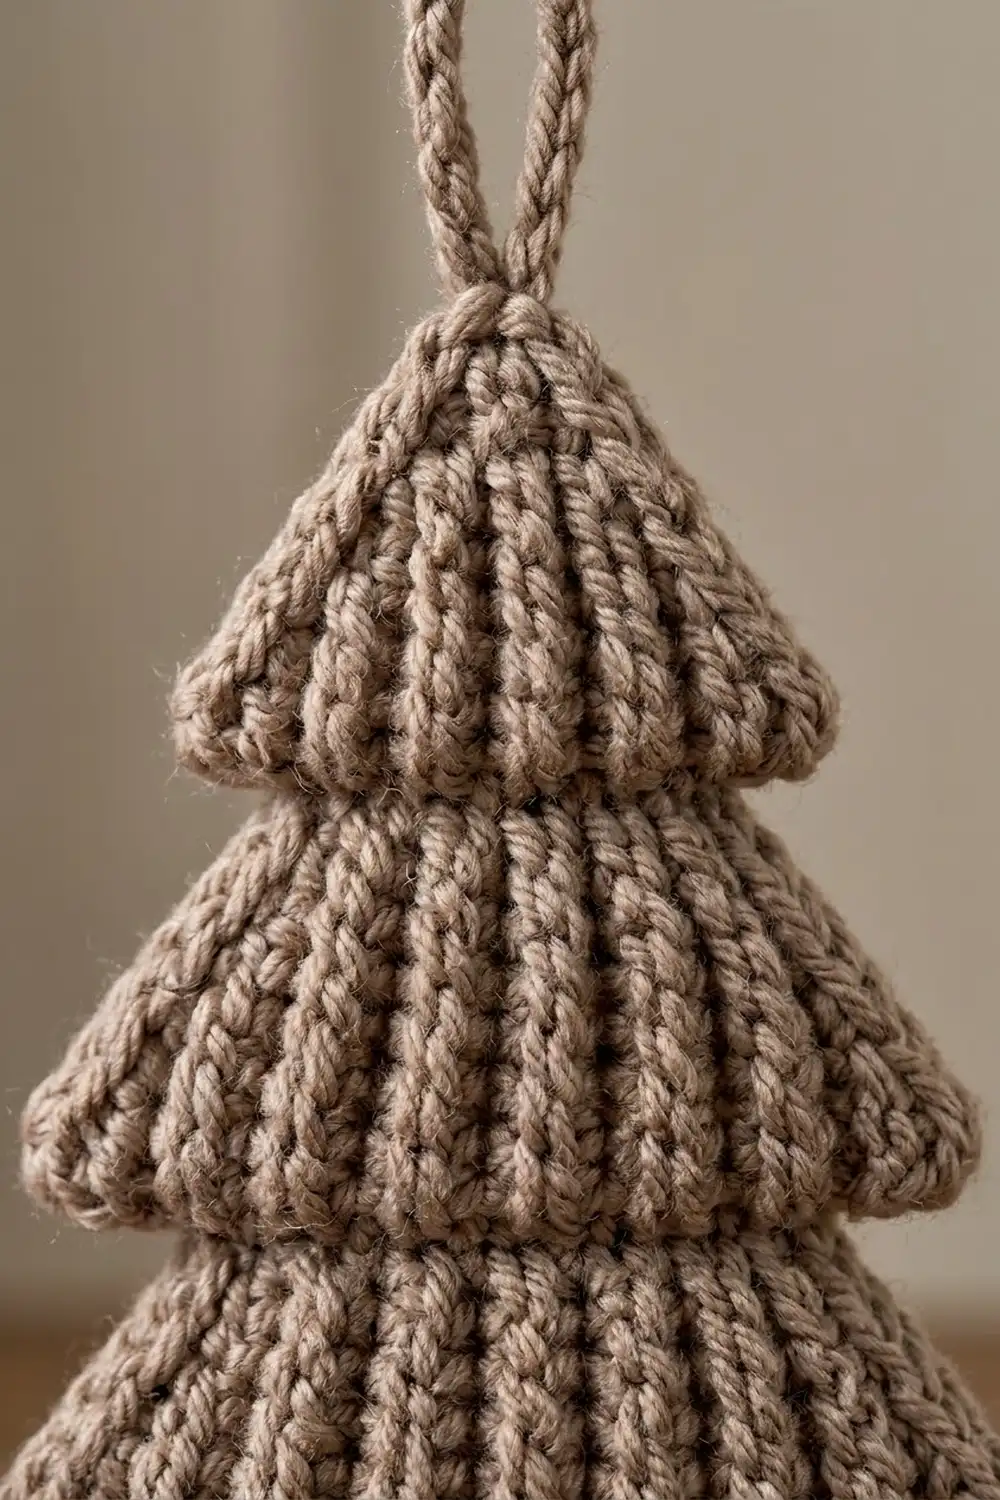
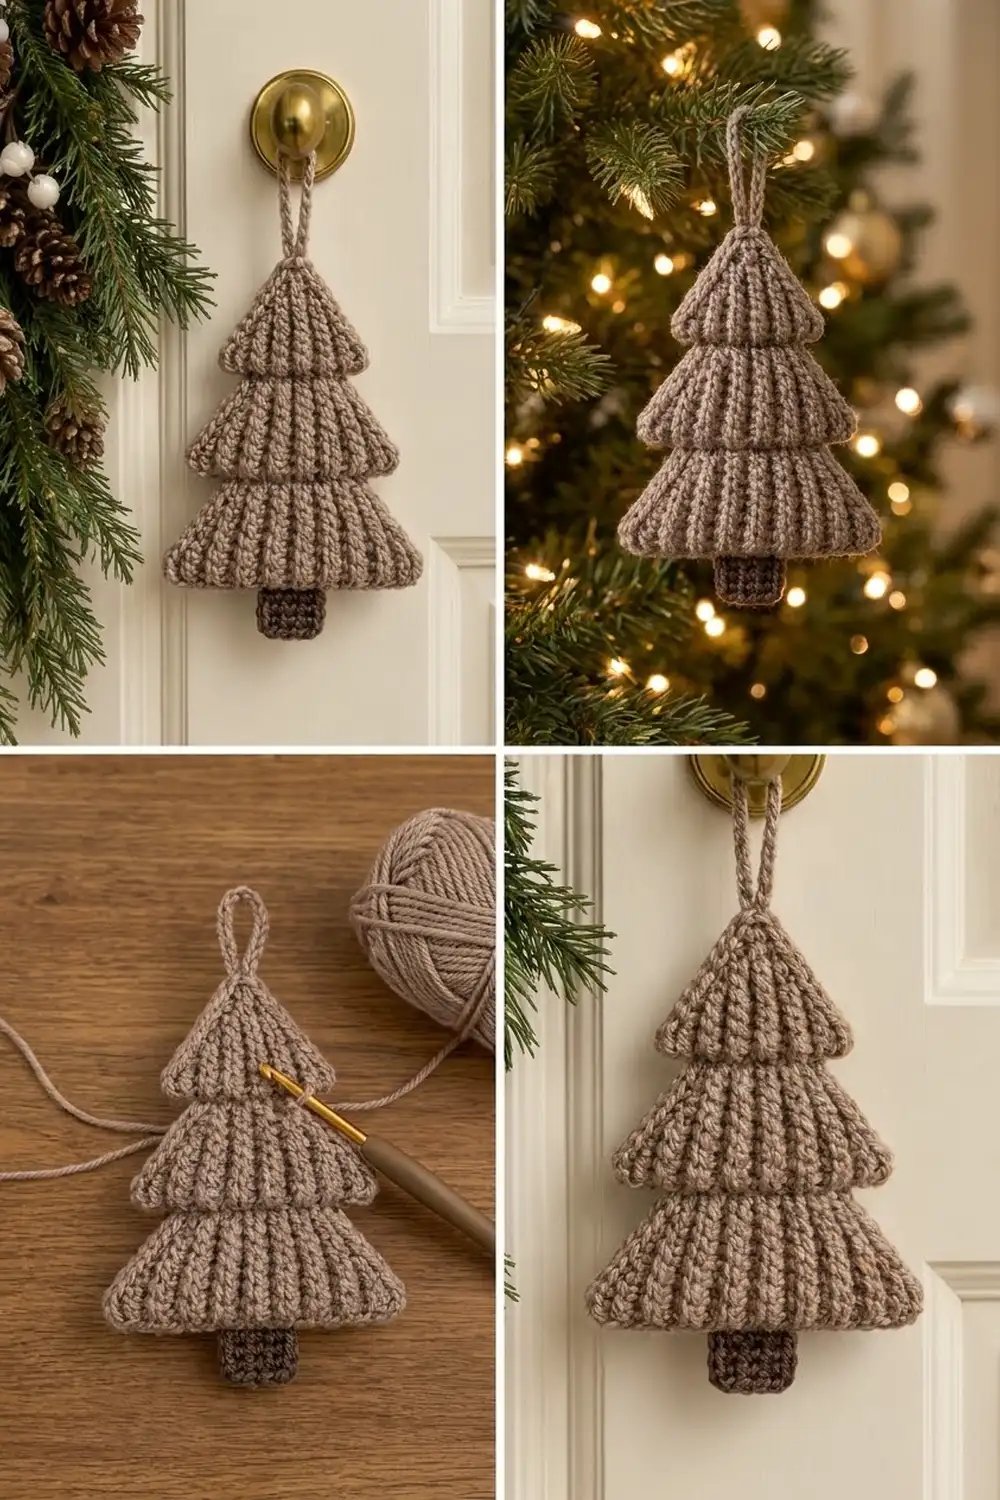
This small tree ornament has a soft, sculpted look. It has three stacked tiers covered in fine vertical ribs, and each tier finishes with a rounded rim that sits slightly over the tier below. A short dark brown trunk anchors the bottom. A firm taupe loop at the top lets it hang from a doorknob, a branch, or a gift.
The palette is quiet and natural: a warm mushroom taupe for the tree and loop, with a deep chocolate brown for the trunk. It suits rustic, Scandinavian, or neutral holiday decor. The pattern uses US crochet terms throughout.
The finished ornament measures about 4.25 in (10.8 cm) wide and 6.25 in (15.9 cm) tall, not counting the loop. With the loop it is about 8.25 in (21.0 cm) tall.
The tree is one flat piece worked top-down in rows, starting at the point. Each tier is ribbed with front post and back post half double crochet. It ends with a single crochet rim row and then steps in with decreases to start the next tier. The trunk is worked straight down from the center of the last rim row. A single-crochet border goes around the taupe outline, and the hanging loop goes on last.
Finished Size and Construction
- Finished size: 4.25 in (10.8 cm) wide x 6.25 in (15.9 cm) tall, plus a 2 in (5.1 cm) loop
- Skill level: Easy-intermediate (post stitches, simple decreases)
- Terminology: US crochet terms
- Yarn weight: Worsted (Category 4)
- Hook: 4.0 mm (US G-6)
- Number of pieces: 1 (a single flat ornament worked in one piece)
- Layout: 3 stacked tiers plus a trunk, worked top to bottom
- Piece size before border: 3.75 in (9.5 cm) wide x 6 in (15.2 cm) tall
- Border depth: 1 round of sc, about 0.25 in (0.6 cm)
Materials
Choose a smooth, plied worsted yarn with good stitch definition. Acrylic, wool, or a wool blend all work well. Fuzzy or loosely plied yarn hides the ribs, so avoid it for this design. Matte yarns give the soft, natural look shown here.
- Color A, Taupe (mushroom beige): 15 g, about 30 m, for the tiers, border, and loop
- Color B, Dark Brown: 3 g, about 6 m, for the trunk
These quantities include a margin of about 25 percent for gauge testing and tails. One ornament uses less than listed.
Tools:
- 4.0 mm (US G-6) crochet hook
- Tapestry needle
- Scissors
- Stitch markers (2)
- Ruler or tape measure
- Pins and a blocking mat or folded towel
- Spray bottle with water
Abbreviations (US Terms)
- ch: chain
- sl st: slip stitch
- sc: single crochet
- hdc: half double crochet
- st(s): stitch(es)
- RS / WS: right side / wrong side
- FPhdc: front post half double crochet. Yarn over, insert the hook from front to back to front around the post of the stitch below, yarn over and pull up a loop, then yarn over and pull through all 3 loops.
- BPhdc: back post half double crochet. Work it like FPhdc, but insert the hook from back to front to back around the post.
- hdc2tog: (yarn over, insert the hook in the next st, yarn over and pull up a loop) twice, then yarn over and pull through all 5 loops.
- hdc3tog: (yarn over, insert the hook in the next st, yarn over and pull up a loop) 3 times, then yarn over and pull through all 7 loops.
Special technique (rib pattern): Work FPhdc on RS rows and BPhdc on WS rows. A back post worked from the WS pushes the post toward the RS. That way every post column stands up on the front as a vertical rib.
Turning chains: The ch 1 at the start of every row does not count as a stitch.
Gauge and Checkpoints
Rib gauge: 16 sts and 12 rows = 4 in (10.2 cm) in the FPhdc/BPhdc rib pattern. One hdc row is about 1/3 in (0.8 cm) tall.
Single crochet gauge: 16 sts and 16 rows = 4 in (10.2 cm). One sc row is about 0.25 in (0.6 cm) tall.
The top tier doubles as your gauge test. Work Rows 1–4, lay the piece flat, and measure it before you go on.
Checkpoints:
- After Row 4 (top tier): 1.75 in (4.4 cm) wide x 1.25 in (3.2 cm) tall
- After Row 9 (middle tier): 2.75 in (7.0 cm) wide at the rim, about 2.8 in (7.1 cm) total height
- After Row 15 (bottom tier): 3.75 in (9.5 cm) wide at the rim, 4.75 in (12.1 cm) total height
- After Row 20 (trunk): 6 in (15.2 cm) total height
- After the border: 4.25 in (10.8 cm) x 6.25 in (15.9 cm)
If the top tier is too big, go down 0.5 mm in hook size and start again. If it is too small, go up 0.5 mm. If the width is right but the height is off, check your hdc height. Pull the first loop up to the height of the previous row before you finish each hdc.
Pattern
Tier 3 (Top Tier), Color A
Foundation: With Color A, ch 5.
Row 1 (RS): Hdc in the 3rd ch from the hook and in each ch across. (3 sts) The 2 skipped ch do not count. Place a marker on this side to mark the RS.
Row 2 (WS): Ch 1, turn. 2 hdc in the first st, BPhdc in the next st, 2 hdc in the last st. (5 sts)
Row 3 (RS): Ch 1, turn. 2 hdc in the first st, FPhdc in the next 3 sts, 2 hdc in the last st. (7 sts)
Row 4 (WS): Ch 1, turn. Sc in each st across. (7 sts)
This sc row is the rim of the top tier. Check your gauge now. The piece should be 1.75 in (4.4 cm) wide and 1.25 in (3.2 cm) tall.
Tier 2 (Middle Tier), Color A
The first row of each new tier steps in with decreases. This lets the rim above stand out past the start of the next tier.
Row 5 (RS): Ch 1, turn. Hdc2tog, hdc in the next 3 sts, hdc2tog. (5 sts)
Row 6 (WS): Ch 1, turn. 2 hdc in the first st, BPhdc in the next 3 sts, 2 hdc in the last st. (7 sts)
Row 7 (RS): Ch 1, turn. 2 hdc in the first st, FPhdc in the next 5 sts, 2 hdc in the last st. (9 sts)
Row 8 (WS): Ch 1, turn. 2 hdc in the first st, BPhdc in the next 7 sts, 2 hdc in the last st. (11 sts)
Row 9 (RS): Ch 1, turn. Sc in each st across. (11 sts)
Checkpoint: The rim is 2.75 in (7.0 cm) wide and the piece is about 2.8 in (7.1 cm) tall. The top tier’s rim overhangs Row 5 by 1 st, or 0.25 in (0.6 cm), on each side.
Tier 1 (Bottom Tier), Color A
Row 10 (WS): Ch 1, turn. Hdc3tog, hdc in the next 5 sts, hdc3tog. (7 sts)
Row 11 (RS): Ch 1, turn. 2 hdc in the first st, FPhdc in the next 5 sts, 2 hdc in the last st. (9 sts)
Row 12 (WS): Ch 1, turn. 2 hdc in the first st, BPhdc in the next 7 sts, 2 hdc in the last st. (11 sts)
Row 13 (RS): Ch 1, turn. 2 hdc in the first st, FPhdc in the next 9 sts, 2 hdc in the last st. (13 sts)
Row 14 (WS): Ch 1, turn. 2 hdc in the first st, BPhdc in the next 11 sts, 2 hdc in the last st. (15 sts)
Row 15 (RS): Ch 1, turn. Sc in each st across. (15 sts) Fasten off Color A, leaving a 6 in (15.2 cm) tail.
Checkpoint: The rim is 3.75 in (9.5 cm) wide and the piece is 4.75 in (12.1 cm) tall. The middle tier’s rim overhangs Row 10 by 2 sts, or 0.5 in (1.3 cm), on each side.
Trunk, Color B
Row 16 (WS): With the WS facing, skip the first 5 sts of Row 15 and join Color B in the 6th st. Ch 1, then sc in the same st and in the next 4 sts. (5 sts) This leaves 5 free sts on each side of the trunk.
Rows 17–20: Ch 1, turn. Sc in each st across. (5 sts)
Fasten off Color B. The trunk is 1.25 in (3.2 cm) wide and 1.25 in (3.2 cm) long. The piece is now 6 in (15.2 cm) tall.
Border
The border is a single round of sc in Color A. It runs around the tree outline from one side of the trunk to the other. The trunk itself is not bordered, so it keeps its clean brown edge.
Border gauge: 16 sc = 4 in (10.2 cm), so each sc covers 0.25 in (0.6 cm).
Border round (RS): With the RS facing, join Color A in the free st of Row 15 that sits right next to the trunk. Ch 1 and work outward and up the first side as shown below. The counts are for one half of the tree.
| Segment | Where | Sc |
|---|---|---|
| Tier 1 underside | 1 sc in each of the 5 free sts of Row 15 | 5 |
| Tier 1 tip | 3 sc in the Row 15 row-end | 3 |
| Tier 1 side | Row-ends of Rows 14–10: 2, 1, 2, 1, 2 | 8 |
| Step under Tier 2 | Evenly along the underside of the Row 9 rim | 2 |
| Tier 2 tip | 3 sc in the Row 9 row-end | 3 |
| Tier 2 side | Row-ends of Rows 8–5: 2, 1, 2, 1 | 6 |
| Step under Tier 3 | Under the Row 4 rim | 1 |
| Tier 3 tip | 3 sc in the Row 4 row-end | 3 |
| Tier 3 side | Row-ends of Rows 3–1: 2, 1, 2 | 5 |
| Half total | 36 |
Apex: Work into the underside of the foundation ch: 3 sc in the first st, sc in the center st, 3 sc in the last st. (7 sc) Place a marker in the center sc for the loop.
Second side: Work the same segments in reverse order. That is the Tier 3 side (5), Tier 3 tip (3), step (1), Tier 2 side (6), Tier 2 tip (3), step (2), Tier 1 side (8), Tier 1 tip (3), and 1 sc in each of the 5 free sts of Row 15 (5). (36 sc)
End with a sl st into the side of the trunk and fasten off.
Total: 36 + 7 + 36 = 79 sc.
Why the math works: On the undersides, 1 sc per stitch matches the 0.25 in (0.6 cm) stitch width exactly. Each step count equals that tier’s overhang: 2 sts under Tier 2 and 1 st under Tier 3. On the slanted sides, the 2-1 pattern averages 1.5 sc per hdc row, which covers about 0.375 in (1.0 cm) per row. The diagonal edge of each row is a little longer than that. As a result, the border sits slightly snug and rolls the rims forward into the rounded edge you see on the finished tree. Each 3-sc tip turns the sharp corner without pulling it in.
Hanging loop: Join Color A in the marked center sc at the apex. Ch 22, then sl st in the same sc. Ch 1 and work 30 sc into the chain loop, then sl st into the base. Fasten off, running the tail through the loop sts to firm them up. The loop is about 2 in (5.1 cm) tall.
Final Blocking
- Weave in all ends through stitches of the same color. Hide the brown tails inside the trunk and the taupe tails inside the rims.
- Lightly mist the ornament with water until it is damp, not soaked.
- Lay it RS up on the blocking mat.
- Pin the apex and the 6 tier tips so the piece is 4.25 in (10.8 cm) wide at Tier 1 and 6.25 in (15.9 cm) tall from the apex to the bottom of the trunk.
- Smooth the ribs with your fingers so they run straight down. Do not stretch them sideways.
- Nudge each rim slightly forward so it rolls over the tier below.
- Pin the trunk straight at 1.25 in (3.2 cm) wide.
- Let it dry completely before you unpin it. For acrylic, you can steam it lightly, as long as the iron never touches the yarn.
Final Quality-Control Checklist
- Tier 1 is 4.25 in (10.8 cm) wide.
- The height without the loop is 6.25 in (15.9 cm).
- Before the border, the tier rims measured 1.75 in (4.4 cm), 2.75 in (7.0 cm), and 3.75 in (9.5 cm).
- The ribs run straight and vertical on the RS.
- The border has 36 sc on each half plus 7 at the apex, for 79 in total.
- Each upper rim overhangs the tier below on both sides.
- The trunk is centered, with 5 free sts on each side.
- The loop is firm, centered, and about 2 in (5.1 cm) tall.
- All ends are hidden and secure.
Troubleshooting
The ribs look flat. Make sure you are working BPhdc on WS rows, not FPhdc. A front post worked from the WS sinks the rib to the back.
The tiers curl forward too much. The border is too tight. Redo the bottom tier’s slanted sides with 2 sc in every row-end.
The edges ripple. You may have added extra border stitches. Recount each segment against the table.
The trunk is off-center. Count the 5 skipped sts again. The trunk must start in the 6th st of Row 15.
There are holes at the decreases. Pull the hdc2tog and hdc3tog loops snug before you close them. The border will also cover small gaps.
The tree leans to one side. Check that every increase row has exactly 2 hdc in both the first and last sts.
The loop droops or twists. Pack the 30 sc tightly, or add 2 to 4 more sc.
Care
Hand wash in cool water and lay flat to dry, reshaping the rims while the piece is damp. Store the ornament flat or hanging so the tiers keep their shape.
Final Notes
The top tier is your gauge test and should measure 1.75 in (4.4 cm) x 1.25 in (3.2 cm). The middle tier brings the piece to 2.75 in (7.0 cm) wide and about 2.8 in (7.1 cm) tall. The bottom tier makes it 3.75 in (9.5 cm) wide and 4.75 in (12.1 cm) tall, and the trunk takes it to 6 in (15.2 cm). The border adds 0.25 in (0.6 cm) around the tree outline, for a finished ornament of 4.25 in (10.8 cm) x 6.25 in (15.9 cm). If each checkpoint matches, the next one will too.
Make one for the doorknob, a few for the tree, or tie one onto a wrapped gift.
Happy crocheting!