

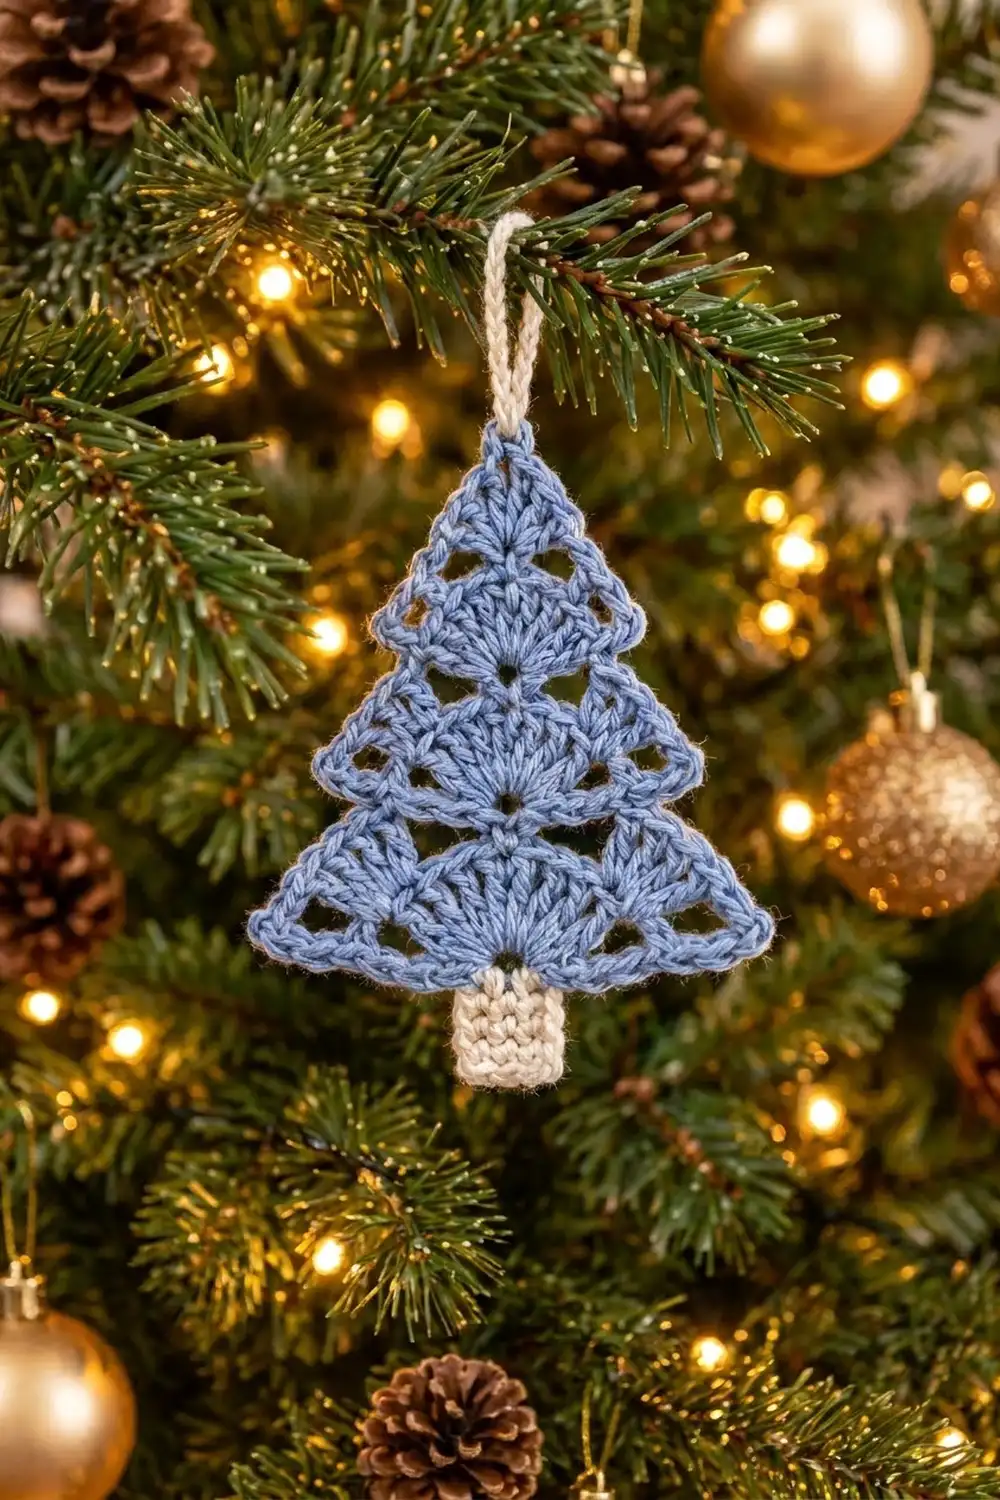
The Frosted Fan Tree is a small, lacy Christmas tree ornament made from four stacked fan-shaped tiers. Each tier grows from a single point at its base. It opens into a solid fan of double crochet, then a ring of open windows, then a crisp single crochet outline that ends in a pointed tip.
The tree is a soft dusty blue with a cream trunk and a cream hanging loop. The look is quiet and wintry rather than bright, so it works on a natural tree, on a gift package, or hung from a window hook.
This pattern uses US crochet terms. The finished ornament is 4 in (10.2 cm) wide and 6 in (15.2 cm) tall including the trunk. The hanging loop adds another 1.75 in (4.4 cm).
You crochet the widest tier first, in turned rows from a magic ring. Each smaller tier then starts directly in the tip of the tier below. A base edging tidies the bottom of every tier. The trunk is worked down from the bottom tier, and the loop is added at the top.
Finished Size and Construction
- Finished size: 4 in (10.2 cm) wide x 6 in (15.2 cm) tall, not counting the loop
- Skill level: Easy
- Terminology: US crochet terms
- Yarn weight: Worsted (#4), cotton or cotton blend
- Hook: 4.0 mm (US G-6)
- Number of pieces: 1 ornament, worked in one piece (4 tiers + trunk + loop)
- Layout: 4 tiers stacked vertically, widest at the bottom, trunk centered below
- Piece size: 4 in (10.2 cm) x 6 in (15.2 cm)
- Size before border: 4 in (10.2 cm) wide x 5 in (12.7 cm) tall (tiers only)
- Border depth: 1 row of sc, about 0.2 in (0.5 cm), along each tier base
Materials
Choose a smooth cotton in worsted weight, either mercerized or matte, at roughly 80 to 100 m per 50 g. Cotton holds the pointed tips and open windows well after blocking. Acrylic also works, but the fans will look softer and slightly rounder.
- Dusty blue (tree): 12 g / 25 m
- Cream (trunk and loop): 4 g / 8 m
These amounts include a small extra margin for a gauge test and for weaving in ends.
Tools:
- 4.0 mm (US G-6) crochet hook
- Tapestry needle
- Scissors
- Blocking mat or folded towel
- Rust-proof pins
- Spray bottle with water (optional: light spray starch)
Abbreviations (US Terms)
- ch – chain
- sl st – slip stitch
- sc – single crochet
- dc – double crochet
- tr – treble crochet
- sp – space
- st(s) – stitch(es)
- tch – turning chain
- RS – right side
- [ ] – repeat the steps inside the brackets the stated number of times
Special technique – Magic ring: Wrap the yarn around two fingers to make a loop. Insert the hook, pull up a loop, and work the first row into the ring. Pull the tail firmly to close the ring into a point.
Apex: The ch-2 or ch-3 space at the top center of each tier. It forms the tier’s tip and is where the next tier starts.
Gauge and Checkpoints
Gauge: 18 sc and 20 rows = 4 in (10.2 cm). One dc row is about 0.45 in (1.1 cm) tall, and one tr row is about 0.65 in (1.7 cm).
Before you commit, work Tier 1 Rows 1–2 as a test piece and measure it lying flat.
Checkpoints:
- Tier 1, Row 1: 1.25 in (3.2 cm) across the straight base
- Tier 1, Row 2: 2.5 in (6.4 cm) across
- Tier 1, Row 3: 3.5 in (8.9 cm) across
- Tier 1, Row 4: 4 in (10.2 cm) across, 1.8 in (4.6 cm) tall
- Tier 2: 3 in (7.6 cm) across, 1.4 in (3.6 cm) tall
- Tier 3: 2.5 in (6.4 cm) across, 1.1 in (2.8 cm) tall
- Tier 4: 1.75 in (4.4 cm) across, 0.7 in (1.8 cm) tall
If your tier is too big: Switch to a 3.5 mm hook, and check that your tr stitches are not loose and loopy.
If your tier is too small: Switch to a 4.5 mm hook. A ruffled fan usually means your tension is tight, not that you have too many stitches.
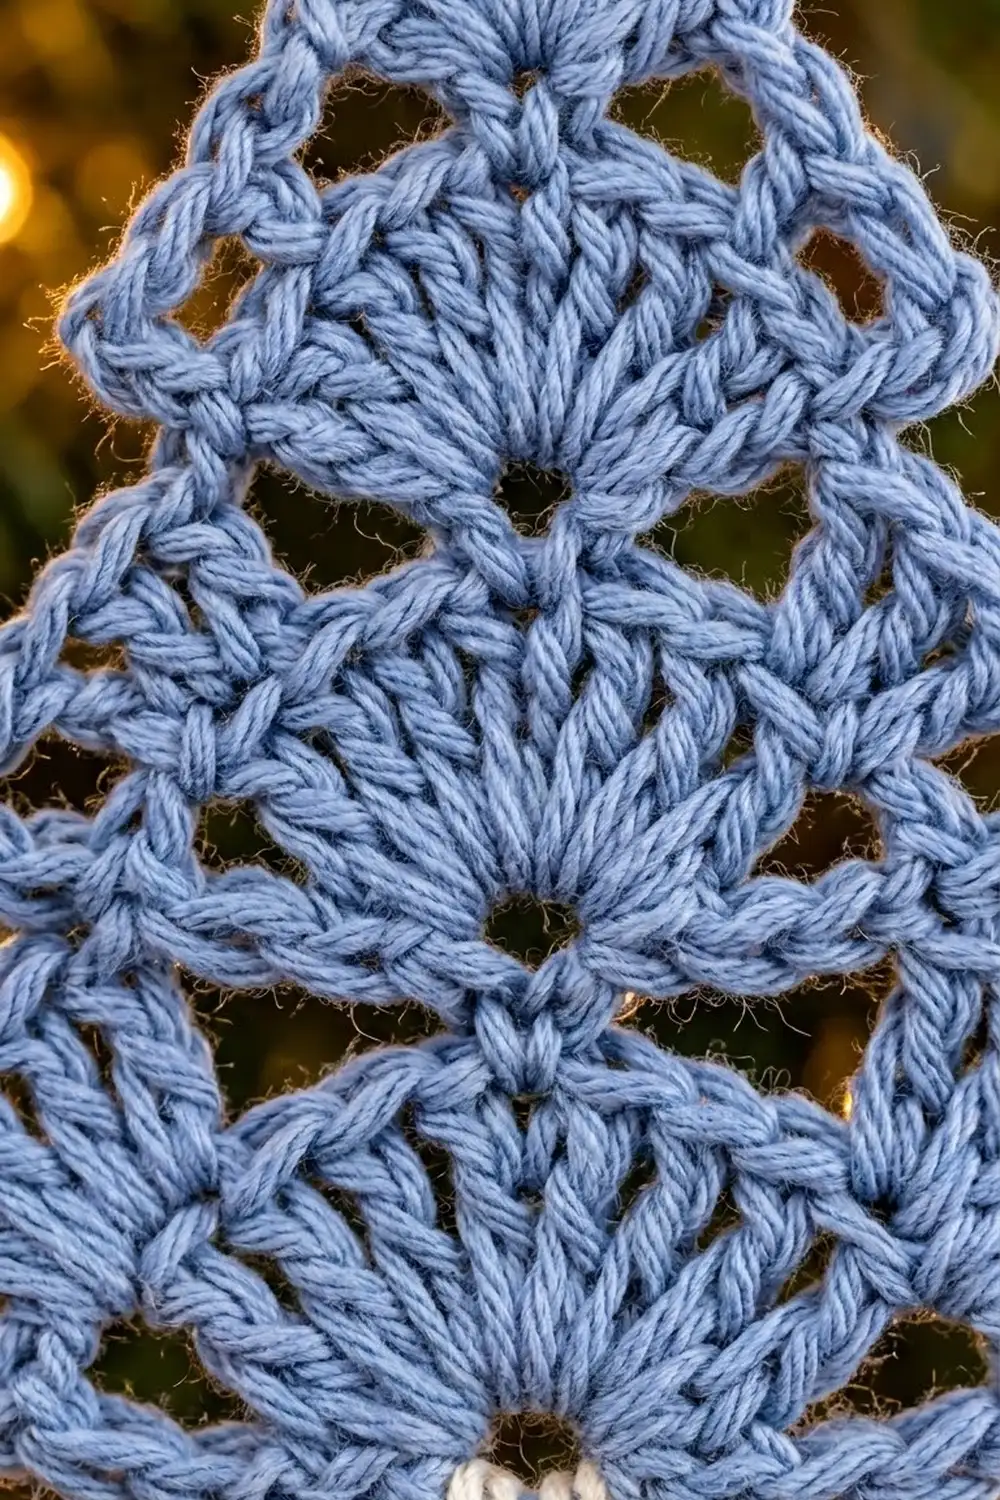
Tier 1 (Bottom Tier)
With dusty blue, make a magic ring.
Row 1: Ch 3 (counts as dc), 8 dc in ring. Pull the ring closed. Turn. (9 dc)
The stitches should form a half circle, with the closed ring at the bottom center.
Row 2 (windows): Ch 6 (counts as tr + ch 2), [tr in next dc, ch 2] 3 times, (tr, ch 3, tr) in next (center) dc, [ch 2, tr in next dc] 4 times, working the last tr in the top of the tch. Turn. (10 tr, 8 ch-2 sps, 1 ch-3 apex)
The tall tr stitches and ch-2 spaces make the ring of open windows around the solid fan.
Row 3 (solid band): Ch 3 (counts as dc), [2 dc in next ch-2 sp, dc in next tr] 4 times, (2 dc, ch 2, 2 dc) in ch-3 apex, dc in next tr, [2 dc in next ch-2 sp, dc in next st] 4 times, working the last dc in the 4th ch of the tch. Turn. (30 dc: 15 per side, 1 ch-2 apex)
Each side has 13 dc before the apex group, plus 2 dc from the apex group, for 15.
Row 4 (outline): Ch 1, sc in each of first 15 dc, (sc, ch 2, sc) in ch-2 apex, sc in each of last 15 dc, working the last sc in the top of the tch. (32 sc: 16 per side, 1 ch-2 apex)
Fasten off. The tier is now a wide triangle with sharp base corners and a pointed tip.
Tier 2
Row 1: With RS facing, join dusty blue with a sl st in the ch-2 apex of Tier 1. Ch 3 (counts as dc), 8 dc in the same apex sp. Turn. (9 dc)
The new fan sits directly on the tip of Tier 1 and opens upward.
Row 2 (windows): Ch 6 (counts as tr + ch 2), [tr in next dc, ch 2] 3 times, (tr, ch 3, tr) in center dc, [ch 2, tr in next dc] 4 times, working the last tr in the top of the tch. Turn. (10 tr, 8 ch-2 sps, 1 ch-3 apex)
Row 3 (outline): Ch 1, sc in first tr, [2 sc in next ch-2 sp, sc in next tr] 4 times, (sc, ch 2, sc) in ch-3 apex, sc in next tr, [2 sc in next ch-2 sp, sc in next st] 4 times, working the last sc in the 4th ch of the tch. (28 sc: 14 per side, 1 ch-2 apex)
Each side has 1 + (4 x 3) = 13 sc before the apex, plus 1 sc from the apex group, for 14. Fasten off.
Tier 3
Row 1: With RS facing, join dusty blue with a sl st in the ch-2 apex of Tier 2. Ch 3 (counts as dc), 6 dc in the same sp. Turn. (7 dc)
Row 2 (windows): Ch 4 (counts as dc + ch 1), [dc in next dc, ch 1] 2 times, (dc, ch 2, dc) in center dc, [ch 1, dc in next dc] 3 times, working the last dc in the top of the tch. Turn. (8 dc, 6 ch-1 sps, 1 ch-2 apex)
The shorter dc and ch-1 spaces make smaller windows to suit the smaller tier.
Row 3 (outline): Ch 1, sc in first dc, [sc in next ch-1 sp, sc in next dc] 3 times, (sc, ch 2, sc) in ch-2 apex, sc in next dc, [sc in next ch-1 sp, sc in next st] 3 times, working the last sc in the 3rd ch of the tch. (16 sc: 8 per side, 1 ch-2 apex)
Each side has 7 sc before the apex, plus 1 sc from the apex group, for 8. Fasten off.
Tier 4 (Top Tier)
Row 1: With RS facing, join dusty blue with a sl st in the ch-2 apex of Tier 3. Ch 3 (counts as dc), 6 dc in the same sp. Turn. (7 dc)
Row 2 (outline): Ch 1, sc in each of first 3 dc, (sc, ch 2, sc) in center dc, sc in each of last 3 sts, working the last sc in the top of the tch. (8 sc: 4 per side, 1 ch-2 apex)
Fasten off. This small solid fan forms the pointed treetop.
Border: Base Edging
The base edging is one row of sc along the straight bottom edge of each tier. It hides the row ends, firms up the base corners, and locks each tier to the tip below it.
Border gauge: Work 2 sc into the side of each dc row, 3 sc into the side of each tr row, and 1 sc into the side of each sc row.
With RS facing, work each tier from its right base corner to its left base corner.
Tier 1 edging: Join dusty blue in the right base corner. Working into the row ends: 1 sc in Row 4, 2 sc in Row 3, 3 sc in Row 2, 2 sc in Row 1 (8 sc). Work 2 sc into the closed magic ring. Then 2 sc in Row 1, 3 sc in Row 2, 2 sc in Row 3, 1 sc in Row 4 (8 sc). Fasten off. (18 sc)
Tier 2 edging: Join in the right base corner. Work 1 sc in Row 3, 3 sc in Row 2, 2 sc in Row 1 (6 sc). Work 1 sc into the base of Row 1, putting the hook through the Tier 1 apex space so both layers are caught. Then 2 sc in Row 1, 3 sc in Row 2, 1 sc in Row 3 (6 sc). Fasten off. (13 sc)
Tier 3 edging: Work 1 sc in Row 3, 2 sc in Row 2, 2 sc in Row 1 (5 sc), then 1 sc through the Tier 2 apex, then 2 sc in Row 1, 2 sc in Row 2, 1 sc in Row 3 (5 sc). Fasten off. (11 sc)
Tier 4 edging: Work 1 sc in Row 2, 2 sc in Row 1 (3 sc), then 1 sc through the Tier 3 apex, then 2 sc in Row 1, 1 sc in Row 2 (3 sc). Fasten off. (7 sc)
Why the math works: At 4.5 sc per inch, 2 sc cover about 0.45 in (1.1 cm), which matches one dc row. Three sc cover about 0.65 in (1.7 cm), which matches one tr row. So the edging lies flat without stretching or rippling.
The edging counts also confirm the tier widths: 18 sc ≈ 4 in (10.2 cm), 13 sc ≈ 3 in (7.6 cm), 11 sc ≈ 2.5 in (6.4 cm), and 7 sc ≈ 1.6 in (4.1 cm). Tier 4 blocks out slightly, to 1.75 in (4.4 cm), at its pointed corners.
Trunk
With RS facing, find the 18 sc of the Tier 1 edging. The 2 center sc are sts 9 and 10.
Row 1: Join cream in st 8 of the Tier 1 edging. Ch 1, sc in same st and in next 3 sts. Turn. (4 sc)
Rows 2–4: Ch 1, sc in each sc across. Turn. (4 sc)
Fasten off after Row 4. The trunk is 0.9 in (2.3 cm) wide and 0.8 in (2.0 cm) tall, with 7 edging stitches on each side of it, so it sits centered under the tree.
Hanging Loop
With cream, join with a sl st in the ch-2 apex of Tier 4. Ch 31, then sl st in 2nd ch from hook and in each ch across (30 sl st). Sl st again in the Tier 4 apex to close the loop. Fasten off.
The slip stitches turn the chain into a firm cord. Folded, the loop stands about 1.75 in (4.4 cm) above the tip.
Weave all ends into the outline rows, where they disappear into the sc.
Final Blocking
- Lay the ornament RS up on the blocking mat.
- Mist it with water until damp but not dripping.
- Pin the two base corners of Tier 1 so they are 4 in (10.2 cm) apart.
- Pin the base corners of Tiers 2, 3, and 4, keeping each tier centered.
- Pin each apex upward to form a sharp tip.
- Pin the trunk straight, with its lower edge 6 in (15.2 cm) below the treetop.
- Open each window with a pin or fingertip so the spokes run straight.
- For a crisper ornament, add a light spray starch.
- Let it dry completely before you unpin it.
Final Quality-Control Checklist
- The ornament is 4 in (10.2 cm) wide and 6 in (15.2 cm) tall, not counting the loop
- Tier 1 Row 4 has 32 sc, Tier 2 Row 3 has 28 sc, Tier 3 Row 3 has 16 sc, and Tier 4 Row 2 has 8 sc
- Every tier has a sharp apex and two crisp base corners
- The base edging counts are 18, 13, 11, and 7 sc
- The trunk is 4 sc wide and centered
- The windows are open and evenly spaced on both sides
- The loop is firmly attached and all ends are hidden
Troubleshooting
Fan ruffles or cups: Your tension is tight. Go up a hook size or loosen your dc and tr.
Magic ring loosens: Weave the tail back through the base stitches in a circle, then pull it firmly before securing.
Apex is rounded: Check that you worked the ch-2 or ch-3 apex, and pin it to a point while blocking.
One side is longer than the other: Count each side separately. Both sides of the apex must have the same stitch count.
Upper tier tilts: The center edging sc was not worked through the lower apex. Pull it out and rework it through both layers.
Trunk is off-center: Recount the Tier 1 edging and restart the trunk in st 8.
Care
Hand wash in cool water with mild soap, roll it in a towel to press out the water, and reshape it to the blocked size. Dry flat, and store the ornament flat between sheets of tissue paper.
Final Notes
The measurements are easy to check as you go. Tier 1 grows from 1.25 in (3.2 cm) to 4 in (10.2 cm) across in four rows. Tiers 2, 3, and 4 step down to 3 in (7.6 cm), 2.5 in (6.4 cm), and 1.75 in (4.4 cm). Together the tiers stand 5 in (12.7 cm) tall. The base edging adds 0.2 in (0.5 cm), and the 0.8 in (2.0 cm) trunk brings the ornament to 6 in (15.2 cm).
If each checkpoint matches, your finished tree will match too. Make one for the tree, then keep a few on hand for gift tags and last-minute presents.
Happy crocheting!