

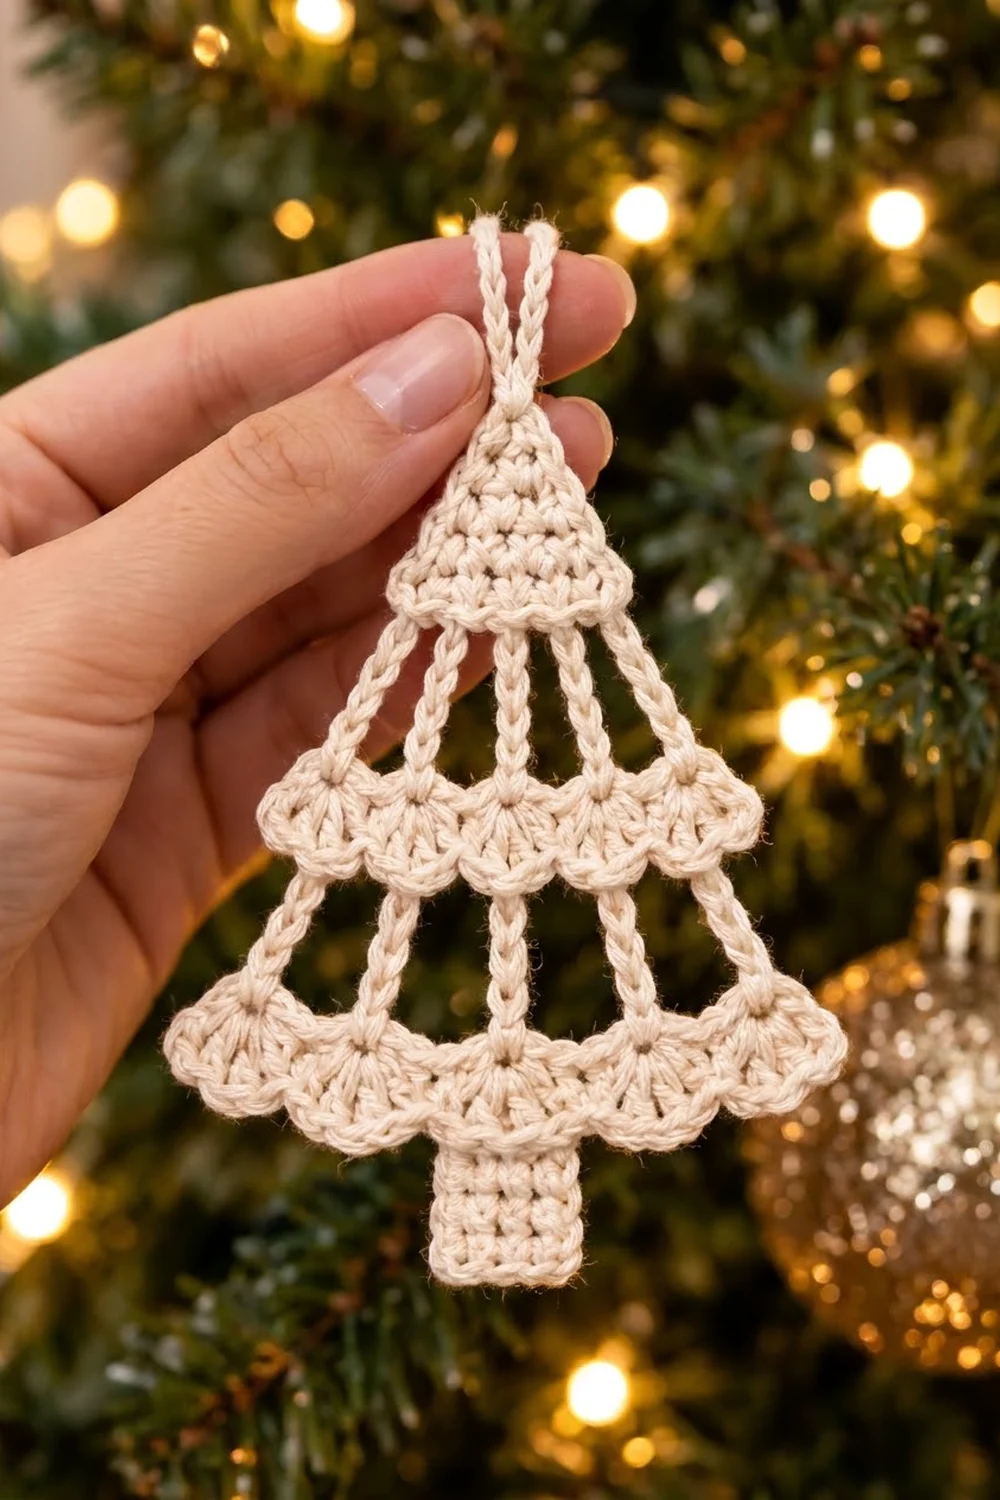
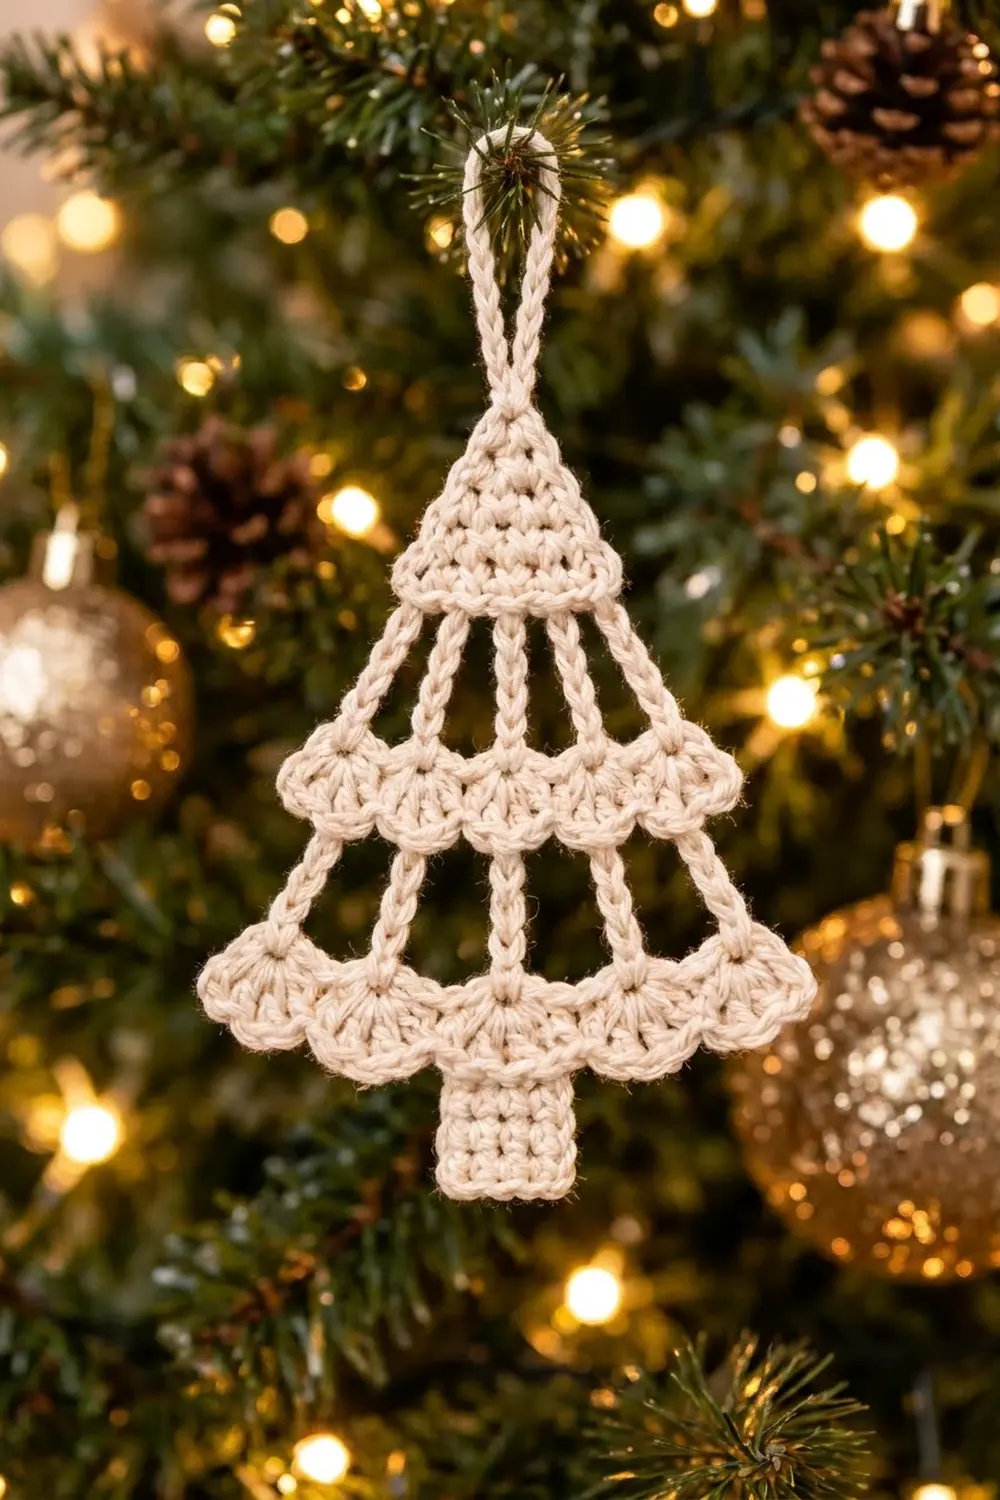
This is a lacy tree ornament with a solid pointed top, two open tiers of tall fanning spokes, scalloped shell edges, and a sturdy little trunk. It hangs flat, catches the light between its spokes, and looks equally good on a real tree, a gift package, or a window.
The sample uses one color, a soft cream cotton. In a single neutral shade, the scallops and spokes do all the decorative work, so the ornament reads as calm and Scandinavian rather than busy. The pattern uses US crochet terms throughout.
The finished ornament measures 4.2 in (10.7 cm) wide at the bottom scallops and 5.5 in (14.0 cm) tall from tip to trunk, plus a hanging loop of about 1.5 in (3.8 cm).
The tree is worked as one piece in turned rows from the top down. You crochet the solid triangle first, then two tiers (each with a spoke row, a band row, and a shell row), and then the trunk directly into the center shell. An edging along the triangle’s slanted sides adds the hanging loop. Nothing is sewn on.
Finished Size and Construction
- Finished size: 4.2 in (10.7 cm) wide × 5.5 in (14.0 cm) tall, plus a 1.5 in (3.8 cm) loop
- Skill level: Easy / advanced beginner
- Terminology: US crochet terms
- Yarn weight: DK (light #3), cotton or cotton blend
- Hook: 3.5 mm (US E-4)
- Number of pieces: 1
- Layout: Single motif, worked top-down in rows
- Piece size: Triangle 1.8 in (4.6 cm) wide × 1.5 in (3.8 cm) tall; each tier about 1.5 in (3.8 cm) deep; trunk 1 in (2.5 cm) wide × 1.1 in (2.8 cm) tall
- Size before border: 4.2 in (10.7 cm) × 5.5 in (14.0 cm)
- Border depth: One single crochet along row ends, which adds less than 1/8 in (0.3 cm)
Materials
Yarn: Choose a smooth DK cotton or cotton blend with good stitch definition. Mercerized or combed cotton gives crisp spokes and scallops that hold their shape. Fuzzy or very soft acrylic will blur the lace and may sag on the tree.
- Cream / ivory: 10 g, about 22 m per ornament
The quantity includes a margin for your gauge swatch, tail ends, and the hanging loop. One ornament actually uses about 7 g.
Tools:
- 3.5 mm (US E-4) crochet hook
- Tapestry needle
- Scissors
- Stitch marker (optional, for the first stitch of each row)
- Blocking mat and rustproof pins
- Spray starch or a fabric stiffener (optional, but recommended for ornaments)
- Ruler or tape measure
Abbreviations (US Terms)
- ch – chain
- sl st – slip stitch
- sc – single crochet
- hdc – half double crochet
- dc – double crochet
- dtr – double treble crochet
- sk – skip
- sp – space
- st(s) – stitch(es)
- RS – right side
- [ ] – repeat the instructions inside the brackets the number of times stated
Double treble (dtr): Yarn over 3 times, insert the hook into the stitch, yarn over and pull up a loop (5 loops on hook). Then [yarn over and pull through 2 loops] 4 times.
Shell: 5 dc worked into the same stitch.
Gauge and Checkpoints
Gauge: 20 sc and 22 rows = 4 in (10.2 cm) in sc worked in turned rows. That works out to 5 sc and 5.5 rows per 1 in (2.5 cm).
Gauge affects the size and how stiff the lace is. Make one test ornament before you make a batch, and check it at each of these stages:
- After Row 8 (triangle): 1.8 in (4.6 cm) wide × 1.5 in (3.8 cm) tall
- After Row 11 (tier 1): About 3.4 in (8.6 cm) wide across the band; total height about 3 in (7.6 cm)
- After Row 14 (tier 2): About 4.2 in (10.7 cm) wide across the band; total height about 4.5 in (11.4 cm)
- After the trunk: About 5.5 in (14.0 cm) total height
If your piece is too big: Go down to a 3.25 mm or 3 mm hook. Floppy spokes are also a sign that your hook is too large.
If your piece is too small: Go up to a 3.75 mm or 4 mm hook. If the spokes look short and stubby, wrap the yarn over a little more loosely on the dtr.
Small differences don’t matter for an ornament, but the triangle and both tiers should stay in proportion.
Pattern
Part 1: Solid Triangle Top
Start at the tip of the tree.
Row 1: Ch 2, sc in 2nd ch from hook. (1 sc)
Row 2: Ch 1, turn, 3 sc in the sc. (3 sc)
Row 3: Ch 1, turn, sc in each st across. (3 sc)
Row 4: Ch 1, turn, 2 sc in first st, sc in next st, 2 sc in last st. (5 sc)
Row 5: Ch 1, turn, sc in each st across. (5 sc)
Row 6: Ch 1, turn, 2 sc in first st, sc in each of next 3 sts, 2 sc in last st. (7 sc)
Row 7: Ch 1, turn, sc in each st across. (7 sc)
Row 8: Ch 1, turn, 2 sc in first st, sc in each of next 5 sts, 2 sc in last st. (9 sc)
Because you increase on every other row, the sides slope steeply and the tip is pointed. Do not fasten off.
Checkpoint: 1.8 in (4.6 cm) wide × 1.5 in (3.8 cm) tall.
Part 2: Tier 1 (Upper Tier)
Row 9 (spokes): Ch 5 (counts as first dtr), turn, ch 3, sk next st, dtr in next st, [ch 3, sk next st, dtr in next st] 3 times. (5 dtr, 4 ch-3 sps)
The spokes sit on sts 1, 3, 5, 7, and 9 of Row 8. At the top they are 2 sts apart, but the ch-3 spaces hold them 4 sts apart at the bottom, which makes the spokes fan outward.
Row 10 (band): Ch 2 (does not count as a st), turn, hdc in first dtr, [3 hdc in next ch-3 sp, hdc in next dtr] 3 times, 3 hdc in last ch-3 sp, hdc in 5th ch of the beginning ch-5. (17 hdc)
Count check: 5 hdc in the dtr + (4 × 3) hdc in the spaces = 17.
Row 11 (scallops): Ch 1, turn, sc in first hdc, [sk next st, shell in next st, sk next st, sc in next st] 4 times. (4 shells, 5 sc)
Count check: 1 + (4 × 4) = 17 sts used. The sc land on sts 1, 5, 9, 13, and 17, and the shells hang between them.
Checkpoint: About 3.4 in (8.6 cm) across the band and about 3 in (7.6 cm) total height.
Part 3: Tier 2 (Lower Tier)
Row 12 (spokes): Ch 5 (counts as first dtr), turn, [ch 4, dtr in next sc] 4 times. (5 dtr, 4 ch-4 sps)
Each dtr goes into one of the 5 sc of Row 11, between the shells. The chains pass behind the shells without catching them. The shells stay free and hang as scallops in the open space below tier 1.
Row 13 (band): Ch 2 (does not count as a st), turn, hdc in first dtr, [4 hdc in next ch-4 sp, hdc in next dtr] 3 times, 4 hdc in last ch-4 sp, hdc in 5th ch of the beginning ch-5. (21 hdc)
Count check: 5 + (4 × 4) = 21.
Row 14 (scallops): Ch 1, turn, sc in first hdc, [sk next st, shell in next st, sk next st, sc in next st] 5 times. (5 shells, 6 sc)
Count check: 1 + (5 × 4) = 21. The shells sit in sts 3, 7, 11, 15, and 19. The center (3rd) shell is in st 11, the exact middle of 21. Fasten off.
Checkpoint: About 4.2 in (10.7 cm) across the band and about 4.5 in (11.4 cm) total height.
Part 4: Trunk
Turn the tree upside down so the shells point up. Join yarn in the first dc of the center (3rd) shell of Row 14.
Row T1: Ch 1, sc in same dc, sc in each of next 4 dc of the same shell. (5 sc)
The fanned shell pulls in to a straight edge, so the trunk takes the place of the middle scallop.
Rows T2–T6: Ch 1, turn, sc in each st across. (5 sc)
Fasten off.
Checkpoint: Trunk 1 in (2.5 cm) wide × 1.1 in (2.8 cm) tall. The tree should now measure about 5.5 in (14.0 cm) from tip to trunk.
Border: Triangle Edging and Hanging Loop
The open tiers don’t need an edge, because the outer spokes and end scallops already finish them. The border only tidies the two slanted sides of the solid triangle, and it adds the hanging loop at the tip.
Border gauge: 1 sc per sc row end. This matches the row gauge of 5.5 rows per 1 in (2.5 cm), so the edge lies flat and doesn’t ruffle or pull in.
Edging round: With the front facing, join yarn at the end of Row 8 on the right side of the triangle.
- Right side: Ch 1, work 1 sc in each row end from Row 8 up to Row 1. (8 sc)
- Tip: Sc in the top of Row 1. Ch 20 for the hanging loop, then sc again in the top of Row 1. (2 sc + ch-20 loop)
- Left side: Work 1 sc in each row end from Row 1 down to Row 8. (8 sc)
Fasten off.
Total: 18 sc + 20 ch.
Why the math works: The triangle has 8 rows, so each slanted side has exactly 8 row ends. One sc per row end gives 8 sc per side, which matches the 1.5 in (3.8 cm) slanted edge at row gauge. The two tip sc aren’t counted in either side, so no stitch is counted twice. Ch 20 at about 6–7 ch per 1 in (2.5 cm) is about 3 in (7.6 cm) of chain. Folded in half, it makes a loop about 1.5 in (3.8 cm) long.
Final Blocking
- Weave in all ends. Run each tail through solid stitches only (the triangle, a band, or the trunk), never through the spokes, where tails would show.
- Wet or spray. Spritz the ornament until it is evenly damp. Cotton can also be soaked briefly and gently pressed in a towel.
- Pin the outline. On a blocking mat, pin the tip, the two band ends of each tier, and the trunk corners. Bottom band: 4.2 in (10.7 cm) wide. Total height: 5.5 in (14.0 cm).
- Straighten the spokes. Pull each spoke straight and pin it at the band so the gaps on both sides of the tree match.
- Open the scallops. Pin the center dc of each shell so the scallops fan evenly downward.
- Stiffen (optional). Apply spray starch or a diluted fabric stiffener while the ornament is pinned.
- Dry fully. Leave the ornament pinned until it is completely dry, usually 6–12 hours. Then unpin it.
Final Quality-Control Checklist
- Triangle: 9 sc at Row 8, 1.8 in (4.6 cm) wide, with a pointed tip
- Tier 1: 5 spokes, 17 hdc band, 4 shells, 5 sc
- Tier 2: 5 spokes, each starting from a sc between the tier 1 shells
- Tier 2: 21 hdc band, 5 shells, 6 sc
- Trunk: 5 sc wide, 6 rows, centered on the 3rd shell
- Edging: 8 sc on each slanted side with a secure loop at the tip
- Spokes are straight and evenly spaced on both sides
- Ends are hidden in solid areas
- Finished size: about 4.2 in (10.7 cm) × 5.5 in (14.0 cm)
Troubleshooting
Spokes are uneven lengths. Wrap the yarn over the same way for every dtr, and keep the first loop pulled up to the same height each time.
The tree leans to one side. Check that Row 9 starts in the first st and ends in the 9th st, and that you have exactly 4 chain spaces in Rows 9 and 12.
The band ruffles. Your gauge is loose. Use 1 fewer hdc in each chain space, or go down a hook size.
The band pulls the spokes inward. Your hdc are too tight. Go up a hook size for the band rows only.
Shells overlap or bunch. Make sure you skip 1 st on each side of every shell.
The trunk is off-center. Count the shells again. The trunk belongs in the 3rd of 5 shells.
The triangle edge looks wavy. Work exactly 1 sc per row end. Don’t add extra sc at the increase rows.
Care
Hand wash in cool water, press out the water gently, and dry the ornament flat and pinned to shape. If it softens over the years, reapply starch to bring back the crisp spokes.
Final Notes
Everything in this ornament follows from its measurements:
- At 5 sc per 1 in (2.5 cm), the 9-stitch triangle is 1.8 in (4.6 cm) wide.
- The ch-3 spokes fan out to a 17-stitch band of 3.4 in (8.6 cm).
- The ch-4 spokes fan out to a 21-stitch band of 4.2 in (10.7 cm).
- Shell repeats of 4 stitches fit those 17- and 21-stitch bands exactly.
- The 5-stitch trunk adds 1.1 in (2.8 cm), for a total height of 5.5 in (14.0 cm).
If your test ornament matches the checkpoints, every other one you make will match it. Make a few, add a shiny bauble or two, and let the scallops catch the lights.
Happy crocheting!