

The Lavender Plume Lace Curtain is a tall, airy tab-top panel. It is covered in feather-shaped fans that open upward inside pointed lavender arches. Light passes through the chain lattice, so the panel softens a sunny doorway without blocking the view.
The palette is two colors: a dusty lavender-gray for the lattice, the closing rows, and every other band of plumes, and a warm cream for the alternate bands. The bands are offset by half a repeat, which gives an overall diagonal checkerboard of cream and lavender plumes.
This pattern uses US crochet terms. Each finished panel measures 40.75 in (103.5 cm) wide and 80.5 in (204.5 cm) long, plus 3 in (7.6 cm) tab loops, for a total drop of 83.5 in (212.1 cm) from the top of the rod.
Each panel is worked flat in one piece from the bottom up, in 5-row bands. A single round of single crochet frames it. A two-row scalloped hem is added along the bottom, and seven solid tabs are worked along the top. Make two identical panels for a doorway pair.
Finished Size and Construction
- Finished panel size: 40.75 in x 80.5 in (103.5 cm x 204.5 cm), plus 3 in (7.6 cm) tab loops
- Skill level: Intermediate
- Terminology: US
- Yarn weight: #4 worsted, mercerized or matte cotton
- Hook: 5 mm (H-8)
- Number of pieces: 2 separate panels, each worked in one piece
- Layout: panels hang side by side on one rod, not joined
- Size before border: 40.25 in x 78.25 in (102.2 cm x 198.8 cm)
- Border depth: 0.25 in (0.6 cm) on the sides and top; 2 in (5.1 cm) at the scalloped hem; tabs fold to 3 in (7.6 cm) loops
Materials
Choose a smooth cotton or cotton blend in worsted weight. Cotton holds the lace shape, resists stretching on a long drop, and washes well. Avoid fuzzy yarn because it blurs the chain lattice.
- Color L (lavender-gray): 1500 g / about 2550 m (750 g / 1275 m per panel)
- Color C (cream): 1000 g / about 1700 m (500 g / 850 m per panel)
Quantities assume about 170 m per 100 g and include a margin of roughly 10 percent. Buy all of each color from one dye lot.
Tools:
– 5 mm (H-8) crochet hook
– Locking stitch markers (at least 10)
– Tapestry needle
– Scissors
– Tape measure
– Blocking pins, foam mats, and a spray bottle
Abbreviations (US Terms)
- ch – chain
- sl st – slip stitch
- sc – single crochet
- dc – double crochet
- sk – skip
- sp – space
- st(s) – stitch(es)
- RS / WS – right side / wrong side
Special stitch – Fan: a group of 7 dc. In later rows, the fan is “opened” by working 1 dc into each dc of the fan with ch-1 or ch-2 spaces between them, so each plume widens as it rises.
Half fan: a group of 4 dc at the panel edge. It is opened the same way as a fan.
Gauge and Checkpoints
Gauge: 16 sc = 4 in (10.2 cm). One 5-row band = 3 in (7.6 cm) tall.
Test swatch: Ch 34 and work Row 1 (33 sc). Then work one Band A and one Band B using 2 repeats (n = 2). The swatch should be 8.25 in (21.0 cm) wide and 6.25 in (15.9 cm) tall after light blocking.
Checkpoints:
– After Row 1: 40.25 in (102.2 cm) wide.
– After 4 pattern repeats (8 bands, Row 41): 24.25 in (61.6 cm) tall.
– After all 26 bands (Row 131): 78.25 in (198.8 cm) tall.
If your swatch is too big, go down half a hook size. If it is too small, go up half a size. If only the height is off, adjust how hard you pull up the dc loops rather than changing hooks. Width matters most, because the tab spacing and scallop count depend on it.
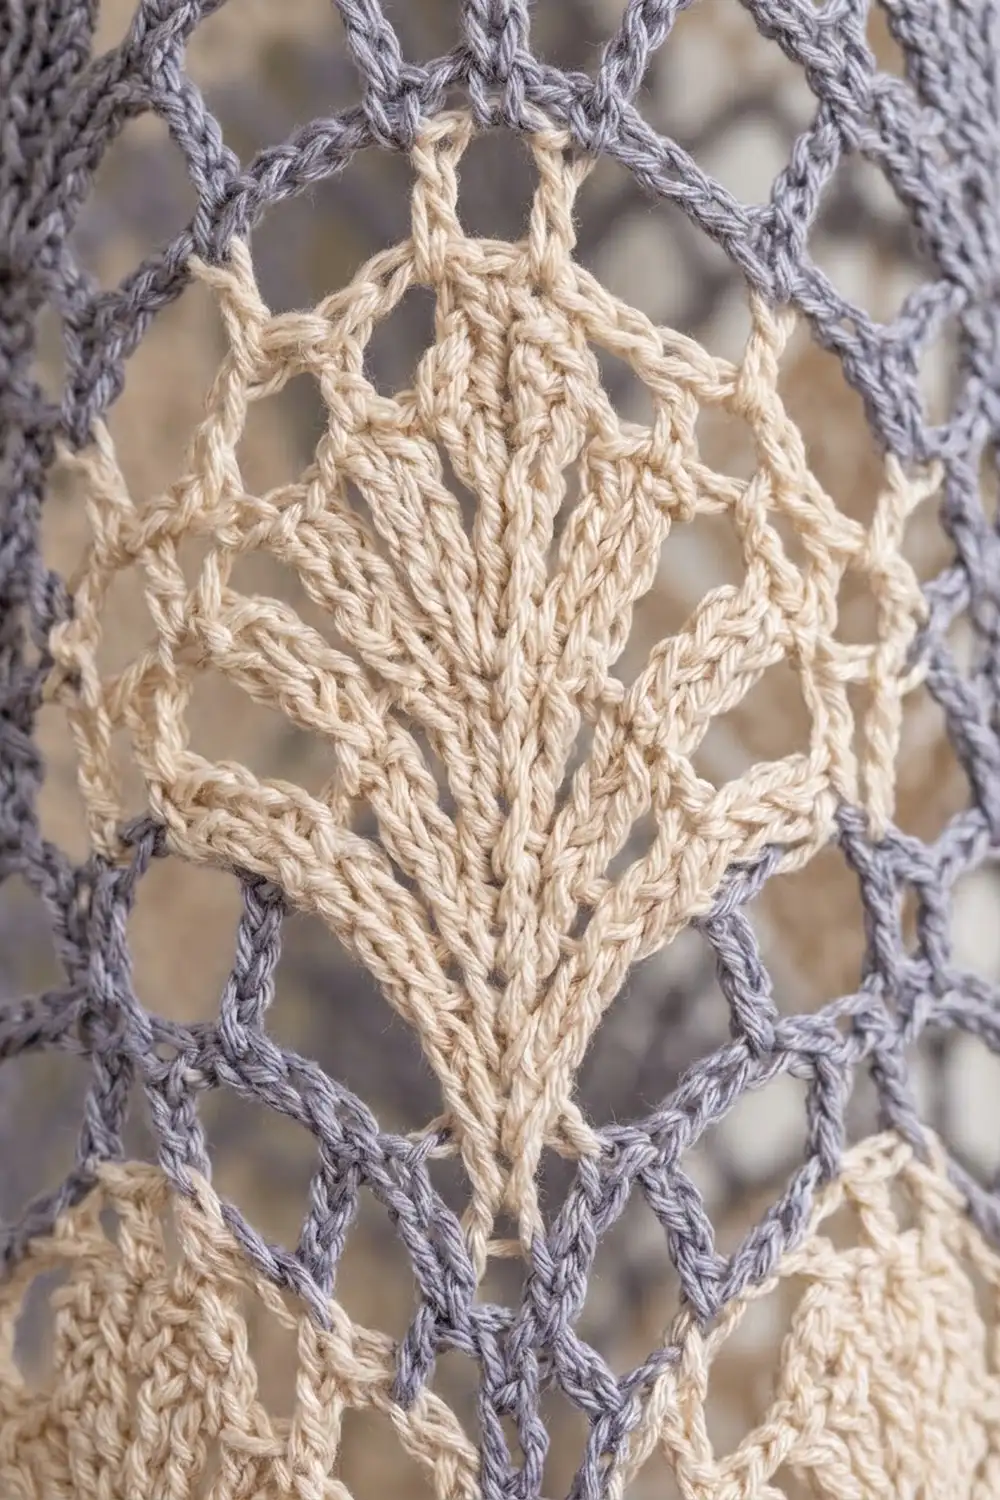
Panel Body
The repeat is 16 sts plus 1. This panel uses 10 repeats (n = 10).
Foundation (L): Ch 162.
Row 1 (RS): Sc in 2nd ch from hook and in each ch across, turn. (161 sc)
Work Band A and then Band B. Each band has 5 rows.
Band A (cream plumes, half fans at the edges)
Row 2 – mesh (L): Ch 1, sc in first sc, ch 5, sk 3 sc, sc in next sc; rep from * across, turn. (40 ch-5 loops, 41 sc)*
Number the loops in groups of four (L1–L4) from the hook end.
Row 3 – fan base (join C): Ch 3 (counts as dc), 3 dc in first sc. This is the half fan. Sc in next loop (L1), ch 5, sk next loop (L2), sc in next loop (L3), 7 dc in next loop (L4); rep from * 9 more times. On the final repeat, replace “7 dc in next loop” with “3 dc in last loop, dc in last sc.” Turn.
(9 fans, 2 half fans of 4 dc each, 10 ch-5 sps, 20 sc)*
Row 4 – open fans (C): Ch 4 (counts as dc + ch 1), (dc in next dc, ch 1) twice, dc in next dc. Ch 3, sk sc, sc in ch-5 sp, ch 3, sk sc, dc in next dc, (ch 1, dc in next dc) 6 times; rep from * 8 more times. Ch 3, sk sc, sc in ch-5 sp, ch 3, sk sc, dc in next dc, (ch 1, dc in next dc) twice, ch 1, dc in top of beg ch-3. Turn.
(Each fan: 7 dc and 6 ch-1 sps. Each half fan: 4 dc and 3 ch-1 sps. 10 sc between them.)*
Row 5 – widen fans (C): Ch 5 (counts as dc + ch 2), (dc in next dc, ch 2) twice, dc in next dc. *Ch 1, sc in sc, ch 1, dc in next dc, (ch 2, dc in next dc) 6 times; rep from * 8 more times. Ch 1, sc in sc, ch 1, dc in next dc, (ch 2, dc in next dc) twice, ch 2, dc in 3rd ch of turning ch-4. Fasten off C and turn.
Row 6 – closing row (L): Join L. Ch 1, sc in first dc, (sc in ch-2 sp, sc in next dc) 3 times. This puts 7 sc over the half fan. Sc in ch-1 sp, sc in sc, sc in ch-1 sp, sc in next dc, (sc in ch-2 sp, sc in next dc) 6 times; rep from * 8 more times. Sc in ch-1 sp, sc in sc, sc in ch-1 sp, then sc in next dc, (sc in ch-2 sp, sc in next dc) 3 times, working the final sc into the 3rd ch of the turning ch-5. Turn.
(161 sc = 2 half fans x 7 + 9 fans x 13 + 10 gaps x 3 = 14 + 117 + 30)*
Band B (lavender plumes, offset by half a repeat)
Work Band B entirely in L.
Row 7 – mesh: Work as Row 2. (40 loops, 41 sc)
Row 8 – fan base: Ch 3 (counts as dc). Sc in next loop (L1), 7 dc in next loop (L2), sc in next loop (L3), ch 5, sk next loop (L4); rep from * 9 more times. On the final repeat, replace “ch 5, sk next loop” with “ch 2, dc in last sc.” Turn.
(10 fans, 2 edge dc, 9 ch-5 sps, 1 ch-2 sp, 20 sc)*
The Band B fans sit in the L2 loops and the Band A fans sit in the L4 loops. That 2-loop shift is exactly half of the 4-loop repeat.
Row 9: Ch 4 (counts as dc + ch 1), sk ch-2 sp and sc, dc in next dc, (ch 1, dc in next dc) 6 times. *Ch 3, sk sc, sc in ch-5 sp, ch 3, sk sc, dc in next dc, (ch 1, dc in next dc) 6 times; rep from * 8 more times. Ch 1, sk sc, dc in top of beg ch-3. Turn.
Row 10: Ch 3 (counts as dc), sk ch-1 sp, dc in next dc, (ch 2, dc in next dc) 6 times. *Ch 1, sc in sc, ch 1, dc in next dc, (ch 2, dc in next dc) 6 times; rep from * 8 more times. Sk ch-1 sp, dc in 3rd ch of turning ch-4. Turn.
Row 11 – closing row: Ch 1, 2 sc in first dc. Sc in next dc, (sc in ch-2 sp, sc in next dc) 6 times, then sc in ch-1 sp, sc in sc, sc in ch-1 sp; rep from * 8 more times. Sc in next dc, (sc in ch-2 sp, sc in next dc) 6 times, then 2 sc in top of turning ch. Turn.
(161 sc = 10 fans x 13 + 9 gaps x 3 + 4 edge sc = 130 + 27 + 4)*
The doubled edge sc fill the small gap left by the edge dc. This brings the count back to 161 so the next mesh row lines up.
Continue
Repeat Rows 2–11 for a total of 13 times (26 bands), ending with Row 131. Do not fasten off L.
Weave in all the C tails along the band edges as you go. The side border will hide them.
Make Both Panels
Work a second panel exactly as written. For the pair you will need 1500 g of L and 1000 g of C in total.
Layout on the rod:
[ Left panel ]   (doorway)   [ Right panel ]
   7 tabs                       7 tabs
The panels are not joined. Each one hangs on its own tabs, so there is no joining step.
Border
Border gauge: 4 sc = 1 in (2.5 cm), the same as the body.
Rnd 1 (L): Turn so you are working along the top of Row 131. Ch 1. Work 3 sc in the first st (corner). Sc in the next 159 sts, then 3 sc in the last st (corner).
Down the side, work into the row ends. Each band is 12 sc: 1 sc in the sc-row end, 2 sc in the mesh-row end, and 3 sc in each of the 3 dc-row ends. Finish the side with 1 sc in the Row 1 end. (313 sc)
Along the remaining loops of the foundation chain, work 3 sc in the first worked ch (corner), 1 sc in each of the next 159 ch, and 3 sc in the last ch (corner). Work the second side as the first (313 sc). Join with a sl st to the first sc.
Total: 2 x 159 + 2 x 313 + 4 x 3 = 956 sts.
Counted from corner center to corner center inclusive, each top and bottom side has 163 sts, and each long side has 317 sts. Those counts already include the corner centers. Do not add them again.
Scalloped Hem (worked across the bottom 163 sts only)
Row S1 (L): Join at a bottom corner center. Ch 1, sc in the same st, ch 5, sk 5 sts, sc in next st; rep from * 26 more times, ending in the opposite corner center. Turn. (27 loops, 28 sc)*
Row S2 (C): Join C. Ch 1. Sc in next loop, [dc, (ch 1, dc) 8 times] in next loop, sc in next loop; rep from * 8 more times. Fasten off. (9 scallops of 9 dc each)*
Why it works: From the first sc to the last, Row S1 spans 162 sts. Since 162 = 27 x 6, the loops fit exactly. Then 27 loops = 9 scallops x 3 loops, so the hem ends with a full scallop at each corner.
Tabs (worked across the top 163 sts)
Tab rows (L): Join at a top corner center. Sc in 7 sts, turn. Work 23 more rows of 7 sc. That is 24 rows, or 6 in (15.2 cm). Fasten off, leaving a 16 in (40.6 cm) tail.
Sk 19 sts, join, and work the next tab. Make 7 tabs in total.
Spacing check: 7 tabs x 7 sts + 6 gaps x 19 sts = 49 + 114 = 163.
Each tab is 1.75 in (4.4 cm) wide, and the gaps are 4.75 in (12.1 cm). Fold each tab to the WS so the last row meets the tab base. Whipstitch it in place to form a 3 in (7.6 cm) loop.
Final Blocking
- Weave in all the remaining tails, splitting the plies on the WS.
- Lay the panel flat on mats, in sections if needed. A floor covered with towels works too.
- Mist it until it is damp but not soaked.
- Pin the sides straight to 40.75 in (103.5 cm) wide.
- Pin the length to 80.5 in (204.5 cm), excluding the tabs.
- Pin the tip of each plume up and each scallop point down, so the fans open evenly.
- Let it dry completely before unpinning. Hang it for 24 hours to let the lace settle.
Final Quality-Control Checklist
- Every closing row has 161 sc.
- Every mesh row has 40 loops.
- Band A has 9 full fans plus 2 half fans; Band B has 10 full fans.
- The plumes alternate color and are offset by half a repeat.
- Rnd 1 has 956 sts, with 3 sc at each corner.
- The hem has 9 scallops ending in both corners.
- There are 7 evenly spaced tabs, and both panels have the same drop.
Troubleshooting
- The panel narrows or flares: Recount the closing row. A missing or extra edge sc changes the next mesh row.
- The fans pucker: Your ch-2 spaces are too tight. Loosen them, or chain 3 instead of 2 and keep the counts the same.
- The sides wave: Rework the side with 1 fewer sc per band, or make the side sc tighter.
- The panel grows when it hangs: Cotton drops with weight. Block it while it hangs, or shorten the panel by one band.
- The tabs twist: Sew the fold evenly across all 7 sts.
Care
Hand wash or machine wash cold on a gentle cycle in a mesh bag. Reshape and dry flat. Never hang the panel wet.
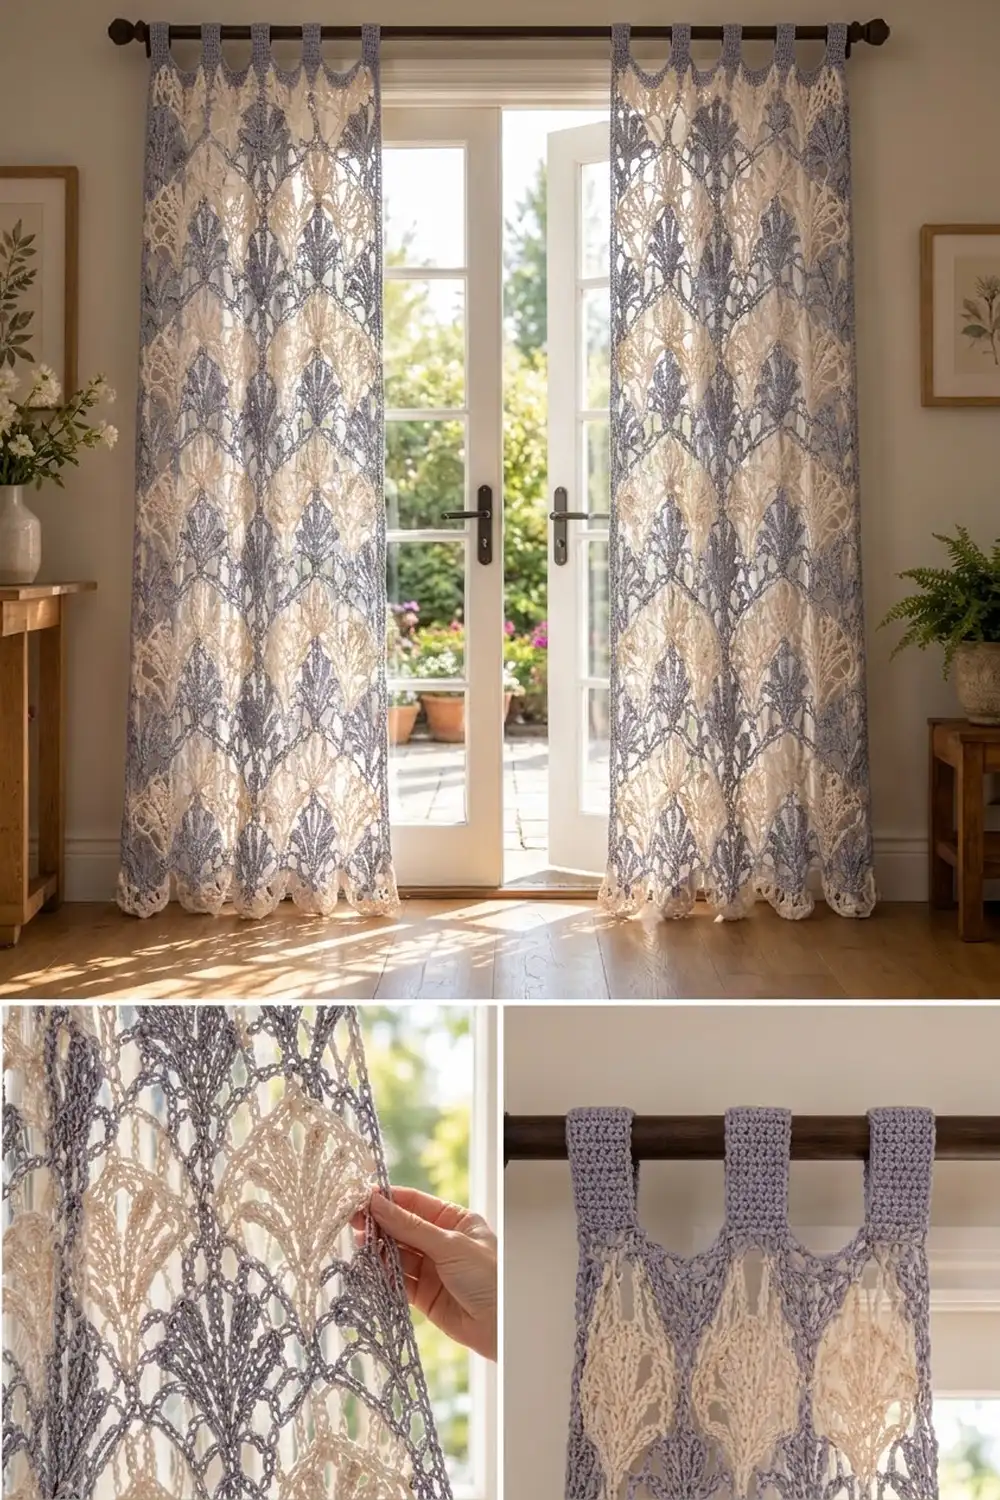
Final Notes
The measurement chain is 16 sc = 4 in (10.2 cm), so 161 sts give a width of 40.25 in (102.2 cm). There are 26 bands of 3 in (7.6 cm) each, for a body length of 78.25 in (198.8 cm). The border makes the panel 40.75 in x 80.5 in (103.5 cm x 204.5 cm), and the 3 in (7.6 cm) tabs give a total drop of 83.5 in (212.1 cm). If your gauge, closing-row counts, and loop counts hold, the scallops and tabs will land exactly.
Happy crocheting!