

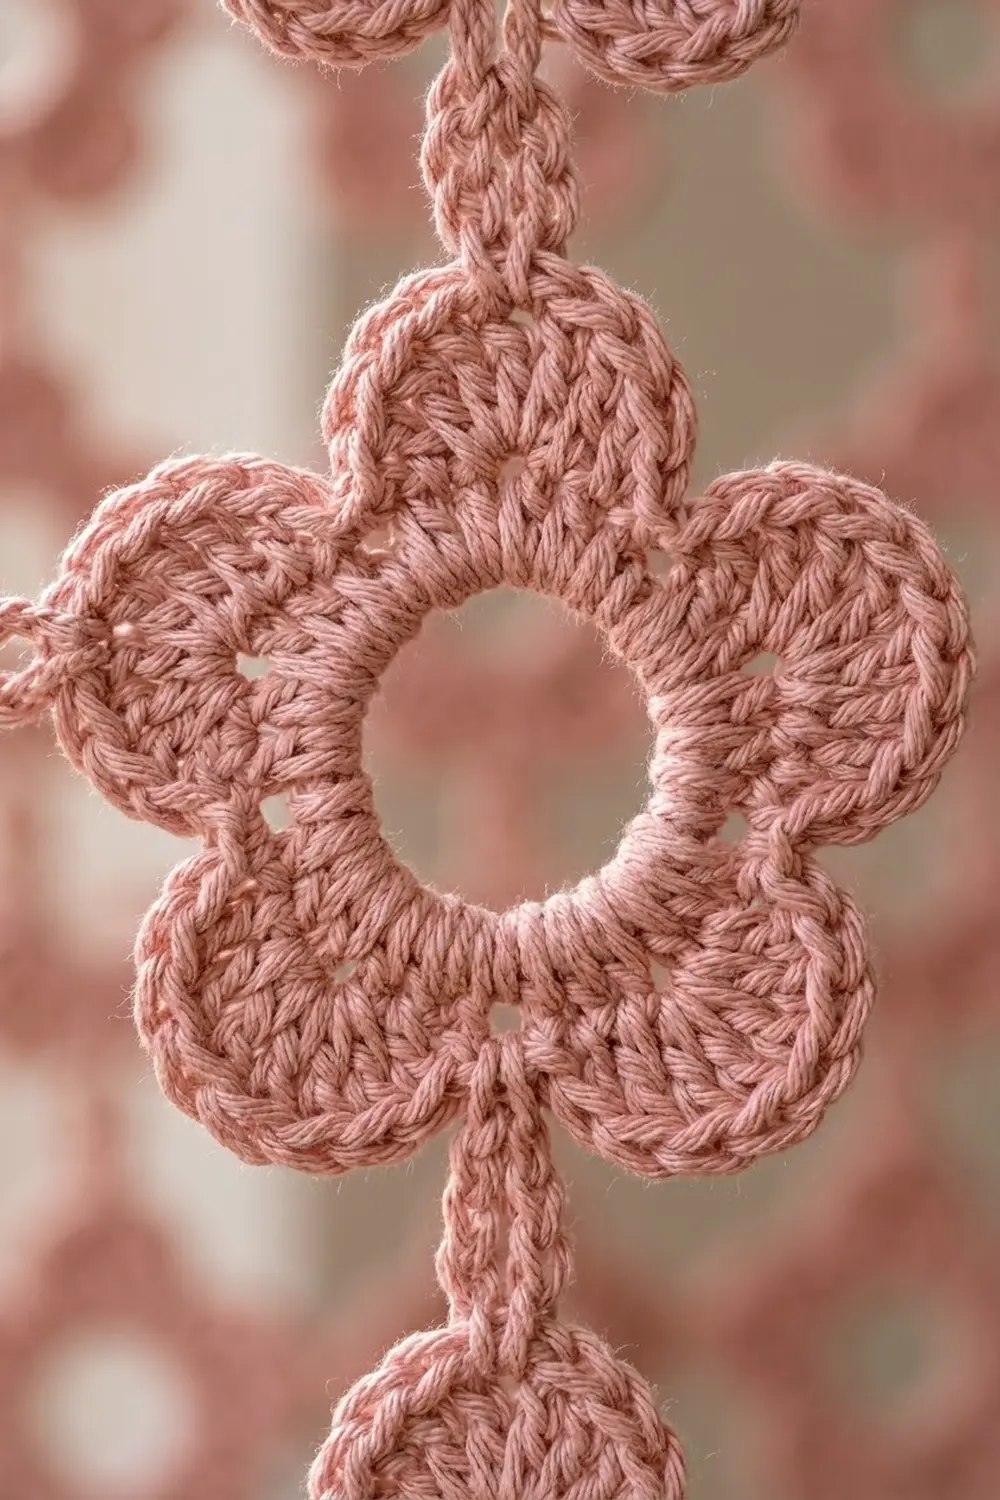
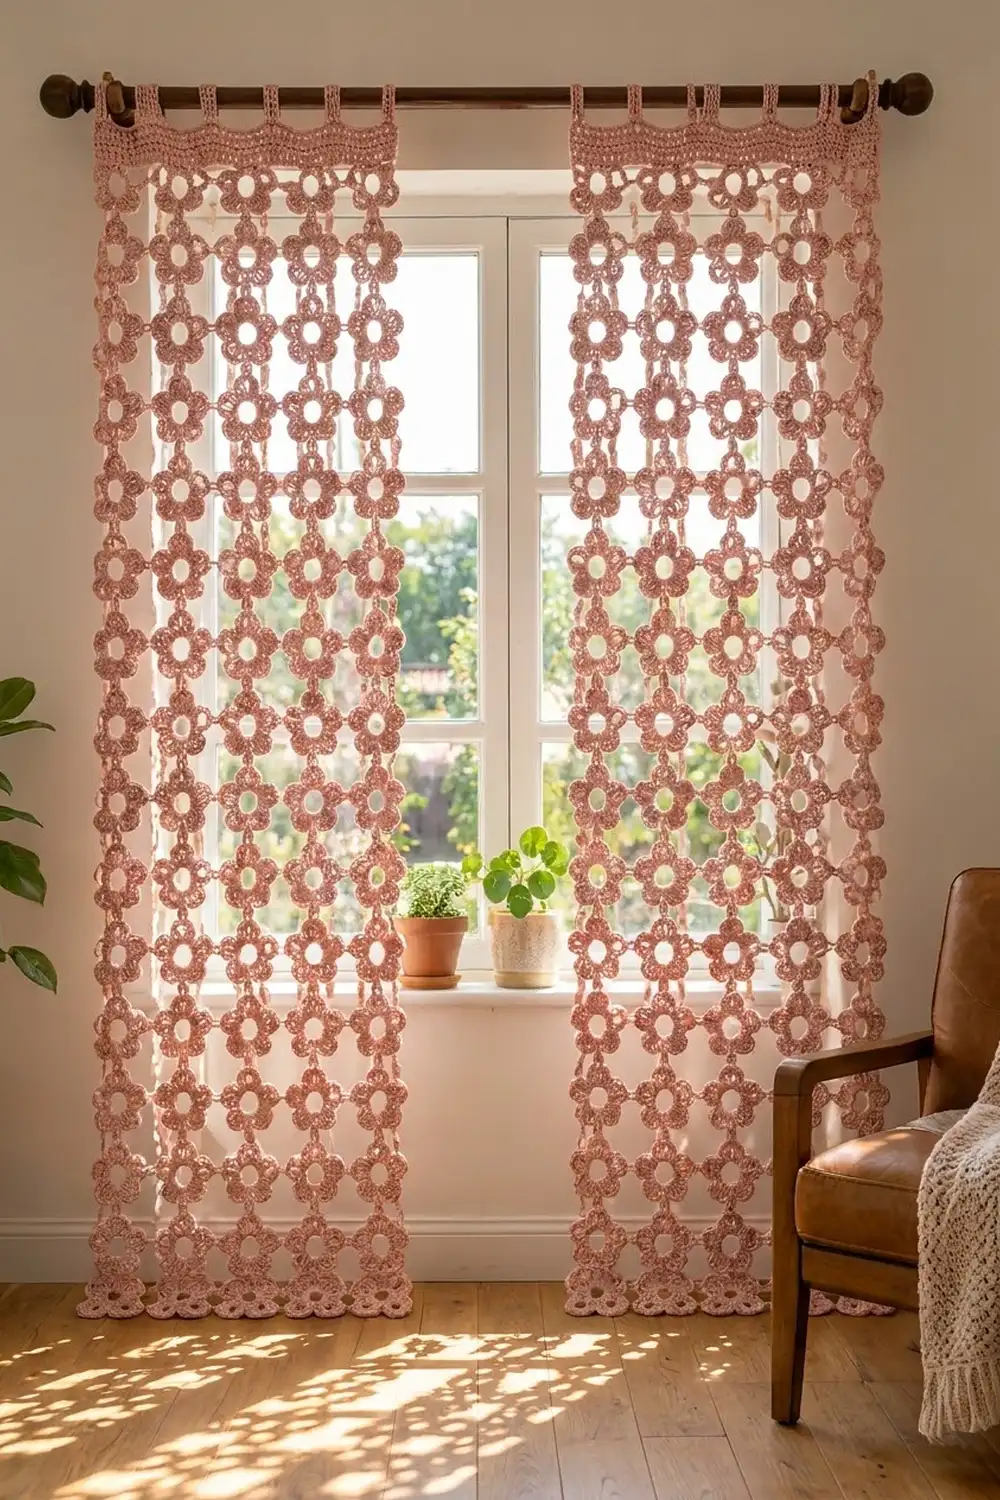
Rosewater Bloom is a lacy curtain panel made from small five-petal flowers linked into an open grid. Each flower has a large round open center, five rounded petals with a neat single crochet outline, and short chain bars that join it to its neighbors. The result filters light and throws flower-shaped shadows, but it still gives a window some soft privacy.
The sample is worked in one dusty rose cotton and hung as a matching pair from a wooden rod. A solid double crochet header band with narrow tab loops runs across the top of each panel. The sides and bottom are left as natural petal scallops, so nothing extra frames the lace.
This pattern uses US crochet terms. One finished panel measures 22.5 in (57.2 cm) wide at the header and 69.5 in (176.5 cm) long from the top of the band to the lowest petals. The tabs add about 2 in (5.1 cm) of loop above the band.
Construction is simple and repeats a lot. You make the first flower in full, then join every following flower to its neighbors during its last round. The last step is working the header straight across the top flowers and adding the tabs.
Finished Size and Construction
- Finished panel size: 22.5 in (57.2 cm) wide x 69.5 in (176.5 cm) long, plus about 2 in (5.1 cm) of tab loop
- Skill level: Intermediate (needs patience for join-as-you-go)
- Terminology: US
- Yarn weight: Worsted (#4) cotton
- Hook: 5.0 mm (H-8)
- Number of pieces: 75 flower motifs per panel, 150 for the pair
- Layout: 5 motifs wide x 15 motifs tall per panel
- Motif size: 4 in (10.2 cm) across at the widest point
- Motif pitch: 4.5 in (11.4 cm) center to center, horizontally and vertically
- Size before header: about 22 in (55.9 cm) wide x 66.5 in (168.9 cm) tall
- Header depth: 3 in (7.6 cm), plus tabs
Materials
Use a smooth, mercerized or combed worsted cotton. Cotton keeps the petals crisp, holds its shape on the rod, and stands up to sunlight better than most acrylics. Avoid very fuzzy yarns, because the open centers and chain bars look best with clear stitch definition.
- Dusty rose worsted cotton: about 850 g / 1,320 m (1,445 yd) for the pair of panels, based on a yarn of about 155 m (170 yd) per 100 g
- Motifs: about 6.5 m (7.1 yd) and 4.2 g each
- Header and tabs: about 50 m (55 yd) per panel
Tools:
- 5.0 mm (H-8) crochet hook
- Tapestry needle
- Stitch markers
- Rust-proof pins and a blocking surface (foam mats or a carpet covered with a towel)
- Spray bottle
- Measuring tape
These quantities include a margin of roughly 20% for gauge differences, joining tails, and test motifs.
Abbreviations (US Terms)
- ch – chain
- sl st – slip stitch
- sc – single crochet
- hdc – half double crochet
- dc – double crochet
- sk – skip
- sp – space
- st(s) – stitch(es)
- RS – right side
- rep – repeat
Special technique – Link bar: Ch the stated number, sl st into the stated point on the neighboring motif, then sl st back in each ch just made. This leaves one firm, slightly thick chain bar instead of a loose loop.
Gauge and Checkpoints
Make one complete flower and block it before you start the panel. With 150 motifs, a small difference per motif adds up across the whole curtain.
Motif checkpoints:
- After Rnd 2: 2 in (5.1 cm) across, with an open center of about 1 in (2.5 cm)
- After Rnd 3: 3.25 in (8.3 cm) across
- After Rnd 4: 4 in (10.2 cm) across at the widest point
Header gauge: 10 dc and 4 dc rows = 3 in (7.6 cm) wide x 2 in (5.1 cm) tall. Work a small swatch of 12 dc for 5 rows to check this.
If your motif is too big, go down a hook size (4.5 mm). If it is too small, go up a size (5.5 mm). If only the center hole looks wrong, check your Rnd 1 chain tension. A tight starting chain shrinks the opening.
Flower Motif
Rnd 1: Ch 15, sl st in first ch to form a ring. (15 ch)
Rnd 2: Ch 1, work 30 sc into the ring, covering the chain fully. Sl st in first sc to join. (30 sc)
Rnd 3 (petals): Ch 1, *sc in next st, hdc in next st, 2 dc in next st, 2 dc in next st, hdc in next st, sc in next st; rep from * 4 more times. Sl st in first sc to join.
(40 sts: 30 sts worked 1 per existing st + 10 extra sts from the 2-dc increases. Each petal has 8 sts sitting on 6 base sts.)
Each petal now has: sc, hdc, dc, dc, dc, dc, hdc, sc.
Rnd 4 (outline, unjoined motif): *Sl st in sc, sc in hdc, sc in next dc, 2 sc in next dc, ch 2, 2 sc in next dc, sc in next dc, sc in hdc, sl st in sc; rep from * 4 more times. Sl st in first sl st and fasten off.
(50 sts + 5 ch-2 tip sps: 40 sts worked 1 per existing st + 10 extra sts from the increases. Each petal has 10 sts plus 1 ch-2 tip.)
The two sl sts where petals meet form a deep notch, and the ch-2 gives each petal a rounded, slightly pointed tip.
Petal names: Hold the motif RS up with the first petal of Rnd 4 pointing straight up. For right-handed crocheters, the petals then go in this order: A (top), B (upper left), C (lower left), D (lower right), E (upper right). Left-handed crocheters get the mirror image, so read “left” as “right” throughout. The bottom notch is the gap between the last sl st of petal C and the first sl st of petal D.
Joining As You Go
Joining happens during Rnd 4 of every motif except the first one. Work Rnds 1–3 as usual. In Rnd 4, replace the ch-2 at a petal tip with a link bar wherever that tip meets an existing motif:
- Horizontal link (petal B): In place of ch 2, ch 4, sl st in the ch-2 tip sp of petal E on the motif to the left, sl st back in each of the 4 ch. Continue with 2 sc in next dc.
- Vertical link (petal A): In place of ch 2, ch 9, sl st into the bottom notch of the motif above (insert hook between the two notch sl sts and under the Rnd 3 sc below them), sl st back in each of the 9 ch. Continue with 2 sc in next dc.
All other tips keep their plain ch 2.
Why the link lengths differ: The upper side petals stick out almost to the motif’s full width, so a short 4-ch bar spaces the centers 4.5 in (11.4 cm) apart. The bottom notch sits only about 1 in (2.5 cm) below the center, so the vertical bar needs 9 ch, about 1.5 in (3.8 cm), to give the same 4.5 in (11.4 cm) pitch.
Tension: Keep the link chains the same size as your other chains. Then sl st back firmly, but not tightly enough to pucker. Bars that are too loose make the panel droop, and tight ones make the grid ripple.
Make All Pieces
Each panel has 75 motifs in one color (dusty rose). The pair takes 150.
Work the motifs in rows from left to right and top to bottom:
- Row 1, motif 1: Unjoined motif.
- Row 1, motifs 2–5: Horizontal link at petal B only.
- Rows 2–15, motif 1: Vertical link at petal A only.
- Rows 2–15, motifs 2–5: Vertical link at petal A, then horizontal link at petal B.
Layout for one panel (O = motif, — = horizontal link, | = vertical link):
Row 1:   O—O—O—O—O
         | | | | |
Row 2:   O—O—O—O—O
         | | | | |
Row 3:   O—O—O—O—O
         ...  (Rows 4–14 repeat the same way)
Row 15:  O—O—O—O—O
Size checkpoints:
- After Row 1: about 22 in (55.9 cm) wide from outer petal tip to outer petal tip.
- After Row 4: 13.5 in (34.3 cm) from the center of Row 1 to the center of Row 4.
- After Row 15: about 66.5 in (168.9 cm) from the Row 1 top tips to the lowest Row 15 petals.
Weave in ends as you go. With 150 motifs, saving the ends for the finish makes for a very long final evening.
Border: Header Band and Tabs
The header is the only border. It runs straight across the top tips (petal A) of the 5 Row 1 motifs. The sides and bottom keep their scalloped petal edge.
Border gauge: 10 sts = 3 in (7.6 cm), so 15 sts = 4.5 in (11.4 cm). That is exactly one motif pitch.
Per-motif allotment: Each top-row motif gives the header 15 sts: ch 7, 1 sc in its top tip, ch 7. With 5 motifs, the starting count is 5 x 15 = 75 sts. No extra stitches are added between motifs, because the two ch-7 sections already fill each gap.
Row 1: With RS facing, place a slipknot on the hook. *Ch 7, sc in the ch-2 tip sp of petal A on the next motif, ch 7; rep from * across all 5 top motifs, starting at the right-hand motif. Between two motifs you will chain 14 in a row.
(75 sts: 5 sc + 70 ch)
Row 2: Turn, ch 3 (counts as first dc), sk first ch, dc in each of next 74 sts. (75 dc)
Rows 3–6: Turn, ch 3 (counts as first dc), sk first st, dc in each st across, ending with dc in top of the turning ch. (75 dc each row)
Row 7: Turn, ch 1, sc in each st across. (75 sc) Fasten off.
Rows 1–7 measure about 3 in (7.6 cm) deep: about 0.25 in (0.6 cm) for Row 1, 2.5 in (6.4 cm) for Rows 2–6, and 0.25 in (0.6 cm) for Row 7.
Tabs (make 6): Tab sts on Row 7 are 1–5, 15–19, 29–33, 43–47, 57–61, and 71–75. Each tab is 5 sts wide with a 9-st gap between tabs: 6 x 5 + 5 x 9 = 30 + 45 = 75.
- Tab Row 1: With RS facing, join yarn in the first tab st, ch 1, sc in same st and in each of the next 4 sts. (5 sc)
- Tab Rows 2–20: Ch 1, turn, sc in each st across. (5 sc)
Each tab is 5 in (12.7 cm) long. Fold it to the back and whipstitch the last row to the back of Row 5 in the same 5 columns. That leaves about a 2 in (5.1 cm) loop, which fits rods up to 1.25 in (3.2 cm) across.
Why the math works: The motif pitch is 4.5 in (11.4 cm), and 15 header sts at 10 sts per 3 in (7.6 cm) also measure 4.5 in (11.4 cm). So 75 sts make 22.5 in (57.2 cm), and the band sits flat without pulling the flowers together or making them flare.
Final Blocking
- Weave in all remaining ends, following the stitch direction. Do not cut close to the fabric.
- Lay the panel RS up on a large padded surface. Work in sections if needed.
- Pin the header straight first, at 22.5 in (57.2 cm) wide.
- Pin each motif row so the centers are 4.5 in (11.4 cm) apart, both across and down.
- Pin out each petal tip and open each center into a round hole.
- Mist with water until the cotton is damp but not dripping.
- Leave it to dry completely, then unpin and move on to the next section.
Final Quality-Control Checklist
- 75 motifs per panel, in 15 rows of 5
- Every motif has 5 petals and a round, open center
- Every horizontal link is 4 ch and every vertical link is 9 ch
- No petal tips are joined by mistake to the wrong neighbor
- Header Rows 2–6 each have 75 dc, and Row 7 has 75 sc
- 6 tabs, evenly spaced and sewn securely
- Panel measures 22.5 in (57.2 cm) x 69.5 in (176.5 cm), not counting the tabs
- Both panels match in length to within 0.5 in (1.3 cm)
Troubleshooting
Center hole closes up: Your Rnd 2 sc are bunching. Make sure all 30 sc fit around the ring, or chain a little more loosely for Rnd 1.
Petals cup instead of lying flat: Rnd 4 is too tight. Loosen your sc or go up half a hook size for Rnd 4 only.
Grid slants to one side: Check that you always join petal B to petal E on the left neighbor. Joining to petal D instead tilts the row.
Header ripples: Row 1 chains are too loose. Redo Row 1 with a tighter chain and check that the band measures 22.5 in (57.2 cm).
Header pulls the top flowers inward: Row 1 chains are too tight. Chain more loosely or go up a hook size for Row 1 only.
Panel stretches longer when hung: Cotton relaxes with weight. Block and hang for a day before measuring. If needed, leave off the last motif row.
Care
Hand wash cool with mild detergent, squeeze out gently, and dry flat, pinned to the blocking measurements. Do not hang the panel to dry while it is wet, because the weight will stretch the vertical links.
Final Notes
The whole curtain rests on a single measurement chain. The motif is 4 in (10.2 cm) across, and the 4-ch and 9-ch link bars set a 4.5 in (11.4 cm) pitch. Five motifs make about 22 in (55.9 cm) of lace, and 15 rows make about 66.5 in (168.9 cm). Each top motif gives the header 15 sts, so 75 sts make a 22.5 in (57.2 cm) band, which adds 3 in (7.6 cm) of depth for a 69.5 in (176.5 cm) panel. Check your first motif and the panel will follow.
Happy crocheting!