

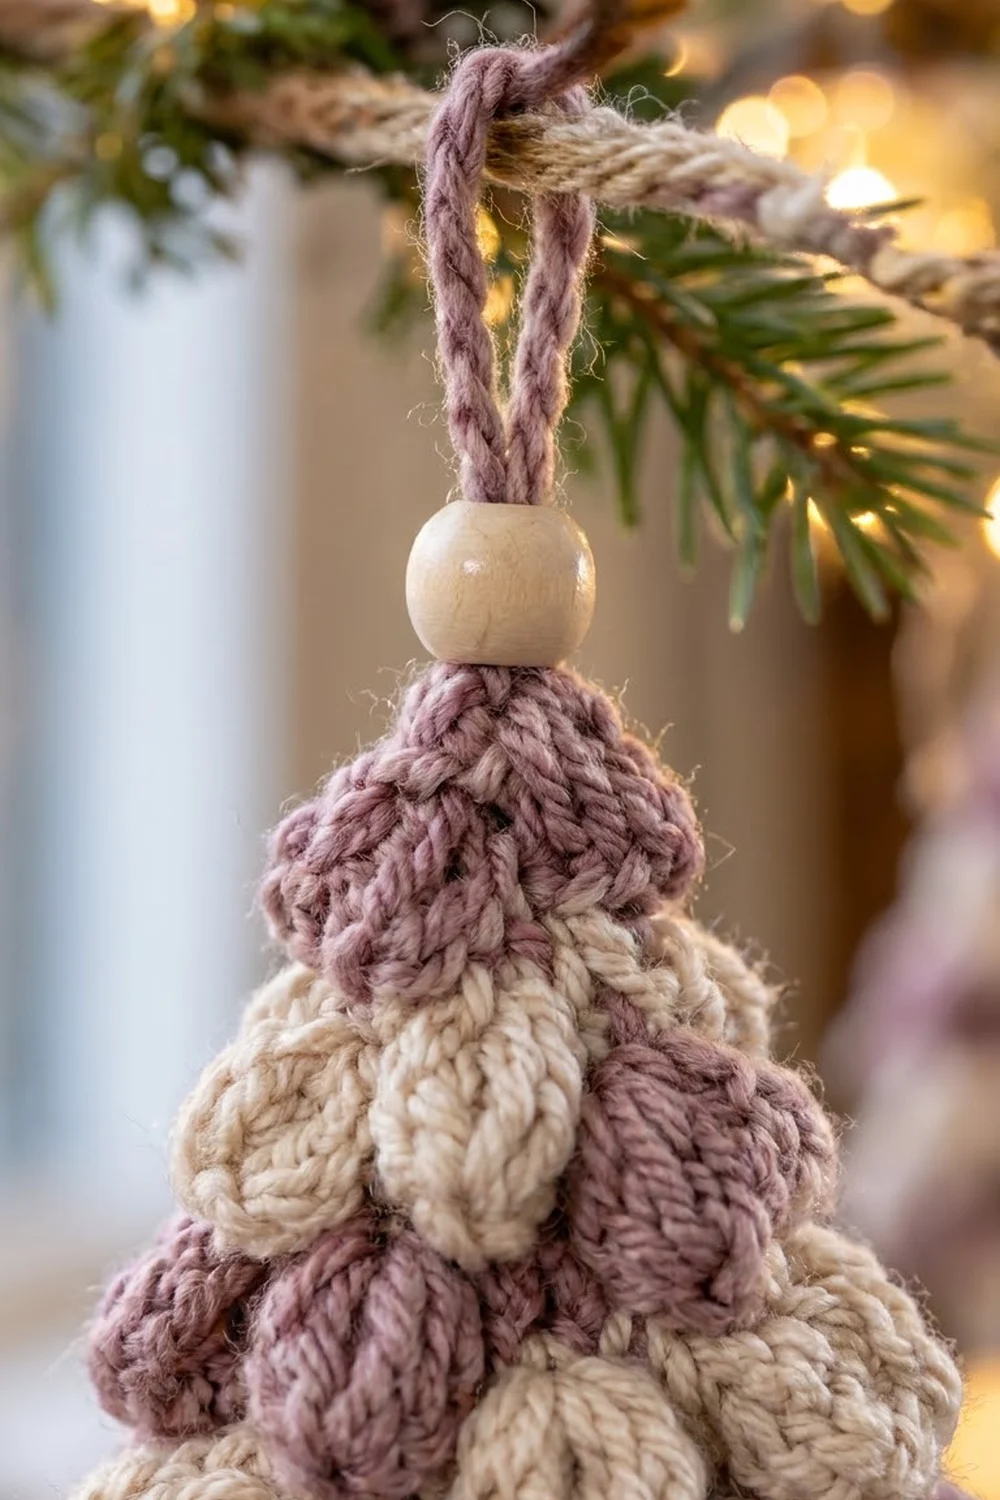
This little tree is covered in overlapping teardrop leaves that give it a soft, scaly look. Dusty mauve and warm cream leaves alternate in a checkerboard. A ribbed taupe trunk, a wooden bead and a simple mauve loop finish it for hanging on a tree or a garland.
The finished ornament measures 3.6 in (9.1 cm) wide and 4.25 in (10.8 cm) tall without the bead and loop. With the bead and loop it is about 6.75 in (17.1 cm) tall. The pattern uses US crochet terms throughout.
You build the ornament from small parts. First you crochet a flat mauve triangle as the base and edge it with one round of single crochet. Next you make 21 small teardrop leaves, a ribbed trunk and a chain loop. Then you sew the leaves to the base in six staggered tiers, attaching only the top half of each leaf so the rounded ends overlap.
Every part is small and quick. The finished look depends on accurate placement, so this pattern gives exact measurements for every tier.
Finished Size and Construction
- Finished size: 3.6 in (9.1 cm) wide × 4.25 in (10.8 cm) tall, not counting the bead and loop
- Total height with bead and loop: about 6.75 in (17.1 cm)
- Skill level: Easy
- Terminology: US
- Yarn weight: Worsted (#4)
- Hook: 4.5 mm (US 7)
- Number of pieces: one ornament, made from 1 base triangle, 21 leaves, 1 trunk and 1 loop
- Layout: 6 staggered tiers of 6, 5, 4, 3, 2 and 1 leaves, from bottom to top
- Leaf size: 0.75 in (1.9 cm) tall × 0.6 in (1.5 cm) wide
- Base size before border: 3.25 in (8.3 cm) wide × 2.9 in (7.4 cm) tall
- Border depth: 0.125 in (0.3 cm), one round of single crochet
Materials
Use a smooth or slightly fuzzy worsted-weight wool or wool blend. A light halo helps the leaves look soft and frosted. Avoid very slippery yarns, because the leaves need to hold their teardrop shape.
- Color M (dusty mauve): 15 g / 30 m (32.8 yd), for the base, 10 leaves and the loop
- Color C (warm cream): 10 g / 20 m (21.9 yd), for 11 leaves
- Color T (taupe-mauve): 5 g / 10 m (10.9 yd), for the trunk
The quantities include a safety margin. One ornament actually uses about two-thirds of these amounts.
Tools:
– 4.5 mm (US 7) crochet hook
– One 12 mm (0.5 in / 1.3 cm) natural wooden bead with a hole at least 4 mm wide
– Tapestry needle
– Ruler or tape measure
– Rustproof pins
– Scissors
– Spray bottle or steamer for blocking
Abbreviations (US Terms)
- ch: chain
- sl st: slip stitch
- sc: single crochet
- hdc: half double crochet
- dc: double crochet
- sc2tog: single crochet 2 together
- sc3tog: single crochet 3 together
- BLO: back loop only
- st(s): stitch(es)
- RS / WS: right side / wrong side
- M, C, T: mauve, cream, taupe
Special stitch: the teardrop leaf. This is a small oval worked around both sides of a 4-chain foundation. One end gets a 5-dc fan and becomes the rounded bottom of the leaf. The other end, at the skipped chain, stays narrow and becomes the point.
Gauge and Checkpoints
Gauge: 16 sc × 18 rows = 4 in (10.2 cm) square. That works out to 4 sc and 4.5 rows per inch.
Make one leaf and the base triangle before you make the full set of leaves. Then check these measurements:
- Base after Row 1: 3.25 in (8.3 cm) wide
- Base after Row 13: 2.9 in (7.4 cm) tall
- Base after the border: 3.5 in (8.9 cm) wide × 3.1 in (7.9 cm) tall
- One leaf: 0.75 in (1.9 cm) tall × 0.6 in (1.5 cm) wide
If your base is too big, go down one hook size to 4.0 mm. If it is too small, go up to 5.0 mm.
Leaves can be adjusted on their own:
– If a leaf is wider than 0.65 in (1.7 cm), six leaves will not fit across the bottom tier. Use a smaller hook for the leaves only.
– If a leaf is narrower than 0.55 in (1.4 cm), gaps will show between leaves. Use a larger hook for the leaves only.
Part 1: Base Triangle
Use M. Work in rows. The triangle loses 2 stitches on every odd row from Row 3 onward.
Ch 14.
- Row 1 (RS): Sc in 2nd ch from hook and in each ch across, turn. (13 sts)
- Row 2: Ch 1, sc in each st across, turn. (13 sts)
- Row 3: Ch 1, sc2tog, sc in next 9 sts, sc2tog, turn. (11 sts)
- Row 4: Ch 1, sc in each st across, turn. (11 sts)
- Row 5: Ch 1, sc2tog, sc in next 7 sts, sc2tog, turn. (9 sts)
- Row 6: Ch 1, sc in each st across, turn. (9 sts)
- Row 7: Ch 1, sc2tog, sc in next 5 sts, sc2tog, turn. (7 sts)
- Row 8: Ch 1, sc in each st across, turn. (7 sts)
- Row 9: Ch 1, sc2tog, sc in next 3 sts, sc2tog, turn. (5 sts)
- Row 10: Ch 1, sc in each st across, turn. (5 sts)
- Row 11: Ch 1, sc2tog, sc in next st, sc2tog, turn. (3 sts)
- Row 12: Ch 1, sc in each st across, turn. (3 sts)
- Row 13: Ch 1, sc3tog. (1 st)
Do not fasten off. Go straight on to the Border section, then come back for Parts 2–5.
Checkpoint: The base should be 3.25 in (8.3 cm) wide at the bottom and 2.9 in (7.4 cm) tall.
Part 2: Teardrop Leaves (make 21)
Make 10 leaves in M and 11 leaves in C.
Ch 4.
- Rnd 1: Sc in 2nd ch from hook, hdc in next ch, 5 dc in last ch. Rotate the piece to work along the opposite side of the foundation chain: hdc in next ch, sc in next ch. Sl st to first sc. (9 sts)
Fasten off and leave an 8 in (20.3 cm) tail for sewing. Weave in the starting tail only.
The 5-dc fan forms the rounded bottom of the leaf. The skipped chain at the other end forms the narrow point. Pinch each leaf lengthwise once so it cups slightly and looks plump.
Checkpoint: Each leaf measures 0.75 in (1.9 cm) tall × 0.6 in (1.5 cm) wide.
Part 3: Trunk
Use T. Ch 7.
- Row 1: Sc in 2nd ch from hook and in each ch across, turn. (6 sts)
- Rows 2–4: Ch 1, sc BLO in each st across, turn. (6 sts)
Fasten off and leave an 8 in (20.3 cm) tail.
The trunk measures 1.5 in (3.8 cm) long × 0.9 in (2.3 cm) wide. Hang it with the 1.5 in side running up and down. The BLO ridges then run vertically, like bark.
Part 4: Hanging Loop
Use M. Ch 25, which measures about 5 in (12.7 cm). Fasten off and leave a 6 in (15.2 cm) tail at each end.
Part 5: Assembly
Finish the base border before you start assembly.
Attaching the leaves. Sew each leaf with the point up. Use the leaf’s tail to whipstitch only the upper half of the leaf to the base: the point and the sc and hdc on each side of it. Leave the 5-dc fan unattached so it overlaps the tier below. Within a tier, place the leaves edge to edge. Center each leaf over the gap between two leaves in the tier below.
Measure each tier from the bordered bottom edge of the base to the leaf points:
| Tier | Leaves | Colors, left to right | Points sit at |
|---|---|---|---|
| 1 (bottom) | 6 | M, C, M, C, M, C | 0.35 in (0.9 cm) |
| 2 | 5 | C, M, C, M, C | 0.9 in (2.3 cm) |
| 3 | 4 | M, C, M, C | 1.45 in (3.7 cm) |
| 4 | 3 | C, M, C | 2.0 in (5.1 cm) |
| 5 | 2 | M, C | 2.55 in (6.5 cm) |
| 6 (top) | 1 | M | 3.1 in (7.9 cm), on the top point |
Color check: M = 3 + 2 + 2 + 1 + 1 + 1 = 10 leaves. C = 3 + 3 + 2 + 2 + 1 = 11 leaves. Total = 21 leaves.
The tier points are 0.55 in (1.4 cm) apart and each leaf is 0.75 in (1.9 cm) tall, so each tier overlaps the one below by 0.2 in (0.5 cm). The bottom tier hangs 0.4 in (1.0 cm) below the base.
Tiers 1 through 5 are wider than the base at their height. The leaf edges should extend past the sides of the base, which gives the flared tree outline. Sew those leaves only where they touch the base.
Trunk. Center the trunk on the WS of the base. Its top edge sits 0.35 in (0.9 cm) above the bordered bottom edge. Whipstitch along the top edge and both sides of that overlap. The trunk then shows 0.75 in (1.9 cm) below the lowest leaves.
Bead and loop. Fold the chain in half. Thread both tails through the bead from the top and slide the bead down to the top point. Take the tails through to the WS and sew them in firmly. About 2 in (5.1 cm) of loop shows above the bead.
Border
Work this round straight after Row 13 of the base, with M still on the hook. It neatens the slanted row ends and gives the leaves a firm edge to sew into.
Border gauge: same as the base, 4 sc per inch.
The counts below list the side stitches separately from the 3-sc corner groups.
- Rnd 1: Ch 1. Work 3 sc in the Row 13 st for the top point.
- Left side: Work 1 sc in the end of each row from Row 12 down to Row 2. (11 sc)
- Bottom left corner: 3 sc in the free loop of the first foundation ch.
- Bottom edge: Sc in the free loop of each of the next 11 ch. (11 sc)
- Bottom right corner: 3 sc in the last foundation ch.
- Right side: Work 1 sc in the end of each row from Row 2 up to Row 12. (11 sc)
- Sl st to the first sc. Fasten off and weave in the tails.
Total: 11 + 11 + 11 side sc + 3 corner groups × 3 sc = 42 sc.
Why the math works: The bottom edge has 13 stitches. That is 11 sc plus one corner stitch at each end, which matches the 13 stitches in Row 1, so the edge stays flat. Each slanted side is 3.3 in (8.4 cm) long: the triangle rises 2.9 in (7.4 cm) over a horizontal distance of 1.6 in (4.1 cm). That side holds 11 sc plus a corner stitch at each end, or 13 stitches. At 4 sc per inch, 13 stitches cover 3.25 in (8.3 cm), almost exactly the same length, so the sides neither ruffle nor pull in. The 3-sc corners let the round turn the corners without curling.
Checkpoint: The base now measures 3.5 in (8.9 cm) wide × 3.1 in (7.9 cm) tall.
Final Blocking
- Lightly mist the base before attaching the leaves, or steam it from 1 in (2.5 cm) above. Never press the iron down onto the yarn.
- Pin the base to the measurements: 3.5 in (8.9 cm) across the bottom and 3.1 in (7.9 cm) tall, with straight sides.
- Let it dry completely.
- After assembly, hold the ornament upright. Steam the leaves lightly from the front and shape each fan into a rounded curve with your fingers.
- Do not pin or flatten the leaves. The overlapping, raised edges give the tree its shape.
- Hang the ornament by its loop to dry, so the trunk and leaves settle naturally.
Final Quality-Control Checklist
- The base is 13 sts wide at Row 1 and ends with 1 st at Row 13.
- The border has 42 sc and lies flat with no ruffling.
- You have 21 leaves, 10 in M and 11 in C, each about 0.75 × 0.6 in (1.9 × 1.5 cm).
- The tiers hold 6, 5, 4, 3, 2 and 1 leaves, in a checkerboard of colors.
- The tier points are 0.55 in (1.4 cm) apart, and every leaf points up.
- Only the upper halves of the leaves are sewn down.
- The trunk ridges run vertically, and 0.75 in (1.9 cm) of trunk shows below the leaves.
- The bead sits right on the top point and the loop hangs straight.
- The finished size is 3.6 × 4.25 in (9.1 × 10.8 cm).
Troubleshooting
Leaves curl backward. The 5-dc fan is too tight. Work those dc a little looser, or use a 5.0 mm hook for the leaves only.
The bottom tier is too wide. Your leaves are bigger than 0.6 in (1.5 cm). Overlap them slightly, by about 0.05 in (0.1 cm) each, or remake them with a smaller hook.
The base shows between tiers. Your tiers are spaced too far apart. Measure each tier again from the bordered bottom edge and keep the 0.55 in (1.4 cm) steps.
The sides of the triangle wave. The border has too many stitches on the sides. Work exactly 11 sc per side, one per row end.
The trunk twists. Sew both sides of the overlap, not just the top edge.
The bead slides around. Thread the loop tails through the bead a second time, then sew them down.
Care
Hand wash in cool water, press out the water in a towel and reshape the leaves. Dry flat, then hang it up to finish drying. Store it flat in a box so the leaves don’t get crushed.

Final Notes
Each measurement in this pattern sets up the next. A gauge of 4 sc per inch makes the base 3.25 in (8.3 cm) wide and 2.9 in (7.4 cm) tall. The 42-sc border brings it to 3.5 × 3.1 in (8.9 × 7.9 cm). Six tiers of 0.6 in (1.5 cm) leaves, spaced 0.55 in (1.4 cm) apart, cover the base and widen it to 3.6 in (9.1 cm). The trunk adds height for a finished size of 4.25 in (10.8 cm). If you check your size at each checkpoint, the ornament will come out at the right size.
Happy crocheting!