

This bedspread is made of tall, ribbed leaves set inside an open chain lattice. Each leaf has raised ridges that fan out from its base to its tip, a bit like a pressed leaf or a pineapple panel. The mesh around the leaves lets the sheet show through.
The whole piece uses one color, a soft denim blue, so the texture does all the work. With plain cream bedding, it looks calm and slightly vintage.
The pattern uses US crochet terms. The finished bedspread measures 84 x 94 in (213.4 x 238.8 cm), which fits a queen bed with a generous drop.
You make 90 identical rectangular motifs. Each motif is a ribbed leaf worked in rows, then framed with three rounds of chain loops. You join the motifs as you go on their last round. A two-round scalloped border goes all the way around.
Finished Size and Construction
- Finished size: 84 x 94 in (213.4 x 238.8 cm)
- Skill level: Intermediate
- Terminology: US crochet terms
- Yarn weight: Worsted (#4) cotton or cotton blend
- Hook: 5.0 mm (H-8)
- Number of pieces: 90 motifs, joined as you go
- Layout: 10 motifs wide x 9 motifs long
- Motif size (blocked): 8 x 10 in (20.3 x 25.4 cm)
- Size before border: 80 x 90 in (203.2 x 228.6 cm)
- Border depth: 2 in (5.1 cm)
Materials
Choose a smooth, round worsted cotton or cotton blend. Cotton shows the ribs clearly and keeps the lattice open after blocking. Avoid fuzzy yarns, because they blur the ribs and the mesh.
- Denim Blue: 1,900 g (about 3,600 m / 3,937 yd)
This amount includes a margin of about 10%. Buy all of it from one dye lot. Each motif uses about 15 g (28 m), and the border uses about 320 g (600 m).
Tools:
- 5.0 mm (H-8) crochet hook
- Tapestry needle
- 4 stitch markers
- Tape measure
- Blocking mats, rust-proof pins, spray bottle
Abbreviations (US Terms)
- ch: chain
- sl st: slip stitch
- sc: single crochet
- dc: double crochet
- tr: treble crochet
- sp: space
- st(s): stitch(es)
- RS / WS: right side / wrong side
- fpdc (front post dc): Yarn over. Insert the hook from front to back to front around the post of the stitch, then finish as a dc.
- bpdc (back post dc): Yarn over. Insert the hook from back to front to back around the post, then finish as a dc.
- dc2tog: [Yarn over, insert the hook in the next st, pull up a loop, yarn over, pull through 2 loops] twice. Yarn over and pull through all 3 loops.
- dc3tog: Work like dc2tog over 3 sts, then pull through all 4 loops.
Ribs: A rib is a column of post stitches. Work it as fpdc on RS rows and bpdc on WS rows, so the ridge always stands up on the RS. In the leaf rows, the ch 2 at the start of a row does not count as a stitch.
Gauge and Checkpoints
Make one complete motif and block it before you start the bedspread. This motif is your gauge swatch. If it measures correctly, use it as Motif 1.
- Leaf gauge: 15 sts = 4 in (10.2 cm) across the widest row. 17 rows = 6 in (15.2 cm).
- After Row 7: 15 sts, 4 in (10.2 cm) wide.
- Finished leaf: 4 x 6 in (10.2 x 15.2 cm).
- After Rnd 1: about 5.5 x 8 in (14.0 x 20.3 cm).
- After Rnd 2: about 7 x 9 in (17.8 x 22.9 cm).
- After Rnd 3, blocked: 8 x 10 in (20.3 x 25.4 cm).
If the leaf is too big, use a 4.5 mm hook. If it is too small, use a 5.5 mm hook. Fix the leaf size first, because the frame follows it. If the leaf is right but the frame is too big, make your chains a little tighter.
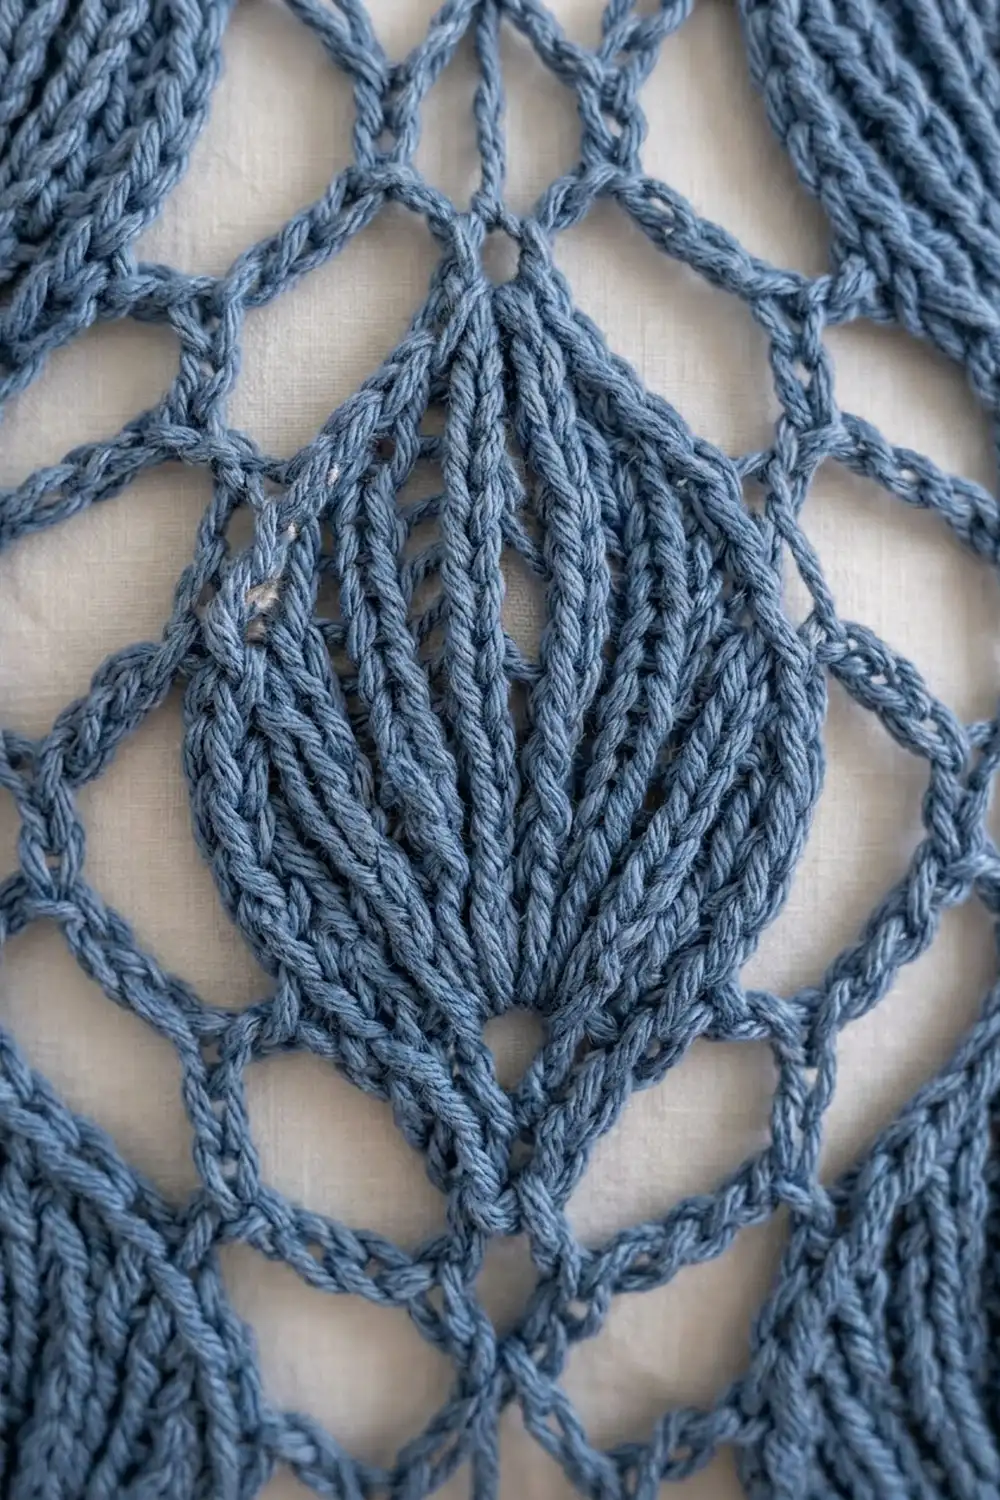
Motif
Leaf (Worked in Rows from the Base)
Row 1 (WS): Ch 3, 3 dc in 3rd ch from hook. Turn. (3 sts)
Row 2 (RS): Ch 2, 2 dc in first st, fpdc around next st, 2 dc in last st. Turn. (5 sts)
Row 3 (WS): Ch 2, 2 dc in first st, *dc in next st, bpdc around next st; rep from * to last 2 sts, dc in next st, 2 dc in last st. Turn. (7 sts)
Row 4 (RS): Ch 2, 2 dc in first st, *fpdc around next st, dc in next st; rep from * to last 2 sts, fpdc around next st, 2 dc in last st. Turn. (9 sts)
On each RS increase row, the fpdc next to each edge starts a new rib. The new ribs lean outward, which makes the fan of ridges.
Row 5: Rep Row 3. (11 sts)
Row 6: Rep Row 4. (13 sts)
Row 7: Rep Row 3. (15 sts, 5 ribs)
Row 8 (RS): Ch 2, dc in first 3 sts, *fpdc around next st, dc in next st; rep from * 3 more times, fpdc around next st, dc in last 3 sts. Turn. (15 sts)
Row 9 (WS): Ch 2, dc in first 3 sts, *bpdc around next st, dc in next st; rep from * 3 more times, bpdc around next st, dc in last 3 sts. Turn. (15 sts)
Row 10: Rep Row 8. (15 sts)
Row 11 (WS): Ch 2, dc2tog over first 2 sts. Work dc in each dc and bpdc around each rib to last 2 sts, then dc2tog. Turn. (13 sts)
Row 12 (RS): Ch 2, dc2tog. Work dc in each dc and fpdc around each rib to last 2 sts, then dc2tog. Turn. (11 sts)
Rows 13–16: Rep Rows 11 and 12 twice more. (9, 7, 5, then 3 sts)
Row 17 (WS): Ch 2, dc3tog. (1 st, the leaf tip)
Do not fasten off. The leaf should measure 4 x 6 in (10.2 x 15.2 cm).
Frame
Rnd 1 (RS): Ch 1, turn, and sc in the dc3tog at the tip.
- Down the first side: Ch 5, sc in the end of Row 15. *Ch 5, skip 1 row end, sc in next row end; rep from * 5 more times. The last sc goes in the end of Row 3.
- Base: Ch 5, sc in the free loop of the foundation ch.
- Up the second side: Ch 5, sc in the end of Row 3. *Ch 5, skip 1 row end, sc in next row end; rep from * 5 more times, ending at Row 15.
- Close the round: Ch 5, sl st to the first sc.
(16 sc and 16 ch-5 loops: 8 on each side)
In Rnd 2, the first-side loops are L1 to L8, with L1 next to the tip. The second-side loops are R8 to R1, with R1 next to the tip.
Rnd 2: Sl st into L1. Ch 1, then work the loops in order:
- L1: sc, ch 5.
- L2 (corner): (tr, ch 7, tr), ch 5.
- L3–L6: [sc, ch 5] in each.
- L7 (corner): (tr, ch 7, tr), ch 5.
- L8 and R8: [sc, ch 5] in each.
- R7 (corner): (tr, ch 7, tr), ch 5.
- R6–R3: [sc, ch 5] in each.
- R2 (corner): (tr, ch 7, tr), ch 5.
- R1: sc, ch 5. Sl st to the first sc.
(12 sc, 8 tr, 16 ch-5 sps, and 4 ch-7 corner sps)
The tall tr corners square off the oval. You now have a rectangle with 3 ch-5 sps across the top, 3 across the bottom, and 5 down each long side, plus the 4 corners.
Rnd 3: Sl st into the next ch-5 sp and then into the next ch-7 corner sp. Ch 1, (sc, ch 5, sc) in the corner sp. *[Ch 5, sc in next ch-5 sp] across to the next corner, ch 5, (sc, ch 5, sc) in the corner sp; rep from * around. End with ch 5 and sl st to the first sc. Fasten off.
Rnd 3 counts: 24 sc and 24 ch-5 loops. Each short side has 4 loops between its corner loops, and each long side has 6. Counting its 2 corner loops, a short side has 6 loops and a long side has 8 loops.
Make All Pieces
Make 90 motifs in Denim Blue. Finish Motif 1 completely. Work Motifs 2–90 through Rnd 2, then join each one during Rnd 3.
Layout (M = motif, leaf tips toward the head of the bed):
Row 9  MMMMMMMMMM
Row 8  MMMMMMMMMM
Row 7  MMMMMMMMMM
Row 6  MMMMMMMMMM
Row 5  MMMMMMMMMM
Row 4  MMMMMMMMMM
Row 3  MMMMMMMMMM
Row 2  MMMMMMMMMM
Row 1  MMMMMMMMMM
That’s 10 across x 9 down, 90 motifs in total.
Joining
Method: Join as you go on Rnd 3. Complete Row 1 from left to right, then add each new row above the last.
Side loops: When you reach a ch-5 loop that should attach to a finished motif, work ch 2, sl st into the matching loop on that motif, ch 2.
Corner loops: Work (sc, ch 2, sl st into the neighbor’s corner loop, ch 2, sc). Where four motifs meet, sl st into the existing join point so all four corners meet in one place.
Stitch-to-stitch logic: Always join one loop to one loop. Long sides join 8 loops to 8, and short sides join 6 to 6. Because the counts always match, the lattice stays straight.
Tension: Keep the join chains as relaxed as your ch-5 loops. If the joins are tight, the seams pucker and the diamonds close up.
Size checkpoint: Three joined motifs measure 24 in (61.0 cm) across, and a full row measures 80 in (203.2 cm). Three rows measure 30 in (76.2 cm) tall. The finished center is 80 x 90 in (203.2 x 228.6 cm).
Border
Border gauge: Rnd 1 puts 5 sc in each loop. That’s 30 sc across 8 in (20.3 cm) on a short motif side and 40 sc down 10 in (25.4 cm) on a long side. Both work out to about 4 sc per inch (2.5 cm), so the edge lies flat.
Rnd 1: With the RS facing, join the yarn in any edge loop. Work 5 sc in every ch-5 loop around, including both corner loops at every seam. In each of the 4 outer corner loops, work 5 sc and mark the 3rd sc as the corner st. Join with a sl st.
Rnd 1 counts:
- Top and bottom edges: 10 motifs x 6 loops x 5 sc = 300 sc. At each outer corner, the 2 sc past the corner st belong to the long edge, so subtract 4: 296 sc per edge, corner st to corner st, including both corner sts.
- Long edges: 9 motifs x 8 loops x 5 sc = 360 sc. Subtract 4 the same way: 356 sc per edge, including both corner sts.
- Total: 296 + 296 + 356 + 356 − 4 shared corner sts = 1,300 sc. Check: 260 edge loops x 5 sc = 1,300.
After Rnd 1, the border is about 0.5 in (1.3 cm) deep.
Rnd 2 (Scallops): Sl st to the next corner st. Ch 1, (sc, ch 3, sc) in the corner st. *[Skip 2 sts, 7 dc in next st, skip 2 sts, sc in next st] across to the next corner st, then (sc, ch 3, sc) in the corner st; rep from * around. Join and fasten off.
Rnd 2 counts: 49 scallops on each short edge and 59 on each long edge, for 216 in total. The border is now about 2 in (5.1 cm) deep.
Why the math works: Each scallop uses 6 sts. A short edge has 296 − 2 = 294 sts between corner sts, and 294 ÷ 6 = 49. A long edge has 356 − 2 = 354, and 354 ÷ 6 = 59. Every edge ends with a sc just before the corner, so no repeat is cut short. The long edges divide evenly only when the number of motif rows is a multiple of 3, which is why there are 9 rows.
Final Blocking
- Weave in all ends along post stitches or chains, working in two directions.
- Soak the bedspread in cool water. Press the water out without wringing.
- Roll it in towels to remove more water.
- Lay it flat on mats or on a clean sheet.
- Pin the corners to 84 x 94 in (213.4 x 238.8 cm).
- Pin the middle of each edge, then pin at every seam.
- Pin each scallop into a round arc.
- Gently spread the lattice diamonds open with your fingers.
- Let it dry completely before unpinning.
Final Quality-Control Checklist
- 90 motifs, all with tips toward the head of the bed
- Each leaf has 17 rows and 5 ribs at its widest point
- Each motif has 24 loops on Rnd 3
- Every seam is joined 1 loop to 1 loop, with no skipped loops
- Border Rnd 1 has 296 sc on each short edge and 356 sc on each long edge
- 49 and 59 scallops per edge
- Blocked size is 84 x 94 in (213.4 x 238.8 cm)
Troubleshooting
- Ribs zigzag: A post stitch went the wrong way. Use fpdc on RS rows and bpdc on WS rows.
- Leaf curls: The post stitches are too tight. Loosen your tension or block harder.
- Motif stays oval: Check that the Rnd 2 corners are tr and sit in L2, L7, R7, and R2.
- Seams pucker: Rework the join chains more loosely.
- Center ripples: The motifs vary in size. Block each one to 8 x 10 in (20.3 x 25.4 cm) before joining.
- Border ruffles: Recount Rnd 1 against 296 and 356.
Care
Hand wash, or machine wash cool on a gentle cycle in a mesh bag. Dry flat and reshape the scallops while the bedspread is damp.
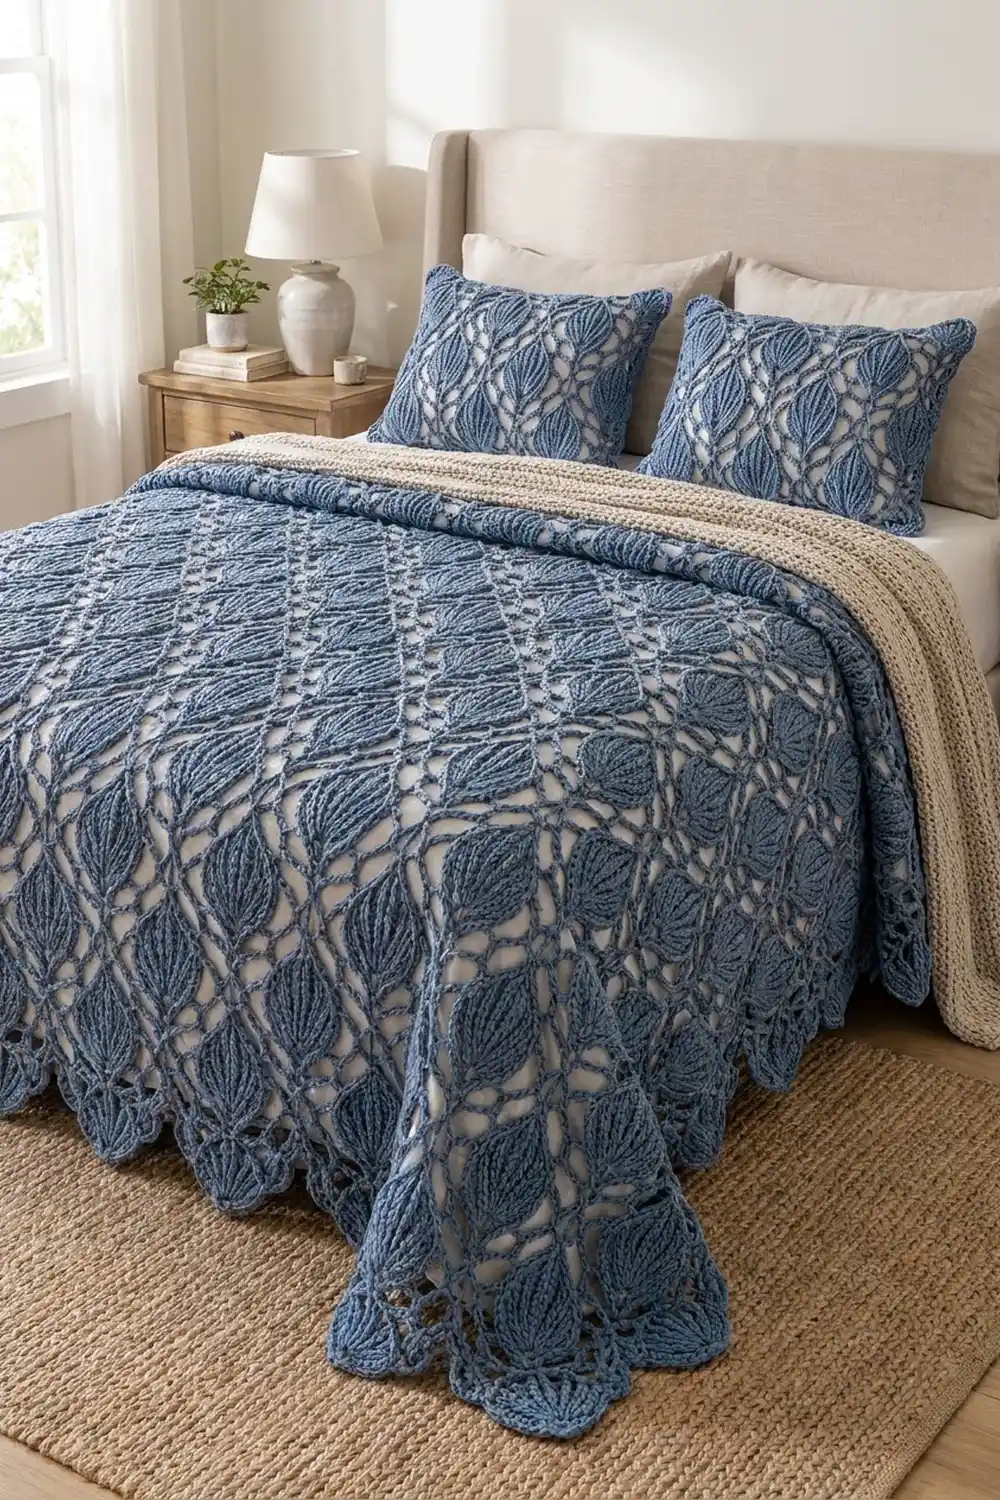
Final Notes
Each stage builds on the one before it:
- Leaf: 4 x 6 in (10.2 x 15.2 cm)
- After Rnd 1: 5.5 x 8 in (14.0 x 20.3 cm)
- After Rnd 2: 7 x 9 in (17.8 x 22.9 cm)
- Blocked motif: 8 x 10 in (20.3 x 25.4 cm)
- Joined center of 90 motifs: 80 x 90 in (203.2 x 228.6 cm)
- With the 2 in (5.1 cm) border: 84 x 94 in (213.4 x 238.8 cm)
Check each stage and the finished size will follow.
Happy crocheting!