

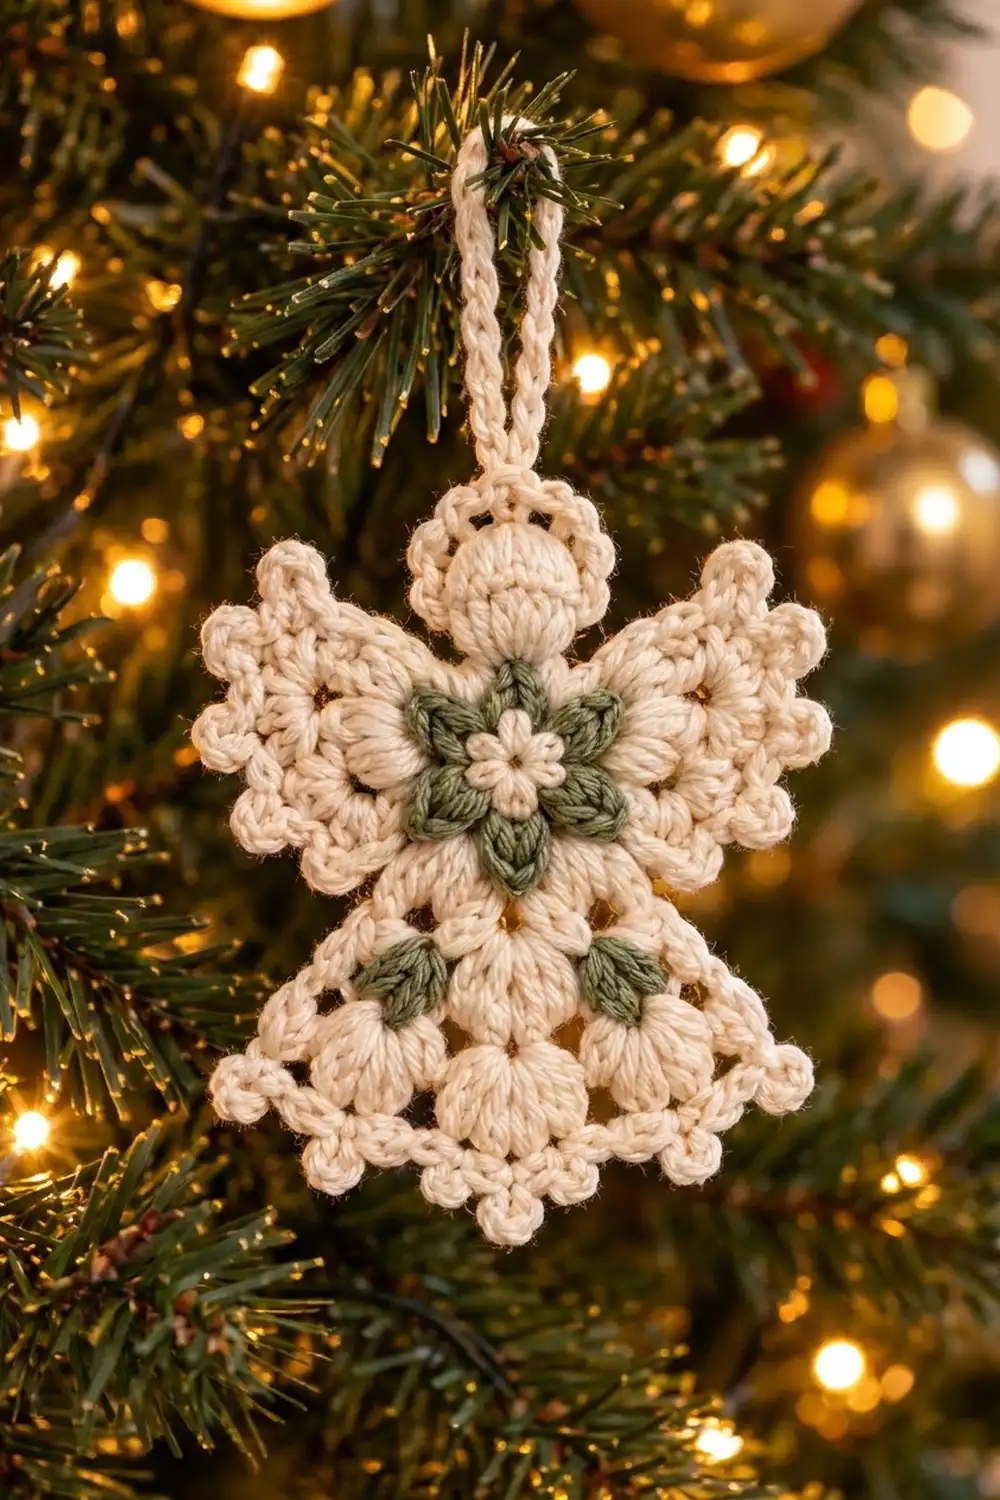
The Sage Blossom Angel is a small, lacy Christmas ornament in soft cream cotton with a sage green flower at its center. She has a round head with a picot halo, two fan-shaped wings full of puff stitches, and a flared openwork skirt edged with picot scallops. A sturdy loop at the top of the halo lets her hang straight on the tree.
You’ll use just two colors. Cream is for the body, wings, head, and edging. Sage green is for the six-petal chest flower and the two tiny leaf sprigs on the skirt. The look is calm, vintage, and textured rather than flat.
This pattern uses US crochet terms. The finished angel is 4.5 in (11.4 cm) wide across the wings and 5.25 in (13.3 cm) tall from the halo to the bottom scallops. The hanging loop adds about 2 in (5.1 cm) above that.
Construction is simple. You start with the chest flower and a cream ring around it (the hub). The skirt, both wings, and the head are each worked in short rows directly off the hub. A two-round border then goes around the whole outline and adds the halo, the hanging loop, and the scallops. Last, you sew two small sage leaf sprigs onto the skirt.
Finished Size and Construction
- Finished size: 4.5 in (11.4 cm) wide x 5.25 in (13.3 cm) tall, excluding loop
- Skill level: Easy-intermediate
- Terminology: US crochet terms
- Yarn weight: DK (light #3) cotton
- Hook: 3.5 mm (E-4)
- Number of pieces: 1 main piece plus 2 tiny sewn-on leaf sprigs
- Layout: single ornament, nothing to assemble
- Hub (chest) size: 1.5 in (3.8 cm) across
- Size before border: 4 in (10.2 cm) wide x 4.75 in (12.1 cm) tall
- Border depth: 0.25 in (0.6 cm) on every edge
Materials
Choose a smooth mercerized or combed DK cotton. Cotton keeps the puff stitches crisp and blocks into sharp picots. Acrylic also works, but the lace will look softer and may need stiffening.
- Color A, cream: 15 g (about 35 m)
- Color B, sage green: 5 g (about 12 m)
These amounts include a comfortable margin for a gauge test and weaving in ends.
Tools:
- 3.5 mm (E-4) crochet hook
- Tapestry needle
- 4 locking stitch markers
- Scissors
- Blocking mat, rustproof pins, and a spray bottle
- Optional: fabric stiffener or starch spray
Abbreviations (US Terms)
- ch – chain
- sl st – slip stitch
- sc – single crochet
- hdc – half double crochet
- dc – double crochet
- sc2tog – single crochet 2 together
- sc3tog – single crochet 3 together
- sp – space
- st(s) – stitch(es)
- tch – turning chain
- RS / WS – right side / wrong side
Special stitches:
- Puff: (yo, insert hook in the given sp, yo, pull up a loop to about 0.5 in / 1.3 cm) 4 times, yo, pull through all 9 loops on hook. There is no closing chain. The ch 1 written after each puff is its own ch-1 sp.
- Picot: ch 3, sl st in 3rd ch from hook.
- Shell: (2 dc, picot, 2 dc) in the same st.
- Petal: (hdc, dc, ch 2, dc, hdc) in the same st.
Gauge and Checkpoints
Gauge: 20 sc and 22 rows = 4 in (10.2 cm) in sc. For an ornament this small, the hub is the best gauge test, so make it first and measure it before you go on.
- After hub Rnd 2: the flower measures 1.25 in (3.2 cm) from tip to tip.
- After hub Rnd 4: the hub measures 1.5 in (3.8 cm) across.
- After skirt Row 5: the skirt is 2.25 in (5.7 cm) long and 3.5 in (8.9 cm) wide at the bottom.
- After each wing: the wing reaches 1.25 in (3.2 cm) out from the hub.
- Before border: 4 in (10.2 cm) x 4.75 in (12.1 cm).
If your hub is larger than 1.5 in (3.8 cm), switch to a 3.25 mm hook. If it is smaller, switch to a 3.75 mm hook. Change only the hook, never the stitch counts.
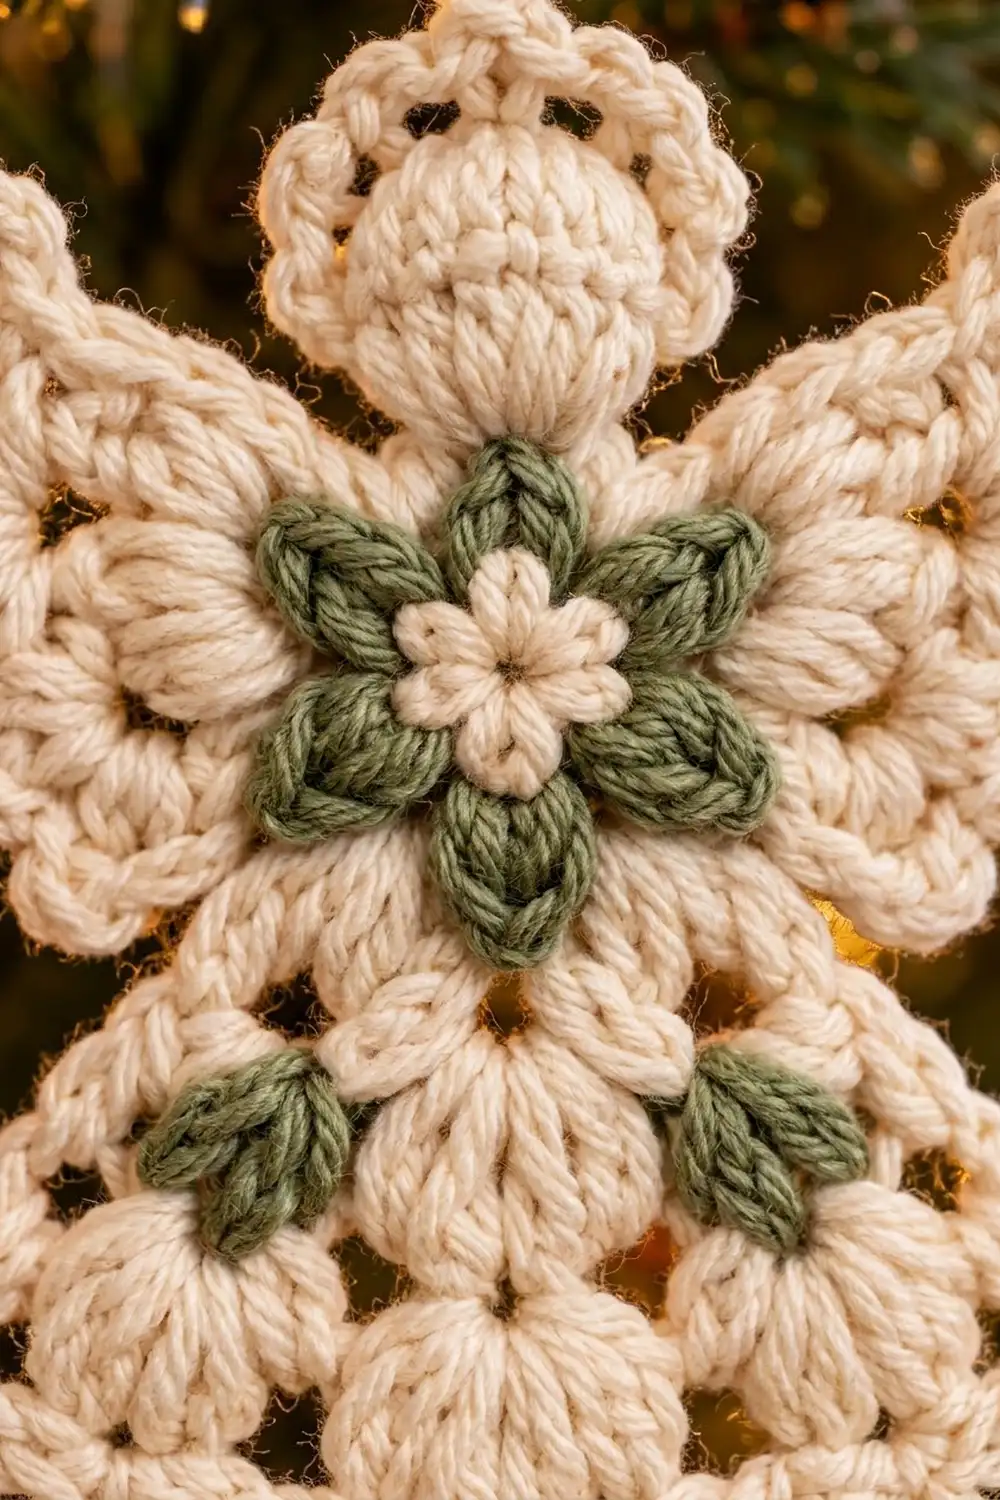
Hub (Chest Flower)
Rnd 1 (Color A): Make a magic ring, ch 1, 12 sc in ring, sl st to first sc. Pull the ring closed. Fasten off. (12 sc)
Rnd 2 (Color B): Join with sl st in any sc. *Petal in next sc, sl st in next sc; rep from * 5 more times, ending with the last sl st in the joining st. Fasten off. (6 petals)
Rnd 3 (Color A): Join with sc in the ch-2 tip of any petal, ch 3, *sc in ch-2 tip of next petal, ch 3; rep from * 4 more times, sl st to first sc. (6 sc, 6 ch-3 sps)
The ch-3 arcs pass behind the sides of the petals, so the sage flower sits on top of a cream frame.
Rnd 4 (Color A): Ch 1, *sc in next sc, 3 sc in next ch-3 sp; rep from * 5 more times, sl st to first sc. Fasten off. (24 sc: 6 worked into existing sc + 18 worked into the spaces)
Now number the stitches. Put a marker in the first sc of Rnd 4 (above a petal tip) and call it st #1; this is the top of the angel. Counting in the direction you worked, the sts run from #1 to #24. St #13 sits directly opposite #1, at the bottom.
Where each part goes:
- Head: #24, #1, #2 (3 sts)
- Shoulder gaps: #3 and #23 (1 st each)
- First wing: #4–#7 (4 sts)
- Underarm gaps: #8–#10 and #16–#18 (3 sts each)
- Skirt: #11–#15 (5 sts)
- Second wing: #19–#22 (4 sts)
Check: 3 + 1 + 4 + 3 + 5 + 3 + 4 + 1 = 24.
Skirt
Work with the RS of the hub facing you.
Row 1 (RS): Join Color A with sl st in st #11, ch 3 (counts as dc), dc in same st, [ch 1, 2 dc in next st] 4 times. (10 dc, 4 ch-1 sps)
Row 2 (WS): Ch 3 (counts as dc), turn, dc in first st, ch 1, [puff in next ch-1 sp, ch 1] 4 times, 2 dc in top of tch. (4 dc, 4 puffs, 5 ch-1 sps)
Skip over the second dc of each pair below. Every puff goes into a space.
Row 3 (RS): Ch 3, turn, dc in first st, ch 1, [puff in next ch-1 sp, ch 1] 5 times, 2 dc in top of tch. (4 dc, 5 puffs, 6 ch-1 sps)
Row 4 (WS): Ch 3, turn, dc in first st, ch 1, [puff in next ch-1 sp, ch 1] 6 times, 2 dc in top of tch. (4 dc, 6 puffs, 7 ch-1 sps)
Row 5 (RS): Ch 3, turn, dc in first st, ch 1, [puff in next ch-1 sp, ch 1] 7 times, 2 dc in top of tch. Fasten off. (4 dc, 7 puffs, 8 ch-1 sps)
Each row adds exactly one puff. That gives the skirt its steady triangular flare and the small open spaces between the puffs.
Checkpoint: 2.25 in (5.7 cm) long, 3.5 in (8.9 cm) across Row 5.
Wings (Make 2)
Row 1 (RS): Join Color A with sl st in st #4 (first wing) or st #19 (second wing), ch 3 (counts as dc), dc in same st, [ch 1, 2 dc in next st] 3 times. (8 dc, 3 ch-1 sps)
Row 2 (WS): Ch 3, turn, dc in first st, ch 1, [puff in next ch-1 sp, ch 1] 3 times, 2 dc in top of tch. (4 dc, 3 puffs, 4 ch-1 sps)
Row 3 (RS): Ch 3, turn, dc in first st, ch 1, [puff in next ch-1 sp, ch 1] 4 times, 2 dc in top of tch. Fasten off. (4 dc, 4 puffs, 5 ch-1 sps)
Checkpoint: Each wing extends 1.25 in (3.2 cm) from the hub, and its outer edge is about 2.25 in (5.7 cm) long. The angel is now 4 in (10.2 cm) across both wings.
Head
Row 1 (RS): Join Color A with sl st in st #24, ch 1, sc in #24, #1, and #2. (3 sc)
Row 2 (WS): Ch 1, turn, 2 sc in first st, sc in next st, 2 sc in last st. (5 sc)
Rows 3–4: Ch 1, turn, sc in each st across. (5 sc)
Row 5 (RS): Ch 1, turn, sc2tog, sc in next st, sc2tog. Fasten off. (3 sc)
Checkpoint: The head is 1 in (2.5 cm) wide and 1 in (2.5 cm) tall. The angel is now 4.75 in (12.1 cm) tall overall. Weave in all ends before you start the border so they stay hidden under it.
Border
Border gauge: In Rnd 1, work 1 sc into each sc row-end and 2 sc into each dc or puff row-end. This matches each row’s height to the width of the stitches, so the edges lie flat without ruffling or cupping.
Rnd 1 (Color A, RS): Join with sc in the last st of skirt Row 5 (the bottom corner). Then work around the angel in this order:
- Skirt bottom: 1 more sc in the same corner st, sc in each dc, each puff, and each ch-1 sp across Row 5, with 2 sc in the last st. (21 sc: 19 worked one into each stitch or space + 2 corner extras)
- Skirt side: 2 sc in each of the 5 row-ends. (10 sc)
- Underarm: sc3tog over the 3 hub gap sts. (1 st)
- Wing: 2 sc in each of the 3 row-ends (6), sc in each st and each ch-1 sp across Row 3 (13), 2 sc in each of the 3 row-ends (6). (25 sc)
- Shoulder: sc in the gap st. (1 sc)
- Head: 1 sc in each of the 5 row-ends (5), sc in each of the 3 sts of Row 5 (3), 1 sc in each of the 5 row-ends (5). (13 sc)
- Shoulder: 1 sc. Wing: 25 sc as before. Underarm: sc3tog. Skirt side: 10 sc.
Sl st to first sc. (108 sts)
Check: 21 + 10 + 1 + 25 + 1 + 13 + 1 + 25 + 1 + 10 = 108.
The sc3tog at each underarm pulls in the inside curve, so the wings stand clearly apart from the skirt. The skirt corners are sharp points, so they get extra stitches. The wing corners are rounded and need none.
Rnd 2 (Color A): Ch 1, then:
- Skirt bottom (21 sts): sc in first st, [skip 1 st, shell in next st, skip 1 st, sc in next st] 5 times. (5 shells)
- Skirt side (10 sts): [sc in next 2 sts, picot] 5 times. (5 picots)
- Underarm (1 st): sl st.
- Wing (25 sts): [sc in next 2 sts, picot] 3 times (6), sc in next st, [skip 1 st, shell in next st, skip 1 st, sc in next st] 3 times (13), [sc in next 2 sts, picot] 3 times (6). (3 shells, 6 picots)
- Shoulder (1 st): sl st.
- Head (13 sts): [sc in next st, picot] 6 times, sc in next st (top center), ch 30, sl st in same st to form the loop, work 24 sc into the loop, sl st in the same top-center st, [sc in next st, picot] 6 times. (12 halo picots + loop)
- Shoulder: sl st. Wing: as before. Underarm: sl st. Skirt side: as before.
Sl st to first sc. Fasten off. (all 108 sts used)
Why the math works: Each section count from Rnd 1 fits its Rnd 2 repeat exactly. The shell repeat uses 4 sts after 1 starting sc, so 21 = 1 + (4 x 5) and 13 = 1 + (4 x 3). The picot repeat uses 2 sts, so 6 = 2 x 3 and 10 = 2 x 5. The head uses 1 st per picot: 6 + 1 + 6 = 13.
Checkpoint: 4.5 in (11.4 cm) wide x 5.25 in (13.3 cm) tall.
Leaf Sprigs (Make 2)
With Color B, ch 5.
Leaf 1: Sc in 2nd ch from hook, hdc in next ch, dc in next ch, sl st in last ch.
Leaf 2: Ch 4, sc in 2nd ch from hook, hdc in next ch, dc in next ch, sl st in the same base ch as Leaf 1.
Fasten off, leaving a 6 in (15.2 cm) tail. Each sprig is a small V of two leaves, about 0.5 in (1.3 cm) long.
Sew one sprig over the first puff and one over the last puff of skirt Row 2, so they sit on either side of the center just below the chest flower. Angle the leaf tips slightly outward, and tack each leaf down at its base and tip.
Final Blocking
- Weave in any remaining ends along the border, not across the open spaces.
- Spray the angel until it is evenly damp, or soak it briefly and roll it in a towel.
- Pin it RS up on a blocking mat at 4.5 in (11.4 cm) x 5.25 in (13.3 cm).
- Pin out the center of every bottom shell and the tip of every picot.
- Pin each wing so its outer edge makes a smooth fan.
- Arrange the halo picots into an even ring around the head.
- Optional: brush or spray on fabric stiffener for a firmer ornament.
- Let it dry completely, at least 12 hours, before you unpin it.
Final Quality-Control Checklist
- The flower has 6 sage petals and a cream center.
- Hub Rnd 4 has 24 sc.
- Skirt Row 5 has 7 puffs and 8 ch-1 sps.
- Row 3 of each wing has 4 puffs and 5 ch-1 sps.
- Head Row 5 has 3 sc.
- Border Rnd 1 totals 108 sts.
- The bottom has 5 shells, and each wing has 3 shells.
- The halo has 12 picots plus the hanging loop at top center.
- Both leaf sprigs are secure and placed evenly.
- Finished size is 4.5 in (11.4 cm) x 5.25 in (13.3 cm).
Troubleshooting
Flower petals curl forward. Your Rnd 3 chains are too tight. Use ch 4 instead of ch 3, but still work 3 sc into each sp in Rnd 4.
Puffs look thin. Pull each loop up to a full 0.5 in (1.3 cm) and keep all loops the same height before closing.
Skirt ripples. Make sure you are working only into ch-1 sps and that each row adds exactly one puff.
Wings droop. Block with stiffener and pin the wing tips slightly upward.
Border cups. You have too few stitches along the row-ends. Recount: 2 sc per dc row-end, 1 sc per sc row-end.
Hanging loop twists. Space the 24 sc evenly around the loop and steam it lightly.
Care
Hand wash in cool water with mild soap, press the water out in a towel, and dry flat while reshaping the picots. Store flat in tissue paper so the wings and halo keep their shape.
Final Notes
The size builds up in a few simple steps. The hub measures 1.5 in (3.8 cm). The skirt adds 2.25 in (5.7 cm) and the head adds 1 in (2.5 cm), for a height of 4.75 in (12.1 cm). The wings bring the width to 4 in (10.2 cm). The 0.25 in (0.6 cm) border on every edge brings the angel to her finished 4.5 in (11.4 cm) x 5.25 in (13.3 cm). Check each stage as you go, and every angel you make will come out the same size.
Happy crocheting!