

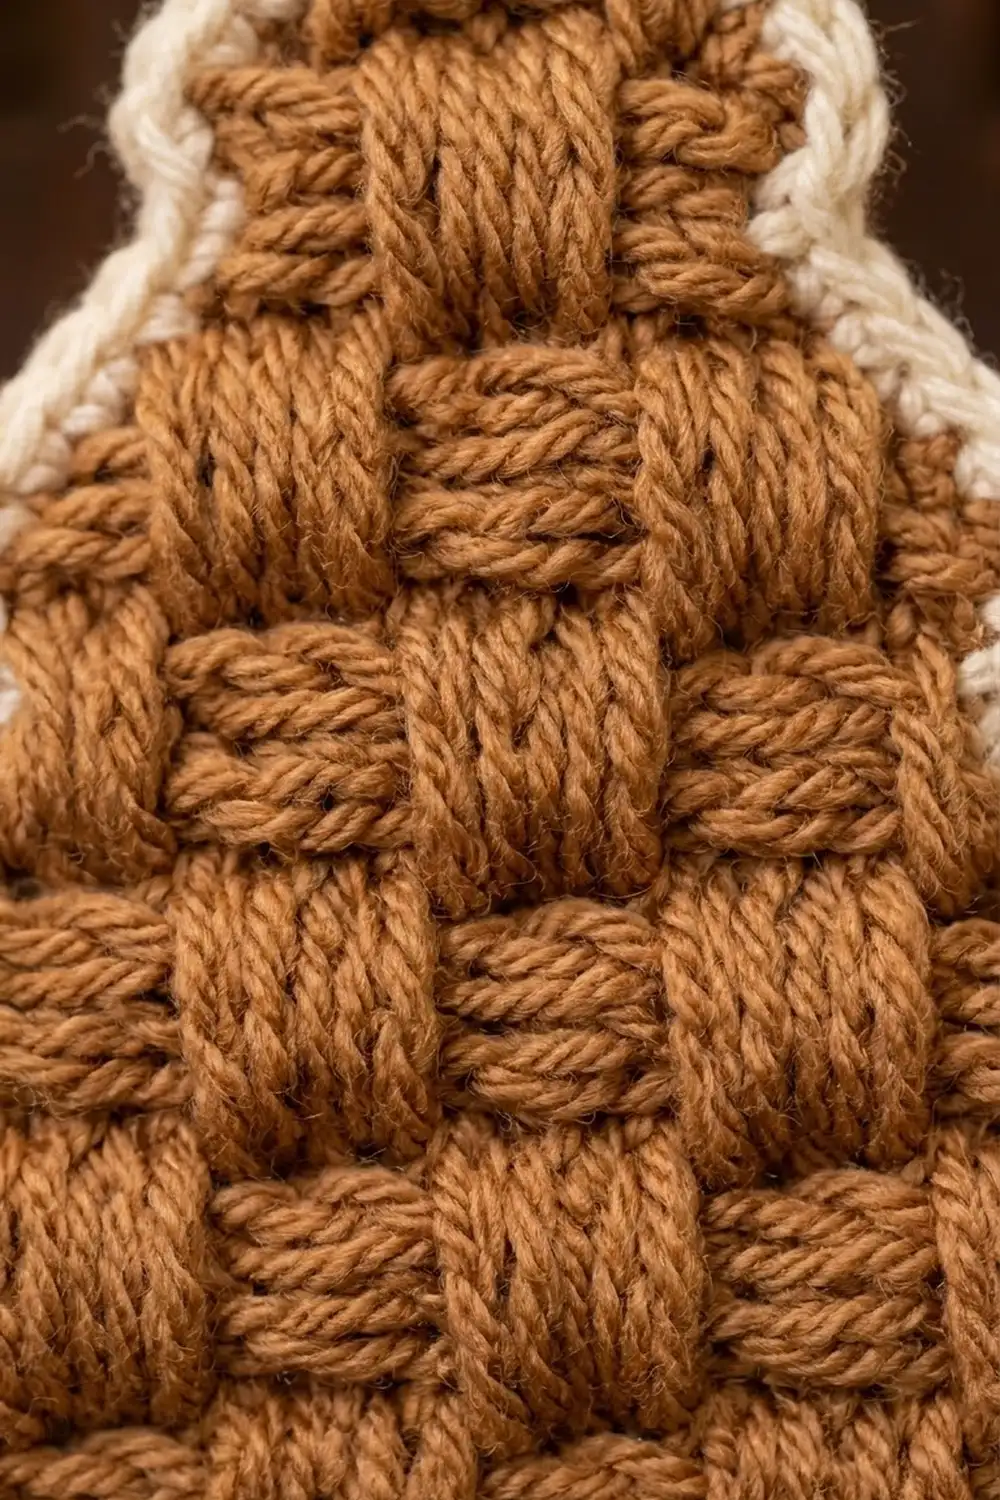
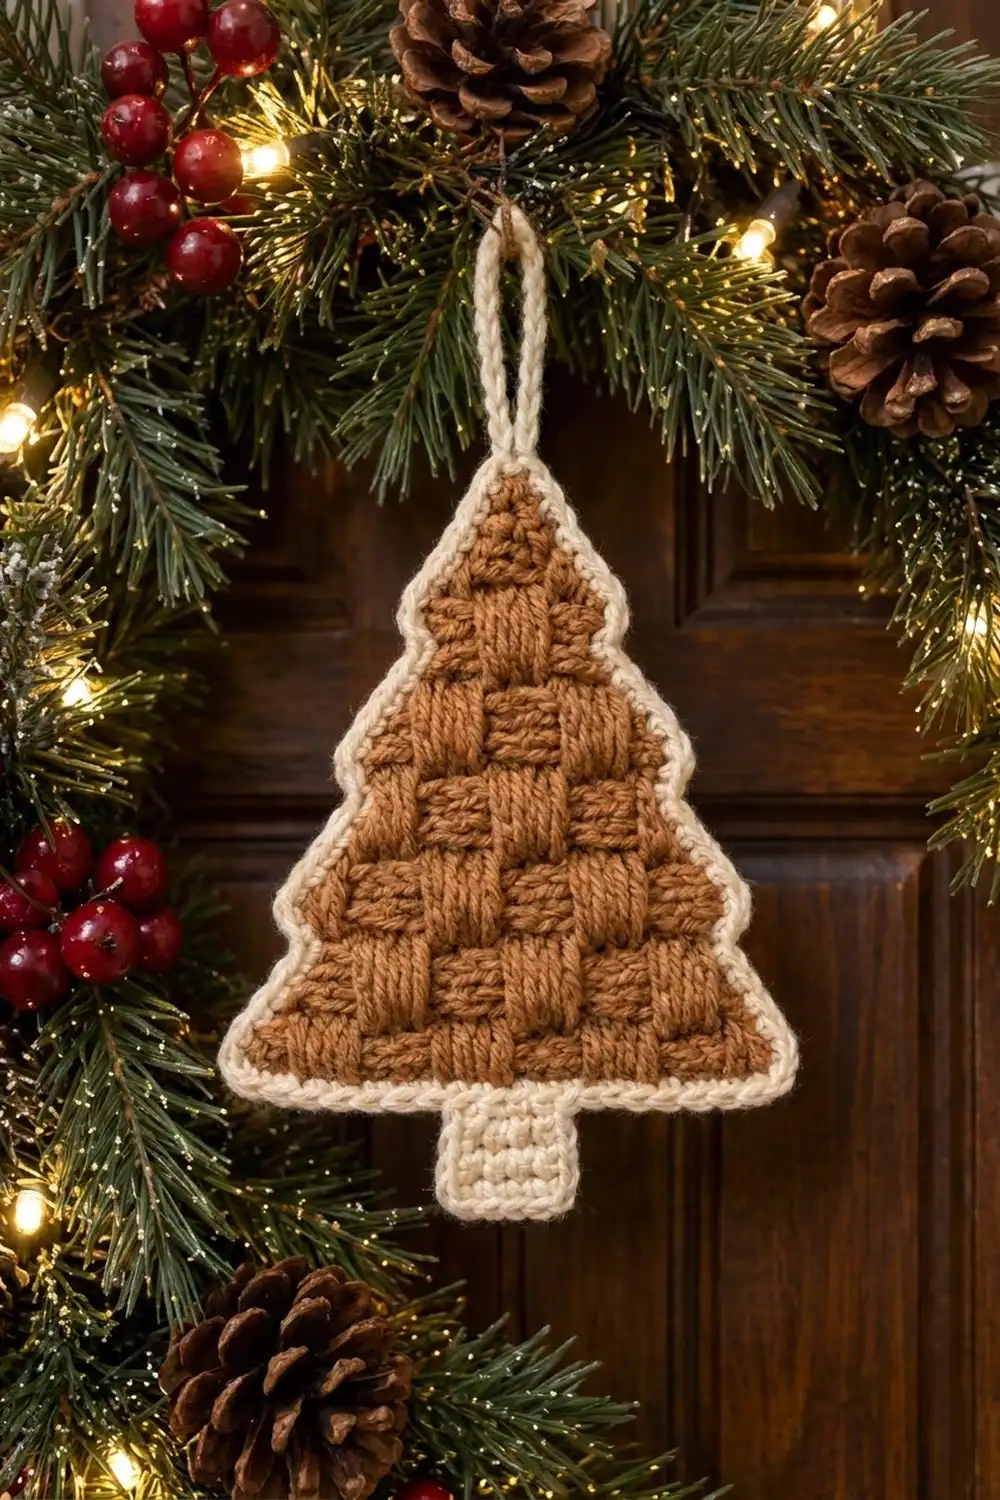
This small tree ornament pairs a warm caramel basketweave body with a crisp cream outline, a cream trunk and a slim cream hanging loop. The checkerboard of raised and sunken post-stitch blocks looks like woven gingerbread.
The style is cozy and rustic rather than bright and glossy. You need just two colors: caramel or toffee brown for the tree body, and cream or ivory for the trunk, border and loop. The whole ornament is one piece, with no appliqués or sewn-on parts.
All instructions use US crochet terms. The finished ornament measures about 4.75 in (12.1 cm) wide and 5.75 in (14.6 cm) tall without the hanging loop. With the loop, it measures about 7.25 in (18.4 cm) from top to bottom.
You crochet the tree body flat from the bottom up in rows, decreasing one stitch at each end of every row until only one stitch remains at the tip. Then you add a short cream trunk to the foundation chain and work one cream border round all the way around, with small tier points on the sides. A slip-stitched loop at the top finishes it.
Finished Size and Construction
- Finished size: 4.75 in (12.1 cm) wide x 5.75 in (14.6 cm) tall, plus a 1.5 in (3.8 cm) loop
- Skill level: Easy-intermediate (post stitches and edge decreases)
- Terminology: US crochet terms
- Yarn weight: Worsted (#4)
- Hook: 5 mm (US H-8)
- Number of pieces: 1 (single, all-in-one ornament)
- Layout: One triangular tree with a centered trunk; no joining
- Piece size before border: body 4.25 in (10.8 cm) wide x 4.5 in (11.4 cm) tall; with trunk, 5.25 in (13.3 cm) tall
- Border depth: 1 round of sc, about 0.25 in (0.6 cm)
Materials
Choose a smooth, plied worsted yarn in cotton, acrylic or a cotton blend. Smooth yarn shows the basketweave texture clearly, and a firm fiber keeps the ornament flat.
Yarn:
– Color A, caramel / toffee brown (body): 12 g, about 24 m
– Color B, cream / ivory (trunk, border, loop): 6 g, about 12 m
These amounts include a margin of about 25 percent for tails and any ripping back.
Tools:
– 5 mm (US H-8) crochet hook
– Tapestry needle
– Scissors
– Stitch marker
– Ruler or tape measure
– Blocking mat and rust-proof pins
– Spray bottle with water
Abbreviations (US Terms)
- ch – chain
- sl st – slip stitch
- sc – single crochet
- dc – double crochet
- dc2tog – double crochet 2 together
- dc3tog – double crochet 3 together
- fpdc – front post double crochet
- bpdc – back post double crochet
- st(s) – stitch(es)
- sp – space
- RS / WS – right side / wrong side
Special note on the basketweave: work each post stitch around the post of the stitch directly below it. On RS rows, fpdc pushes a stitch forward (a raised block) and bpdc pushes it back (a sunken block). On WS rows the roles swap: bpdc makes a block that is raised on the RS, and fpdc makes one that is sunken on the RS. Each row below already names the correct stitch, so follow them exactly as written.
Edge decreases: work every dc2tog and dc3tog into the tops of the stitches as normal, not around the posts.
Gauge and Checkpoints
Gauge: 16 sts and 8 rows = 4 in (10.2 cm) in the basketweave pattern with a 5 mm hook. That is 4 sts and 2 rows per 1 in (2.5 cm). Single crochet in Color B should measure about 4 sts and 4 rows per 1 in (2.5 cm).
The ornament is small, so the ornament itself is the best swatch. Make the body first and measure at each checkpoint below.
Checkpoints:
– After Row 1: 17 dc measure 4.25 in (10.8 cm) wide.
– After Row 4: the piece is 2 in (5.1 cm) tall, and Row 4 (11 sts) is about 2.75 in (7.0 cm) wide.
– After Row 9: the body is 4.5 in (11.4 cm) tall and 4.25 in (10.8 cm) wide at the base.
– After the trunk: the trunk is 0.75 in (1.9 cm) wide and 0.75 in (1.9 cm) tall.
– After the border: 4.75 in (12.1 cm) wide x 5.75 in (14.6 cm) tall.
If your piece is too big: switch to a 4.5 mm hook, or work the post stitches a little more tightly. If it is too small: switch to a 5.5 mm hook. Change the hook, not the stitch counts, because the basketweave blocks depend on the exact counts.
Tree Body (Color A)
The body is worked in rows. The ch-2 at the start of each row does not count as a stitch. Think of the 17 foundation stitches as 17 columns. Each basketweave block is 3 columns wide, and the blocks swap between raised and sunken on every row to form a checkerboard.
Row 1 (WS): With Color A, ch 19. Dc in 3rd ch from hook and in each ch across. Turn. (17 dc)
Place a marker on the side now facing you; this is the RS.
Row 2 (RS): Ch 2, dc2tog over first 2 sts, fpdc in next 2 sts, bpdc in next 3 sts, fpdc in next 3 sts, bpdc in next 3 sts, fpdc in next 2 sts, dc2tog over last 2 sts. Turn. (15 sts: 2 dc2tog + 13 post sts)
Row 3 (WS): Ch 2, dc2tog over first 2 sts, fpdc in next st, bpdc in next 3 sts, fpdc in next 3 sts, bpdc in next 3 sts, fpdc in next st, dc2tog over last 2 sts. Turn. (13 sts)
Row 4 (RS): Ch 2, dc2tog over first 2 sts, bpdc in next 3 sts, fpdc in next 3 sts, bpdc in next 3 sts, dc2tog over last 2 sts. Turn. (11 sts)
Row 5 (WS): Ch 2, dc2tog over first 2 sts, bpdc in next 2 sts, fpdc in next 3 sts, bpdc in next 2 sts, dc2tog over last 2 sts. Turn. (9 sts)
Row 6 (RS): Ch 2, dc2tog over first 2 sts, bpdc in next st, fpdc in next 3 sts, bpdc in next st, dc2tog over last 2 sts. Turn. (7 sts)
Row 7 (WS): Ch 2, dc2tog over first 2 sts, fpdc in next 3 sts, dc2tog over last 2 sts. Turn. (5 sts)
Row 8 (RS): Ch 2, dc2tog over first 2 sts, fpdc in next st, dc2tog over last 2 sts. Turn. (3 sts)
Row 9 (WS): Ch 2, dc3tog over all 3 sts. (1 st) Fasten off and weave in ends.
Stitch-count check: each row is exactly 2 sts shorter than the one before: 17, 15, 13, 11, 9, 7, 5, 3, 1. The post stitches always stay in the same columns, so the checkerboard stays centered on column 9.
The body is now a smooth triangle, 4.25 in (10.8 cm) wide at the base and 4.5 in (11.4 cm) tall.
Trunk (Color B)
Hold the body RS facing with the foundation chain at the bottom. You work the trunk into the free loops on the underside of the 3 center foundation chains (columns 8, 9 and 10). Count 7 chains in from either corner; the next 3 chains are where the trunk goes.
Row 1: Join Color B in the free loop of column 8, ch 1, sc in same loop and in the next 2 loops. Turn. (3 sc)
Rows 2–3: Ch 1, sc in each st across. Turn. (3 sc)
Fasten off and weave in ends. The trunk measures 0.75 in (1.9 cm) wide and 0.75 in (1.9 cm) tall.
Border (Color B)
Border gauge: 4 sc per 1 in (2.5 cm). Each round of sc adds about 0.25 in (0.6 cm) of depth.
The border is one continuous round of sc, worked with the RS facing. It outlines the body and goes around the trunk. Two small tier points on each side create the gently stepped outline.
Tier point: (sc, ch 1, sc) all in the same row-end. It counts as 2 sc plus 1 ch-1 sp.
Rnd 1: With RS facing, join Color B in the top of the dc3tog at the tree tip.
- Top point: Ch 1, 3 sc in the top st. (3 sc)
- Left side: Working down the row-ends: 2 sc in each of Rows 8 and 7, a tier point in Row 6, 2 sc in each of Rows 5 and 4, a tier point in Row 3, 2 sc in each of Rows 2 and 1. (16 sc + 2 ch-1 sps)
- Left bottom corner: 3 sc in the free loop of column 1. (3 sc)
- Bottom left: Sc in the free loops of columns 2 through 7. (6 sc)
- Trunk left side: 1 sc in each of the 3 trunk row-ends. (3 sc)
- Trunk bottom: 3 sc in the first st of trunk Row 3, sc in the next st, 3 sc in the last st. (7 sc)
- Trunk right side: 1 sc in each of the 3 trunk row-ends. (3 sc)
- Bottom right: Sc in the free loops of columns 11 through 16. (6 sc)
- Right bottom corner: 3 sc in the free loop of column 17. (3 sc)
- Right side: Working up the row-ends: 2 sc in each of Rows 1 and 2, a tier point in Row 3, 2 sc in each of Rows 4 and 5, a tier point in Row 6, 2 sc in each of Rows 7 and 8. (16 sc + 2 ch-1 sps)
Sl st to the first sc. Round total: 66 sc + 4 ch-1 sps (3 + 16 + 3 + 6 + 3 + 7 + 3 + 6 + 3 + 16 = 66).
Hanging loop: Sl st into the center sc of the 3-sc top point. Ch 15, then sl st in the same center sc to form a loop. To firm up the loop, sl st in each of the 15 ch, then sl st in the center sc once more. Fasten off and weave the end through the border on the WS. The loop stands about 1.5 in (3.8 cm) tall.
Why the math works: each dc row is 0.5 in (1.3 cm) tall. At 4 sc per inch, 2 sc also cover 0.5 in (1.3 cm), so 2 sc per row-end matches the body. The slanted sides are a little longer than the rows are tall, so 2 sc per row-end is very slightly snug. That snugness keeps the diagonal edges straight instead of wavy. The foundation and the sc border both have 4 sts per inch, so 1 sc per free loop lies flat. Each trunk row is a sc row 0.25 in (0.6 cm) tall, which matches exactly 1 sc.
The border adds 0.25 in (0.6 cm) on each side, taking the width from 4.25 in (10.8 cm) to 4.75 in (12.1 cm). For the height, add 0.25 in (0.6 cm) of border at the tip, 4.5 in (11.4 cm) of body, 0.75 in (1.9 cm) of trunk and 0.25 in (0.6 cm) of border under the trunk. That totals 5.75 in (14.6 cm).
Final Blocking
- Weave in every tail first. Hide cream tails in cream stitches and caramel tails in caramel stitches.
- Lay the ornament RS up on a blocking mat.
- Pin the top point, the two bottom corners and the four trunk corners first.
- Measure 4.75 in (12.1 cm) across the base and 5.75 in (14.6 cm) from tip to trunk bottom. Move the pins until both measurements match.
- Pin each tier point slightly outward so the stepped outline shows.
- Mist with water until damp but not soaked. Don’t press the raised blocks flat.
- Let the ornament dry completely, which takes at least a few hours, before you unpin it.
Final Quality-Control Checklist
- Body rows count 17, 15, 13, 11, 9, 7, 5, 3, 1.
- Raised and sunken blocks alternate in a clear checkerboard.
- The trunk is centered under columns 8 to 10, with 7 columns on each side.
- The border round totals 66 sc plus 4 ch-1 sps.
- The tier points sit at the same height on both sides.
- The ornament measures 4.75 in (12.1 cm) x 5.75 in (14.6 cm).
- The loop is centered at the tip and about 1.5 in (3.8 cm) tall.
- All ends are woven in and can’t be seen from the RS.
Troubleshooting
The checkerboard looks blurry. Check that every post stitch goes around the post directly below it, and that you used the WS-row stitches exactly as written.
One side is longer than the other. Count the stitches along each side. Each side should have 16 sc plus 2 ch-1 sps.
The edges ripple. You may have worked 3 sc into some row-ends. Redo the border with exactly 2 sc per row-end.
The border cups or pulls in. Use 3 sc in every corner and keep the border tension relaxed.
The trunk is off-center. Recount the foundation free loops. There must be exactly 7 loops on each side of columns 8 to 10.
The loop flops sideways. Make sure both ends of the loop are attached to the same center sc of the top point.
Care
Hand wash in cool water with a mild soap. Press the water out in a towel, then reshape and dry flat. Store away from direct sunlight to keep the caramel color rich.
Final Notes
Every measurement in this ornament builds on the one before it. At 4 sts per inch, 17 foundation dc give a 4.25 in (10.8 cm) base, and 9 rows at 0.5 in (1.3 cm) each give a 4.5 in (11.4 cm) body. The trunk adds 0.75 in (1.9 cm), and one round of sc border adds 0.25 in (0.6 cm) on every edge. The finished ornament measures 4.75 in (12.1 cm) x 5.75 in (14.6 cm). Check each stage and keep your counts exact, and your tree will come out crisp, flat and ready to hang.
Happy crocheting!