

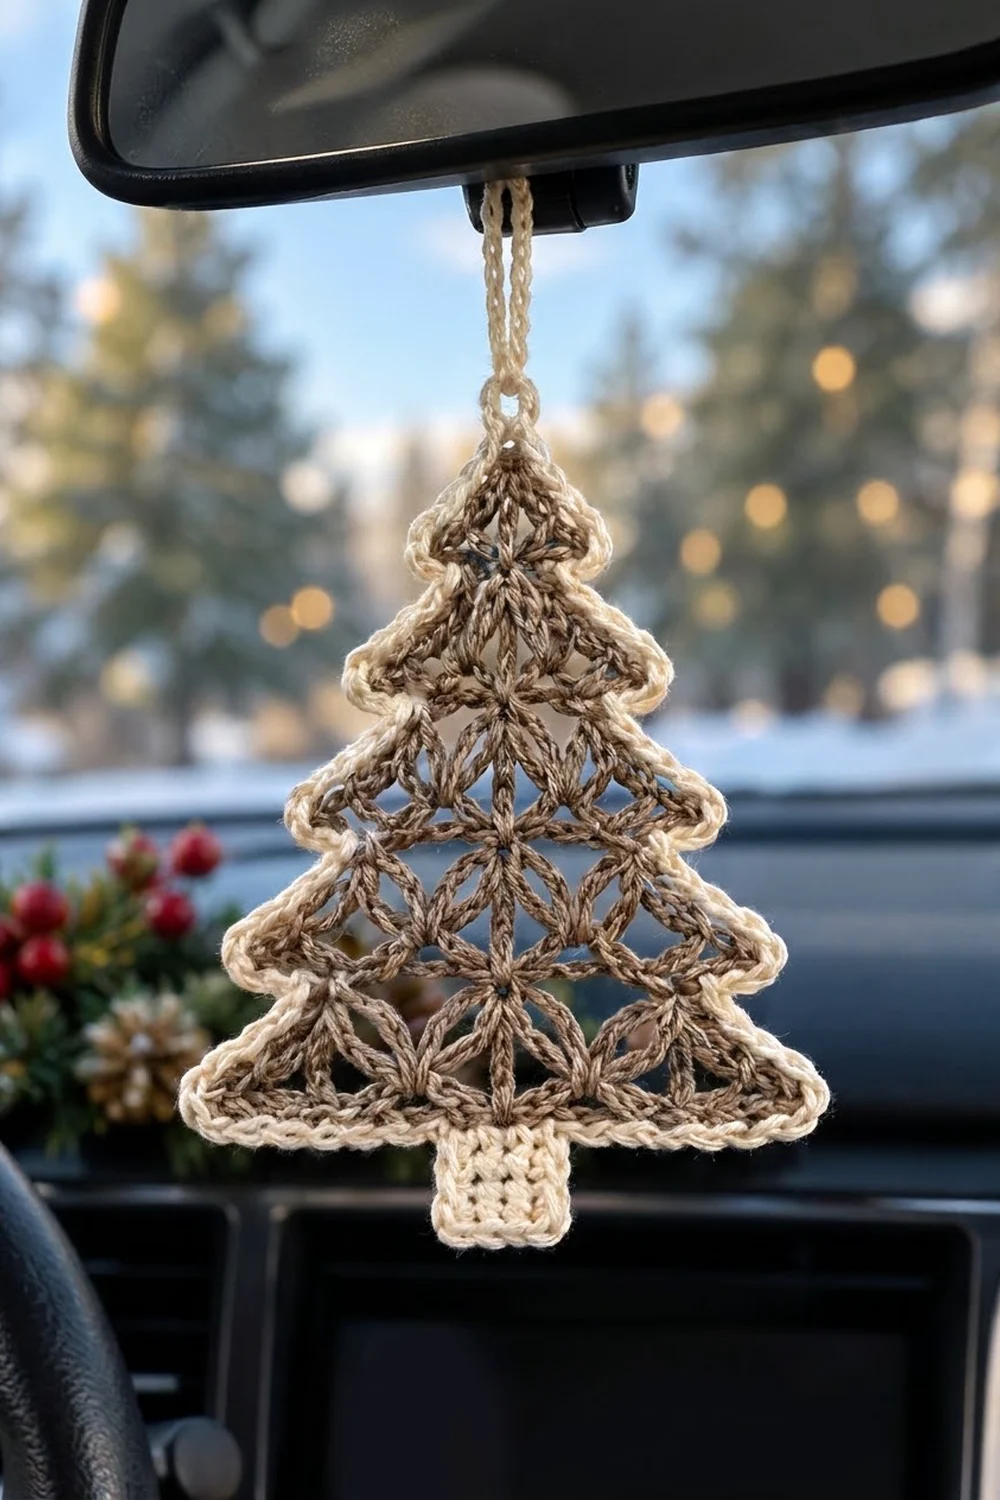
The Starlace Pine is a small, flat Christmas tree ornament with three stepped tiers of starburst lace. Each star forms where a fan of double crochets opens out from the same point that a cluster closed into. The result is a light, airy mesh that glows when light shines through it, which makes it a good fit for hanging on a car mirror or in a window.
It uses two colors. The lace is a soft taupe, and the corded border, trunk and hanging loop are a warm cream. The look is Scandinavian and neutral, so it suits rustic and minimalist holiday decor.
All instructions use US crochet terms. The finished ornament measures about 4.1 in (10.4 cm) wide × 5.5 in (14.0 cm) tall, plus a hanging loop of about 2 in (5.1 cm).
You work the lace body top-down in rows, starting at the tip. Fan rows and cluster rows alternate, so the tree widens by one fan every two rows. A “step row” at the start of each new tier pulls the edges in to create the eaves. You then work the trunk off the bottom center, add a two-round cream border, and finish with the loop.
Finished Size and Construction
- Finished size: 4.1 in (10.4 cm) wide × 5.5 in (14.0 cm) tall, plus a 2 in (5.1 cm) loop
- Skill level: Intermediate
- Terminology: US
- Yarn weight: Fingering (#1) cotton or cotton blend
- Hook: 2.5 mm
- Number of pieces: 1
- Layout: One tree with three tiers, a trunk and a loop
- Body size (lace only): 3.6 in (9.1 cm) wide × 4.25 in (10.8 cm) tall
- Size before border (body + trunk): 3.6 in (9.1 cm) × 5.0 in (12.7 cm)
- Border depth: 0.25 in (0.6 cm) on every edge
Materials
Use a smooth, tightly plied fingering cotton or cotton blend. It shows the star lace clearly and blocks crisp. Avoid fuzzy yarns, which blur the lace.
- Color A, Taupe (body): 10 g, about 34 m
- Color B, Cream (trunk, border, loop): 6 g, about 20 m
The quantities assume about 3.4 m per gram and include a safety margin of roughly 20%.
Tools:
– 2.5 mm crochet hook
– Tapestry needle
– Scissors
– 2 stitch markers
– Blocking mat and rustproof pins
– Spray bottle
– Optional: light fabric stiffener
Abbreviations (US Terms)
- ch – chain
- sl st – slip stitch
- sc – single crochet
- dc – double crochet
- sp – space
- st(s) – stitch(es)
- rep – repeat
- RS – right side
- dc3tog – double crochet 3 together
- rev sc – reverse single crochet (crab stitch)
Special stitches:
- Fan: (dc, ch 1, dc, ch 1, dc) all in the same st. One Fan = 3 dc + 2 ch-1 sps.
- Cluster (CL): dc3tog with one leg in each of 3 places: the last dc of one Fan, the ch-1 sp between Fans, and the first dc of the next Fan. These are the points where the stars meet.
- Point: any edge dc or CL in a cluster row. Each point gets one Fan in the next row.
Gauge and Checkpoints
Make Rows 1–5 (Tier 1) as your gauge swatch, then measure before you continue.
- Lace gauge: Row 5 (3 Fans) measures 2.1 in (5.3 cm) wide. Rows 1–5 measure 1.25 in (3.2 cm) tall, which works out to 4 rows = 1 in (2.5 cm).
- Sc gauge (Color B): 8 sc and 9 sc rows = 1 in (2.5 cm).
Checkpoints:
– After Row 5: 2.1 in (5.3 cm) wide, 1.25 in (3.2 cm) tall
– After Row 11: 2.9 in (7.4 cm) wide, 2.75 in (7.0 cm) tall
– After Row 17: 3.6 in (9.1 cm) wide, 4.25 in (10.8 cm) tall
– After the trunk: 3.6 in (9.1 cm) × 5.0 in (12.7 cm)
– After the border: 4.1 in (10.4 cm) × 5.5 in (14.0 cm)
If your piece is too big, go down 0.25 mm in hook size. If it is too small, go up 0.25 mm. Check that each step row has no extra chains, because loose turning chains are the most common reason the width grows.
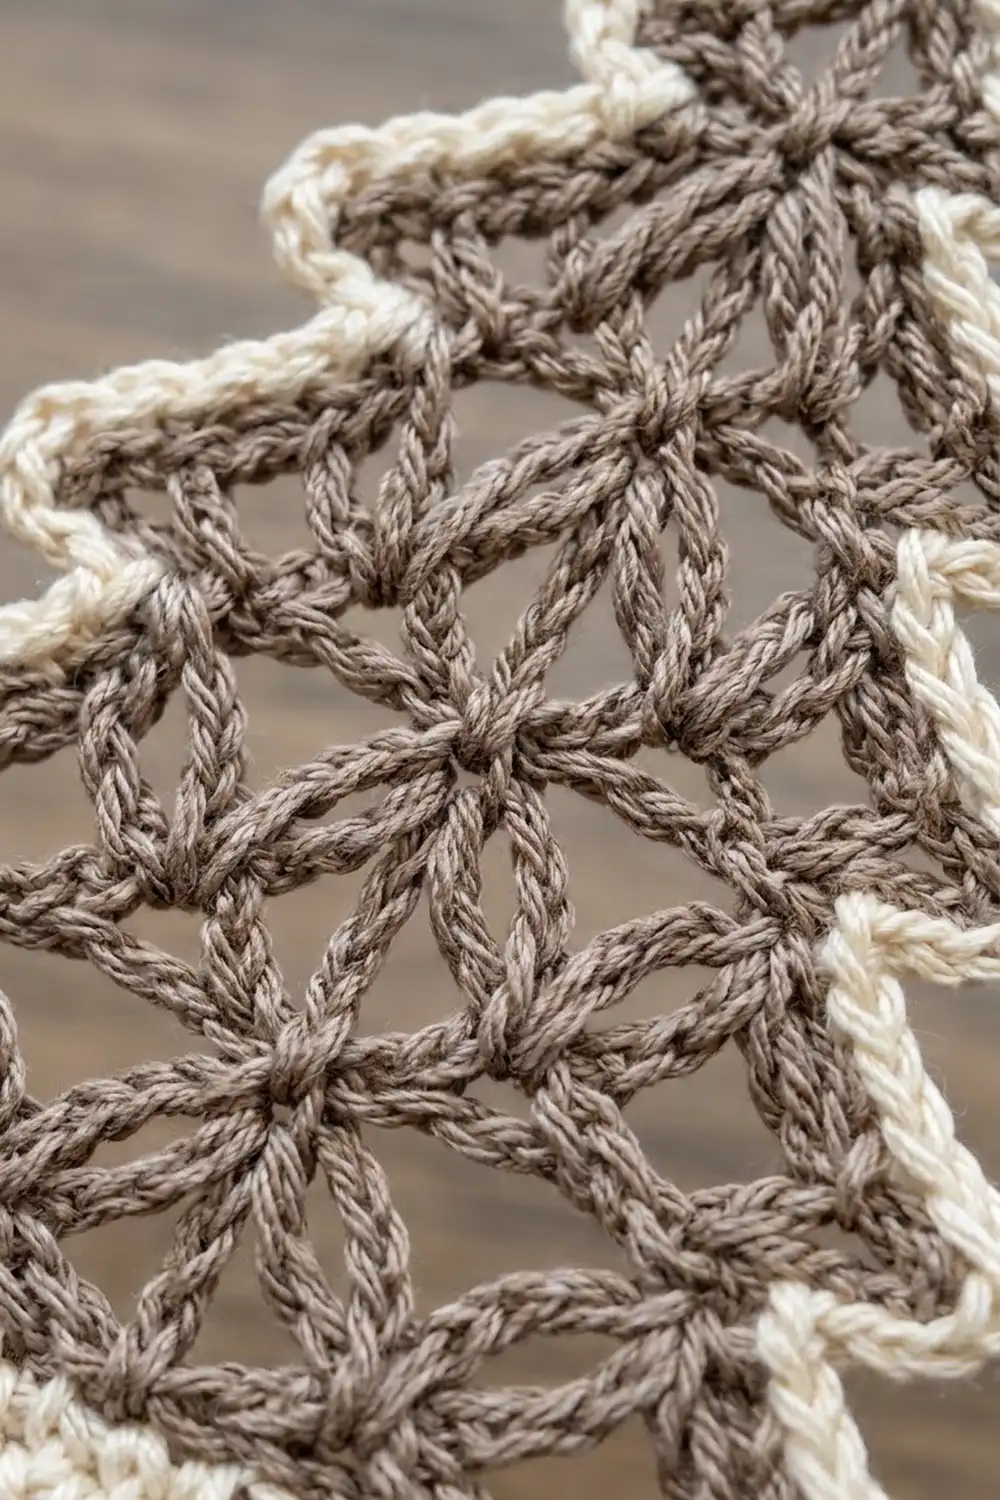
Tree Body (Color A)
Row pattern:
- Fan row (worked over K points): Ch 3 (counts as dc), (ch 1, dc, ch 1, dc) in the first st (the edge dc at the base of the ch). *Ch 1, Fan in the next point; rep from * across, working the last Fan in the top of the turning ch-3. Turn.
- Result: K Fans = 3K dc, 2K ch-1 sps inside the Fans, and K−1 ch-1 sps between Fans.
- Cluster row (worked over K Fans): Ch 3 (counts as dc), ch 2, sc in the center dc of the first Fan. *Ch 2, CL, ch 2, sc in the center dc of the next Fan; rep from * K−1 times. Ch 2, dc in the top of the turning ch-3. Turn.
- Result: K+1 points (2 edge dc + K−1 CL), K sc and 2K ch-2 sps.
- Step row (worked over K Fans): Sl st in the first dc, sl st in the ch-1 sp, sl st in the center dc, sl st in the ch-1 sp, sl st in the last dc of that Fan, then sl st in the ch-1 sp between Fans (6 sl sts). Ch 3 (counts as dc), ch 2, sc in the center dc of the next Fan. *Ch 2, CL, ch 2, sc in the center dc of the next Fan; rep from * until one Fan remains. Ch 2, dc in the next ch-1 sp, leaving the last Fan unworked. Turn.
- Result: K−1 points (2 edge dc + K−3 CL), K−2 sc and 2(K−2) ch-2 sps.
- The two outer Fans that are left unworked become the eaves of the tier above.
Tier 1:
Row 1 (RS): Ch 4, sl st in the first ch to form a ring. Ch 3 (counts as dc), (ch 1, dc) twice in the ring. Turn. (1 Fan: 3 dc, 2 ch-1 sps)
Row 2: Cluster row, K = 1. Ch 3, ch 2, sc in the center dc, ch 2, dc in the top of the turning ch. The repeat is worked 0 times. (2 points, 1 sc, 2 ch-2 sps)
Row 3: Fan row. (2 Fans: 6 dc, 1 ch-1 sp between Fans)
Row 4: Cluster row. (3 points: 2 edge dc + 1 CL; 2 sc)
Row 5: Fan row. (3 Fans: 9 dc, 2 ch-1 sps between Fans)
Checkpoint: 2.1 in (5.3 cm) wide.
Tier 2:
Row 6: Step row, K = 3. (2 points, 1 sc, 2 ch-2 sps)
Row 7: Fan row. (2 Fans)
Row 8: Cluster row. (3 points, 2 sc)
Row 9: Fan row. (3 Fans)
Row 10: Cluster row. (4 points: 2 edge dc + 2 CL; 3 sc)
Row 11: Fan row. (4 Fans: 12 dc, 3 ch-1 sps between Fans)
Checkpoint: 2.9 in (7.4 cm) wide, 2.75 in (7.0 cm) tall.
Tier 3:
Row 12: Step row, K = 4. (3 points: 2 edge dc + 1 CL; 2 sc; 4 ch-2 sps)
Row 13: Fan row. (3 Fans)
Row 14: Cluster row. (4 points, 3 sc)
Row 15: Fan row. (4 Fans)
Row 16: Cluster row. (5 points: 2 edge dc + 3 CL; 4 sc)
Row 17 (RS): Fan row. (5 Fans: 15 dc, 4 ch-1 sps between Fans)
Fasten off and weave in the ends.
Checkpoint: 3.6 in (9.1 cm) wide, 4.25 in (10.8 cm) tall. The Fan tops of Row 17 form the bottom edge, and the center (3rd) Fan is where the trunk goes.
Trunk (Color B)
With the RS facing, join B with a sc in the first dc of the center Fan of Row 17.
Row 1: Sc in the same dc (already made), sc in the ch-1 sp, 2 sc in the center dc, sc in the ch-1 sp, sc in the last dc of the Fan. Turn. (6 sc)
Rows 2–7: Ch 1, sc in each sc across. Turn. (6 sc)
Fasten off. The trunk measures about 0.75 in (1.9 cm) wide × 0.75 in (1.9 cm) tall. The body and trunk together now measure 3.6 in (9.1 cm) × 5.0 in (12.7 cm).
Border (Color B)
Border gauge: 8 sc = 1 in (2.5 cm) along the edge. Two rounds add 0.25 in (0.6 cm) on every side.
Round 1: With the RS facing, join B in the tip ring and ch 1. Work 3 sc in the ring (the tip). Then work down the first side as follows:
- Tier 1 slope: 2 sc in each row end of Rows 1–4 (8 sc), then 3 sc in the end of Row 5 (outer eave corner). (11 sc)
- Eave 1 underside: 1 sc in each of the 5 positions of the outer Fan of Row 5 (dc, ch-1 sp, dc, ch-1 sp, dc). On the sl-st side, insert the hook under the sl sts. (5 sc)
- Tier 2 slope: 2 sc in each row end of Rows 6–10 (10 sc), then 3 sc in the end of Row 11. (13 sc)
- Eave 2 underside: 5 sc across the outer Fan of Row 11. (5 sc)
- Tier 3 slope: 2 sc in each row end of Rows 12–16 (10 sc), then 3 sc in the end of Row 17. (13 sc)
- Bottom edge: 4 sc across the remaining positions of Fan 1, 1 sc in the ch-1 sp, 5 sc across Fan 2, 1 sc in the ch-1 sp. (11 sc)
- Trunk side: 1 sc in each row end of Rows 1–7. (7 sc)
Trunk bottom: 3 sc in the first sc, 1 sc in each of the next 4 sc, 3 sc in the last sc. (10 sc)
Work the second side as a mirror image, going back up: trunk side 7, bottom edge 11, tier 3 slope 13, eave 2 underside 5, tier 2 slope 13, eave 1 underside 5, tier 1 slope 11. Sl st to the first sc.
Round 1 total: 3 (tip) + 65 + 10 (trunk bottom) + 65 = 143 sc.
Round 2: Ch 1, rev sc in each sc around. Sl st to the first st. (143 rev sc)
Do not fasten off.
Why the math works:
– A dc row end is about two sc tall, so 2 sc per row end keeps the slopes flat.
– 3 sc at each outer corner turns the points without cupping.
– The inner corners (where an eave meets the next slope) get no extra stitches, so they pull in and stay crisp.
– Round 2 is worked 1:1, so it cords the edge without ruffling.
Hanging loop: From the center tip sc, ch 36 and sl st into the same tip st. Turn and sl st in the back bump of each ch around the loop (36 sl sts) to make a firm cord. Sl st into the tip and fasten off. The finished loop is about 2 in (5.1 cm) long.
Final Blocking
- Weave in all ends inside the cream border, not through the lace.
- Spray the ornament until it is evenly damp.
- Pin it flat to 4.1 in (10.4 cm) × 5.5 in (14.0 cm), body and trunk included.
- Pin each of the six eave points outward, then pin the tip straight up.
- Pin each inner corner slightly in toward the center to sharpen the tiers.
- Gently open each star so the spokes sit evenly.
- If you want, brush on a light stiffener for a mirror ornament that keeps its shape.
- Let it dry completely before unpinning.
Final Quality-Control Checklist
- [ ] Row 17 has 5 Fans and the body is 3.6 in (9.1 cm) wide.
- [ ] Each tier has two clear eaves.
- [ ] The trunk is centered under Fan 3 with 6 sc per row.
- [ ] Border Round 1 has 143 sc.
- [ ] The finished size is 4.1 in (10.4 cm) × 5.5 in (14.0 cm).
- [ ] The tree lies flat with no rippling at the edges.
- [ ] The loop is secure and centered at the tip.
- [ ] No ends show through the lace.
Troubleshooting
- Stars look lopsided: One CL leg probably went into the wrong place. Each CL needs exactly one leg in the last dc, one in the ch-1 sp and one in the first dc.
- Eaves don’t step in: You didn’t leave the last Fan unworked in a step row. Check that Rows 6 and 12 have the right point counts (2 and 3).
- Border ruffles: Use 2 sc per row end, not 3, and check your hook size.
- Inner corners round off: Pin them in firmly while blocking and don’t add extra sc there.
- Trunk is off-center: Count the Fans in Row 17 again and join in Fan 3.
Care
Hand wash in cool water and lay flat to dry, reshaping while it is damp. If you used stiffener, spot clean only.
Final Notes
Here is the measurement chain:
– Tier 1 is 2.1 in (5.3 cm) wide.
– Tier 2 is 2.9 in (7.4 cm) wide.
– Tier 3 is 3.6 in (9.1 cm) wide and 4.25 in (10.8 cm) tall.
– Adding the 0.75 in (1.9 cm) trunk brings it to 5.0 in (12.7 cm) tall.
– The 0.25 in (0.6 cm) border finishes the tree at 4.1 in (10.4 cm) × 5.5 in (14.0 cm).
If you check each stage, the starburst lace will line up. Happy crocheting!