

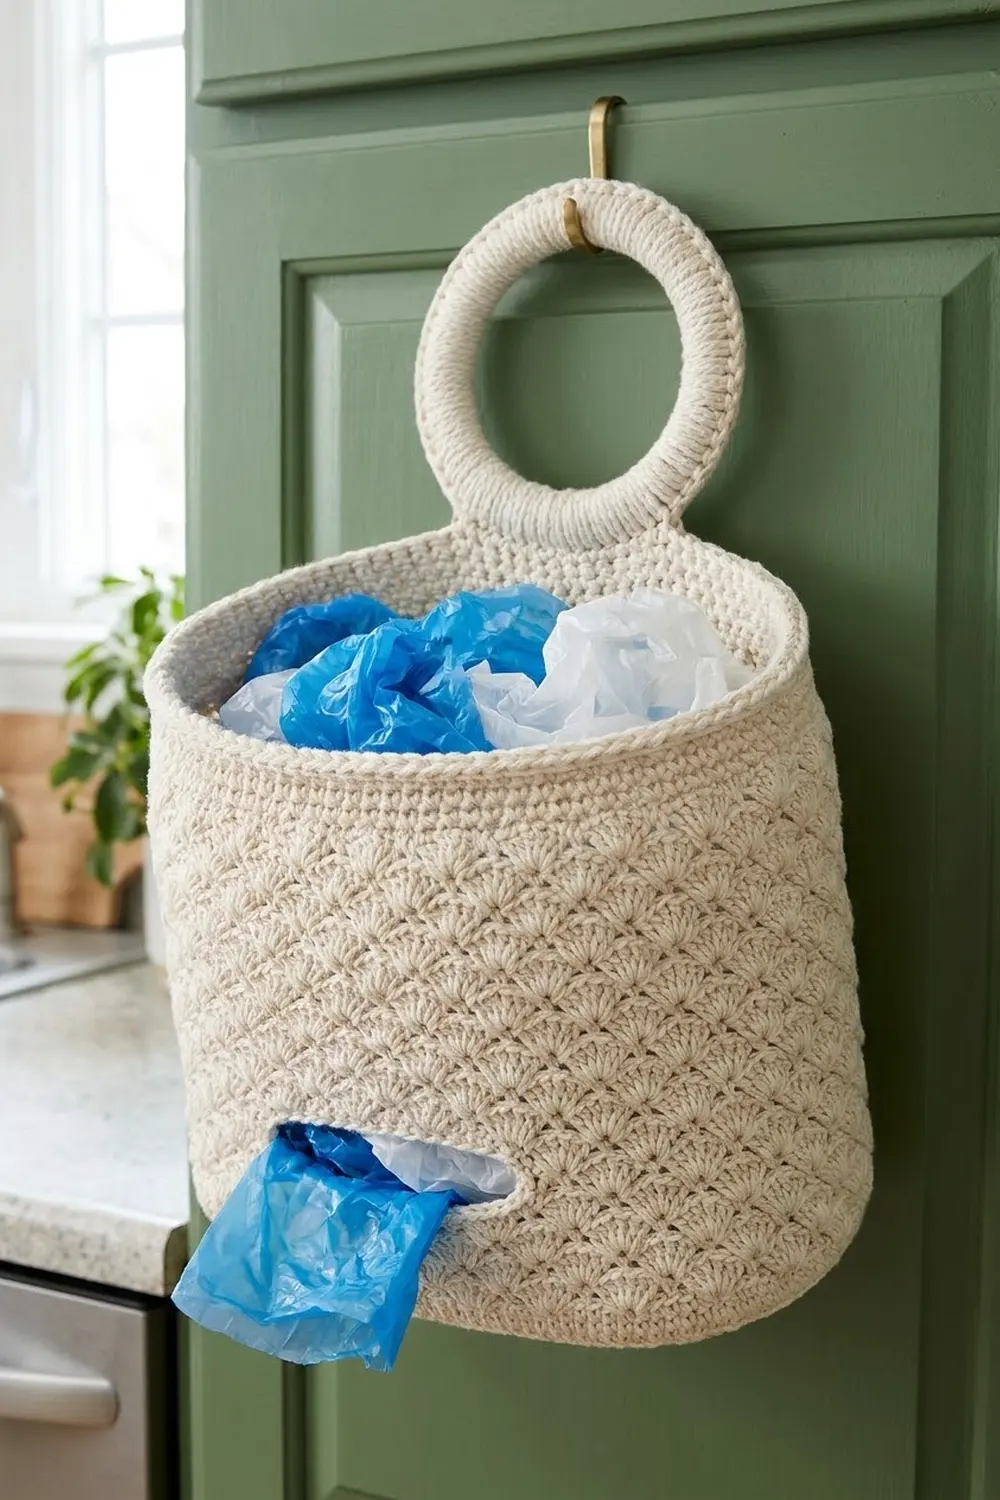
The Cottage Shell Bag Keeper is a hanging basket that keeps loose plastic bags tidy. You stuff bags in through the open top and pull them out one at a time through a small slot low on the front. A covered ring at the back hangs from a door hook, cabinet knob or wall peg.
It is worked in one cream cotton yarn. Rows of offset five-double-crochet shells cover the walls, framed by plain single crochet at the base and a thick rim. It suits a farmhouse or cottage kitchen and looks good next to natural wood, brass and painted cabinetry.
The pattern uses US crochet terms. The finished basket measures 12 in (30.5 cm) wide, 5 in (12.7 cm) deep and 7.2 in (18.3 cm) tall. With the ring attached, the total hanging height is 10.2 in (25.9 cm).
You’ll work an oval single crochet base in joined rounds, then turn up the wall with a back-loop round and make the dispensing slot. Next come six rounds of shell pattern and a three-round rim. Last, you cover a ring in single crochet and sew it to the back rim.
Finished Size and Construction
- Finished size: 12 in (30.5 cm) wide × 5 in (12.7 cm) deep × 7.2 in (18.3 cm) tall
- Total height with ring: 10.2 in (25.9 cm)
- Skill level: Easy+ (oval base, shell pattern in the round)
- Terminology: US
- Yarn weight: Bulky (#5) cotton
- Hook: 6 mm (J-10)
- Number of pieces: 1 basket body plus 1 covered ring hanger, sewn together into one item
- Layout: Ring centered on the back rim, overlapping it by 1.5 in (3.8 cm)
- Base size: 11.9 in (30.2 cm) × 4.9 in (12.4 cm)
- Size before rim border: 6.3 in (16.0 cm) wall height
- Rim border depth: 0.9 in (2.3 cm)
- Ring: 4.5 in (11.4 cm) outer diameter once covered
Materials
Yarn: Use a smooth, firm bulky cotton or a cotton blend. Cotton holds its shape under the weight of the bags and shows the shell texture clearly. Avoid fuzzy or very soft yarn, because the basket will sag.
- Cream / natural: 400 g, about 440 m (481 yd)
The amount includes about a 15% margin for a gauge swatch and the hanger.
Tools:
– 6 mm (J-10) crochet hook
– One 4 in (10.2 cm) wooden, metal or plastic ring (for example a macramé ring)
– 4 locking stitch markers
– Tapestry needle
– Scissors
– Measuring tape
– Spray bottle and a rolled towel for blocking
Abbreviations (US Terms)
- ch – chain
- sl st – slip stitch
- sc – single crochet
- dc – double crochet
- st(s) – stitch(es)
- sk – skip
- blo – back loop only
- inc – 2 sc in the same stitch
- rnd – round
- sp – space
Special stitch: Shell. Work 5 dc in the stitch indicated. The 3rd dc is the center of the shell.
Half shell. At the start of a round: ch 3 (counts as 1 dc), then 2 dc in the same stitch. At the end of the round: 2 dc in that same starting stitch. The two halves together make one full 5-dc shell.
Gauge and Checkpoints
- Single crochet: 12 sts and 13 rnds = 4 in (10.2 cm)
- Shell pattern: 2 repeats (12 sts) = 4 in (10.2 cm), and 4 rnds = 3.6 in (9.1 cm)
The base works as a gauge swatch, so test it first. Make Rnds 1–4 and measure before going further.
Checkpoints:
– After Rnd 4 (64 sts): 9.5 in (24.1 cm) × 2.5 in (6.4 cm)
– After Rnd 8 (88 sts): 11.9 in (30.2 cm) × 4.9 in (12.4 cm)
– After Rnd 11: the wall is 0.9 in (2.3 cm) tall and the circumference is 30 in (76.2 cm)
– After Rnd 17: the wall is 6.3 in (16.0 cm) tall
– After Rnd 20: the wall is 7.2 in (18.3 cm) tall
If your base is too big, go down to a 5.5 mm hook. If it’s too small, go up to a 6.5 mm hook. Don’t fix the size by changing the stitch counts. The shell pattern needs exactly 90 stitches.
Basket Base
The base is worked in joined rounds without turning. Join each round with a sl st to the first sc. The ch 1 at the start of a round never counts as a stitch.
Rnd 1: Ch 23. Sc in the 2nd ch from the hook and in the next 20 ch (21 sc). Work 3 sc in the last ch. Rotate the work and sc in the underside of the next 20 ch. Work 2 sc in the last ch, which already holds the first sc. Join. (46 sts)
Rnd 2: Ch 1. Sc in the next 21 sts, inc in the next 3 sts, sc in the next 20 sts, inc in the next 2 sts. Join. (52 sts)
From here on, you add 6 stitches per round: 3 at each curved end.
Rnd 3: Ch 1. Sc in the next 21 sts, then (sc 1, inc) 3 times. Sc in the next 20 sts, then (sc 1, inc) 2 times, sc 1. Join. (58 sts)
Rnd 4: Ch 1. Sc in the next 22 sts, then (sc 2, inc) 3 times. Sc in the next 20 sts, then (sc 2, inc) 2 times, sc 2. Join. (64 sts)
Checkpoint: 9.5 in (24.1 cm) × 2.5 in (6.4 cm).
Rnd 5: Ch 1. Sc in the next 22 sts, then (sc 3, inc) 3 times. Sc in the next 21 sts, then (sc 3, inc) 2 times, sc 3. Join. (70 sts)
Rnd 6: Ch 1. Sc in the next 23 sts, then (sc 4, inc) 3 times. Sc in the next 21 sts, then (sc 4, inc) 2 times, sc 4. Join. (76 sts)
Rnd 7: Ch 1. Sc in the next 23 sts, then (sc 5, inc) 3 times. Sc in the next 22 sts, then (sc 5, inc) 2 times, sc 5. Join. (82 sts)
Rnd 8: Ch 1. Sc in the next 24 sts, then (sc 6, inc) 3 times. Sc in the next 22 sts, then (sc 6, inc) 2 times, sc 6. Join. (88 sts)
Checkpoint: 11.9 in (30.2 cm) × 4.9 in (12.4 cm). The base should lie flat. If it ruffles, your increases are bunched at the ends, so spread them out evenly around the curves.
Lower Wall and Dispensing Slot
Rnd 9 (conversion round): Ch 1. Working in back loops only, sc in each stitch around, and work 1 inc at the center of each curved end. Join. 88 sts worked 1 per existing stitch + 2 extra stitches = 90 sts.
The unworked front loops form a ridge, and the wall begins to turn upward.
Before Rnd 10, lay the basket flat. Choose one long side as the front and mark its 8 center stitches with markers.
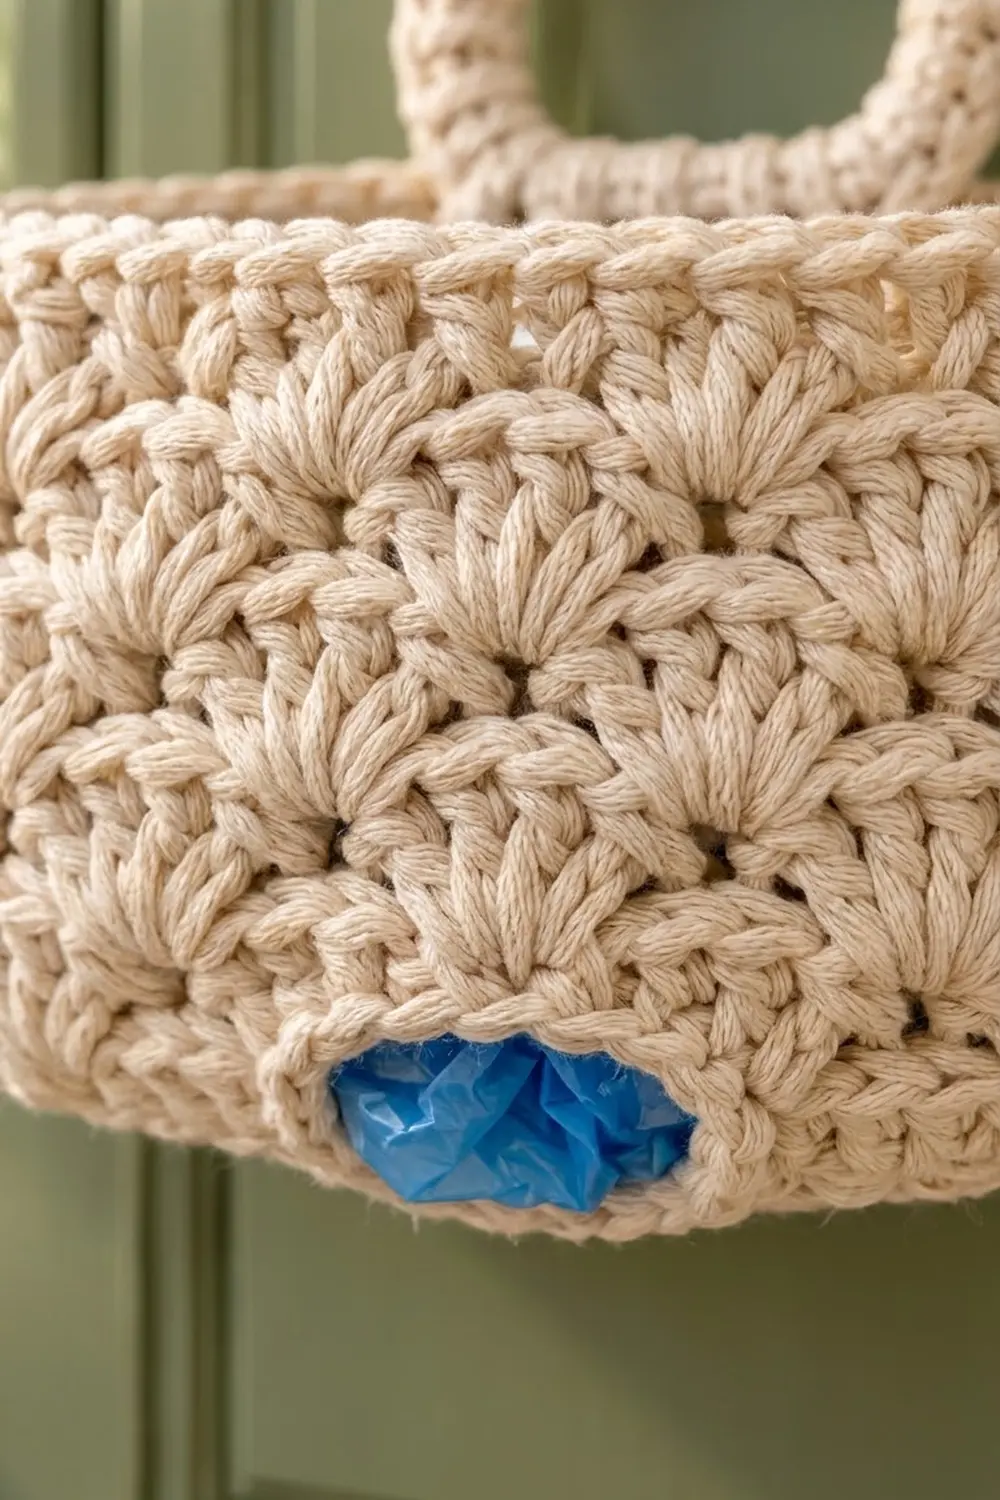
Rnd 10 (slot round): Ch 1. Sc in each stitch up to the first marked stitch. Ch 8 and skip the 8 marked stitches. Sc in each remaining stitch. Join. (82 sc + 8 ch = 90 sts)
Rnd 11: Ch 1. Sc in each sc and in each ch. Join. (90 sts)
The slot is about 2.7 in (6.9 cm) wide, low on the front wall. That’s where the bags come out.
Shell Body
Every shell round has 90 stitches, which is 15 repeats of 6 stitches.
Rnd 12 (Shell Rnd A): Ch 1. Sc in the first st. Sk 2, shell in the next st, sk 2, sc in the next st. Repeat from * 13 more times. Then sk 2, shell in the next st, sk 2, and join to the first sc. (15 shells + 15 sc = 90 sts)
Rnd 13 (Shell Rnd B): Ch 3 and work 2 dc in the joining sc (half shell). Sc in the center dc of the next shell, shell in the next sc. Repeat from * 13 more times. Then sc in the center dc of the last shell, 2 dc in the starting sc, and join to the top of the ch-3. (14 shells + 2 half shells + 15 sc = 90 sts)
Rnd 14: Repeat Rnd 12, working the first sc into the joining point, which is the center of the split shell. The shells now sit on top of the sc of Rnd 13. (90 sts)
Rnd 15: Repeat Rnd 13. (90 sts)
Rnd 16: Repeat Rnd 12. (90 sts)
Rnd 17: Repeat Rnd 13. (90 sts)
Checkpoint: the wall measures 6.3 in (16.0 cm) from the Rnd 9 ridge. That is 0.9 in (2.3 cm) of sc plus 5.4 in (13.7 cm) of shells. The fans should alternate like brickwork.
Ring Hanger
Rnd 1: Make a slipknot on the hook. Working over the 4 in (10.2 cm) ring, pack sc tightly around it until it is completely covered, about 48 sc. Adjust the count so that no ring shows, and keep it an even number. Join to the first sc.
Rnd 2: Sl st in the back loop of each sc around. This makes a rolled ridge on the outer edge. Fasten off and leave a 24 in (61.0 cm) tail for sewing.
Checkpoint: outer diameter 4.5 in (11.4 cm).
Rim Border
Border gauge: 3 sts = 1 in (2.5 cm) and 3 rnds = 0.9 in (2.3 cm), the same as the base.
Rnd 18 (conversion round): Ch 1. Sc in each st around, including the top of the ch-3. Join. (90 sts worked 1 per existing stitch + 0 extra = 90 sts: 45 across the front half and 45 across the back half)
Rnd 19: Ch 1, sc in each st around. Join. (90 sts: 45 front, 45 back)
Rnd 20: Ch 1, sc in each st around. Join. (90 sts: 45 front, 45 back) Fasten off and weave in the end.
Why the math works: The base finished at 88 sts. Rnd 9 added exactly 2 to reach 90, which is 15 × 6, so the shell repeat fits with no partial repeat. Every shell round stays at 90, and the rim works 1 sc per stitch for a 90-stitch rim. At 3 sts per inch, 90 sts is 30 in (76.2 cm), almost exactly the base perimeter of 29.3 in (74.4 cm). That’s why the walls rise straight instead of flaring or pulling in.
Attaching the ring: Center the ring on the back half of the rim, with its lower 1.5 in (3.8 cm) overlapping the inside of the back wall. That covers Rnds 18–20 and the top of Rnd 17. Whipstitch the ring to the wall through both layers along about 3 in (7.6 cm) of the ring’s arc. Go over it twice for strength. The ring stands 3 in (7.6 cm) above the rim, so the total height is 10.2 in (25.9 cm).
Slot edging: Join yarn at one corner of the slot. Work 8 sc along the lower edge, 1 sc at the corner, 8 sc in the underside of the chains, and 1 sc at the last corner. Join. (18 sts) Fasten off and weave in the end.
Final Blocking
- Weave in all the ends on the inside of the basket.
- Stuff the basket firmly with a rolled towel to make a smooth oval, 12 in (30.5 cm) × 5 in (12.7 cm).
- Mist the outside until it is damp but not soaked.
- Shape the rim so it stands straight, and pinch the oval ends into even curves.
- Press the shells flat with your palm so the fans look even.
- Shape the ring into a true circle and let it dry upright.
- Let it dry completely, usually 24 hours, before taking the towel out.
Final Quality-Control Checklist
- The base measures 11.9 in (30.2 cm) × 4.9 in (12.4 cm) and lies flat.
- Each round from Rnd 9 to Rnd 20 has 90 sts.
- There are 15 shells in each shell round, and they alternate evenly.
- The slot is centered on the front and edged with 18 sc.
- The wall is 7.2 in (18.3 cm) tall.
- The ring is fully covered and measures 4.5 in (11.4 cm).
- The ring is centered on the back and firmly stitched along 3 in (7.6 cm).
- No ends show on the outside.
Troubleshooting
The base cups upward. You need more increases at the ends, or a larger hook. Check that each round adds exactly 6 sts.
The base ruffles. Your increases are stacking. Stagger them as written, or use a smaller hook.
The shells don’t line up. You skipped the wrong number of stitches. Count 6 positions per repeat, and count the shells (15) before you join.
The walls flare. Your shell tension is looser than your sc. Go down half a hook size for Rnds 12–17 only.
The slot gapes or tears. Work the slot edging tightly, or add a second round of 18 sc.
The basket tilts forward. Move the ring so it is exactly centered, and sew it lower for more support.
Care
Hand wash cool with mild soap, press out the water in a towel, and dry it flat over a rolled towel to keep the shape. Don’t tumble dry.
Final Notes
Here is how the measurements build on each other. The base is 88 sts and 11.9 in × 4.9 in (30.2 cm × 12.4 cm). The conversion round brings it to 90 sts, and 15 shell repeats of 6 sts make a 30 in (76.2 cm) wall circumference. The wall is 0.9 in (2.3 cm) of sc, 5.4 in (13.7 cm) of shells and a 0.9 in (2.3 cm) rim, for a total of 7.2 in (18.3 cm). The ring adds 3 in (7.6 cm), for 10.2 in (25.9 cm) overall. If you check your size at each step, the finished basket will hang straight and dispense bags easily.
Happy crocheting!