

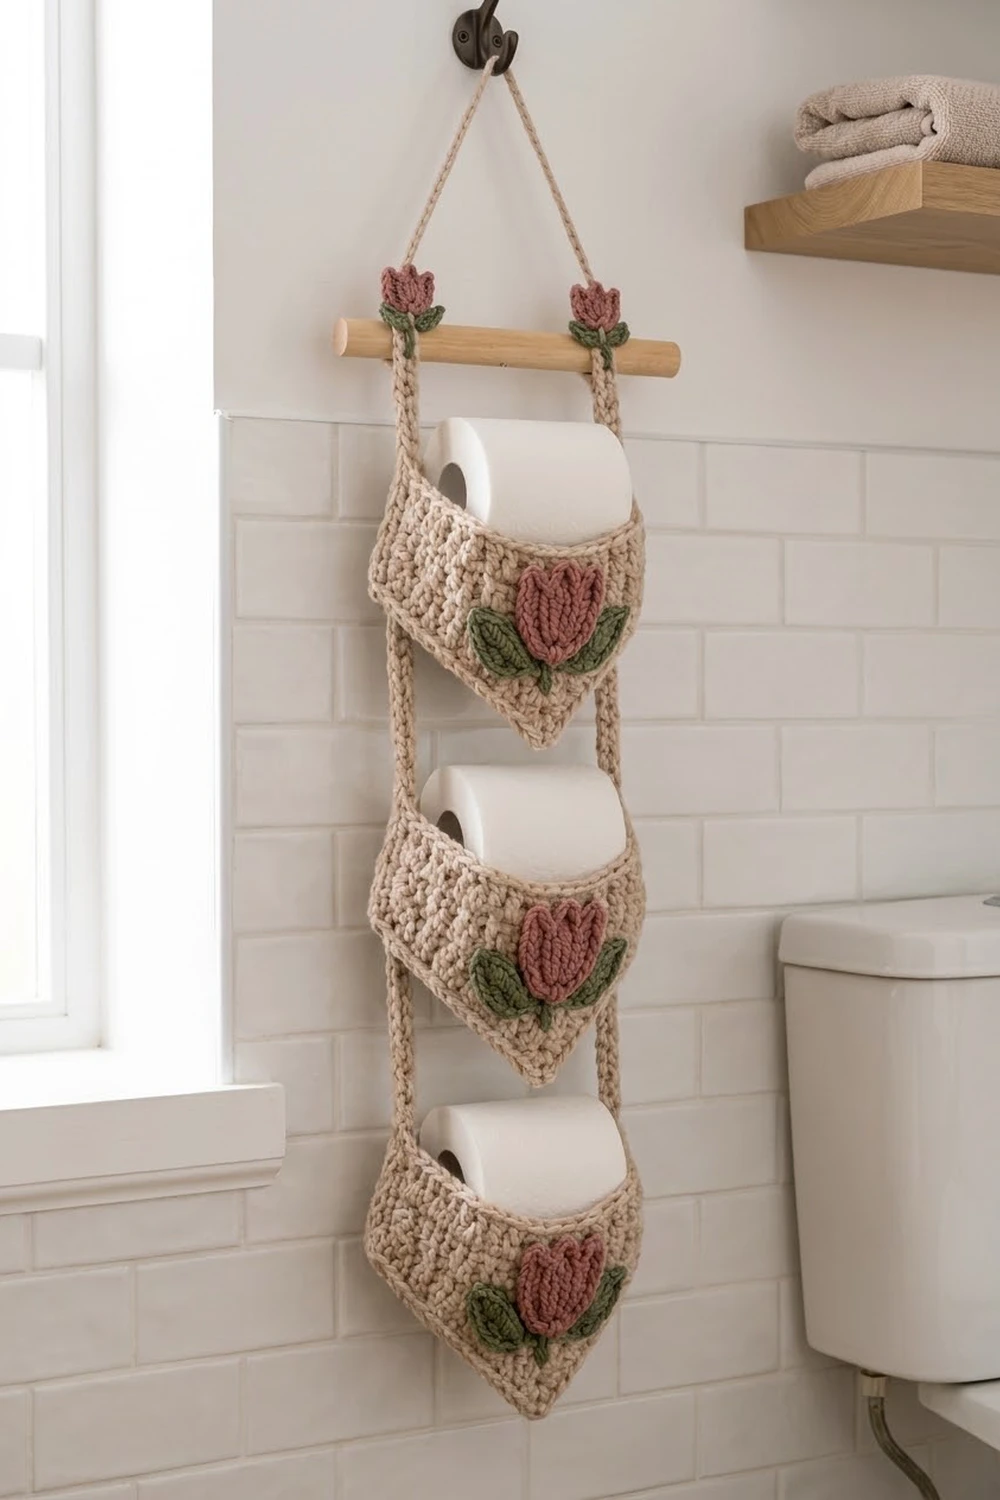
The Tulip Trio is a hanging organizer that holds three spare toilet paper rolls. It has three pockets with a V-shaped bottom point, hung on two side straps from a wooden dowel. Each pocket has a dusty-rose tulip with sage leaves on the front, and smaller matching tulips sit at the tops of the straps.
The main fabric is chunky oatmeal yarn worked in single crochet, so the pockets hold their shape. A ribbed post-stitch band finishes each pocket opening. The look is soft, cottage-style and practical.
The pattern uses US crochet terms. The finished holder measures about 10¾ in (27.3 cm) wide and 27¼ in (69.2 cm) from the dowel to the bottom point.
Construction overview: you work two V-point panels for each pocket, seam them into a pouch and add a ribbed rim. You then crochet two long straps, sew the pockets to the straps, make the appliqués and sew them on, and hang everything from a dowel.
Finished Size and Construction
- Finished size: 10¾ in (27.3 cm) wide × 27¼ in (69.2 cm) long below the dowel
- Skill level: Intermediate (front- and back-post stitches, seaming, appliqué)
- Terminology: US
- Yarn weight: Bulky (#5), cotton or cotton blend
- Hook: 6 mm (US J-10)
- Number of pieces: 6 panels, 2 straps, 1 hanging cord, 3 large tulips, 6 large leaves, 2 small tulips, 4 small leaves
- Layout: 3 pockets stacked in one column between 2 straps
- Panel size: 9 in (22.9 cm) wide × 6 in (15.2 cm) tall
- Pocket size before the rim band: 9½ in (24.1 cm) wide × 6¼ in (15.9 cm) tall, after seaming
- Rim band depth: 1¼ in (3.2 cm)
- Finished pocket: 9½ in (24.1 cm) × 7½ in (19.1 cm)
Materials
Choose a smooth bulky cotton or cotton-acrylic blend, about 140 m per 100 g. Cotton holds its shape well and handles bathroom humidity.
- Oatmeal (main color): 250 g, about 350 m (383 yd)
- Dusty rose: 25 g, about 35 m (38 yd)
- Sage green: 20 g, about 28 m (31 yd)
These quantities include a margin of about 15–20% for your gauge swatch and seams.
Tools:
– 6 mm (US J-10) crochet hook
– Tapestry needle
– 6 stitch markers
– Wooden dowel, 12 in (30.5 cm) long × ¾ in (1.9 cm) in diameter
– Measuring tape
– Pins and a blocking mat
Abbreviations (US Terms)
- ch – chain
- sl st – slip stitch
- sc – single crochet
- hdc – half double crochet
- dc – double crochet
- tr – treble crochet
- fpdc – front-post double crochet
- bpdc – back-post double crochet
- st(s) – stitch(es)
- RS / WS – right side / wrong side
Special stitch – picot: ch 2, sl st in the 2nd ch from the hook. A picot forms a petal tip and does not count as a stitch.
Gauge and Checkpoints
Gauge: 12 sc and 14 rows = 4 in (10.2 cm) in sc worked in rows.
Make a swatch 15 sts wide and 16 rows tall, then measure 4 in (10.2 cm) across the center. Before you make all six panels, make one complete panel and check it:
- After Row 7: 27 sts measuring 9 in (22.9 cm) wide. The V section is 2 in (5.1 cm) tall.
- After Row 21: the panel is 6 in (15.2 cm) tall from the point to the top edge.
- After seaming: the pocket lies flat at 9½ in (24.1 cm) wide.
- After the rim band: the pocket is 7½ in (19.1 cm) tall at the center.
If your panel is too big, use a hook 0.5 mm smaller. If it is too small, use a hook 0.5 mm larger. Don’t change any stitch counts, because the rim band and the strap layout depend on them.
Pocket Panel (make 6, oatmeal)
You work each panel from the bottom point up. Turn at the end of every row. The ch 1 at the start of a row does not count as a stitch.
Row 1: Ch 2, 3 sc in the 2nd ch from the hook, turn. (3 sts)
Row 2: Ch 1, 3 sc in the first st, sc in the next st, 3 sc in the last st, turn. (7 sts)
Row 3: Ch 1, 3 sc in the first st, sc in each of the next 5 sts, 3 sc in the last st, turn. (11 sts)
Row 4: Ch 1, 3 sc in the first st, sc in each of the next 9 sts, 3 sc in the last st, turn. (15 sts)
Row 5: Ch 1, 3 sc in the first st, sc in each of the next 13 sts, 3 sc in the last st, turn. (19 sts)
Row 6: Ch 1, 3 sc in the first st, sc in each of the next 17 sts, 3 sc in the last st, turn. (23 sts)
Row 7: Ch 1, 3 sc in the first st, sc in each of the next 21 sts, 3 sc in the last st, turn. (27 sts)
Each row adds 2 sts at each edge. That gives the shallow V point: 9 in (22.9 cm) wide over only 2 in (5.1 cm) of height.
Rows 8–21: Ch 1, sc in each st across, turn. (27 sts each row)
These 14 straight rows add 4 in (10.2 cm), so the panel measures 6 in (15.2 cm) in total. Fasten off and leave a 6 in (15.2 cm) tail on 3 of the 6 panels. These 3 panels are the backs.
Strap (make 2, oatmeal)
Foundation: Ch 85.
Row 1: Sc in the 2nd ch from the hook and in each ch across, turn. (84 sts)
Row 2: Ch 1, sc in each st across. (84 sts)
Fasten off. Each strap measures 28 in (71.1 cm) × about ⅝ in (1.6 cm). Foundation chains often work up tight. If your strap is shorter than 28 in (71.1 cm), remake it with a hook one size larger for the chain only.
Hanging Cord (make 1, oatmeal)
Ch 56. Sl st in the 2nd ch from the hook and in each ch across. (55 sl sts)
Fasten off and leave long tails. The cord measures about 18 in (45.7 cm).
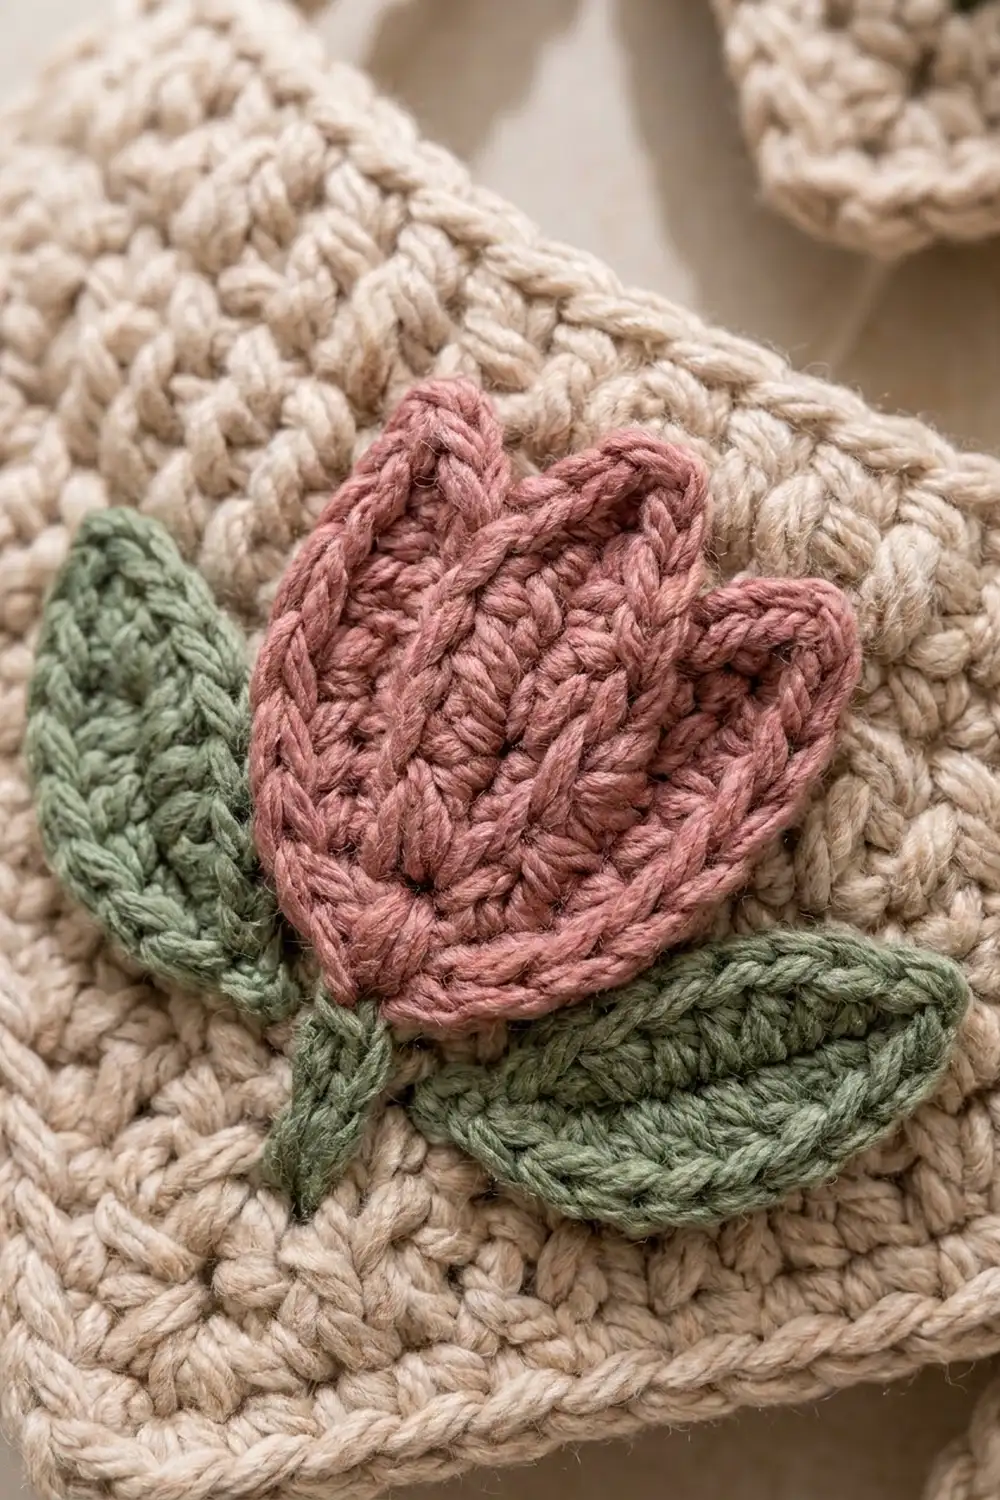
Large Tulip (make 3, dusty rose)
Foundation: Ch 6.
Row 1: Sc in the 2nd ch from the hook and in each ch across, turn. (5 sts)
Row 2: Ch 1, 2 sc in the first st, sc in each of the next 3 sts, 2 sc in the last st, turn. (7 sts)
Rows 3–4: Ch 1, sc in each st across, turn. (7 sts each row)
Row 5 (petals): Ch 2 (does not count as a stitch). Work across the 7 sts as follows:
– (hdc, dc, picot) in the first st for the left petal
– sl st in the next st for a valley
– dc in the next st, (tr, picot, tr) in the next st, dc in the next st for the center petal
– sl st in the next st for a valley
– (dc, picot, hdc) in the last st for the right petal
All 7 sts are used. Do not fasten off.
Edging: Ch 1. Work sc evenly down the side, across the bottom and up the other side, using 4 sc per side and 5 sc across the foundation. Sl st at the base of the right petal. (13 edging sc)
Fasten off and leave a 12 in (30.5 cm) tail. Thread the tail and backstitch a line from each valley down to the base. The 2 lines divide the bloom into three petals. The tulip measures about 2½ in (6.4 cm) wide × 2 in (5.1 cm) tall.
Large Leaf (make 6, sage)
Foundation: Ch 7.
Round: Sc in the 2nd ch from the hook, hdc in the next ch, dc in each of the next 2 chs, hdc in the next ch, 3 sc in the last ch. Rotate and work along the other side of the foundation: hdc in the next ch, dc in each of the next 2 chs, hdc in the next ch, sc in the last ch. Ch 2, sl st in the first sc to form the tip. (13 sts plus the tip)
Fasten off and leave a 10 in (25.4 cm) tail. Sl st a center vein in oatmeal or sage if you like. The leaf measures about 2 in (5.1 cm) × ¾ in (1.9 cm).
Small Tulip (make 2, dusty rose)
Foundation: Ch 4.
Row 1: Sc in the 2nd ch from the hook and in each ch across, turn. (3 sts)
Row 2: Ch 1, 2 sc in the first st, sc in the next st, 2 sc in the last st, turn. (5 sts)
Row 3: Ch 1, sc in each st across, turn. (5 sts)
Row 4 (petals): Ch 2 (does not count), then work:
– (hdc, dc, picot) in the first st
– sl st in the next st
– (dc, picot, dc) in the next st
– sl st in the next st
– (dc, picot, hdc) in the last st
All 5 sts are used. Fasten off and leave a 10 in (25.4 cm) tail. The tulip measures about 1¾ in (4.4 cm) × 1½ in (3.8 cm).
Small Leaf (make 4, sage)
Foundation: Ch 5.
Round: Sc in the 2nd ch from the hook, hdc in each of the next 2 chs, 3 sc in the last ch. Working along the other side: hdc in each of the next 2 chs, sc in the last ch. Ch 2, sl st in the first sc. (9 sts plus the tip)
Fasten off. The leaf measures about 1¼ in (3.2 cm) long.
Make All Pieces
| Color | Pieces |
|---|---|
| Oatmeal | 6 panels, 2 straps, 1 hanging cord |
| Dusty rose | 3 large tulips, 2 small tulips |
| Sage | 6 large leaves, 4 small leaves |
Layout, from top to bottom (S = strap, P = pocket):
 [small tulip]===== dowel =====[small tulip]
       S                           S
       S  [ Pocket 1 + tulip ]     S
       S  [      \    /      ]     S
       S          \/               S
       S  [ Pocket 2 + tulip ]     S
       S  [      \    /      ]     S
       S          \/               S
       S  [ Pocket 3 + tulip ]     S
          [      \    /      ]
                  \/
Lay out each pair of panels with the appliqués on top and check the placement before you sew anything.
Joining
The holder is joined in three steps. Do Step 1 and Step 2 first. Then work the rim band from the Border section on every pocket. Then come back for Step 3.
Step 1 – Sew on the pocket appliqués. Pin a large tulip on a front panel (one without a sewing tail). Center it, with its base 1¼ in (3.2 cm) above the point. Tuck a large leaf under each side of the tulip base, angled up and out at about 45°. Whipstitch around the edges with the matching tails. Catch only the front loops of the panel so the stitches don’t show on the back.
Step 2 – Seam the pockets. Hold one front and one back panel with wrong sides together and the edges matched. Join oatmeal at the top right corner and work through both layers:
– 14 sc down the straight side (1 per row end)
– 14 sc down the diagonal (2 per row end)
– 3 sc in the point
– 14 sc up the other diagonal
– 14 sc up the straight side
That is 59 sc in total. Leave the top edge unworked. The seam forms the raised outline around each pocket. Keep your tension firm and even: if the 2 sc per diagonal row end are too loose, the V will ripple. Checkpoint: the pocket lies flat at 9½ in (24.1 cm) wide.
Step 3 – Attach the pockets to the straps. Lay both straps flat, 9½ in (24.1 cm) apart, and place markers on each strap, measuring down from one end:
– 3 in (7.6 cm) for the dowel fold
– Another 2¼ in (5.7 cm) to the top of Pocket 1
– Then alternate 5¼ in (13.3 cm) for a pocket side and 3½ in (8.9 cm) for a gap until you reach the bottom of Pocket 3
The total comes to exactly 28 in (71.1 cm): 3 + 2¼ + 5¼ + 3½ + 5¼ + 3½ + 5¼.
Whipstitch each pocket’s straight seam edge and the side of its rim band (5¼ in, 13.3 cm, in total) to the inner edge of each strap. Keep the pocket rims level with each other.
Fold the top 3 in (7.6 cm) of each strap back over the dowel and sew it down. Sew one cord end to the back of each strap fold. Sew a small tulip to the front of each fold so the bloom sits above the dowel, with a small leaf on each side.
Size checkpoint: 10¾ in (27.3 cm) wide and 27¼ in (69.2 cm) from the dowel to the bottom point.
Border (Pocket Rim Band)
Border gauge: 3 sts per inch, the same as the panels. This keeps the band from flaring or pulling in.
The opening has 27 sts across the front and 27 sts across the back: 2 panels × 27 = 54 sts. No stitches are added at the seams.
Rnd 1: With the RS facing, join oatmeal at the right side seam. Sc in each of the 27 Row 21 sts of the front, then in each of the 27 sts of the back. Sl st to the first sc. (54 sts: 27 front + 27 back)
Rnd 2: Ch 2 (does not count). Fpdc around the next st, bpdc around the next st. Repeat from * 26 more times. Sl st to the first fpdc. (54 sts: 27 fpdc + 27 bpdc)
Rnd 3: Ch 2. Fpdc around each fpdc and bpdc around each bpdc. Sl st to join. (54 sts)
Fasten off. The band is 1¼ in (3.2 cm) deep.
Why the math works: 54 is even, so the fpdc/bpdc pairs close perfectly at the join. The ribs on the back panel sit one stitch off from the front because 27 is odd, but this can’t be seen once the pocket is worn flat. The opening measures 18 in (45.7 cm) around: 54 sts ÷ 3 sts per inch. A roll’s circumference is about 14 in (35.6 cm), so rolls slide in easily.
Final Blocking
- Before you attach the pockets in Step 3, mist each pocket lightly or soak it and press out the water in a towel.
- Pin each pocket to 9½ in (24.1 cm) × 7½ in (19.1 cm). Set the V point first, then the two top corners.
- Pat the ribbed band so the ribs run straight up and down. Don’t stretch the band.
- Pin each tulip’s petals into points and spread its leaves.
- Pin the straps straight at 28 in (71.1 cm) long.
- Let everything dry completely, then finish Step 3.
Final Quality-Control Checklist
- [ ] All 6 panels have 27 sts in Row 21 and measure 6 in (15.2 cm) tall.
- [ ] Each seam has 59 sc and the V points are sharp.
- [ ] Every rim band has 54 sts with ribs that line up.
- [ ] The tulips are centered 1¼ in (3.2 cm) above each point.
- [ ] The pocket rims are level across both straps.
- [ ] All three gaps are 3½ in (8.9 cm).
- [ ] The dowel folds are secure and the small tulips are sewn above the dowel.
- [ ] All ends are woven in on the wrong side.
Troubleshooting
The V point ripples or cups. You are working the corner 3-sc groups too loosely. Tighten your tension or use a hook 0.5 mm smaller for Rows 1–7 only.
The pocket is wider than 9½ in (24.1 cm). Check your gauge. If the panel is correct, you are working the seam sc too loosely.
The rim band flares. Work Rnd 1 with a hook 0.5 mm smaller.
Rolls won’t fit. Make sure Rnd 1 of the band has all 54 sts.
The pockets hang crooked. Re-measure the strap markers and resew so the rims line up.
The tulip petals curl. Steam-block them flat and backstitch the petal lines more firmly.
Care
Hand wash in cool water, reshape and dry flat. Slide the dowel out before washing.
Final Notes
The measurement chain:
- Gauge is 12 sc and 14 rows = 4 in (10.2 cm).
- Each panel works up to 27 sts, 9 in (22.9 cm) wide × 6 in (15.2 cm) tall.
- Seaming makes each pocket 9½ in (24.1 cm) wide.
- The 54-st rim band adds 1¼ in (3.2 cm), for a 7½ in (19.1 cm) pocket.
- The 28 in (71.1 cm) straps, marked 3 + 2¼ + 5¼ + 3½ + 5¼ + 3½ + 5¼ in, carry three pockets.
- The finished holder measures 10¾ in (27.3 cm) × 27¼ in (69.2 cm).
If every checkpoint matches, the finished holder will match too.
Happy crocheting!