

Buttercup Arches is an open, airy crochet curtain made from small arch motifs. Each arch has a flat bottom, short straight sides, and a rounded top around an arch-shaped opening. Short solid connectors link the arches into long vertical strands. The strands hang from a solid top band with tab loops that slide onto a curtain rod.
The whole curtain uses one pale butter-yellow yarn. Dense single crochet gives each arch a chunky, rope-like texture that holds its shape. When the sun comes through, the openings cast patterned shadows. The style is relaxed and a little retro, and it suits sunny living rooms, kitchens and doorways.
This pattern uses US crochet terms. One finished panel measures 28 in (71.1 cm) wide by 84 in (213.4 cm) long from the top of the band to the bottom of the strands, plus the tab loops above. The photo shows a matching pair, so make two panels for a standard window.
Construction is simple. You crochet the arch motifs in joined rounds around a chain ring, and most of them get a short connector. Then you sew the motifs into 7 strands of 18 arches each. Last, you crochet a top band with tabs and hang the strands from the band’s lower edge.
Finished Size and Construction
- Finished panel size: 28 in (71.1 cm) wide x 84 in (213.4 cm) long, plus tab loops
- Skill level: Easy to intermediate (simple stitches, lots of repetition, careful assembly)
- Terminology: US crochet terms
- Yarn weight: Bulky (#5)
- Hook: 6.0 mm (J-10)
- Number of pieces per panel: 126 arch motifs, 7 band connectors, 1 top band with 7 tabs
- Layout: 7 strands across x 18 arches down
- Single arch size: 3.5 in (8.9 cm) wide x 3.5 in (8.9 cm) tall
- Connector length: 1 in (2.5 cm) between arches
- Panel width before band: 7 strands spaced every 4 in (10.2 cm) = 28 in (71.1 cm)
- Top band depth: 3 in (7.6 cm)
Materials
Choose a smooth bulky cotton or cotton-blend yarn. Cotton shows the stitches clearly, stretches less than acrylic and lets the arches hang straight. Aim for a yarn of about 130 m per 100 g.
- Pale butter yellow (one color only): 2,000 g / 2,600 m per panel; 4,000 g / 5,200 m for a pair of panels
- 6.0 mm (J-10) crochet hook
- 5.0 mm (H-8) hook, optional, in case your band needs tightening
- Tapestry needle
- Locking stitch markers
- Measuring tape
- Blocking mats, rustproof pins and a spray bottle
- Curtain rod up to 1.25 in (3.2 cm) in diameter
Quantities include a margin of roughly 10% for the gauge swatch, long sewing tails and small tension differences.
Abbreviations (US Terms)
- ch: chain
- sc: single crochet
- sl st: slip stitch
- st(s): stitch(es)
- rnd: round
- 2 sc in next: increase; work 2 sc in the same st
- 3 sc in next: corner; work 3 sc in the same st
- Standing sc: with a slipknot on the hook, insert the hook into the st, yarn over, pull up a loop, yarn over, pull through both loops
The beginning ch 1 of every round or row never counts as a stitch.
Gauge and Checkpoints
Gauge: 12 sc and 13 rows = 4 in (10.2 cm) in sc rows with a 6.0 mm hook.
Make one complete arch before you start production. The whole panel depends on this arch measuring 3.5 in (8.9 cm) square. Its width sets the strand spacing, and its height sets the panel length.
Checkpoints for one arch:
- After Rnd 1: about 2 in (5.1 cm) wide x 2 in (5.1 cm) tall
- After Rnd 2: about 2.75 in (7.0 cm) wide x 2.75 in (7.0 cm) tall
- After Rnd 3: 3.5 in (8.9 cm) wide x 3.5 in (8.9 cm) tall
- Connector: 1.25 in (3.2 cm) wide x 1 in (2.5 cm) long
If your arch is too big, go down one hook size. If it is too small, go up one hook size. Being off by 0.25 in (0.6 cm) per arch adds up to 4.5 in (11.4 cm) over one 18-arch strand, so it’s worth getting right.
If the opening ripples, your Rnd 1 is too tight against the chain ring. Chain the ring a little more loosely.
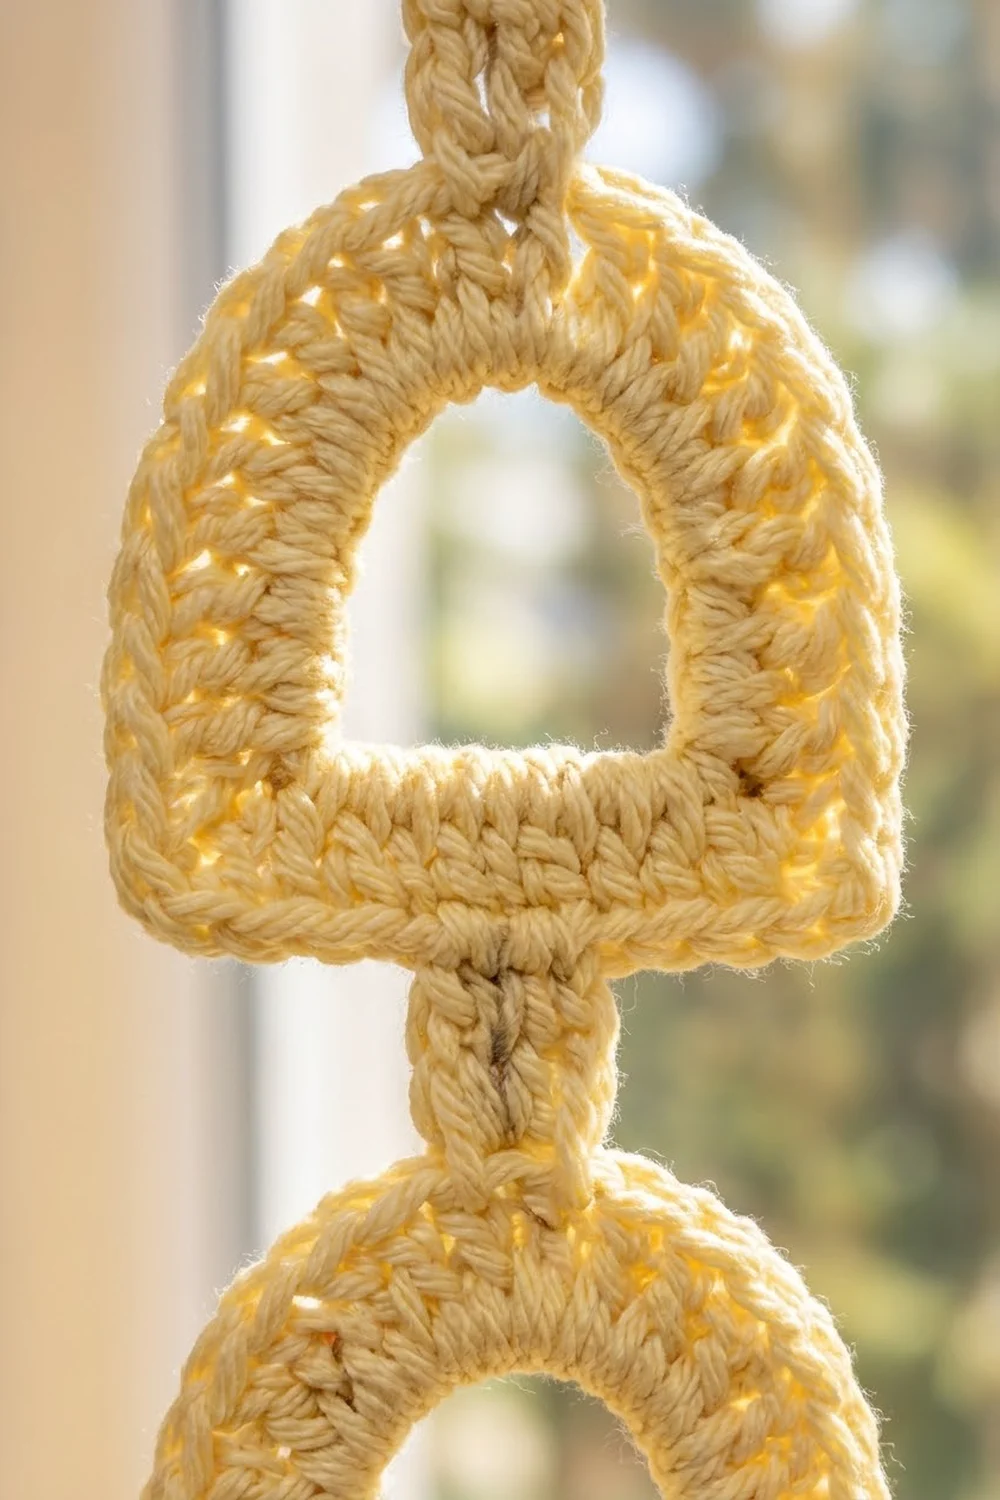
Arch Motif
You will make two versions. Arch A has a connector worked from its bottom edge. Arch B is the bottom arch of each strand and has no connector.
The foundation ring forms the arch-shaped opening. Rnd 1 has 16 sts: the first 4 form the flat bottom of the opening, and the last 12 form the sides and rounded top.
Ch 16, then join with a sl st to the first ch to form a ring. Take care not to twist the chain.
Rnd 1: Ch 1, sc in each ch around, join with sl st to first sc. (16 sc) Sts 1–4 are the bottom and sts 5–16 are the curve. Place a marker in st 1 and in st 4.
Rnd 2: Ch 1, 2 sc in first st, sc in next 2 sts, 2 sc in next st (bottom: 6 sts); sc in next st, 2 sc in next st; repeat from * 5 more times (curve: 18 sts); join. (24 sc: 6 bottom + 18 curve)*
Rnd 3: Ch 1, 3 sc in first st, sc in next 4 sts, 3 sc in next st (bottom: 10 sts); sc in next 2 sts, 2 sc in next st; repeat from * 5 more times (curve: 24 sts); join. (34 sc: 10 bottom + 24 curve)*
The two 3-sc corners square off the flat bottom. The evenly spaced increases keep the top smoothly rounded. Shape the arch with your fingers so the bottom lies straight and the sides rise straight before the curve begins.
For Arch B: Fasten off and weave in the ends. Stop here.
For Arch A, continue with the connector. The joining sl st sits in st 1 of Rnd 3. The bottom edge has 10 sts, and the connector uses the center 4 (sts 4–7), which leaves 3 sts on each side.
Sl st loosely in the next 2 sts (sts 2 and 3).
Connector Row 1: Ch 1, sc in next 4 sts (sts 4–7), turn. (4 sc)
Connector Rows 2–3: Ch 1, sc in each st across, turn. (4 sc)
Fasten off, leaving a 12 in (30.5 cm) tail for sewing.
Make All Pieces
Each panel needs 7 strands of 18 arches. Each strand has 17 Arch A plus 1 Arch B.
- Arch A: 7 x 17 = 119
- Arch B: 7 x 1 = 7
- Total arches per panel: 126
- For a pair of panels: 238 Arch A and 14 Arch B (252 arches)
All pieces are pale butter yellow. Layout of one panel (A = Arch A, B = Arch B; the columns are strands 1–7):
[ TAB ][ TAB ][ TAB ][ TAB ][ TAB ][ TAB ][ TAB ]
[============== TOP BAND, 84 sts ==============]
   |      |      |      |      |      |      |    band connectors
Row 1:   A  A  A  A  A  A  A
Row 2:   A  A  A  A  A  A  A
 ...     (rows 3 to 16 the same)
Row 17:  A  A  A  A  A  A  A
Row 18:  B  B  B  B  B  B  B
Bag the finished arches in groups of 17 A plus 1 B so each strand is ready to assemble.
Joining
Method: Whipstitch, stitch to stitch, using the connector’s long tail.
Stitch logic: Each connector’s last row has 4 sts, and it is sewn to the top center 4 sts of the arch below. The curve has 24 sts, so the top center 4 are curve sts 11–14 (Rnd 3 sts 21–24). That leaves 10 curve sts on each side. Mark these 4 sts before sewing.
- Lay Arch 1 (Arch A) above Arch 2, right sides up.
- Line up connector st 1 with curve st 11 of Arch 2, and connector st 4 with curve st 14.
- Whipstitch through the back loops of the 4 connector sts and both loops of the 4 arch sts, 1 to 1, for 4 stitches in total.
- Secure the yarn, then weave the tail back up into the connector.
- Repeat down the strand, ending with Arch B at the bottom.
Tension: Pull each whipstitch snug but not tight. A tight seam shortens the connector and puckers the arch top. A loose seam lets the arch tilt.
Checkpoint: Each joined strand measures 18 x 3.5 in + 17 x 1 in = 80 in (203.2 cm). Hang it and check that it’s straight before you make the band.
Border: Top Band and Tabs
For this curtain, the top band is the border. It carries the weight of every strand, so work it firmly.
Border gauge: Same as the main gauge, 12 sc = 4 in (10.2 cm). Your band’s stitches per inch must match, because each strand hangs from one 12-st slot.
Why the math works: 7 strands x 12 sts per slot = 84 sts, and 84 sts / 3 sts per inch = 28 in (71.1 cm). Each 3.5 in (8.9 cm) arch sits in a 4 in (10.2 cm) slot, which leaves 0.5 in (1.3 cm) between strands.
Foundation: Ch 85.
Row 1: Sc in 2nd ch from hook and in each ch across, turn. (84 sc)
Rows 2–10: Ch 1, sc in each st across, turn. (84 sc)
The band now measures 28 in (71.1 cm) x 3 in (7.6 cm). Fasten off.
Tabs: With the last row facing up, divide the band into 7 slots of 12 sts. Each tab uses slot sts 4–9 (6 sts), which leaves 3 sts on each side.
Tab Row 1: Join with a standing sc in slot st 4, sc in next 5 sts, turn. (6 sc)
Tab Rows 2–12: Ch 1, sc in each st across, turn. (6 sc)
Fasten off with a 12 in (30.5 cm) tail. Each tab measures about 2 in (5.1 cm) wide x 3.75 in (9.5 cm) long. Repeat for all 7 slots.
Fold each tab to the back. Whipstitch its last row, stitch to stitch, to the back of the band just below the tab’s base. This makes a loop for a rod up to 1.25 in (3.2 cm) across.
Band connectors: With the foundation edge facing up, use slot sts 5–8 of each slot. That’s 4 sts, with 4 sts on each side.
Row 1: Join with a standing sc in slot st 5, sc in next 3 sts, turn. (4 sc)
Rows 2–3: Ch 1, sc in each st across, turn. (4 sc)
Fasten off with a 12 in (30.5 cm) tail. Sew each band connector to the top center 4 sts of a strand’s first arch, the same way as in Joining.
Full panel length: 3 in band + 1 in band connector + 80 in strand = 84 in (213.4 cm).
Final Blocking
- Lay the band and the top few arches of each strand on blocking mats.
- Spray lightly until damp, not soaked.
- Pin the band to 28 in (71.1 cm) x 3 in (7.6 cm) with straight edges.
- Pin each arch to 3.5 in (8.9 cm) square, with a straight flat bottom and an evenly rounded top.
- Keep the strand centers 4 in (10.2 cm) apart.
- Let everything dry completely, then move down the panel and repeat section by section.
- Or hang the panel on its rod, spray it lightly and let gravity straighten the strands.
Final Quality-Control Checklist
- Every arch has 34 sts in Rnd 3: 10 bottom + 24 curve
- All arches measure 3.5 in (8.9 cm) square
- Every connector is 4 sts wide and 3 rows long
- Each connector is centered, with 3 sts on each side at the bottom and 10 sts on each side on the curve
- 7 strands of 18 arches, with Arch B at the bottom of each
- Band is 84 sts and 10 rows, 28 in (71.1 cm) x 3 in (7.6 cm)
- 7 tabs, each centered over a strand
- Panel hangs 84 in (213.4 cm) from the top of the band
- All ends are woven in securely
Troubleshooting
Arch bottom curves instead of lying flat: Your 3-sc corners are in the wrong sts. Recount Rnd 2 so the corners fall in its first and sixth sts.
Arch top looks pointed: Spread the Rnd 3 increases evenly instead of stacking them.
Strand twists when hanging: A connector was sewn off-center. Recheck the 10-and-10 split on the curve.
Band ripples: Your band is looser than the arches. Rework it with a 5.0 mm (H-8) hook.
Band too narrow for the strands: Your band gauge is tight. Check that the 84 sts measure 28 in (71.1 cm).
Panel too long or too short: Add or remove arches in every strand. Each arch-plus-connector unit is 4.5 in (11.4 cm).
Tab loops too tight: Add 2 rows to every tab.
Care
Hand wash in cool water and roll the panel in a towel to remove water. Dry it flat or hanging so the strands don’t stretch, and shake it gently before rehanging.
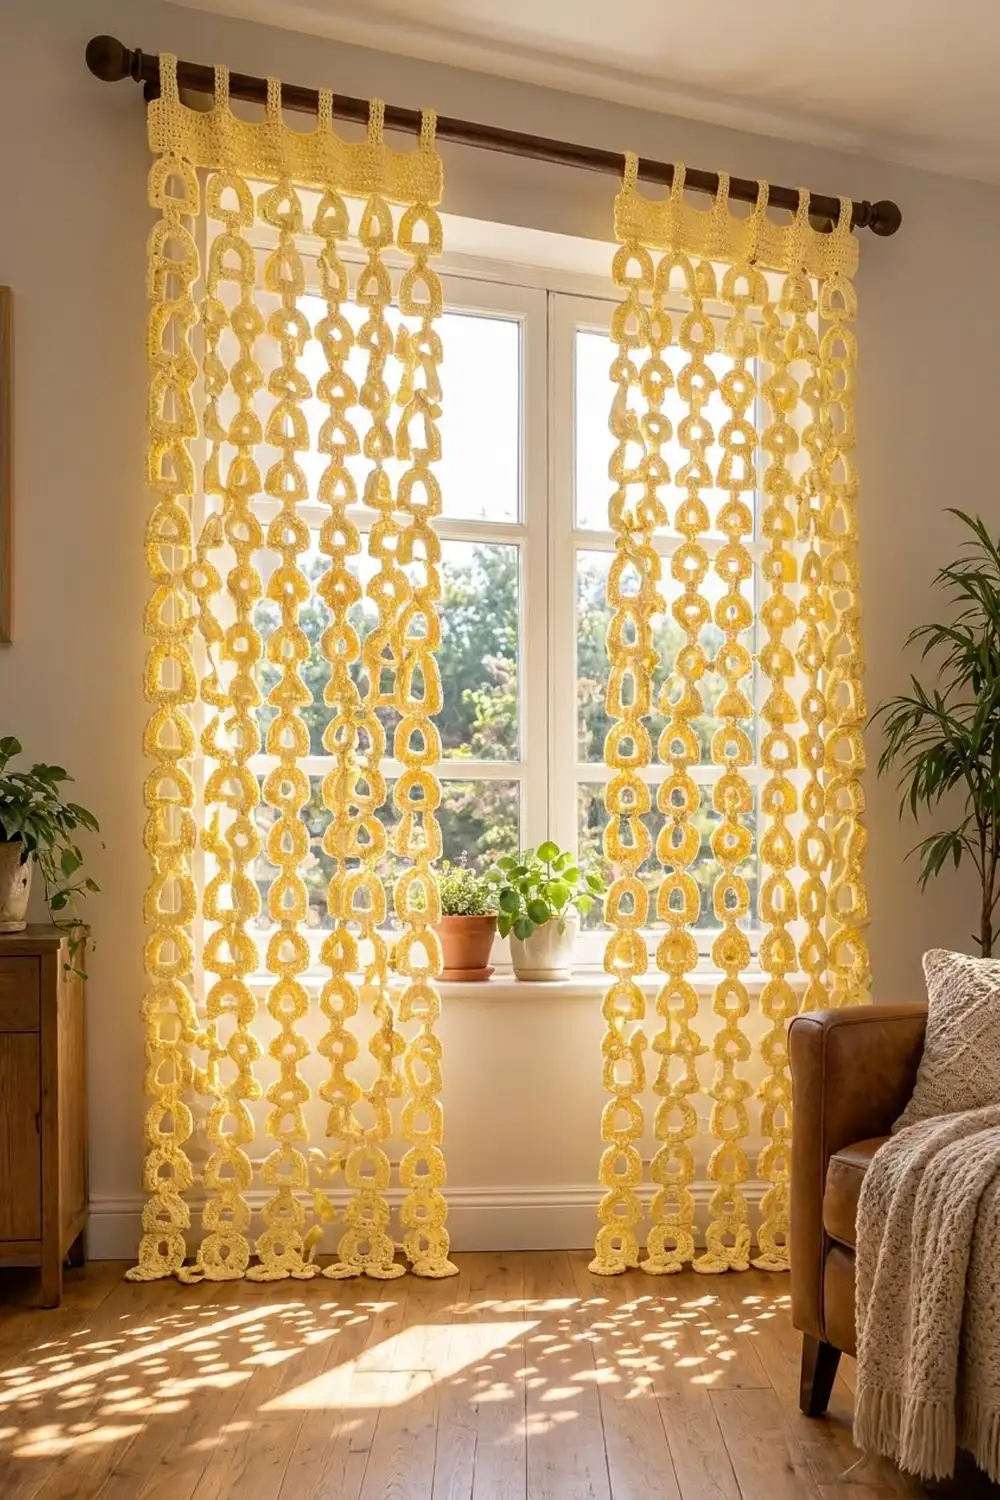
Final Notes
Everything follows from one chain of measurements. A gauge of 12 sc = 4 in (10.2 cm) gives a 3.5 in (8.9 cm) arch. Each arch plus its 1 in (2.5 cm) connector adds 4.5 in (11.4 cm) of length. Eighteen arches make an 80 in (203.2 cm) strand. The band connector and the 3 in (7.6 cm) band bring the panel to 84 in (213.4 cm). Across the width, 7 slots of 12 sts give 84 sts and 28 in (71.1 cm).
Check your first arch and keep your connectors centered, and the panel will hang straight and even.
Happy crocheting!