

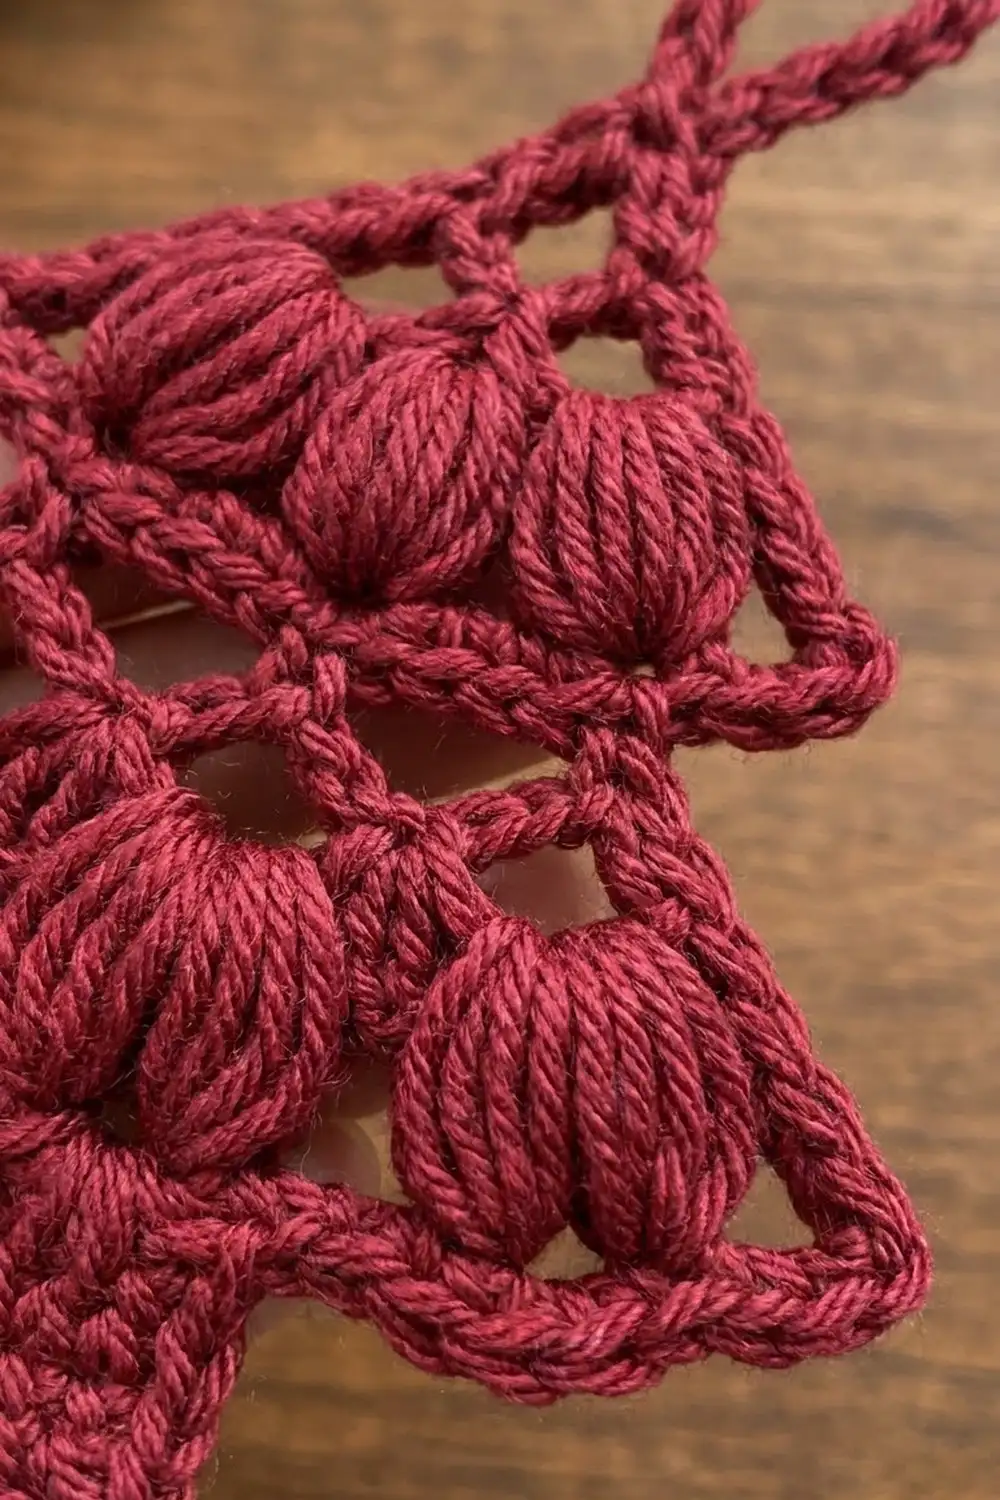
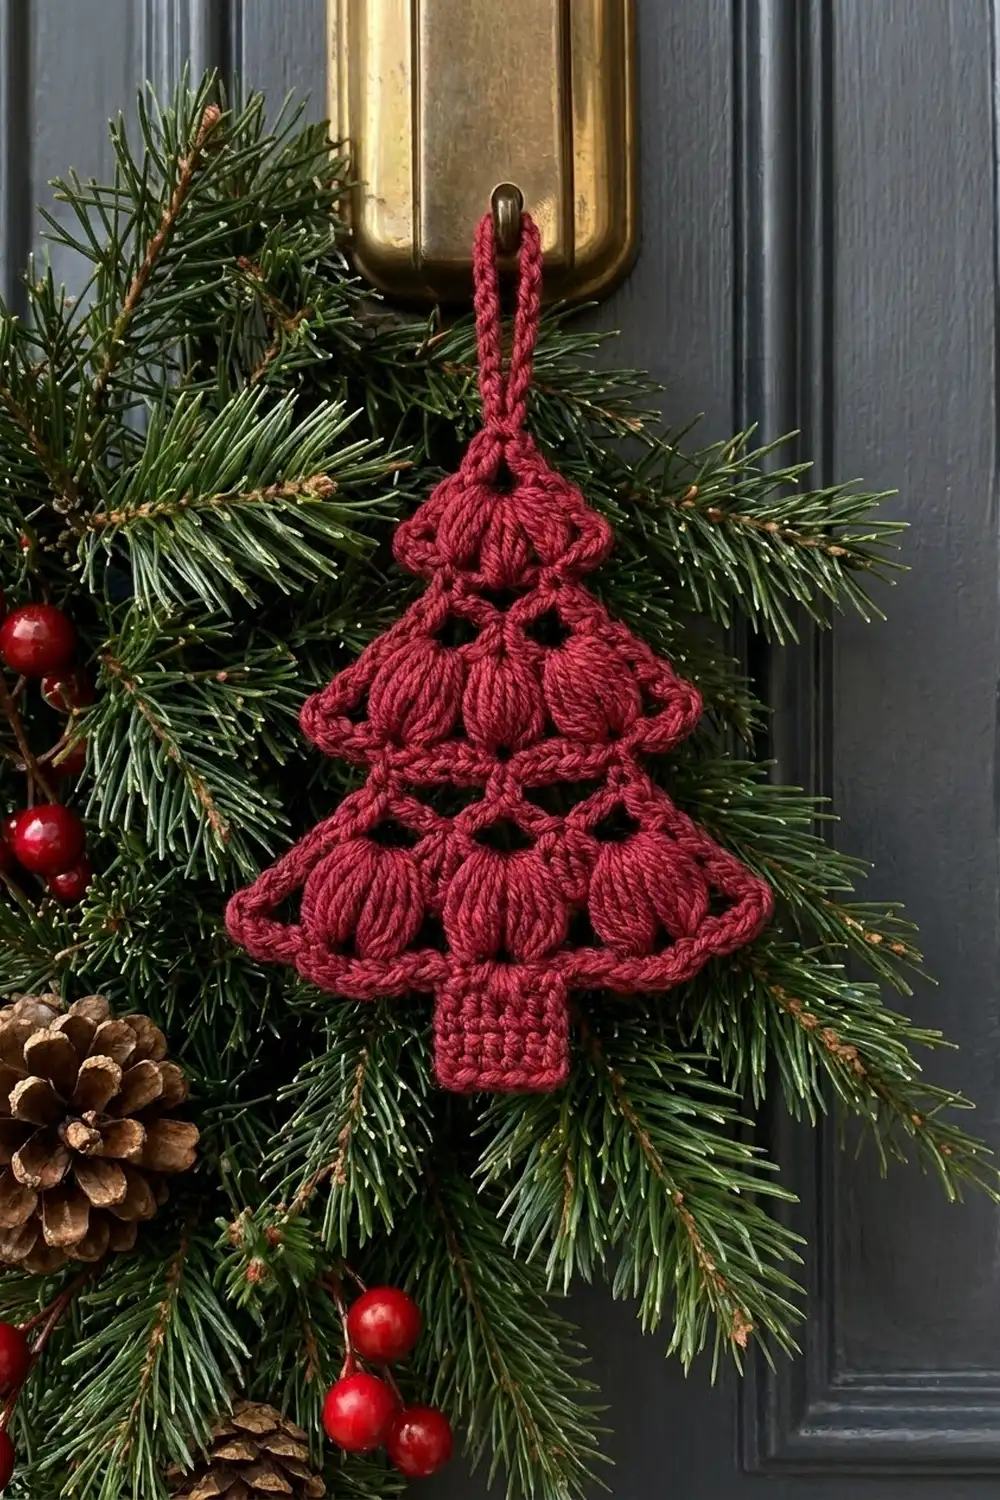
This little tree ornament has three tiers of rounded puff stitches separated by bands of lacy mesh, and a solid square trunk below. It is worked in one rich cranberry red, so the texture does all the work. The puffs catch the light and the open mesh lets a bit of greenery show through when it hangs on a wreath or door.
The look is classic and a little rustic. It suits a natural garland, a gift tag on a wrapped present, or a tree branch. The pattern uses US crochet terms throughout.
The finished ornament measures about 4.8 in (12.2 cm) wide and 6 in (15.2 cm) tall, not counting the hanging loop. The loop adds about 1.75 in (4.4 cm).
You make the tree body flat in turned rows, from the widest tier up to the point. Then you work the trunk into the underside of the first row. Two border rounds finish the outline, make sharp tier points and add a covered hanging loop. It is all one piece, so there is no sewing.
Finished Size and Construction
- Finished size: 4.8 in (12.2 cm) wide × 6 in (15.2 cm) tall, plus a 1.75 in (4.4 cm) loop
- Skill level: Advanced beginner / easy intermediate
- Terminology: US crochet terms
- Yarn weight: DK (light worsted, #3)
- Hook: 4.0 mm (US G-6)
- Number of pieces: 1
- Layout: Single flat ornament with three tiers and a trunk
- Piece size before border: 4.4 in (11.2 cm) wide × 5.6 in (14.2 cm) tall
- Border depth: 2 rounds, about 0.2 in (0.5 cm) per edge
Materials
Yarn: Use a smooth DK yarn with good stitch definition. Mercerized cotton or a cotton blend makes the crispest puffs, and acrylic also works for a softer look. Avoid fuzzy or very splitty yarn, because it hides the mesh openings.
- Cranberry red: 15 g / 35 m (38 yd)
These quantities include a margin of about 50% for your gauge swatch and tension differences. The ornament itself uses about 10 g.
Tools:
– 4.0 mm (US G-6) crochet hook
– Tapestry needle
– Scissors
– Stitch marker (optional)
– Pins and a blocking mat or folded towel
– Spray bottle with water, or a steam iron
Abbreviations (US Terms)
- ch – chain
- sl st – slip stitch
- sc – single crochet
- sc2tog – single crochet 2 together
- sc3tog – single crochet 3 together
- dc – double crochet
- sk – skip
- sp – space
- st(s) – stitch(es)
- RS / WS – right side / wrong side
Special stitch: Puff stitch (puff)
[Yarn over, insert the hook in the stitch, yarn over and pull up a loop to about 0.5 in (1.3 cm) tall] 4 times, so you have 9 loops on the hook. Yarn over and pull through all 9 loops, then ch 1 to close. The closing ch 1 is not counted as a separate stitch.
Gauge and Checkpoints
Gauge: 18 sc × 20 rows = 4 in (10.2 cm) in sc with a 4.0 mm hook.
Before you start the ornament, work Rows 1–3 as a test. Row 1 should measure 4.4 in (11.2 cm) across. If it does, pull the test out and start properly, or keep going, since it is the real start of the tree.
Checkpoints:
– After Row 1: 4.4 in (11.2 cm) wide
– After Row 3: tier 1 is about 1.1 in (2.8 cm) tall, and its top edge is 2.9 in (7.4 cm) wide
– After Row 7: the body is about 2.5 in (6.4 cm) tall, and Row 5 is 3.3 in (8.4 cm) wide
– After Row 13: the body is about 4.4 in (11.2 cm) tall
– After the trunk: the trunk is 1.3 in (3.3 cm) wide × 1.2 in (3.0 cm) tall, and the whole piece is 5.6 in (14.2 cm) tall
If your piece is too big, go down to a 3.75 mm hook (US F-5). If it is too small, go up to a 4.5 mm hook (US 7). If only the puffs look too tall or too flat, keep the hook and adjust how high you pull up the puff loops.
Tree Body
The body is worked flat in turned rows. Row 2 is the RS. The turning ch 1 does not count as a stitch. The turning ch 3 counts as 1 dc.
Tier 1 (4 puffs)
Row 1 (WS): Ch 21. Sc in the 2nd ch from the hook and in each ch across. Turn. (20 sc)
Row 2 (RS): Ch 3 (counts as dc), ch 1, sk next st, puff in next st, [ch 3, sk next 4 sts, puff in next st] 3 times, ch 1, sk next st, dc in last st. Turn.
(4 puffs, 2 dc, 5 ch-sps)
Check the placement: the dc goes in st 1, the puffs in sts 3, 8, 13 and 18, and the last dc in st 20. The spacing is mirror-symmetric.
Row 3 (WS, conversion row): Ch 1, sk the first dc and ch-1 sp, sc in the first puff, [3 sc in the next ch-3 sp, sc in the next puff] 3 times. Turn, leaving the last ch-1 sp and dc unworked.
(13 sc = 4 sc in puffs + 9 sc in ch-3 sps)
Leaving the edge dc and ch-1 spaces unworked steps the row in at both sides. This is what gives tier 1 its sloped triangle shape.
Tier 2 (3 puffs)
Row 4 (RS, mesh): Ch 3 (counts as dc), ch 1, sk next st, dc in next st, [ch 1, sk next st, dc in next st] 5 times. Turn.
(7 dc, 6 ch-1 sps)
This mesh row makes the small open band between tiers.
Row 5 (WS, conversion row): Ch 1, 2 sc in the first dc, sc in each ch-1 sp and each dc across to the turning ch, 2 sc in the top of the turning ch. Turn.
(15 sc = 13 sts worked 1 per st + 2 extra)
The extra stitch at each end pushes tier 2 out past the top of tier 1, which creates the flared tier corner.
Row 6 (RS): Ch 3 (counts as dc), ch 1, sk next st, puff in next st, [ch 3, sk next 4 sts, puff in next st] 2 times, ch 1, sk next st, dc in last st. Turn.
(3 puffs, 2 dc, 4 ch-sps)
The puffs sit in sts 3, 8 and 13.
Row 7 (WS, conversion row): Ch 1, sk the first dc and ch-1 sp, sc in the first puff, [3 sc in the next ch-3 sp, sc in the next puff] 2 times. Turn, leaving the rest unworked.
(9 sc = 3 sc in puffs + 6 sc in ch-3 sps)
Tier 3 (2 puffs and peak)
Row 8 (RS, mesh): Ch 3 (counts as dc), ch 1, sk next st, dc in next st, [ch 1, sk next st, dc in next st] 3 times. Turn.
(5 dc, 4 ch-1 sps)
Row 9 (WS, conversion row): Ch 1, 2 sc in the first dc, sc in each ch-1 sp and each dc across to the turning ch, 2 sc in the top of the turning ch. Turn.
(11 sc = 9 sts worked 1 per st + 2 extra)
Row 10 (RS): Ch 3 (counts as dc), ch 2, sk next 2 sts, puff in next st, ch 3, sk next 3 sts, puff in next st, ch 2, sk next 2 sts, dc in last st. Turn.
(2 puffs, 2 dc, 3 ch-sps)
The puffs sit in sts 4 and 8.
Row 11 (WS, conversion row): Ch 1, sk the first dc and ch-2 sp, sc in the first puff, 3 sc in the ch-3 sp, sc in the next puff. Turn, leaving the rest unworked.
(5 sc)
Row 12: Ch 1, sc2tog, sc in the next st, sc2tog. Turn. (3 sts)
Row 13: Ch 1, sc3tog. (1 st)
Fasten off and weave in the end. The body should measure 4.4 in (11.2 cm) wide at Row 1 and about 4.4 in (11.2 cm) tall.
Trunk
The trunk is worked into the free loops of the Row 1 foundation chain. Row 1 has 20 free loops, and the trunk uses the middle 6.
Row 1: With RS facing and the bottom edge up, sk the first 7 free loops. Join the yarn with a sc in the 8th loop, then sc in each of the next 5 loops. Turn. (6 sc, with 7 loops left free on each side)
Rows 2–6: Ch 1, sc in each st across. Turn. (6 sc)
Fasten off after Row 6. The trunk should measure 1.3 in (3.3 cm) wide × 1.2 in (3.0 cm) tall, and the whole piece should be 5.6 in (14.2 cm) tall.
Border
Border gauge: Work 1 sc for each sc stitch or sc row end, 2 sc around each mesh-row end and 3 sc around each puff-row end. These ratios match the row heights. A sc row is about 0.2 in (0.5 cm) tall, a mesh row about 0.45 in (1.1 cm) and a puff row about 0.6 in (1.5 cm). With these ratios the edge stays flat without ruffling or cupping.
Round 1
With RS facing, join the yarn at the bottom right corner of Row 1 (the tier 1 tip).
Right side, working up toward the peak:
– (sc, ch 2, sc) in the corner st for tip 1
– 3 sc around the Row 2 end
– 1 sc in the Row 3 end
– 2 sc around the Row 4 end
– (sc, ch 2, sc) in the last st of Row 5 for tip 2
– 3 sc around the Row 6 end
– 1 sc in the Row 7 end
– 2 sc around the Row 8 end
– (sc, ch 2, sc) in the last st of Row 9 for tip 3
– 3 sc around the Row 10 end
– 1 sc in each of the Row 11 and Row 12 ends
That gives 23 sc per side: 17 sc along the edges plus 6 sc in the tips, and 3 ch-2 sps.
Peak: (Sc, ch 18, sc) in the Row 13 st. (2 sc, 1 ch-18 loop)
Left side, working down: Mirror the right side, ending with (sc, ch 2, sc) in the bottom left corner of Row 1. (23 sc, 3 ch-2 sps)
Bottom edge:
– 6 sc in the free loops between the left tip and the trunk
– 6 sc along the trunk side (1 per row end)
– Along trunk Row 6: 2 sc in the first st, sc in the next 4 sts, 2 sc in the last st. (8 sc = 6 worked 1 per st + 2 extra for the corners)
– 6 sc along the other trunk side
– 6 sc in the free loops back to the start
That gives 32 sc on the bottom edge. Join with a sl st to the first sc.
Round 1 total: 23 + 2 + 23 + 32 = 80 sc, plus 6 ch-2 sps and 1 ch-18 loop.
Round 2
Ch 1. Sl st in each sc around. At each tip, work (sl st, ch 2, sl st) in the ch-2 sp. At the peak, work 26 sc into the ch-18 loop to cover it. Join with a sl st to the first sl st.
Round 2 total: 80 sl st over the sc + 12 sl st in the tips = 92 sl st, plus 6 ch-2 tips and 26 sc on the loop.
Keep the slip stitches relaxed. If they pull, the edge will cup. Go up a hook size for this round if you need to.
Why the math works: Each side climbs 11 row ends. The 17 edge sc follow the 3-2-1 ratio by row height, so the side length matches the actual height of the rows. The 6 extra tip stitches only build the corner points and don’t add length along the edge. Along the bottom, the 6 + 6 free loops plus the 6 trunk stitches use up all 20 foundation loops. The other 2 loops (one at each end) sit under the tips, so nothing is skipped or doubled. Twenty-six sc over 18 ch lets the loop curve smoothly without twisting. The border adds about 0.2 in (0.5 cm) all around: 4.4 + 0.4 = 4.8 in (12.2 cm) wide, and 5.6 + 0.4 = 6 in (15.2 cm) tall.
Final Blocking
- Weave in all ends before blocking, then trim them.
- Mist the ornament lightly with water, or hover a steam iron over it without touching it. If you use acrylic, use steam only.
- Lay it RS up on the blocking mat.
- Pin the 6 tier tips outward so they are sharp and the two sides match.
- Pin the trunk square at its 4 corners.
- Gently open each mesh hole with a fingertip, and plump each puff upward.
- Check the size: 4.8 in (12.2 cm) wide at tip 1 and 6 in (15.2 cm) tall from the trunk bottom to the base of the loop.
- Let it dry completely, about 2–4 hours, before you unpin it.
Final Quality-Control Checklist
- Tiers hold 4, 3 and 2 puffs from bottom to top
- Each mesh band shows evenly spaced open holes
- Tiers 2 and 3 flare slightly past the tier below
- All 6 tips are pointed and mirror each other
- The trunk is centered, with 7 free loops on each side before the border
- The edge lies flat with no ruffles or cupping
- The loop is fully covered and sits straight above the peak
- No loose ends show on the RS
- Size is 4.8 in (12.2 cm) × 6 in (15.2 cm)
Troubleshooting
Puffs look flat or uneven: Pull up every loop to the same height before you close the puff. Ch 1 firmly to lock it.
The tree leans to one side: Recount the puff placements in Rows 2, 6 and 10. They must be symmetric.
Tiers don’t flare: Make sure you worked 2 sc at each end of Rows 5 and 9.
The border ruffles: You added too many stitches at the row ends. Use exactly 3, 2 and 1 sc per puff, mesh and sc row end.
The border cups: Round 2 is too tight. Redo it with a larger hook.
The trunk is off-center: Recount the free loops. There should be 7 on each side.
The loop twists: Work all 26 sc in the same direction, without turning, and block the loop flat.
Care
Hand wash in cool water with a mild soap, press out the water in a towel and lay flat to dry. Store the ornament flat or hang it by its loop so the tips keep their shape.
Final Notes
The measurement chain is simple. Gauge of 18 sc = 4 in (10.2 cm) gives a 4.4 in (11.2 cm) Row 1. The body grows to 4.4 in (11.2 cm) tall and the trunk adds 1.2 in (3.0 cm), so the piece is 5.6 in (14.2 cm) tall before the border. Two border rounds add 0.2 in (0.5 cm) per edge, for a finished ornament of 4.8 in (12.2 cm) × 6 in (15.2 cm) with a 1.75 in (4.4 cm) loop. Check each checkpoint as you go and the ornament will come out right. Make one for a tree branch or tie it to a gift.
Happy crocheting!