

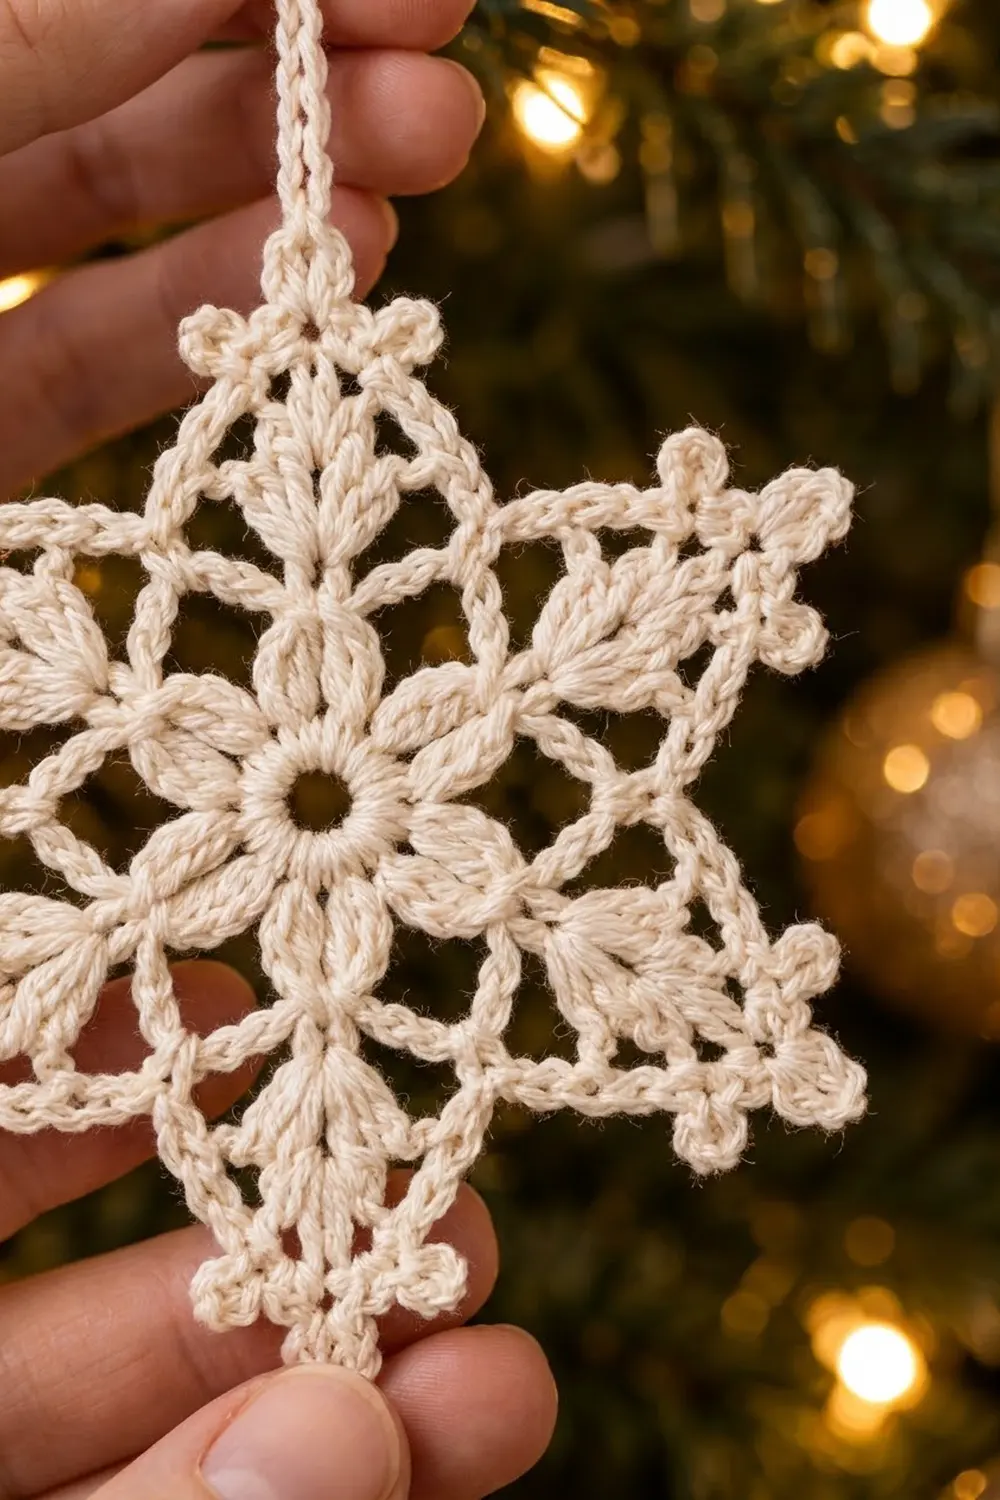
The Frosted Star Snowflake is a lacy, six-pointed ornament worked in one soft ivory cotton thread. It has a small open center, a ring of rounded petals, puffy cluster leaves and crisp picot points. The result looks delicate but blocks into a sturdy, flat star.
It’s a classic winter style that looks good on a tree, tied to a gift or hung in a window. One color keeps the stitch texture in focus, and the cream thread reads warm and vintage under string lights.
This pattern uses US crochet terms. The finished snowflake measures 4.5 in (11.4 cm) from point to point after blocking, plus a hanging loop of about 2 in (5.1 cm).
You’ll work it in 7 rounds from a chain ring: center, petals, chain hexagon, shells and leaves, lattice, then a picot edging round that forms the points and edges. A chain hanging loop finishes it. There’s no sewing and no joining.
Finished Size and Construction
- Finished size: 4.5 in (11.4 cm) point to point; about 3.0 in (7.6 cm) valley to valley
- Skill level: Intermediate
- Terminology: US crochet terms
- Yarn weight: Size 3 mercerized cotton crochet thread (lace weight, 0)
- Hook: 2.25 mm (B-1)
- Number of pieces: 1
- Layout: Single motif worked in the round
- Piece size: 4.5 in (11.4 cm) point to point
- Size before border (after Round 6): 3.4 in (8.6 cm) across shell tips
- Border depth: about 0.55 in (1.4 cm) at each point
Materials
Thread: Choose a smooth, mercerized cotton in size 3. Mercerized cotton gives clean stitch definition, holds starch well and won’t fuzz on the tree. Avoid acrylic, which won’t hold a crisp point after blocking.
- Ivory/cream: 10 g, about 40 m (44 yd) per snowflake
The ornament itself uses roughly 7 g (28 m). The quantity above includes a margin for the gauge swatch, the hanging loop and weaving in ends.
Tools:
– 2.25 mm (B-1) crochet hook
– Tapestry needle with a small eye
– Scissors
– Blocking board or foam mat
– Rustproof pins
– Spray starch or fabric stiffener (optional but recommended)
– Ruler or tape measure
Abbreviations (US Terms)
- ch – chain
- sl st – slip stitch
- sc – single crochet
- hdc – half double crochet
- dc – double crochet
- tr – treble crochet
- sp – space
- sk – skip
- st(s) – stitch(es)
Special stitches:
- CL (3-dc cluster): *Yarn over, insert hook in the indicated space, yarn over and pull up a loop, yarn over and draw through 2 loops; repeat from * 2 more times in the same space (4 loops on hook), yarn over and draw through all 4 loops.
- Picot: Ch 3, sl st in the 3rd ch from the hook.
Gauge and Checkpoints
Gauge is measured on the motif itself. Work Rounds 1–3 as a test before you go on.
Gauge: Rounds 1–3 = 1.5 in (3.8 cm) across, measured petal tip to petal tip.
Checkpoints (lightly pressed flat, before blocking):
– After Round 1: 0.75 in (1.9 cm) across
– After Round 3: 1.5 in (3.8 cm) across
– After Round 4: 2.0 in (5.1 cm) across
– After Round 5: 2.6 in (6.6 cm) across
– After Round 6: 3.4 in (8.6 cm) across shell tips
– After Round 7 and blocking: 4.5 in (11.4 cm) point to point
If your test is too big (more than 1.6 in / 4.1 cm after Round 3), go down to a 2.0 mm hook. If it’s too small (under 1.4 in / 3.6 cm), go up to a 2.5 mm hook. A tolerance of ±0.125 in (0.3 cm) at Round 3 is fine, because blocking evens out small differences. Thread snowflakes are forgiving on size. What matters most is that the piece lies flat at each checkpoint.
Pattern
Center Ring
Ch 6, sl st in the first ch to form a ring.
Round 1: Ch 3 (counts as dc), 17 dc in the ring, sl st to the top of the beginning ch-3. (18 dc)
Don’t pull the ring closed. The open center is part of the design.
Petals
Round 2: Ch 1, sc in the same st, ch 4, sk 2 dc, sc in the next dc; repeat from * 4 more times, ch 4, sk 2 dc, sl st to the first sc. (6 sc, 6 ch-4 loops)*
Round 3: Sl st in the first ch-4 loop, ch 1, (sc, hdc, 3 dc, hdc, sc) in the same loop and in each of the next 5 ch-4 loops, sl st to the first sc. (6 petals; 42 sts: 12 sc, 12 hdc, 18 dc)
Each petal has 7 stitches. The middle dc of the 3 is the petal tip.
Checkpoint: 1.5 in (3.8 cm) across.
Chain Hexagon
Round 4: Sl st in the next 4 sts (sc, hdc, dc, dc), so you finish in the center dc of the first petal. Ch 1, sc in the same st, ch 7, sc in the center dc of the next petal; repeat from * 4 more times, ch 7, sl st to the first sc. (6 sc, 6 ch-7 loops)*
Each sc sits at a petal tip. Each sc lines up with one future point of the star.
Checkpoint: 2.0 in (5.1 cm) across.
Shells and Cluster Leaves
Round 5: Ch 3 (counts as dc), (dc, ch 3, 2 dc) in the same sc. This is the first shell. Ch 2, (CL, ch 3, CL) in the next ch-7 loop (leaf pair), ch 2. *(2 dc, ch 3, 2 dc) in the next sc, ch 2, (CL, ch 3, CL) in the next ch-7 loop, ch 2; repeat from * 4 more times. Sl st to the top of the beginning ch-3.
Round total: 6 shells (24 dc, 6 ch-3 sps), 6 leaf pairs (12 CL, 6 ch-3 sps), 12 ch-2 sps.
The shells point toward the star points and the leaf pairs sit toward the inner valleys.
Checkpoint: 2.6 in (6.6 cm) across.
Lattice
Round 6: Sl st in the next dc and in the next ch-3 sp. Ch 3 (counts as dc), (2 dc, ch 3, 3 dc) in the same sp. Ch 5, sc in the ch-3 sp of the next leaf pair, ch 5. *(3 dc, ch 3, 3 dc) in the ch-3 sp of the next shell, ch 5, sc in the ch-3 sp of the next leaf pair, ch 5; repeat from * 4 more times. Sl st to the top of the beginning ch-3.
Round total: 6 shells (36 dc, 6 ch-3 sps), 6 sc, 12 ch-5 loops.
You skip the ch-2 spaces of Round 5. The ch-5 loops arch over them to make the open lattice windows.
Checkpoint: 3.4 in (8.6 cm) across shell tips. This is your size before the border.
Border: Picot Points and Edges
Round 7 is the edging. It turns the round shape into a six-pointed star. It builds each point, runs a straight chain edge to each valley and adds the picots.
Border gauge: Each edge chain (ch 3, picot, ch 3) is about 0.75 in (1.9 cm) long. Each point adds about 0.55 in (1.4 cm) beyond the Round 6 shell tip.
Round 7: Sl st in the next 2 dc and in the ch-3 sp of the shell.
- First point: Ch 3 (counts as dc), (dc, tr, picot, tr, 2 dc) in the same ch-3 sp.
- Edge to valley: Ch 3, picot, ch 3. Skip the ch-5 loop and (sc, picot, sc) in the next sc.
- Edge to next point: Ch 3, picot, ch 3. Skip the next ch-5 loop.
- *Next point: (2 dc, tr, picot, tr, 2 dc) in the ch-3 sp of the next shell. Ch 3, picot, ch 3, (sc, picot, sc) in the next sc, ch 3, picot, ch 3; repeat from * 4 more times.
- Sl st to the top of the beginning ch-3.
Counts per point-and-side repeat:
– Point: 6 sts (4 dc, 2 tr) + 1 tip picot
– Two edge chains: 2 × (ch 3, picot, ch 3) = 12 ch + 2 picots
– Valley: 2 sc + 1 picot
Round total: 24 dc, 12 tr, 12 sc, 24 picots (6 tip, 12 edge, 6 valley), 24 ch-3 segments.
Why the math works: Round 6 has exactly 6 shells and 6 sc, alternating. Round 7 uses each shell’s ch-3 space once for a point and each sc once for a valley, so you get 6 points and 6 valleys with nothing left over. The two straight edge chains per repeat skip the ch-5 loops, which pulls each edge taut and straight. That straight line is what gives the star its crisp hexagram outline. The tr stitches stand taller than the dc next to them, so each point peaks at the picot.
Fasten off, leaving a 6 in (15.2 cm) tail.
Hanging Loop
Join the thread with a sl st in the tip picot of any point. Ch 40, sl st in the same picot. Fasten off.
The loop hangs about 2 in (5.1 cm) above the point. Weave all ends into the backs of the stitches. On the loop tail, weave back through the dc of the point so the loop is anchored firmly.
Final Blocking
- Wet the snowflake in cool water and gently press out the extra water in a towel. Don’t wring it.
- Put it right side up on the blocking board.
- Pin the 6 tip picots first, spacing them evenly on a 4.5 in (11.4 cm) circle. If your board has no grid, draw the circle and mark 6 points on it every 60 degrees.
- Pin the 6 valley picots on a 3.0 in (7.6 cm) circle, each one halfway between two points.
- Pull the edges straight. If you want extra crispness, pin each edge picot in line.
- Open the center ring and each lattice window by nudging them with a pin.
- Spray with starch or brush on stiffener. Let it dry completely, usually 12–24 hours.
- Unpin and check the measurements: 4.5 in (11.4 cm) point to point.
Final Quality-Control Checklist
- Center ring is open and round, about 0.25 in (0.6 cm) across
- 6 petals, each with 7 stitches
- 6 shells and 6 leaf pairs alternate evenly
- Lattice windows are open, with no twisted ch-5 loops
- 6 points, each ending in a tr-picot-tr peak
- Edges are straight, with one picot centered in each edge
- 6 valley picots, each sitting at the inner corner
- Point to point: 4.5 in (11.4 cm); valley to valley: 3.0 in (7.6 cm)
- Hanging loop is secure and the ornament hangs with one point straight up
- All ends are hidden and clipped close
Troubleshooting
Center cups upward: Round 1 is too tight. Rework it with a looser tension or a 2.5 mm hook for Round 1 only.
Piece ruffles after Round 5: The CL may be too loose, or the ch-2 spaces too long. Keep the chains snug and close each cluster firmly.
Edges curve instead of running straight: The edge chains are too loose. Make each ch a little tighter, or replace “ch 3, picot, ch 3” with “ch 2, picot, ch 2”.
Points look blunt: Make sure you work a tr, not a dc, on each side of the tip picot. Pin the picot out well during blocking.
Count is off in Round 6: Check that you skipped the ch-2 spaces and worked only into the shell and leaf ch-3 spaces.
Ornament hangs crooked: The loop is attached off-center. Re-attach it directly in the tip picot.
Care
Spot-clean with cool water and re-block if needed. Store the snowflake flat between sheets of tissue paper so the points stay crisp from season to season.

Final Notes
The measurement chain is 0.75 in (1.9 cm) after Round 1, 1.5 in (3.8 cm) after the petals, 2.0 in (5.1 cm) after the hexagon, and 2.6 in (6.6 cm) after the shells and leaves. It reaches 3.4 in (8.6 cm) after the lattice, and the picot border adds 0.55 in (1.4 cm) at each point for a finished 4.5 in (11.4 cm) star. If you hit the Round 3 gauge and keep each round flat, the rest of the measurements will follow. Once you’ve made one, the rest go quickly, so make enough for the whole tree.
Happy crocheting!