

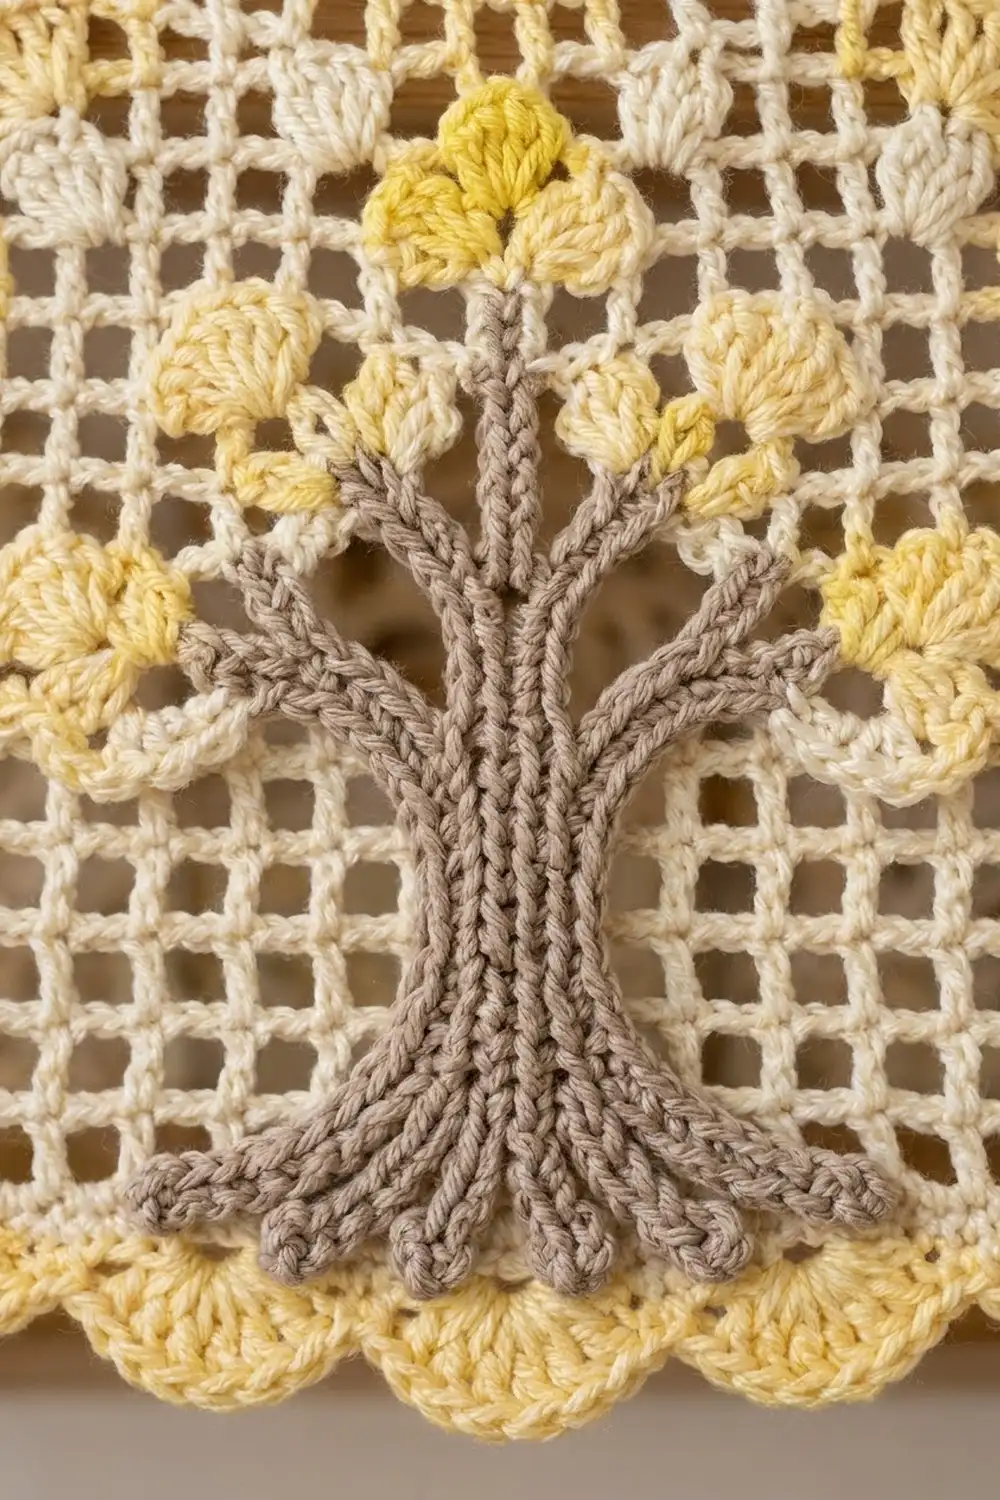
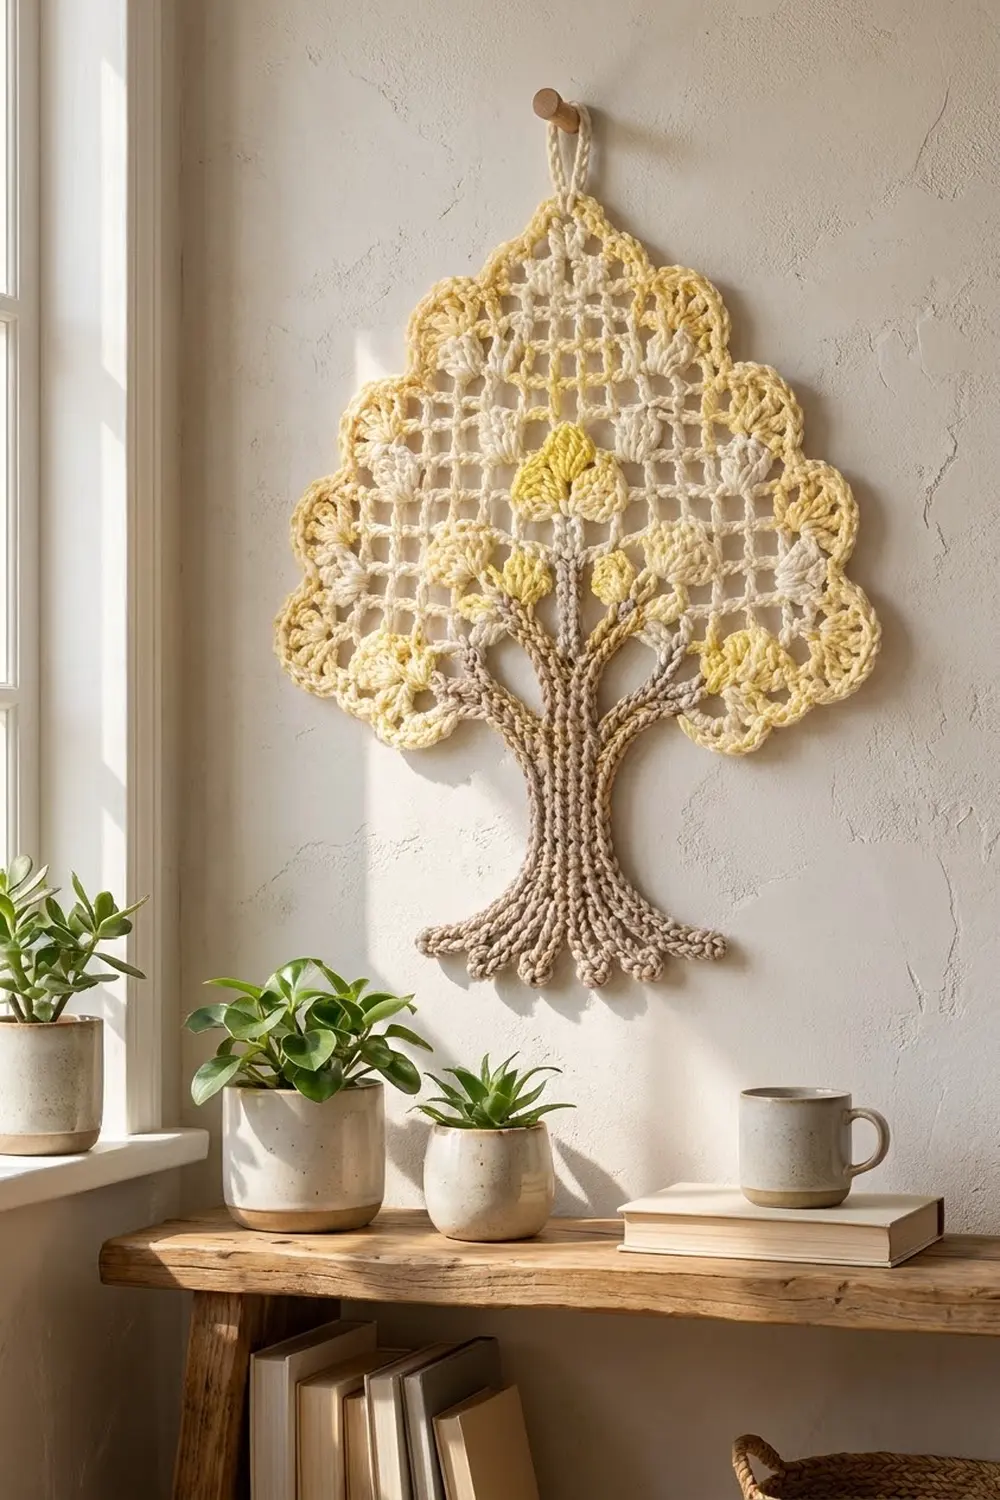
The Lemon Grove Tree of Life is a small filet-mesh wall hanging shaped like a rounded, gently pointed tree crown. An airy cream grid fills the canopy, and butter-yellow and lemon leaf fans sit inside the mesh. A pale yellow scalloped edge frames the whole crown, and a corded taupe trunk rises through the center and spreads into curling roots below.
The palette is soft and sunny: cream, pale butter, lemon, and warm taupe. It suits a kitchen wall, a nursery shelf, or a spring display, and it hangs from a crocheted loop at the top point.
This pattern uses US crochet terms. The finished hanging measures about 9.5 in (24.1 cm) wide and 11 in (27.9 cm) tall from the top of the border to the root tips, not counting the 1.25 in (3.2 cm) hanging loop.
Construction is simple and logical. You work the canopy bottom-up in filet mesh and decrease into a point, then add a two-round scalloped border. You work leaf fans over chosen meshes, make the trunk from eight slip-stitch cords sewn onto the canopy, and finish the top with a loop.
Finished Size and Construction
- Finished size: 9.5 in (24.1 cm) wide x 11 in (27.9 cm) tall, plus a 1.25 in (3.2 cm) loop
- Skill level: Intermediate
- Terminology: US
- Yarn weight: DK / light worsted (#3), cotton or cotton blend
- Hook: 4.0 mm (G-6)
- Number of pieces: 1 finished piece (canopy with applied trunk cords and leaves)
- Layout: single canopy, with the trunk centered on the lower half
- Canopy mesh size before border: 8 in (20.3 cm) wide x 7 in (17.8 cm) tall
- Size with border: 9.5 in (24.1 cm) x 8.5 in (21.6 cm)
- Border depth: 0.75 in (1.9 cm)
- Roots below border: 2.5 in (6.4 cm)
Materials
Choose a smooth, mercerized or matte cotton in DK weight. Cotton keeps the mesh square and the scallops crisp. Avoid fuzzy yarns, because they blur the grid.
- Color A, Cream: 15 g / 35 m (mesh canopy, border Round 1)
- Color B, Pale Butter: 10 g / 25 m (scallops, 8 leaves, hanging loop)
- Color C, Lemon: 5 g / 10 m (5 leaves)
- Color D, Taupe: 10 g / 25 m (trunk cords and sewing)
These quantities include a comfortable margin for checking gauge and weaving in ends.
Tools:
- 4.0 mm (G-6) crochet hook
- Tapestry needle
- Stitch markers (4)
- Rustproof pins and a blocking mat
- Spray bottle
- Scissors and a ruler
Abbreviations (US Terms)
- ch – chain
- sl st – slip stitch
- sc – single crochet
- dc – double crochet
- sk – skip
- sp – space
- RS – right side
- st(s) – stitch(es)
Mesh: one ch-2 sp with a dc post on each side. A row of n meshes has n + 1 posts.
Leaf fan (special stitch): With RS facing, insert the hook through the chosen mesh from front to back, around its bottom bar, and pull up a loop. Ch 3 (counts as dc) and work 4 dc around the same bar. Then sl st around the center of the mesh’s top bar and fasten off. (5 dc per fan)
Slip-stitch cord: Ch the given number, then sl st in the back bump of the 2nd ch from hook and in each ch across. Fasten off, leaving a 12 in (30.5 cm) tail.
Gauge and Checkpoints
Mesh gauge: 4 meshes and 4 rows = 2 in (5.1 cm) square, so 1 mesh = 0.5 in (1.3 cm) each way.
Cord gauge: 4 ch = 1 in (2.5 cm).
Test before you commit: work Rows 1–4 of the canopy first. This strip is your swatch and also the start of your piece.
Checkpoints:
- After Row 4: 8 in (20.3 cm) wide x 2 in (5.1 cm) tall
- After Row 14: 7 in (17.8 cm) tall at the center
- After the border: 9.5 in (24.1 cm) x 8.5 in (21.6 cm)
If your Row 4 strip is wider than 8.25 in (21.0 cm), go down one hook size. If it is narrower than 7.75 in (19.7 cm), go up one size. Mesh height matters too. If your meshes are taller than they are wide, pull up a slightly shorter loop on each dc.
Canopy
Use Color A for the whole canopy. The turning ch-5 counts as a dc plus ch 2.
Foundation: Ch 53.
Row 1 (RS): Dc in 8th ch from hook, *ch 2, sk 2 ch, dc in next ch; rep from * 14 more times. Turn. (16 meshes, 17 posts)
Row 2: Ch 5, dc in next dc, *ch 2, dc in next dc; rep from * across, working the last dc in the 5th ch of the beg skipped ch-7. Turn. (16 meshes)
Rows 3–4: Ch 5, dc in next dc, *ch 2, dc in next dc; rep from * across, working the last dc in the 3rd ch of the turning ch-5. Turn. (16 meshes)
Decrease row (used for Rows 5, 7, 9, 11, 12, 13, 14): Sl st in each of the first 2 ch, sl st in next dc, ch 5, dc in next dc, *ch 2, dc in next dc; rep from * until 1 ch-2 sp remains, and leave that sp unworked. Turn. (2 meshes fewer than the previous row)
Straight row (used for Rows 6, 8, 10): Work as Row 3. (Same count as the previous row)
Row-by-row counts:
- Row 5: decrease row (14 meshes, 15 posts)
- Row 6: straight row (14 meshes)
- Row 7: decrease row (12 meshes)
- Row 8: straight row (12 meshes)
- Row 9: decrease row (10 meshes)
- Row 10: straight row (10 meshes)
- Row 11: decrease row (8 meshes)
- Row 12: decrease row (6 meshes)
- Row 13: decrease row (4 meshes)
- Row 14: decrease row (2 meshes, 3 posts)
Fasten off. The canopy now has straight lower sides, a stepped dome on the upper half, and a narrow top 1 in (2.5 cm) wide.
Each decrease leaves one exposed mesh at each side, which forms a “ledge.” There are 7 ledges per side, on top of Rows 4, 6, 8, 10, 11, 12, and 13.
Leaf Fans
Count rows from the bottom. Count meshes from the right edge of each row with RS facing. Work one fan over each listed mesh.
Color C, Lemon (5 fans): Row 12, meshes 3 and 4; Row 9, meshes 3 and 8; Row 7, mesh 6.
Color B, Pale Butter (8 fans): Row 11, meshes 2 and 7; Row 8, meshes 2 and 11; Row 6, meshes 4 and 11; Row 4, meshes 2 and 15.
Each fan fills the lower two-thirds of its mesh and opens upward like a small leaf. Keep the fan dc loose enough that the mesh stays square. Weave each tail along the dc posts on the wrong side.
Border
Border gauge: about 6 sc = 1 in (2.5 cm), or 3 sc per mesh edge.
Round 1 (Color A): With RS facing, join A at the base of the bottom-right corner post. Work counterclockwise:
- Bottom-right corner: 2 sc at the base of the corner post (2 sc)
- Right side: working in order as you climb, 3 sc around each of 14 row ends (42 sc) and 3 sc in each of 7 ledge ch-2 sps (21 sc) (63 sc)
- Top: sc in the top of the corner post of Row 14, 3 sc in each of 2 ch-2 sps, sc in the last post (8 sc)
- Left side: same as the right side, working downward (63 sc)
- Bottom-left corner: 2 sc at the base of the corner post (2 sc)
- Bottom: 3 sc in each of 16 foundation ch-2 sps (48 sc)
Sl st to first sc and fasten off. (186 sc total)
Place a marker in the 1st sc of the top segment.
Round 2 (Color B): Join B in the marked sc. Ch 1, sc in same st, *sk 2 sc, 7 dc in next sc, sk 2 sc, sc in next sc; rep from * around, leaving out the final sc on the last repeat. Sl st to first sc and fasten off. (31 scallops: 31 sc + 217 dc = 248 sts)
Why the math works: Round 1 holds 2 + 63 + 8 + 63 + 2 + 48 = 186 sc. Each scallop repeat uses exactly 6 sc, and 186 ÷ 6 = 31. The repeat closes evenly, so no scallop has to be squeezed or stretched. Starting on the top segment centers the first scallop over the point. The rate of 6 sc per inch matches the mesh: 16 meshes x 3 sc = 48 sc across the 8 in (20.3 cm) bottom, and each side path of about 10.5 in (26.7 cm) carries 63 sc.
Trunk
With Color D, make 8 slip-stitch cords:
- Cords 4 and 5 (center): ch 37, 36 sl sts each, about 9.25 in (23.5 cm) long
- Cords 2, 3, 6, and 7 (side branches): ch 31, 30 sl sts each, about 7.75 in (19.7 cm) long
- Cords 1 and 8 (outer low branches): ch 25, 24 sl sts each, about 6.25 in (15.9 cm) long
Lay the canopy RS up. Place the cords side by side, numbered left to right, so their lower ends extend 3.25 in (8.3 cm) below the foundation row. This leaves 2.5 in (6.4 cm) of roots below the border.
Trunk section: From the foundation row up to Row 5, keep all 8 cords touching. The bundle should be about 1.25 in (3.2 cm) wide and centered under meshes 7–10. Give it half a twist for a bark texture.
Branches: Above Row 5, fan the cords out. Cords 4 and 5 run straight up to Row 12. Cords 2–3 and 6–7 run diagonally to Row 9, one pair on each side. Cords 1 and 8 curve outward to Row 7.
Roots: Below the border, spread the cords into a fan about 3.5 in (8.9 cm) wide and curl each tip slightly.
Pin everything in place. Using the tails and a tapestry needle, whipstitch each cord every 0.5 in (1.3 cm) to the dc posts and ch bars it crosses. In the root section, tack neighboring cords together at the border edge so the roots keep their spread.
Hanging Loop
With Color B, join in the 4th (center) dc of the top scallop. Ch 14 and sl st in the same dc. Work 20 sc into the loop and sl st to first sc. Fasten off and weave the tail into the scallop.
Final Blocking
- Weave in all remaining ends on the wrong side, following the posts and bars.
- Pin the piece RS up on a blocking mat.
- Pin the mesh body first: 8 in (20.3 cm) across the bottom and 7 in (17.8 cm) up to the top center.
- Pin the center dc of each scallop outward to open the border to 9.5 in (24.1 cm) x 8.5 in (21.6 cm).
- Shape the roots into their fan and pin each curled tip.
- Mist evenly until damp but not soaked.
- Let the piece dry completely, at least 12 hours, before unpinning.
- For extra stiffness, mist lightly with fabric stiffener and let it dry again.
Final Quality-Control Checklist
- The canopy mesh measures 8 in (20.3 cm) x 7 in (17.8 cm).
- Every row has the correct mesh count, ending with 2 meshes at Row 14.
- All 13 leaf fans sit upright in the correct meshes.
- Border Round 1 has 186 sc, and Round 2 has 31 scallops.
- One scallop is centered on the top point.
- The trunk cords lie flat and the mesh doesn’t pucker.
- The roots extend 2.5 in (6.4 cm) below the border.
- The hanging loop is centered and firm.
- No ends show on the RS.
Troubleshooting
Meshes look rectangular, not square: Adjust your dc height or change hook size, and check your ch-2 tension.
The canopy leans to one side: You may have missed a decrease at one end. Count posts on every row.
The border ruffles: Round 1 has too many sc. Recount to 186 and keep to 3 sc per row end.
The border cups or pulls in: Your sc are too tight. Go up one hook size for Round 1 only.
The scallops don’t close evenly: Round 1 is off by at least one stitch. Fix Round 1 instead of fudging the last scallop.
The mesh puckers under the trunk: The whipstitches are too tight. Snip them, re-pin the piece flat, and sew more loosely.
The roots droop: Tack the cords together at the border and use stiffener when blocking.
Care
Hand wash in cool water with mild soap, press the water out in a towel, and reblock flat to dry. Keep the hanging out of strong direct sunlight so the yellows don’t fade.
Final Notes
Everything rests on one chain of measurements. Mesh gauge gives 0.5 in (1.3 cm) per mesh, so 16 meshes make the 8 in (20.3 cm) base and 14 rows make the 7 in (17.8 cm) height. Border Round 1 holds 186 sc at 6 per inch, which divides evenly into 31 scallops. The border adds 0.75 in (1.9 cm) all around, for 9.5 in (24.1 cm) x 8.5 in (21.6 cm). The trunk cords add 2.5 in (6.4 cm) of roots, for a full height of 11 in (27.9 cm).
Check each stage against its checkpoint, and the finished tree will block out straight and even.
Happy crocheting!