

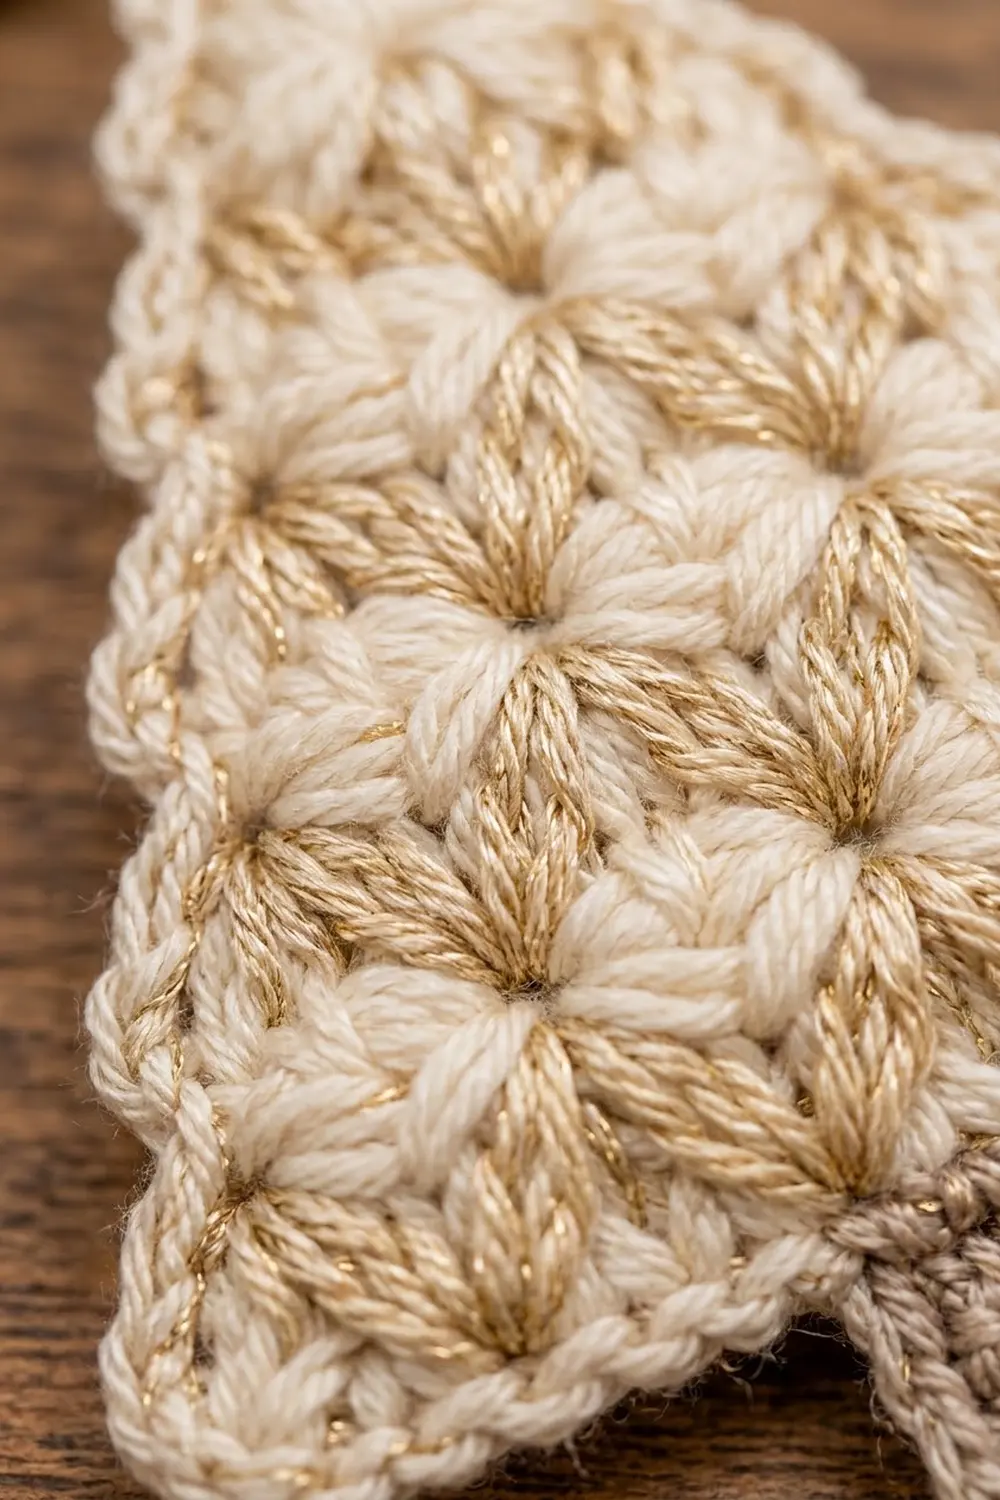
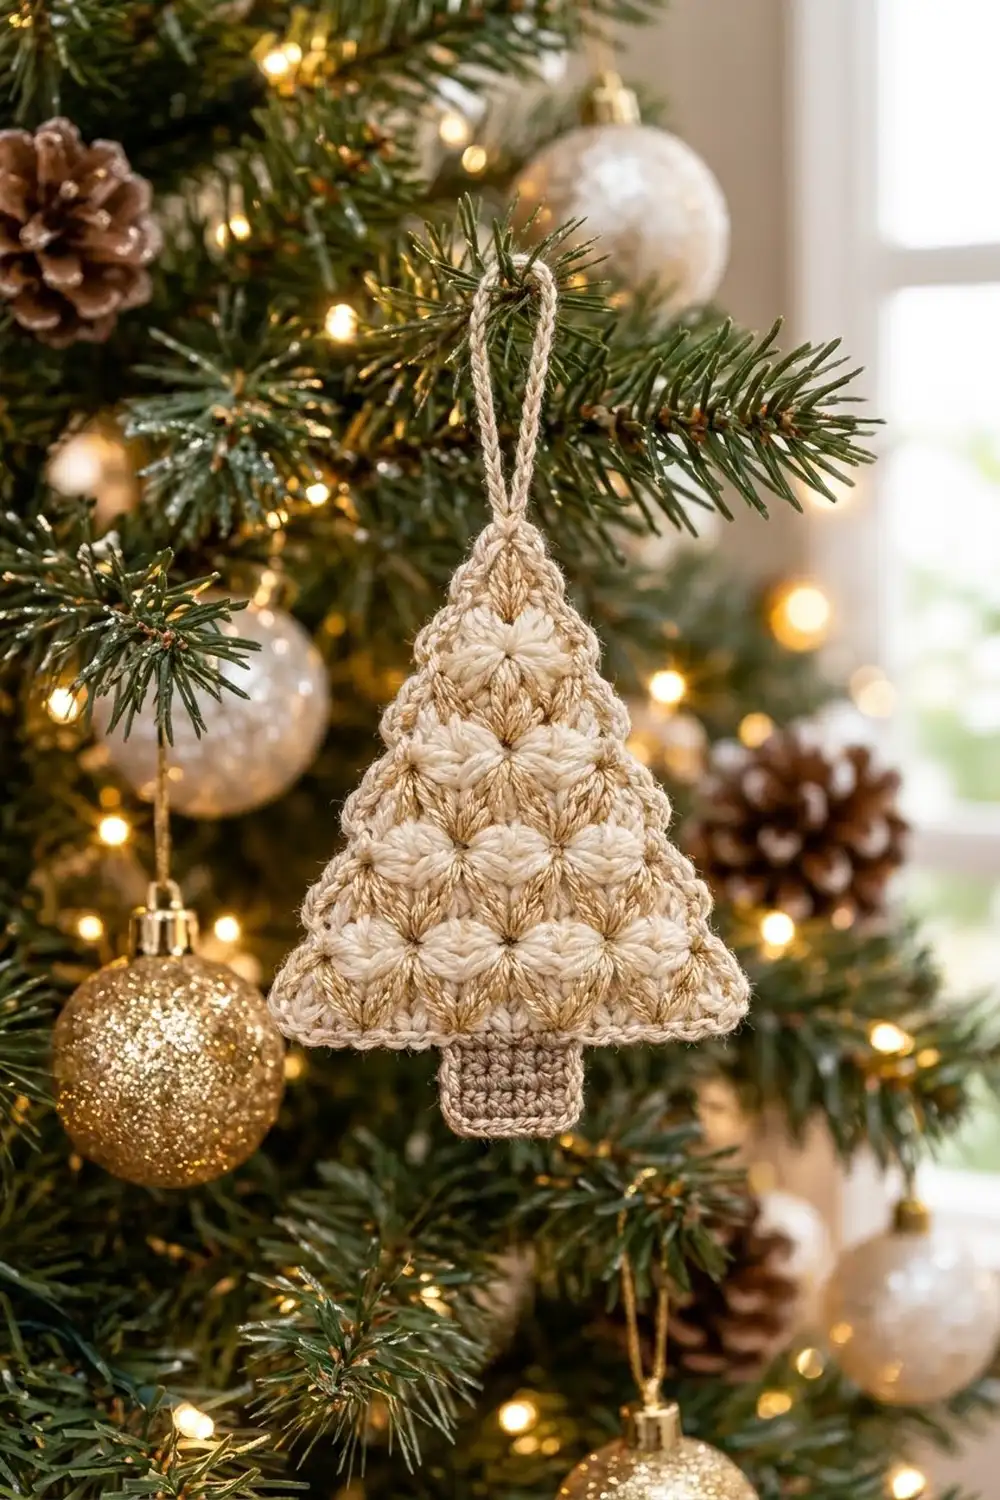
This little tree ornament has a lot of texture packed into a few inches. Plump cream puff stitches sit in offset tiers, and thin golden-beige stripes show between them, so every puff looks like a small starburst. A cream twisted-cord edge outlines the tree, and a short taupe trunk finishes the bottom.
The colors are soft and warm: cream, golden camel, and taupe. They suit a neutral, natural, or gold-themed tree, and they also look good tied onto gifts or hung from a wreath.
The pattern uses US crochet terms. The finished ornament measures about 4.25 in (10.8 cm) wide and 4.4 in (11.2 cm) tall including the trunk, not counting the hanging loop.
The construction is simple. You work the tree body flat from the bottom up in turned rows, changing color every row and decreasing at both edges. Then you work a two-round cream border, add the trunk into the bottom of the border, and finish with a chain hanging loop at the tip.
Finished Size and Construction
- Finished size: 4.25 in (10.8 cm) wide × 4.4 in (11.2 cm) tall, plus a hanging loop of about 1.2 in (3.0 cm)
- Skill level: Easy-intermediate
- Terminology: US crochet terms
- Yarn weight: Sport (#2), cotton or cotton blend
- Hook: 2.75 mm (C)
- Number of pieces: 1 (body, border, trunk, and loop are all worked onto one piece)
- Layout: Single upright triangle with a centered trunk
- Body size before border: 3.75 in (9.5 cm) wide × 3.15 in (8.0 cm) tall
- Border depth: 2 rounds, about 0.25 in (0.6 cm)
- Body size after border: 4.25 in (10.8 cm) wide × 3.65 in (9.3 cm) tall
- Trunk: 1.05 in (2.7 cm) wide × 0.75 in (1.9 cm) tall
Materials
Yarn: Use a smooth sport-weight cotton or cotton blend so the puffs stay round and the edge stays crisp. A golden yarn with a slight sheen, or a metallic blend, makes the stripes glow under tree lights. Fuzzy yarns hide the starburst texture.
- Color A – Cream: 8 g, about 26 m
- Color B – Golden beige/camel: 3 g, about 10 m
- Color C – Taupe: 2 g, about 7 m
These quantities make one ornament and include a safety margin of about 25 percent.
Tools:
– 2.75 mm (C) crochet hook
– Tapestry needle
– Scissors
– Stitch markers (2)
– Ruler or tape measure
– Blocking mat and rust-proof pins
– Spray bottle or steam iron
Abbreviations (US Terms)
- ch – chain
- sl st – slip stitch
- sc – single crochet
- dc – double crochet
- sc2tog – single crochet 2 together
- dc2tog – double crochet 2 together
- dc3tog – double crochet 3 together
- rsc – reverse single crochet (crab stitch)
- FLO / BLO – front loop only / back loop only
- st(s) – stitch(es)
- RS / WS – right side / wrong side
Special stitch – Puff: Yarn over, insert hook into the stitch, yarn over and pull up a loop to dc height. Repeat from * to * 2 more times in the same stitch (7 loops on hook). Yarn over and pull through all 7 loops, then ch 1 to lock. The locking ch-1 does not count as a stitch. Skip it on the next row.
Gauge and Checkpoints
Gauge: 20 sc and 20 rows = 3 in (7.6 cm) in sc. One “tier” (1 sc row plus 1 dc/puff row) measures 0.5 in (1.3 cm) tall.
Gauge matters less for an ornament than for a garment. Still, the border counts are calculated for this gauge, so make one tree and check it before you make a batch.
Checkpoints (measure flat, unstretched):
– After Row 1: 3.75 in (9.5 cm) wide
– After Row 3: 0.65 in (1.7 cm) tall
– After Row 7: 1.65 in (4.2 cm) tall
– After Row 11: 2.65 in (6.7 cm) tall
– After Row 13: 3.15 in (8.0 cm) tall at the center
If your tree is too big, go down to a 2.5 mm hook. If it is too small, go up to a 3.0 mm hook. If only the height is off, check your dc and puff height: pull each loop up to a full dc height, no taller.
Tree Body
The body is worked flat in turned rows. Cut the yarn at the end of every row, leaving a 4 in (10.2 cm) tail. Join the next color at the start of the next row. The tails are crocheted over in Border Round 1, so you weave in very few ends.
With single-row stripes, the yarn always ends up on the wrong side of the work for its next row. That is why cutting is cleaner than carrying.
The turning ch does not count as a stitch in any row.
Row 1 (RS), Color A: Ch 26. Sc in the 2nd ch from the hook and in each ch across. Fasten off. (25 sts)
Place a marker on the RS.
Tier 1
Row 2 (WS), Color B: Join with sc2tog over the first 2 sts. Sc in the next 21 sts, then sc2tog. Fasten off. (23 sts)
Row 3 (RS), Color A: Join, ch 2, dc2tog. Dc in the next st, puff in the next st, dc in the next 3 sts; repeat from * to * 3 more times. Puff in the next st, dc in the next st, dc2tog. Fasten off. (21 sts: 5 puffs)
Check the math: 2 + 1 + 16 + 1 + 1 + 2 = 23 sts worked into, and 21 sts made.
Tier 2
Row 4 (WS), Color B: Sc2tog, sc in the next 17 sts, sc2tog. (19 sts)
Row 5 (RS), Color A: Ch 2, dc2tog, dc in the next st, puff, dc in the next 3 sts; repeat from * to * 2 more times. Puff, dc in the next st, dc2tog. (17 sts: 4 puffs)
Tier 3
Row 6 (WS), Color B: Sc2tog, sc in the next 13 sts, sc2tog. (15 sts)
Row 7 (RS), Color A: Ch 2, dc2tog, dc in the next st, puff, dc in the next 3 sts; repeat from * to * once more. Puff, dc in the next st, dc2tog. (13 sts: 3 puffs)
Tier 4
Row 8 (WS), Color B: Sc2tog, sc in the next 9 sts, sc2tog. (11 sts)
Row 9 (RS), Color A: Ch 2, dc2tog, dc in the next st, puff, dc in the next 3 sts, puff, dc in the next st, dc2tog. (9 sts: 2 puffs)
Tier 5
Row 10 (WS), Color B: Sc2tog, sc in the next 5 sts, sc2tog. (7 sts)
Row 11 (RS), Color A: Ch 2, dc2tog, dc in the next st, puff, dc in the next st, dc2tog. (5 sts: 1 puff)
Tier 6 (Tip)
Row 12 (WS), Color B: Sc2tog, sc in the next st, sc2tog. (3 sts)
Row 13 (RS), Color A: Ch 2, dc3tog. (1 st) Fasten off.
Every tier removes exactly 4 sts: 2 in the gold row and 2 in the cream row. That gives the sequence 25 → 21 → 17 → 13 → 9 → 5 → 1. The edge drops 1 st every row, which gives the clean triangular slope. Each puff row starts one stitch farther in, so its puffs sit between the puffs of the tier below. That creates the offset, brick-like starburst pattern.
Border
Border gauge: Round 1 is worked at the body gauge, 20 sc = 3 in (7.6 cm). Use these placement rules on the side edges:
– 1 sc in each sc row-end (Row 1 and Rows 2, 4, 6, 8, 10, 12)
– 3 sc in each dc row-end (Rows 3, 5, 7, 9, 11, 13)
Each tier rises 0.5 in (1.3 cm) and steps in by one stitch width. Its slanted edge measures about 0.58 in along the slope, and 4 border sc (1 + 3) cover about 0.6 in, so the edge lies flat without ruffling or cupping.
Round 1, Color A: With the RS facing, turn the tree upside down so the foundation edge is at the top. Join at the right-hand corner foundation ch. As you work, lay the yarn tails along the edge and crochet over them.
– Foundation edge: 3 sc in the first foundation ch (corner), sc in the next 23 ch, 3 sc in the last ch (corner).
– First slanted side: Work 25 sc evenly in the row-ends: 7 sc rows × 1 + 6 dc rows × 3 = 25.
– Tip: 3 sc in the top of Row 13.
– Second slanted side: Work 25 sc in the row-ends, the same way.
– Sl st to the first sc. (82 sts)
Counts per side, including corners: The middle sc of each 3-sc group is that side’s corner stitch.
– Bottom side: 1 corner + 1 + 23 + 1 + 1 corner = 27 sts
– Each slanted side: 1 corner + 1 + 25 + 1 + 1 tip corner = 29 sts
– Total: 27 + 29 + 29 − 3 shared corners = 82 sts, which matches 3 + 23 + 3 + 25 + 3 + 25.
Place markers in the 9th and 15th of the 23 straight bottom sts. That marks the center 7 sts, with 8 straight sts on each side of them (8 + 7 + 8 = 23).
Round 2, Color A: Ch 1. Work rsc in each st around, working in FLO across the 7 marked bottom sts and through both loops everywhere else. Do not increase at the corners, because rsc is flexible enough to turn them. Sl st to the first rsc. (82 sts) Fasten off.
The back loops of the 7 center bottom sts are now free for the trunk.
Trunk
Row 1 (RS), Color C: Hold the tree with the RS facing and the bottom edge at the top. Join at the first free back loop of the marked sts. Sc in BLO of each of the 7 marked sts. (7 sts)
Rows 2–5: Ch 1, turn, sc in each st across. (7 sts)
After Row 5, the trunk measures 1.05 in (2.7 cm) wide × 0.75 in (1.9 cm) tall. Fasten off and weave the end up the trunk’s side edge.
Hanging Loop
With Color A, join with a sl st in the center rsc at the tip. Ch 16, which is about 2.4 in (6.1 cm) and folds into a loop of about 1.2 in (3.0 cm). Sl st in the same st. Fasten off, leaving a tail. Weave the tail down through the tip to anchor the loop firmly.
Final Blocking
- Weave in any tails left after Border Round 1, and trim them close.
- Lightly spritz the ornament with water. If you are using cotton, you can instead hover a steam iron over it without touching.
- Pin the base corners 4.25 in (10.8 cm) apart, keeping the bottom edge straight.
- Pin the tip so the body measures 3.65 in (9.3 cm) from the bottom edge to the top.
- Pin the trunk straight down from the center, square and 0.75 in (1.9 cm) long.
- Gently press the puffs from the back with a fingertip so they round out toward the front.
- Leave it pinned until it is completely dry.
Final Quality-Control Checklist
- Row stitch counts were 25, 23, 21, 19, 17, 15, 13, 11, 9, 7, 5, 3, 1.
- Puff counts per tier were 5, 4, 3, 2, 1.
- The puffs sit offset from the puffs in the tier below.
- Border Round 1 totals 82 sts: 27 on the bottom and 29 on each slanted side, corners included.
- Both slanted sides are the same length and lie flat.
- The trunk is centered, with 8 border sts on each side of it.
- The finished size is about 4.25 × 4.4 in (10.8 × 11.2 cm).
- The hanging loop is secure and centered on the tip.
Troubleshooting
Puffs look flat or lean sideways: Pull each loop up to the same full dc height, and always close the puff with the locking ch-1.
The gold stripes don’t show: Make sure every gold row is sc and every puff row is worked into the gold stitches, not into the row below.
The edges ripple: You have too many border sts. Use 3 sc per dc row-end, not 4, and check that the side count is 25.
The edges pull in or cup: You have too few border sts. Check that you worked 3 sc, not 2, in each dc row-end.
Tails poke through: Crochet over them for at least 1 in (2.5 cm) in Border Round 1, then trim.
The trunk is off-center: Recount the 23 straight bottom sts. The trunk uses sts 9–15.
The tip is lumpy: Work Row 13’s dc3tog loosely, and keep the 3-sc tip group even.
Care
Hand wash in cool water with mild soap, press out the water in a towel, and lay flat to dry, reshaping while damp. Store it flat or hanging so the puffs don’t get crushed.
Final Notes
The measurement chain is easy to follow. Twenty-five foundation sts at 20 sc per 3 in (7.6 cm) give a 3.75 in (9.5 cm) base. Six tiers of 0.5 in (1.3 cm), plus Row 1, give a 3.15 in (8.0 cm) body. The 82-stitch, two-round border adds 0.25 in (0.6 cm) on each edge, for 4.25 × 3.65 in (10.8 × 9.3 cm). The 0.75 in (1.9 cm) trunk brings the total height to 4.4 in (11.2 cm). Check your first tree against these numbers, and every one after it will match.
Happy crocheting!